Datasheet
Page 1
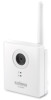
... network camera will immediately take a snapshot of the detected motion and send the snapshot to the user via email or FTP. Wide Angle, High Quality Videos The Edimax IC-3015Wn is built with a wide 1.7mm (28mm equiv.) lens that allows users to access and manage up to 16 network cameras simultaneously. Free Management Software for PC, iPhone, and Android Phones The Edimax IC-3015Wn comes with a free 16-channel viewer software for easy home monitoring. When motion is detected, the IC-3015Wn is...
... network camera will immediately take a snapshot of the detected motion and send the snapshot to the user via email or FTP. Wide Angle, High Quality Videos The Edimax IC-3015Wn is built with a wide 1.7mm (28mm equiv.) lens that allows users to access and manage up to 16 network cameras simultaneously. Free Management Software for PC, iPhone, and Android Phones The Edimax IC-3015Wn comes with a free 16-channel viewer software for easy home monitoring. When motion is detected, the IC-3015Wn is...
Datasheet
Page 2
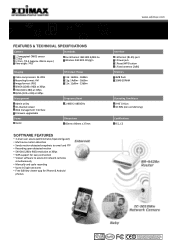
... x 80mm x 27mm SOFTWARE FEATURES • 3-level user access (administrator/operator/guest) • Multi-area motion detection • Sends motion-detected snapshots to email and FTP • Recording upon detected motion • SXVGA (1280 x 960) resolution at 30fps • WPS support for easy connection • Viewer software to access 16 network cameras simultaneously • Manually and cycle recording • Up to 16 login accounts • Free EdiView viewer app for iPhone & Android phones Interface 1 Ethernet (RJ-45) port 1 Power jack 1 Reset/WPS button 1 Fixed antenna...
... x 80mm x 27mm SOFTWARE FEATURES • 3-level user access (administrator/operator/guest) • Multi-area motion detection • Sends motion-detected snapshots to email and FTP • Recording upon detected motion • SXVGA (1280 x 960) resolution at 30fps • WPS support for easy connection • Viewer software to access 16 network cameras simultaneously • Manually and cycle recording • Up to 16 login accounts • Free EdiView viewer app for iPhone & Android phones Interface 1 Ethernet (RJ-45) port 1 Power jack 1 Reset/WPS button 1 Fixed antenna...
Quick Install Guide
Page 3
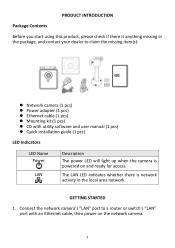
... utility software and user manual (1 pcs) z Quick installation guide (1 pcs) LED Indicators LED Name Power LAN Description The power LED will light up when the camera is network activity in the local area network. GETTING STARTED 1. The LAN LED indicates whether there is powered on the network camera. 2 Connect the network camera's "LAN" port to claim the missing item(s): z Network camera (1 pcs) z Power adapter (1 pcs) z Ethernet cable (1 pcs) z Mounting kit (1 pcs) z CD with an Ethernet cable, then power on and ready for access...
... utility software and user manual (1 pcs) z Quick installation guide (1 pcs) LED Indicators LED Name Power LAN Description The power LED will light up when the camera is network activity in the local area network. GETTING STARTED 1. The LAN LED indicates whether there is powered on the network camera. 2 Connect the network camera's "LAN" port to claim the missing item(s): z Network camera (1 pcs) z Power adapter (1 pcs) z Ethernet cable (1 pcs) z Mounting kit (1 pcs) z CD with an Ethernet cable, then power on and ready for access...
Quick Install Guide
Page 7
...;located or operating in conjunction with the specific antenna tested in accordance with the instructions, may not cause harmful interference, and (2) this transmitter must accept any other antenna or transmitter. Federal Communications Commission (FCC) Radiation Exposure Statement This equipment complies with Part 15 of electric shock and static electricity when working with the limits for certification. The antenna(s) used...
...;located or operating in conjunction with the specific antenna tested in accordance with the instructions, may not cause harmful interference, and (2) this transmitter must accept any other antenna or transmitter. Federal Communications Commission (FCC) Radiation Exposure Statement This equipment complies with Part 15 of electric shock and static electricity when working with the limits for certification. The antenna(s) used...

Manual
Page 2
... obligation to the contents hereof and specifically disclaims any form or by third parties, software code is . Edimax Technology Co., Ltd. For details, see the GNU (www.gnu.org) and LPGL(www.gnu.org) Websites to the user manual on the CD-ROM. Edimax Technology Co., Ltd. No part of each license. Should the programs prove defective following their purchase...
... obligation to the contents hereof and specifically disclaims any form or by third parties, software code is . Edimax Technology Co., Ltd. For details, see the GNU (www.gnu.org) and LPGL(www.gnu.org) Websites to the user manual on the CD-ROM. Edimax Technology Co., Ltd. No part of each license. Should the programs prove defective following their purchase...
Manual
Page 3
... II: Accessing the Camera's Web Interface...10 2.1 Network Setup ...10 2.2 Connecting to the Camera's Web User Interface and Installing the ActiveX Plugin (IE only 13 2.3 Live Video Monitoring...17 Chapter III: Setting Up the Network Camera ...20 3.1 Basic Network Settings...21 3.2 Wireless...24 3.3 Dynamic DNS...29 3.4 Date & Time ...31 3.5 Users ...33 3.6 UPnP...35 3.7 Bonjour...36 Chapter IV: Video Configuration ...37 4.1 Video Settings ...37 4.2 Image...38 Chapter V: Event Configuration ...40 5.1 Motion Detection Setup...40 5.1.1 Detection Region...41 5.1.2 FTP...44 5.1.3 SMTP ...46...
... II: Accessing the Camera's Web Interface...10 2.1 Network Setup ...10 2.2 Connecting to the Camera's Web User Interface and Installing the ActiveX Plugin (IE only 13 2.3 Live Video Monitoring...17 Chapter III: Setting Up the Network Camera ...20 3.1 Basic Network Settings...21 3.2 Wireless...24 3.3 Dynamic DNS...29 3.4 Date & Time ...31 3.5 Users ...33 3.6 UPnP...35 3.7 Bonjour...36 Chapter IV: Video Configuration ...37 4.1 Video Settings ...37 4.2 Image...38 Chapter V: Event Configuration ...40 5.1 Motion Detection Setup...40 5.1.1 Detection Region...41 5.1.2 FTP...44 5.1.3 SMTP ...46...
Manual
Page 4
...: Advanced Operations ...56 8.1 Applying for a Free DynDNS Account...56 Chapter IX: Windows Surveillance Utility ...62 9.1 Installing the Network Camera Administration Software 62 9.2 Using the Network Camera Surveillance Software 71 9.3 Configuring the Network Camera Surveillance Software 74 9.3.1 Camera Configuration ...74 9.3.2 General Settings ...83 9.4 Changing the Display Layout ...90 9.5 Full-Screen Mode ...93 9.6 Scan ...94 9.7 Zoom-In/Zoom-Out ...95 9.8 PTZ...96 9.9 Snapshot...97 9.10 Recording ...98 9.11 Video Playback ...99 Chapter X: Appendix ...100 10.1 Troubleshooting ...100...
...: Advanced Operations ...56 8.1 Applying for a Free DynDNS Account...56 Chapter IX: Windows Surveillance Utility ...62 9.1 Installing the Network Camera Administration Software 62 9.2 Using the Network Camera Surveillance Software 71 9.3 Configuring the Network Camera Surveillance Software 74 9.3.1 Camera Configuration ...74 9.3.2 General Settings ...83 9.4 Changing the Display Layout ...90 9.5 Full-Screen Mode ...93 9.6 Scan ...94 9.7 Zoom-In/Zoom-Out ...95 9.8 PTZ...96 9.9 Snapshot...97 9.10 Recording ...98 9.11 Video Playback ...99 Chapter X: Appendix ...100 10.1 Troubleshooting ...100...
Manual
Page 9
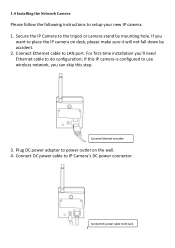
... following instructions to the tripod or camera stand by accident. 2. If you can skip this IP camera is configured to use wireless network, you want to do configuration; Connect Ethernet cable to IP Camera's DC power connector. If this step. Connect DC power cable to LAN port. Plug DC power adapter to DC Jack 8 Connect DC power cable to power outlet on desk, please make sure it will not fall down by mounting hole. For first-time installation...
... following instructions to the tripod or camera stand by accident. 2. If you can skip this IP camera is configured to use wireless network, you want to do configuration; Connect Ethernet cable to IP Camera's DC power connector. If this step. Connect DC power cable to LAN port. Plug DC power adapter to DC Jack 8 Connect DC power cable to power outlet on desk, please make sure it will not fall down by mounting hole. For first-time installation...
Manual
Page 21
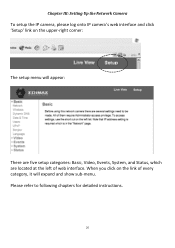
Chapter III: Setting Up the Network Camera To setup the IP camera, please log onto IP camera's web interface and click 'Setup' link on the link of web interface. Please refer to following chapters for detailed instructions. 20 When you click on the upper-right corner: The setup menu will appear: There are five setup categories: Basic, Video, Events, System, and Status, which are located at the left of every category, it will expand and show sub-menu.
Chapter III: Setting Up the Network Camera To setup the IP camera, please log onto IP camera's web interface and click 'Setup' link on the link of web interface. Please refer to following chapters for detailed instructions. 20 When you click on the upper-right corner: The setup menu will appear: There are five setup categories: Basic, Video, Events, System, and Status, which are located at the left of every category, it will expand and show sub-menu.
Manual
Page 23
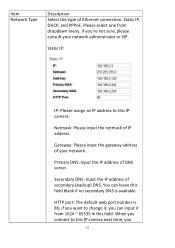
... Ethernet connection: Static IP, DHCP, and PPPoE. Item Network Type Description Select the type of DNS server. Netmask: Please input the netmask of secondary (backup) DNS. You can leave this IP camera. HTTP port: The default web port number is available. Static IP: IP: Please assign an IP address to this field. Gateway: Please input the gateway address of your network administrator or ISP. Secondary DNS: Input the IP address of IP address...
... Ethernet connection: Static IP, DHCP, and PPPoE. Item Network Type Description Select the type of DNS server. Netmask: Please input the netmask of secondary (backup) DNS. You can leave this IP camera. HTTP port: The default web port number is available. Static IP: IP: Please assign an IP address to this field. Gateway: Please input the gateway address of your network administrator or ISP. Secondary DNS: Input the IP address of IP address...
Manual
Page 24
... change MTU setting. Please note: In some cases you can improve network efficiency or correct connection problem by PPPoE. have to save changes you made. 23 Please input PPPoE user name and password, and input MTU value when required. PPPoE: IP camera will obtain IP address from DHCP server on your local area network automatically. Click 'Apply' button to add a colon and port number after IP camera's IP address...
... change MTU setting. Please note: In some cases you can improve network efficiency or correct connection problem by PPPoE. have to save changes you made. 23 Please input PPPoE user name and password, and input MTU value when required. PPPoE: IP camera will obtain IP address from DHCP server on your local area network automatically. Click 'Apply' button to add a colon and port number after IP camera's IP address...

Manual
Page 26
... wireless operating mode: B (802.11b, maximum 11mbps) G (802.11g, maximum 54mbps) N (802.11n, maximum 150mbps). If you can switch wireless network off, but you select B, 25 Network Type Mode Please note: You can 't switch wired Ethernet off. When you enter this page, IP camera will work with all kinds of wireless network. The descriptions of network you wish to connect: Infra (infrastructure: wireless access point). Select the type...
... wireless operating mode: B (802.11b, maximum 11mbps) G (802.11g, maximum 54mbps) N (802.11n, maximum 150mbps). If you can switch wireless network off, but you select B, 25 Network Type Mode Please note: You can 't switch wired Ethernet off. When you enter this page, IP camera will work with all kinds of wireless network. The descriptions of network you wish to connect: Infra (infrastructure: wireless access point). Select the type...
Manual
Page 34
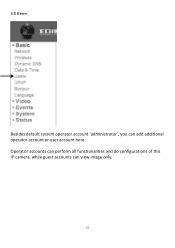
3.5 Users Besides default system operator account 'administrator', you can add additional operator account or user account here: Operator accounts can perform all functionalities and do configurations of this IP camera, while guest accounts can view image only. 33
3.5 Users Besides default system operator account 'administrator', you can add additional operator account or user account here: Operator accounts can perform all functionalities and do configurations of this IP camera, while guest accounts can view image only. 33
Manual
Page 35
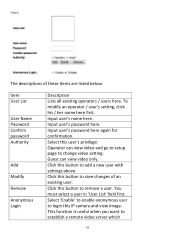
... user to remove a user. Click this button to login this user's privilege: Operator can view video only. Input user's name here. Guest can view video and go to setup page to save changes of these items are listed below: Item User List User Name Password Confirm password Authority Add Modify Remove Anonymous Login Description Lists all existing operators / users here. Click this button to change video setting. Click this button to establish a remote video server which 34 This function is useful...
... user to remove a user. Click this button to login this user's privilege: Operator can view video only. Input user's name here. Guest can view video and go to setup page to save changes of these items are listed below: Item User List User Name Password Confirm password Authority Add Modify Remove Anonymous Login Description Lists all existing operators / users here. Click this button to change video setting. Click this button to establish a remote video server which 34 This function is useful...
Manual
Page 48
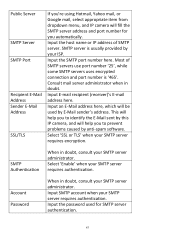
... SMTP port number here. Input an E-Mail address here, which will help you to identify the E-Mail sent by this IP camera, and will be used for you to prevent problems caused by your SMTP server requires authentication. SMTP Authentication When in doubt, consult your SMTP server administrator. Account Password When in doubt. Select 'SSL or TLS' when your SMTP server requires authentication. Select 'Enable' when your SMTP server...
... SMTP port number here. Input an E-Mail address here, which will help you to identify the E-Mail sent by this IP camera, and will be used for you to prevent problems caused by your SMTP server requires authentication. SMTP Authentication When in doubt, consult your SMTP server administrator. Account Password When in doubt. Select 'SSL or TLS' when your SMTP server requires authentication. Select 'Enable' when your SMTP server...
Manual
Page 52
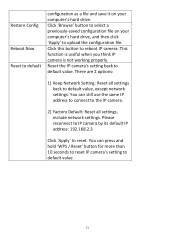
... working properly. There are 2 options: 1) Keep Network Setting: Reset all settings, include network settings. You can still use the same IP address to connect to the IP camera. 2) Factory Default: Reset all settings back to default value, except network settings. Please reconnect to IP camera by its default IP address: 192.168.2.3 Click 'Apply' to reboot IP camera. Restore Config Reboot Now Reset to default configuration as a file and save it on your computer's hard drive. Click this button to reset...
... working properly. There are 2 options: 1) Keep Network Setting: Reset all settings, include network settings. You can still use the same IP address to connect to the IP camera. 2) Factory Default: Reset all settings back to default value, except network settings. Please reconnect to IP camera by its default IP address: 192.168.2.3 Click 'Apply' to reboot IP camera. Restore Config Reboot Now Reset to default configuration as a file and save it on your computer's hard drive. Click this button to reset...
Manual
Page 73
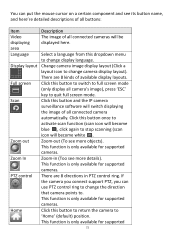
... (scan icon will be displayed here. Zoom In Zoom-in PTZ control ring. PTZ control There are 8 kinds of available display layouts. Home Click this dropdown menu to change display language. Display layout Change camera image display layout (Click a layout icon to quit full screen mode. Click this button and the IP camera surveillance software will switch displaying the image of all connected cameras will become white ). This function is...
... (scan icon will be displayed here. Zoom In Zoom-in PTZ control ring. PTZ control There are 8 kinds of available display layouts. Home Click this dropdown menu to change display language. Display layout Change camera image display layout (Click a layout icon to quit full screen mode. Click this button and the IP camera surveillance software will switch displaying the image of all connected cameras will become white ). This function is...

Manual
Page 74
Snapshot Take a snapshot of all system messages like camera is disconnected etc. Minimize window Minimizes IP camera surveillance software window. Playback Playback a recorded video file. Video displaying area Displays the image of current camera. Start video recording. Terminates IP camera surveillance software. Configure Software / camera configuration. Message display Close window (stop surveillance) Displays all cameras by the display layout you selected. 73 Recording cameras.
Snapshot Take a snapshot of all system messages like camera is disconnected etc. Minimize window Minimizes IP camera surveillance software window. Playback Playback a recorded video file. Video displaying area Displays the image of current camera. Start video recording. Terminates IP camera surveillance software. Configure Software / camera configuration. Message display Close window (stop surveillance) Displays all cameras by the display layout you selected. 73 Recording cameras.

Manual
Page 77
... the camera. Username* Input the user name of selected camera. By default it's '80'. You should change the name of camera so you can not be changed the password of camera. Web Port* Input the web port of this field. **: Only available for cameras support this tab. Cancel Discard all settings in this tab. *: It's recommended to use 'Select' button to save settings, and if everything's correct, you changed . OK Save settings in IP camera surveillance software...
... the camera. Username* Input the user name of selected camera. By default it's '80'. You should change the name of camera so you can not be changed the password of camera. Web Port* Input the web port of this field. **: Only available for cameras support this tab. Cancel Discard all settings in this tab. *: It's recommended to use 'Select' button to save settings, and if everything's correct, you changed . OK Save settings in IP camera surveillance software...
Manual
Page 101
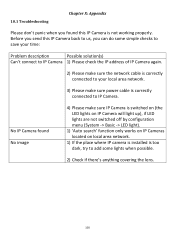
... LED lights on IP Camera will light up), if LED lights are not switched off by configuration menu (System -> Basic -> LED light). 1) 'Auto search' function only works on IP Cameras located on local area network. 1) If the place where IP camera is installed is too dark, try to IP Camera. 10.1 Troubleshooting Chapter X: Appendix Please don't panic when you found No image 4) Please make sure power cable is correctly connected to add...
... LED lights on IP Camera will light up), if LED lights are not switched off by configuration menu (System -> Basic -> LED light). 1) 'Auto search' function only works on IP Cameras located on local area network. 1) If the place where IP camera is installed is too dark, try to IP Camera. 10.1 Troubleshooting Chapter X: Appendix Please don't panic when you found No image 4) Please make sure power cable is correctly connected to add...


