Manual
Page 3
... ...2 Chapter I: Introduction ...4 1.1 Highlights of your new Network IP Camera...4 1.2 Safety Instructions ...4 1.3 Package Contents...5 1.4 Installing the Network Camera ...8 Chapter II: Accessing the Camera's Web Interface...10 2.1 Network Setup ...10 2.2 Connecting to the Camera's Web User Interface and Installing the ActiveX Plugin (IE only ...13 2.3 Live Video Monitoring...17 Chapter III: Setting Up the Network Camera ...20 3.1 Basic Network Settings...21 3.2 Wireless...24 3.3 Dynamic DNS...29 3.4 Date & Time ...31 3.5 Users ...33...
... ...2 Chapter I: Introduction ...4 1.1 Highlights of your new Network IP Camera...4 1.2 Safety Instructions ...4 1.3 Package Contents...5 1.4 Installing the Network Camera ...8 Chapter II: Accessing the Camera's Web Interface...10 2.1 Network Setup ...10 2.2 Connecting to the Camera's Web User Interface and Installing the ActiveX Plugin (IE only ...13 2.3 Live Video Monitoring...17 Chapter III: Setting Up the Network Camera ...20 3.1 Basic Network Settings...21 3.2 Wireless...24 3.3 Dynamic DNS...29 3.4 Date & Time ...31 3.5 Users ...33...
Manual
Page 5
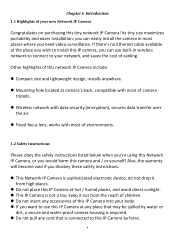
...the place you wish to install this IP camera, you can easily install the camera in most of this IP Camera into your new Network IP Camera Congratulates on purchasing this IP Camera by force. 4 you need video surveillance. Other highlights of this network IP Camera include: Compact size and lightweight.... 1.2 Safety Instructions Please obey the safety instructions listed below when you're using this Network IP Camera, or you disobey these safety instructions. This Network IP Camera is not a toy; keep it from the reach of children. Do not insert...
...the place you wish to install this IP camera, you can easily install the camera in most of this IP Camera into your new Network IP Camera Congratulates on purchasing this IP Camera by force. 4 you need video surveillance. Other highlights of this network IP Camera include: Compact size and lightweight.... 1.2 Safety Instructions Please obey the safety instructions listed below when you're using this Network IP Camera, or you disobey these safety instructions. This Network IP Camera is not a toy; keep it from the reach of children. Do not insert...
Manual
Page 6
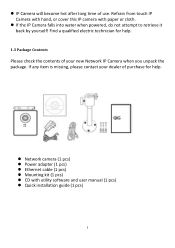
... (1 pcs) 5 IP Camera will become hot after long time of purchase for help . Network camera (1 pcs) Power adapter (1 pcs) Ethernet cable (1 pcs) Mounting kit (1 pcs) CD with paper or cloth. If the IP Camera falls into water when powered, do... not attempt to retrieve it back by yourself! If any item is missing, please contact your new Network IP Camera when you unpack the package. Find a qualified electric technician for help...
... (1 pcs) 5 IP Camera will become hot after long time of purchase for help . Network camera (1 pcs) Power adapter (1 pcs) Ethernet cable (1 pcs) Mounting kit (1 pcs) CD with paper or cloth. If the IP Camera falls into water when powered, do... not attempt to retrieve it back by yourself! If any item is missing, please contact your new Network IP Camera when you unpack the package. Find a qualified electric technician for help...
Manual
Page 7
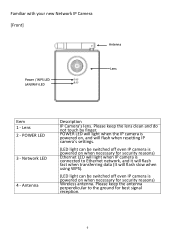
... Ethernet LED will light when IP camera is connected to the ground for security reasons) Wireless antenna. POWER LED will light when the IP camera is powered on, and will flash when resetting IP camera's settings. (LED light can be switched off even IP camera is powered on when necessary for... best signal reception. 6 Familiar with your new Network IP Camera [Front] Antenna Lens Power / WPS LED...
... Ethernet LED will light when IP camera is connected to the ground for security reasons) Wireless antenna. POWER LED will light when the IP camera is powered on, and will flash when resetting IP camera's settings. (LED light can be switched off even IP camera is powered on when necessary for... best signal reception. 6 Familiar with your new Network IP Camera [Front] Antenna Lens Power / WPS LED...
Manual
Page 8
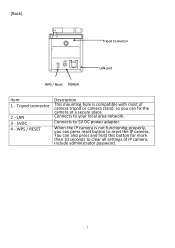
Tripod connector 2 - Connects to reset the IP camera. [Back] Tripod Connector LAN port WPS / Reset POWER Item 1 - LAN 3 - 5VDC 4 - WPS / RESET Description This mounting hole is not functioning properly, you can fix the camera at a secure place. When the IP camera is compatible with most of IP camera, include administrator password. 7 Connects to clear all settings of camera tripod or camera stand, so you can also press and hold this button for more than 10 seconds to 5V DC power adapter. You can press reset button to your local area network.
Tripod connector 2 - Connects to reset the IP camera. [Back] Tripod Connector LAN port WPS / Reset POWER Item 1 - LAN 3 - 5VDC 4 - WPS / RESET Description This mounting hole is not functioning properly, you can fix the camera at a secure place. When the IP camera is compatible with most of IP camera, include administrator password. 7 Connects to clear all settings of camera tripod or camera stand, so you can also press and hold this button for more than 10 seconds to 5V DC power adapter. You can press reset button to your local area network.
Manual
Page 9
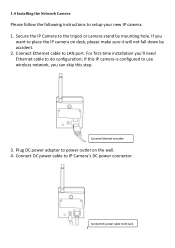
... can skip this step. Connect Ethernet net cable 3. If this IP camera is configured to use wireless network, you 'll need Ethernet cable to place the IP camera on the wall. 4. Secure the IP Camera to IP Camera's DC power connector. Connect DC power cable to the tripod or camera stand by accident. 2. Plug DC power adapter to LAN...
... can skip this step. Connect Ethernet net cable 3. If this IP camera is configured to use wireless network, you 'll need Ethernet cable to place the IP camera on the wall. 4. Secure the IP Camera to IP Camera's DC power connector. Connect DC power cable to the tripod or camera stand by accident. 2. Plug DC power adapter to LAN...

Manual
Page 10
Please note if you should see the POWER LED light up (and Ethernet LED, if Ethernet cable is inserted). If everything's ok, you configured IP camera to switch LED lights off, two LED lights won't light. 9 If not, please recheck every step and try again, or ask your dealer of purchase for help.
Please note if you should see the POWER LED light up (and Ethernet LED, if Ethernet cable is inserted). If everything's ok, you configured IP camera to switch LED lights off, two LED lights won't light. 9 If not, please recheck every step and try again, or ask your dealer of purchase for help.

Manual
Page 11
Please click 'Start' button and then click 'Control Panel'. 2. Please follow the following instructions to it. Click 'View network status and tasks' under 'Network and Internet' 10 Chapter II: Accessing the Camera's Web Interface 2.1 Network Setup This IP camera's default IP address is 192.168.2.3, and you must use a computer that uses 192.168.2.x IP address to connect to setup your computer's IP address: 1.
Please click 'Start' button and then click 'Control Panel'. 2. Please follow the following instructions to it. Click 'View network status and tasks' under 'Network and Internet' 10 Chapter II: Accessing the Camera's Web Interface 2.1 Network Setup This IP camera's default IP address is 192.168.2.3, and you must use a computer that uses 192.168.2.x IP address to connect to setup your computer's IP address: 1.
Manual
Page 14
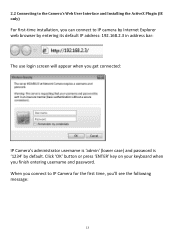
...when you get connected: IP Camera's administrator username is 'admin' (lower case) and password is '1234' by entering its default IP address: 192.168.2.3 in address bar: The use login screen will appear when you finish entering username and password. 2.2 Connecting to the Camera's Web User Interface and... Installing the ActiveX Plugin (IE only) For first-time installation, you can connect to IP Camera for the first time, you'll see the following message: 13 When you ...
...when you get connected: IP Camera's administrator username is 'admin' (lower case) and password is '1234' by entering its default IP address: 192.168.2.3 in address bar: The use login screen will appear when you finish entering username and password. 2.2 Connecting to the Camera's Web User Interface and... Installing the ActiveX Plugin (IE only) For first-time installation, you can connect to IP Camera for the first time, you'll see the following message: 13 When you ...
Manual
Page 15
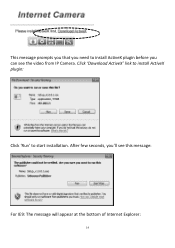
Click 'Download ActiveX' link to install ActiveX plugin: Click 'Run' to install ActiveX plugin before you 'll see the video from IP Camera. After few seconds, you can see this message: For IE9: The message will appear at the bottom of Internet Explorer: 14 This message prompts you that you need to start installation.
Click 'Download ActiveX' link to install ActiveX plugin: Click 'Run' to install ActiveX plugin before you 'll see the video from IP Camera. After few seconds, you can see this message: For IE9: The message will appear at the bottom of Internet Explorer: 14 This message prompts you that you need to start installation.
Manual
Page 18
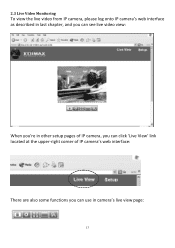
2.3 Live Video Monitoring To view the live video from IP camera, please log onto IP camera's web interface as described in last chapter, and you can see live video view: When you're in other setup pages of IP camera, you can click 'Live View' link located at the upper-right corner of IP camera's web interface: There are also some functions you can use in camera's live view page: 17
2.3 Live Video Monitoring To view the live video from IP camera, please log onto IP camera's web interface as described in last chapter, and you can see live video view: When you're in other setup pages of IP camera, you can click 'Live View' link located at the upper-right corner of IP camera's web interface: There are also some functions you can use in camera's live view page: 17
Manual
Page 21
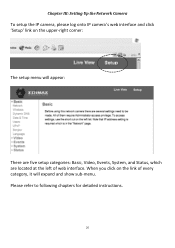
When you click on the upper-right corner: The setup menu will appear: There are five setup categories: Basic, Video, Events, System, and Status, which are located at the left of every category, it will expand and show sub-menu. Chapter III: Setting Up the Network Camera To setup the IP camera, please log onto IP camera's web interface and click 'Setup' link on the link of web interface. Please refer to following chapters for detailed instructions. 20
When you click on the upper-right corner: The setup menu will appear: There are five setup categories: Basic, Video, Events, System, and Status, which are located at the left of every category, it will expand and show sub-menu. Chapter III: Setting Up the Network Camera To setup the IP camera, please log onto IP camera's web interface and click 'Setup' link on the link of web interface. Please refer to following chapters for detailed instructions. 20
Manual
Page 23
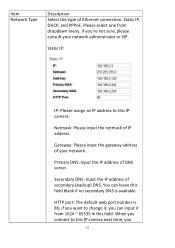
...netmask of your network administrator or ISP. HTTP port: The default web port number is available. You can input it , you can leave this IP camera. When you connect to this field blank if no secondary DNS is 80, if you want to change it from dropdown menu, if you ...22 Primary DNS: Input the IP address of Ethernet connection: Static IP, DHCP, and PPPoE. Static IP: IP: Please assign an IP address to this field. Item Network Type Description Select the type of DNS server. Please select one from 1024 ~ 65535 in this IP camera next time, you 're not sure, please...
...netmask of your network administrator or ISP. HTTP port: The default web port number is available. You can input it , you can leave this IP camera. When you connect to this field blank if no secondary DNS is 80, if you want to change it from dropdown menu, if you ...22 Primary DNS: Input the IP address of Ethernet connection: Static IP, DHCP, and PPPoE. Static IP: IP: Please assign an IP address to this field. Item Network Type Description Select the type of DNS server. Please select one from 1024 ~ 65535 in this IP camera next time, you 're not sure, please...
Manual
Page 24
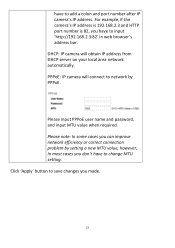
Please input PPPoE user name and password, and input MTU value when required. have to change MTU setting. PPPoE: IP camera will obtain IP address from DHCP server on your local area network automatically. DHCP: IP camera will connect to network by setting a new MTU value, however, In most cases you don't have to input... network efficiency or correct connection problem by PPPoE. Click 'Apply' button to save changes you have to add a colon and port number after IP camera's IP address. For example, if the camera's IP address is 192.168.2.3 and HTTP port number is 82, you made. 23
Please input PPPoE user name and password, and input MTU value when required. have to change MTU setting. PPPoE: IP camera will obtain IP address from DHCP server on your local area network automatically. DHCP: IP camera will connect to network by setting a new MTU value, however, In most cases you don't have to input... network efficiency or correct connection problem by PPPoE. Click 'Apply' button to save changes you have to add a colon and port number after IP camera's IP address. For example, if the camera's IP address is 192.168.2.3 and HTTP port number is 82, you made. 23

Manual
Page 26
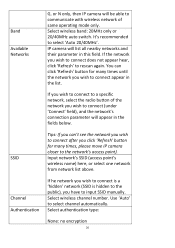
... scan for wireless devices nearby automatically and display them here. Select the type of wireless network. If you enter this page, IP camera will work with all kinds of network you can't switch wired Ethernet off. Network Type Mode Please note: You can enable or disable wireless functionality ...
... scan for wireless devices nearby automatically and display them here. Select the type of wireless network. If you enter this page, IP camera will work with all kinds of network you can't switch wired Ethernet off. Network Type Mode Please note: You can enable or disable wireless functionality ...
Manual
Page 27
... the fields below. You can 't see the network you wish to connect after you click 'Refresh' button for many times, please move IP camera closer to a specific network, select the radio button of same operating mode only. Select authentication type: None: no encryption 26 Select wireless band...: 20MHz only or 20/40MHz auto switch. IP camera will appear in this field. If you wish to connect to the network's access point). Use 'Auto' to select 'Auto 20/40MHz'. ...
... the fields below. You can 't see the network you wish to connect after you click 'Refresh' button for many times, please move IP camera closer to a specific network, select the radio button of same operating mode only. Select authentication type: None: no encryption 26 Select wireless band...: 20MHz only or 20/40MHz auto switch. IP camera will appear in this field. If you wish to connect to the network's access point). Use 'Auto' to select 'Auto 20/40MHz'. ...
Manual
Page 29
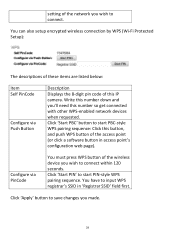
... You have to start PBC-style WPS pairing sequence: Click this number so get connected with other WPS-enabled network devices when requested. Write this IP camera.
... You have to start PBC-style WPS pairing sequence: Click this number so get connected with other WPS-enabled network devices when requested. Write this IP camera.
Manual
Page 30
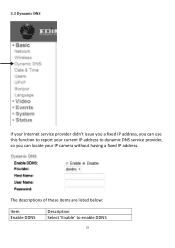
The descriptions of these items are listed below: Item Enable DDNS Description Select 'Enable' to dynamic DNS service provider, so you can locate your current IP address to enable DDNS 29 3.3 Dynamic DNS If your Internet service provider didn't issue you a fixed IP address, you can use this function to report your IP camera without having a fixed IP address.
The descriptions of these items are listed below: Item Enable DDNS Description Select 'Enable' to dynamic DNS service provider, so you can locate your current IP address to enable DDNS 29 3.3 Dynamic DNS If your Internet service provider didn't issue you a fixed IP address, you can use this function to report your IP camera without having a fixed IP address.
Manual
Page 32
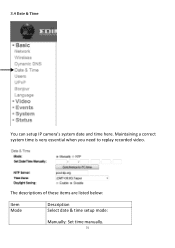
3.4 Date & Time You can setup IP camera's system date and time here. The descriptions of these items are listed below: Item Mode Description Select date & time setup mode: Manually: Set time manually. 31 Maintaining a correct system time is very essential when you need to replay recorded video.
3.4 Date & Time You can setup IP camera's system date and time here. The descriptions of these items are listed below: Item Mode Description Select date & time setup mode: Manually: Set time manually. 31 Maintaining a correct system time is very essential when you need to replay recorded video.
Manual
Page 33
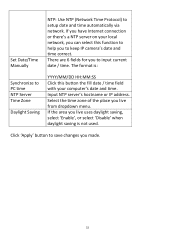
Click 'Apply' button to save changes you to input current date / time. Input NTP server's hostname or IP address. There are 6 fields for you made. 32 The format is not used. Select the time zone of the place you live uses daylight saving, ... have Internet connection or there's a NTP server on your computer's date and time. Set Date/Time Manually NTP: Use NTP (Network Time Protocol) to keep IP camera's date and time correct. If you live from dropdown menu.
Click 'Apply' button to save changes you to input current date / time. Input NTP server's hostname or IP address. There are 6 fields for you made. 32 The format is not used. Select the time zone of the place you live uses daylight saving, ... have Internet connection or there's a NTP server on your computer's date and time. Set Date/Time Manually NTP: Use NTP (Network Time Protocol) to keep IP camera's date and time correct. If you live from dropdown menu.
