Datasheet
Page 1
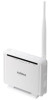
... wireless network clients (up to 253 clients), with downstream speeds up to 24Mbps and upstream speeds up to 150Mbps) and 3 times better coverage than a minute with advanced MIMO technology, the AR-7186WnA/B provides up to 6 times better data transmission rates (up a wireless network in virtual server and DMZ functions are subject to setup the router and configure the Internet connection, password, SSID and wireless security. All rights reserved. Copyright © 2012 Edimax Technology Co. Virtual Server and DMZ...
... wireless network clients (up to 253 clients), with downstream speeds up to 24Mbps and upstream speeds up to 150Mbps) and 3 times better coverage than a minute with advanced MIMO technology, the AR-7186WnA/B provides up to 6 times better data transmission rates (up a wireless network in virtual server and DMZ functions are subject to setup the router and configure the Internet connection, password, SSID and wireless security. All rights reserved. Copyright © 2012 Edimax Technology Co. Virtual Server and DMZ...
Datasheet
Page 2
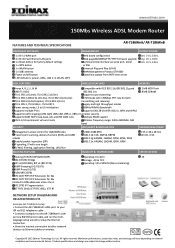
... AR-7186WnA's ADSL port to your ISP via RJ11 telephone cable . • Connect a computer to the AR-7186WnA's LAN port via RJ45 Ethernet cable, and run the multilanguage setup wizard to setup the Internet connection. • Share the Internet connection to change without notice. Copyright © 2012 Edimax Technology Co. Ltd. All rights reserved. www.edimax.com 150Mbs Wireless ADSL Modem Router FEATURES AND TECHNICAL SPECIFICATIONS AR-7186WnA/ AR-7186WnB HARDWARE INTERFACE 1 x RJ-11 WAN-port 4 x RJ-45 Fast Ethernet LAN ports 1 x Reset button for factory default settings 1 x WPS button...
... AR-7186WnA's ADSL port to your ISP via RJ11 telephone cable . • Connect a computer to the AR-7186WnA's LAN port via RJ45 Ethernet cable, and run the multilanguage setup wizard to setup the Internet connection. • Share the Internet connection to change without notice. Copyright © 2012 Edimax Technology Co. Ltd. All rights reserved. www.edimax.com 150Mbs Wireless ADSL Modem Router FEATURES AND TECHNICAL SPECIFICATIONS AR-7186WnA/ AR-7186WnB HARDWARE INTERFACE 1 x RJ-11 WAN-port 4 x RJ-45 Fast Ethernet LAN ports 1 x Reset button for factory default settings 1 x WPS button...
Quick Install Guide
Page 4
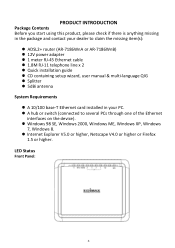
...+ router (AR-7186WnA or AR-7186WnB) 12V power adapter 1 meter RJ-45 Ethernet cable 1.8M RJ-11 telephone line x 2 Quick installation guide CD containing setup wizard, user manual & multi-language QIG Splitter 5dBi antenna System Requirements A 10/100 base-T Ethernet card installed in your PC. A hub or switch (connected to several PCs through one of the Ethernet interfaces on the device). Windows 98 SE, Windows...
...+ router (AR-7186WnA or AR-7186WnB) 12V power adapter 1 meter RJ-45 Ethernet cable 1.8M RJ-11 telephone line x 2 Quick installation guide CD containing setup wizard, user manual & multi-language QIG Splitter 5dBi antenna System Requirements A 10/100 base-T Ethernet card installed in your PC. A hub or switch (connected to several PCs through one of the Ethernet interfaces on the device). Windows 98 SE, Windows...
Quick Install Guide
Page 5
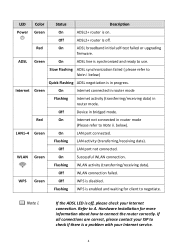
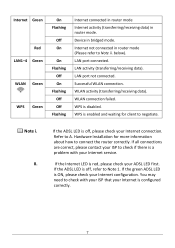
...) in progress. Off LAN port not connected. Off ADSL2+ router Is off , please check your Internet service. 4 WPS Green Off WPS is on. Refer to use. LED Color Status Description Power Green On ADSL2+ router is disabled. Red On ADSL broadband initial self-test failed or upgrading firmware. Note i. Off Device in router mode (Please refer to Note ii. Red On Internet not connected in bridged mode. Flashing WLAN activity (transferring/receiving data). Off WLAN connection failed. Flashing WPS is enabled and waiting for...
...) in progress. Off LAN port not connected. Off ADSL2+ router Is off , please check your Internet service. 4 WPS Green Off WPS is on. Refer to use. LED Color Status Description Power Green On ADSL2+ router is disabled. Red On ADSL broadband initial self-test failed or upgrading firmware. Note i. Off Device in router mode (Please refer to Note ii. Red On Internet not connected in bridged mode. Flashing WLAN activity (transferring/receiving data). Off WLAN connection failed. Flashing WPS is enabled and waiting for...
Quick Install Guide
Page 7
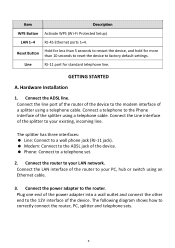
Connect the ADSL line. Connect the router to correctly connect the router, PC, splitter and telephone sets. 6 The following diagram shows how to your LAN network. Line RJ-11 port for more than 10 seconds to reset the device to factory default settings. Hardware Installation 1. Connect a telephone to the Phone interface of the router to your PC, hub or switch using a telephone cable. Connect the LAN interface of the splitter using an Ethernet cable. 3. Connect the line port of the router of the device to the modem interface of the splitter...
Connect the ADSL line. Connect the router to correctly connect the router, PC, splitter and telephone sets. 6 The following diagram shows how to your LAN network. Line RJ-11 port for more than 10 seconds to reset the device to factory default settings. Hardware Installation 1. Connect a telephone to the Phone interface of the router to your PC, hub or switch using a telephone cable. Connect the LAN interface of the splitter using an Ethernet cable. 3. Connect the line port of the router of the device to the modem interface of the splitter...
Quick Install Guide
Page 11
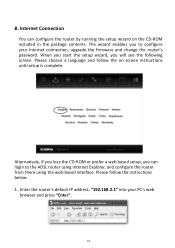
.... Enter the router's default IP address: "192.168.2.1" into your Internet connection, upgrade the firmware and change the router's password. The wizard enables you to the ADSL router using Internet Explorer, and configure the router from there using the web-based interface. Please choose a language and follow the instructions below: 1. B. Internet Connection You can login to configure your PC's web browser and press "Enter". 10 Alternatively, if you lose the CD-ROM or prefer a web based setup, you...
.... Enter the router's default IP address: "192.168.2.1" into your Internet connection, upgrade the firmware and change the router's password. The wizard enables you to the ADSL router using Internet Explorer, and configure the router from there using the web-based interface. Please choose a language and follow the instructions below: 1. B. Internet Connection You can login to configure your PC's web browser and press "Enter". 10 Alternatively, if you lose the CD-ROM or prefer a web based setup, you...
Manual
Page 5
... to the power load of the Ethernet interfaces on the device are as follows. A 10/100 base-T Ethernet card installed in the package and contact your PC. A hub or Switch (connected to claim the missing item(s): ADSL2+ router (AR-7186WnA or AR-7186WnB) 12V power adapter 1 meter RJ-45 Ethernet cable 1.8M RJ-11 telephone line x 2 Quick installation guide CD containing setup wizard, user manual & multi-language...
... to the power load of the Ethernet interfaces on the device are as follows. A 10/100 base-T Ethernet card installed in the package and contact your PC. A hub or Switch (connected to claim the missing item(s): ADSL2+ router (AR-7186WnA or AR-7186WnB) 12V power adapter 1 meter RJ-45 Ethernet cable 1.8M RJ-11 telephone line x 2 Quick installation guide CD containing setup wizard, user manual & multi-language...
Manual
Page 7
...Green WLAN Green WPS Green On Flashing Off On On Flashing Off On Flashing Off Off Flashing Internet connected in router mode Internet activity (transferring/receiving data) in bridged mode. WLAN activity (transferring/receiving data). Note i. You may need to negotiate. Refer to connect the router correctly. LAN port not connected. Hardware Installation for client to check with your Internet connection. Internet not connected in router mode (Please refer to Note 1. ii. If the ADSL LED is disabled. LAN activity (transferring/receiving data). WLAN connection failed...
...Green WLAN Green WPS Green On Flashing Off On On Flashing Off On Flashing Off Off Flashing Internet connected in router mode Internet activity (transferring/receiving data) in bridged mode. WLAN activity (transferring/receiving data). Note i. You may need to negotiate. Refer to connect the router correctly. LAN port not connected. Hardware Installation for client to check with your Internet connection. Internet not connected in router mode (Please refer to Note 1. ii. If the ADSL LED is disabled. LAN activity (transferring/receiving data). WLAN connection failed...
Manual
Page 8
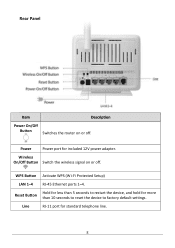
WPS Button Activate WPS (Wi-Fi Protected Setup) LAN 1-4 RJ-45 Ethernet ports 1-4. Line RJ-11 port for more than 5 seconds to restart the device, and hold for standard telephone line. 8 Wireless On/Off Button Switch the wireless signal on or off . Reset Button Hold for less than 10 seconds to reset the device to factory default settings. Power Power port for included 12V power adapter. Rear Panel Item Description Power On/Off Button Switches the router on or off .
WPS Button Activate WPS (Wi-Fi Protected Setup) LAN 1-4 RJ-45 Ethernet ports 1-4. Line RJ-11 port for more than 5 seconds to restart the device, and hold for standard telephone line. 8 Wireless On/Off Button Switch the wireless signal on or off . Reset Button Hold for less than 10 seconds to reset the device to factory default settings. Power Power port for included 12V power adapter. Rear Panel Item Description Power On/Off Button Switches the router on or off .
Manual
Page 9
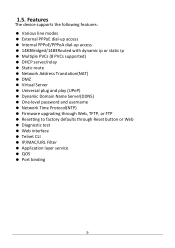
...; Multiple PVCs (8 PVCs supported) DHCP server/relay Static route Network Address Translation(NAT) DMZ Virtual Server Universal plug and play (UPnP) Dynamic Domain Name Server(DDNS) One-level password and username Network Time Protocol(NTP) Firmware upgrading through Web, TFTP, or FTP Resetting to factory defaults through Reset button or Web Diagnostic test Web interface Telnet CLI IP/MAC/URL Filter Application layer service QOS Port...
...; Multiple PVCs (8 PVCs supported) DHCP server/relay Static route Network Address Translation(NAT) DMZ Virtual Server Universal plug and play (UPnP) Dynamic Domain Name Server(DDNS) One-level password and username Network Time Protocol(NTP) Firmware upgrading through Web, TFTP, or FTP Resetting to factory defaults through Reset button or Web Diagnostic test Web interface Telnet CLI IP/MAC/URL Filter Application layer service QOS Port...
Manual
Page 12
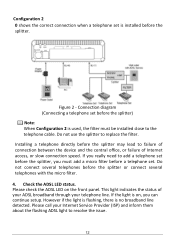
... flashing ADSL light to add a telephone set before the splitter, you can continue setup. Please check the ADSL LED on , you must be installed close to replace the filter. If you really need to resolve the issue. 12 This light indicates the status of Internet access, or slow connection speed. Check the ADSL LED status. However if the light is flashing, there is on the front panel. Connection diagram (Connecting a telephone set before the splitter) Note: When Configuration 2 is used, the filter...
... flashing ADSL light to add a telephone set before the splitter, you can continue setup. Please check the ADSL LED on , you must be installed close to replace the filter. If you really need to resolve the issue. 12 This light indicates the status of Internet access, or slow connection speed. Check the ADSL LED status. However if the light is flashing, there is on the front panel. Connection diagram (Connecting a telephone set before the splitter) Note: When Configuration 2 is used, the filter...

Manual
Page 17
... strongly recommended to desktop mode. The TCP/IP protocol of each PC has to obtain IP Address automatically through a hub or switch. IP Address Setting To use the router to access the Internet, the PCs in the network must be installed and the IP Address of each PC must have an Ethernet adapter installed and be in the bottom left of how to configure your PC so...
... strongly recommended to desktop mode. The TCP/IP protocol of each PC has to obtain IP Address automatically through a hub or switch. IP Address Setting To use the router to access the Internet, the PCs in the network must be installed and the IP Address of each PC must have an Ethernet adapter installed and be in the bottom left of how to configure your PC so...
Manual
Page 37
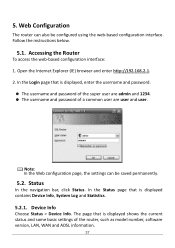
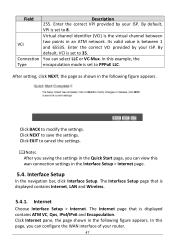
... password. The username and password of the super user are admin and 1234. The username and password of the router, such as model number, software version, LAN, WAN and ADSL information. 37 In the Login page that is displayed contains Device Info, System Log and Statistics. 5.2.1. Note: In the Web configuration page, the settings can also be saved permanently. 5.2. Follow the instructions below. 5.1. Device Info Choose Status > Device Info. Accessing the Router To access the web-based configuration interface...
... password. The username and password of the super user are admin and 1234. The username and password of the router, such as model number, software version, LAN, WAN and ADSL information. 37 In the Login page that is displayed contains Device Info, System Log and Statistics. 5.2.1. Note: In the Web configuration page, the settings can also be saved permanently. 5.2. Follow the instructions below. 5.1. Device Info Choose Status > Device Info. Accessing the Router To access the web-based configuration interface...
Manual
Page 47
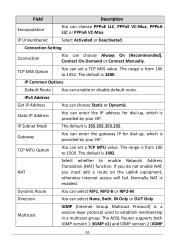
... points in an ATM network. Internet Choose Interface Setup > Internet. Its valid value is the virtual channel between 1 and 65535. In this example, the Type encapsulation mode is set to 8. Click BACK to cancel the settings. Click EXIT to modify the settings. Interface Setup In the navigation bar, click Interface Setup. The Interface Setup page that is displayed contains Internet, LAN and Wireless. 5.4.1. Click Internet pane, the page shown in the Quick Start page, you can view...
... points in an ATM network. Internet Choose Interface Setup > Internet. Its valid value is the virtual channel between 1 and 65535. In this example, the Type encapsulation mode is set to 8. Click BACK to cancel the settings. Click EXIT to modify the settings. Interface Setup In the navigation bar, click Interface Setup. The Interface Setup page that is displayed contains Internet, LAN and Wireless. 5.4.1. Click Internet pane, the page shown in the Quick Start page, you can view...
Manual
Page 55
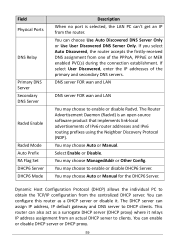
... to 1452. If you do not enable NAT, NAT you must add a route on the uplink equipment, otherwise Internet access will fail. TCP MTU Option You can choose PPPoE LLC, PPPoE VC-Mux, PPPoA LLC or PPPoA VC-Mux. The default is enabled. Field Description Encapsulation You can set a TCP MSS value. The ADSL Router supports both IGMP version 1 (IGMP v1) and IGMP version 2 (IGMP 55 Normally NAT is 1400.
... to 1452. If you do not enable NAT, NAT you must add a route on the uplink equipment, otherwise Internet access will fail. TCP MTU Option You can choose PPPoE LLC, PPPoE VC-Mux, PPPoA LLC or PPPoA VC-Mux. The default is enabled. Field Description Encapsulation You can set a TCP MSS value. The ADSL Router supports both IGMP version 1 (IGMP v1) and IGMP version 2 (IGMP 55 Normally NAT is 1400.
Manual
Page 59
... Mode Auto Prefix RA Flag Set DHCP6 Server DHCP6 Mode Description When no port is an open-source software product that implements link-local advertisements of the primary and secondary DNS servers. If select User Discovered, enter the IP addresses of IPv6 router addresses and IPv6 routing prefixes using the Neighbor Discovery Protocol (NDP). DNS server FOR wan and LAN DNS server FOR wan and LAN You may choose to DHCP clients. You may choose Auto or Manual. Dynamic Host Configuration Protocol (DHCP...
... Mode Auto Prefix RA Flag Set DHCP6 Server DHCP6 Mode Description When no port is an open-source software product that implements link-local advertisements of the primary and secondary DNS servers. If select User Discovered, enter the IP addresses of IPv6 router addresses and IPv6 routing prefixes using the Neighbor Discovery Protocol (NDP). DNS server FOR wan and LAN DNS server FOR wan and LAN You may choose to DHCP clients. You may choose Auto or Manual. Dynamic Host Configuration Protocol (DHCP...
Manual
Page 61
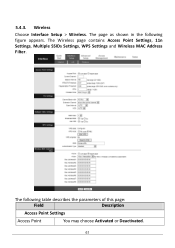
5.4.3. The Wireless page contains Access Point Settings, 11n Settings, Multiple SSIDs Settings, WPS Settings and Wireless MAC Address Filter. The following figure appears. Wireless Choose Interface Setup > Wireless. The page as shown in the following table describes the parameters of this page: Field Description Access Point Settings Access Point You may choose Activated or Deactivated. 61
5.4.3. The Wireless page contains Access Point Settings, 11n Settings, Multiple SSIDs Settings, WPS Settings and Wireless MAC Address Filter. The following figure appears. Wireless Choose Interface Setup > Wireless. The page as shown in the following table describes the parameters of this page: Field Description Access Point Settings Access Point You may choose Activated or Deactivated. 61
Manual
Page 68
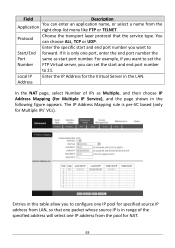
Enter the specific start and end port number you want to configure one port, enter the end port number the Port same as Multiple, and then choose IP Address Mapping (for the Virtual Server in the following figure appears. For example, if you to set the Number FTP Virtual server, you can set the start port number. You can choose ALL, TCP or UDP. Local IP Enter the IP Address for Multiple IP Service), and the...
Enter the specific start and end port number you want to configure one port, enter the end port number the Port same as Multiple, and then choose IP Address Mapping (for the Virtual Server in the following figure appears. For example, if you to set the Number FTP Virtual server, you can set the start port number. You can choose ALL, TCP or UDP. Local IP Enter the IP Address for Multiple IP Service), and the...

Manual
Page 87
Location Romfile Backup Click Browse and select a path to factory default settings. 87 You can restart the device with current settings or back to save the configuration file of this page: Field Description New Firmware Click Browse to starting upgrading the file. 5.7.4. UPGRADE After selecting the file, click UPGRADE to select the firmware file. SysRestart Choose Maintenance > SysRestart, the page shown in the following table describes the parameters of the router. The following figure appears.
Location Romfile Backup Click Browse and select a path to factory default settings. 87 You can restart the device with current settings or back to save the configuration file of this page: Field Description New Firmware Click Browse to starting upgrading the file. 5.7.4. UPGRADE After selecting the file, click UPGRADE to select the firmware file. SysRestart Choose Maintenance > SysRestart, the page shown in the following table describes the parameters of the router. The following figure appears.

Manual
Page 89
... PC, and the TCP/IP configuration of common user: user/user 89 To restore the factory default settings, turn on ? device and the wall jack. off? Check the running status of network cable, the connection between the device and Why is on the device, and press the reset button for about 3 seconds, and then release it. 6. Why does Internet access fail while the ADSL indicator is the LAN indicator your PC, hub or switch.
... PC, and the TCP/IP configuration of common user: user/user 89 To restore the factory default settings, turn on ? device and the wall jack. off? Check the running status of network cable, the connection between the device and Why is on the device, and press the reset button for about 3 seconds, and then release it. 6. Why does Internet access fail while the ADSL indicator is the LAN indicator your PC, hub or switch.


