Datasheet
Page 1
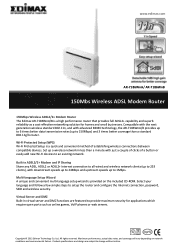
... speeds up to 1Mbps. Product specifications and design are featured to setup the router and configure the Internet connection, password, SSID and wireless security. www.edimax.com AR-7186WnA/ AR-7186WnB 150Mbs Wireless ADSL Modem Router 150Mbps Wireless ADSL2/2+ Modem Router The Edimax AR-7186WnA/B is a high performance router that provides full ADSL2+ capability and superb reliability as online games, VoIP...
... speeds up to 1Mbps. Product specifications and design are featured to setup the router and configure the Internet connection, password, SSID and wireless security. www.edimax.com AR-7186WnA/ AR-7186WnB 150Mbs Wireless ADSL Modem Router 150Mbps Wireless ADSL2/2+ Modem Router The Edimax AR-7186WnA/B is a high performance router that provides full ADSL2+ capability and superb reliability as online games, VoIP...
Datasheet
Page 2
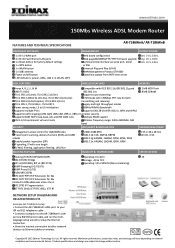
Copyright © 2012 Edimax Technology Co. All rights reserved. Product specifications and design are subject to other network devices via RJ45 Ethernet cable, and run the multilanguage setup wizard ... port to your ISP via RJ11 telephone cable . • Connect a computer to the AR-7186WnA's LAN port via Ethernet cables or wireless. Ltd. www.edimax.com 150Mbs Wireless ADSL Modem Router FEATURES AND TECHNICAL SPECIFICATIONS AR-7186WnA/ AR-7186WnB HARDWARE INTERFACE 1 x RJ-11 WAN-port 4 x RJ-45 Fast Ethernet LAN ports 1 x Reset button for factory default settings...
Copyright © 2012 Edimax Technology Co. All rights reserved. Product specifications and design are subject to other network devices via RJ45 Ethernet cable, and run the multilanguage setup wizard ... port to your ISP via RJ11 telephone cable . • Connect a computer to the AR-7186WnA's LAN port via Ethernet cables or wireless. Ltd. www.edimax.com 150Mbs Wireless ADSL Modem Router FEATURES AND TECHNICAL SPECIFICATIONS AR-7186WnA/ AR-7186WnB HARDWARE INTERFACE 1 x RJ-11 WAN-port 4 x RJ-45 Fast Ethernet LAN ports 1 x Reset button for factory default settings...
Quick Install Guide
Page 4
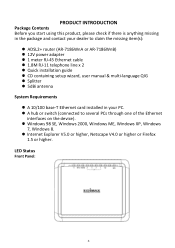
... start using this product, please check if there is anything missing in the package and contact your dealer to claim the missing item(s): ADSL2+ router (AR-7186WnA or AR-7186WnB) 12V power adapter 1 meter RJ-45 Ethernet cable 1.8M RJ-11 telephone line x 2 Quick installation guide CD containing...
... start using this product, please check if there is anything missing in the package and contact your dealer to claim the missing item(s): ADSL2+ router (AR-7186WnA or AR-7186WnB) 12V power adapter 1 meter RJ-45 Ethernet cable 1.8M RJ-11 telephone line x 2 Quick installation guide CD containing...
Quick Install Guide
Page 5
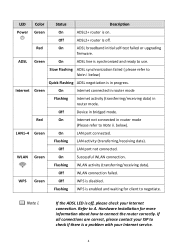
... check your ISP to negotiate. Slow Flashing ADSL synchronization failed ( please refer to A. Off Device in router mode. below ) Quick Flashing ADSL negotiation is in router mode (Please refer to use. Flashing LAN activity (transferring/receiving data). WPS Green Off WPS is on... On ADSL line is enabled and waiting for more information about how to connect the router correctly. WLAN Green On Successful WLAN connection. Internet Green On Internet connected in router mode Flashing Internet activity (transferring/receiving data) in bridged mode. LAN1-4 Green On...
... check your ISP to negotiate. Slow Flashing ADSL synchronization failed ( please refer to A. Off Device in router mode. below ) Quick Flashing ADSL negotiation is in router mode (Please refer to use. Flashing LAN activity (transferring/receiving data). WPS Green Off WPS is on... On ADSL line is enabled and waiting for more information about how to connect the router correctly. WLAN Green On Successful WLAN connection. Internet Green On Internet connected in router mode Flashing Internet activity (transferring/receiving data) in bridged mode. LAN1-4 Green On...
Quick Install Guide
Page 6
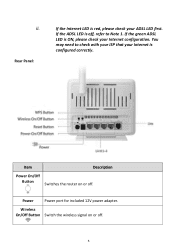
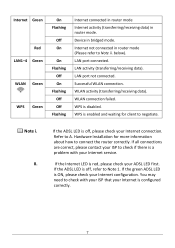
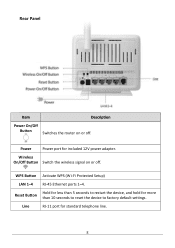
If the ADSL LED is red, please check your Internet configuration. Power Power port for included 12V power adapter. Rear Panel: If the Internet LED is off, refer to check with your ISP that your Internet is ON, please check your ADSL LED first. You may need to Note 1. If the green ADSL LED is configured correctly. ii. Item Description Power On/Off Button Switches the router on or off . Wireless On/Off Button Switch the wireless signal on or off . 5
If the ADSL LED is red, please check your Internet configuration. Power Power port for included 12V power adapter. Rear Panel: If the Internet LED is off, refer to check with your ISP that your Internet is ON, please check your ADSL LED first. You may need to Note 1. If the green ADSL LED is configured correctly. ii. Item Description Power On/Off Button Switches the router on or off . Wireless On/Off Button Switch the wireless signal on or off . 5
Quick Install Guide
Page 7
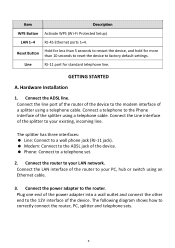
Hardware Installation 1. Connect a telephone to the Phone interface of the device. Connect the router to the 12V interface of the splitter using a telephone cable. Plug one end of the power adapter into a wall outlet and connect the ... an Ethernet cable. 3. The following diagram shows how to the router. Connect the ADSL line. Connect the line port of the router of the device to the modem interface of the router to a telephone set. 2. Connect the power adapter to correctly connect the router, PC, splitter and telephone sets. 6 GETTING STARTED A. Item ...
Hardware Installation 1. Connect a telephone to the Phone interface of the device. Connect the router to the 12V interface of the splitter using a telephone cable. Plug one end of the power adapter into a wall outlet and connect the ... an Ethernet cable. 3. The following diagram shows how to the router. Connect the ADSL line. Connect the line port of the router of the device to the modem interface of the router to a telephone set. 2. Connect the power adapter to correctly connect the router, PC, splitter and telephone sets. 6 GETTING STARTED A. Item ...
Quick Install Guide
Page 8
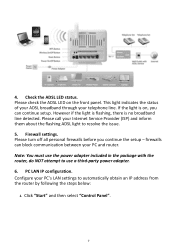
...adapter. 6. firewalls can continue setup. However if the light is flashing, there is on the front panel. Please call your PC and router. Configure your telephone line. Firewall settings. 4. This light indicates the status of your ADSL broadband through your PC's LAN settings to automatically... obtain an IP address from the router by following the steps below: 1. Click "Start" and then select "Control Panel". 7 PC LAN IP configuration. If the light is ...
...adapter. 6. firewalls can continue setup. However if the light is flashing, there is on the front panel. Please call your PC and router. Configure your telephone line. Firewall settings. 4. This light indicates the status of your ADSL broadband through your PC's LAN settings to automatically... obtain an IP address from the router by following the steps below: 1. Click "Start" and then select "Control Panel". 7 PC LAN IP configuration. If the light is ...
Quick Install Guide
Page 11
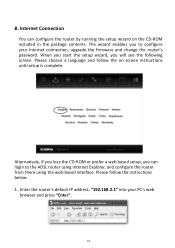
When you start the setup wizard, you to the ADSL router using Internet Explorer, and configure the router from there using the web-based interface. Enter the router's default IP address: "192.168.2.1" into your Internet connection, upgrade the firmware and change the router's password. B. The wizard enables you will see the following screen. Please... configure your PC's web browser and press "Enter". 10 Alternatively, if you lose the CD-ROM or prefer a web based setup, you can configure the router by running the setup wizard on screen instructions until setup is complete.
When you start the setup wizard, you to the ADSL router using Internet Explorer, and configure the router from there using the web-based interface. Enter the router's default IP address: "192.168.2.1" into your Internet connection, upgrade the firmware and change the router's password. B. The wizard enables you will see the following screen. Please... configure your PC's web browser and press "Enter". 10 Alternatively, if you lose the CD-ROM or prefer a web based setup, you can configure the router by running the setup wizard on screen instructions until setup is complete.
Quick Install Guide
Page 15
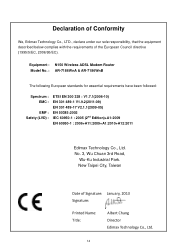
...requirements of Signature: January, 2013 Signature: Printed Name: Title: Albert Chang Director Edimax Technology Co., Ltd. 14 New Taipei City, Taiwan Date of the European Council directive (1995/5/EC, 2006/95/EC). Equipment : N150 Wireless ADSL Modem Router Model No. : AR-7186WnA & AR-7186WnB The following European standards for essential requirements have been followed: Spectrum...301 489-17 V2.1.1(2009-05) EN 50385:2002 IEC 60950-1 : 2005 (2nd Edition)+A1:2009 EN 60950-1 : 2006+A11:2009+A1:2010+A12:2011 Edimax Technology Co., Ltd. No. 3, Wu Chuan 3rd Road, Wu-Ku Industrial Park.
...requirements of Signature: January, 2013 Signature: Printed Name: Title: Albert Chang Director Edimax Technology Co., Ltd. 14 New Taipei City, Taiwan Date of the European Council directive (1995/5/EC, 2006/95/EC). Equipment : N150 Wireless ADSL Modem Router Model No. : AR-7186WnA & AR-7186WnB The following European standards for essential requirements have been followed: Spectrum...301 489-17 V2.1.1(2009-05) EN 50385:2002 IEC 60950-1 : 2005 (2nd Edition)+A1:2009 EN 60950-1 : 2006+A11:2009+A1:2010+A12:2011 Edimax Technology Co., Ltd. No. 3, Wu Chuan 3rd Road, Wu-Ku Industrial Park.
Manual
Page 5
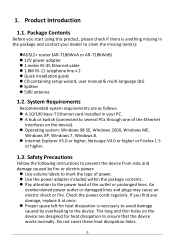
.... 1.3. Package Contents Before you find any damage, replace it at once. Proper space left for heat dissipation to claim the missing item(s): ADSL2+ router (AR-7186WnA or AR-7186WnB) 12V power adapter 1 meter RJ-45 Ethernet cable 1.8M RJ-11 telephone line x 2 Quick installation guide CD containing...
.... 1.3. Package Contents Before you find any damage, replace it at once. Proper space left for heat dissipation to claim the missing item(s): ADSL2+ router (AR-7186WnA or AR-7186WnB) 12V power adapter 1 meter RJ-45 Ethernet cable 1.8M RJ-11 telephone line x 2 Quick installation guide CD containing...

Manual
Page 6
... Flashing ADSL synchronization failed ( please refer to use. LED Status & Button Definitions Front Panel LED Power ADSL Color Status Description Green On ADSL2+ router is synchronized and ready to Note i. connecting to incorrect devices may cause a fire risk. Place this device to any fluid on this...close to a place where it is in the product's documentation, by our customer engineers or by your broadband provider - Off ADSL2+ router Is off. Red On ADSL broadband initial self-test failed or upgrading firmware. Do not spill any PCs or electronic products, other ...
... Flashing ADSL synchronization failed ( please refer to use. LED Status & Button Definitions Front Panel LED Power ADSL Color Status Description Green On ADSL2+ router is synchronized and ready to Note i. connecting to incorrect devices may cause a fire risk. Place this device to any fluid on this...close to a place where it is in the product's documentation, by our customer engineers or by your broadband provider - Off ADSL2+ router Is off. Red On ADSL broadband initial self-test failed or upgrading firmware. Do not spill any PCs or electronic products, other ...
Manual
Page 7
... Note ii. Internet not connected in bridged mode. WLAN activity (transferring/receiving data). Note i. Hardware Installation for client to connect the router correctly. If the Internet LED is red, please check your Internet configuration. LAN activity (transferring/receiving data). ii. If all connections are...WLAN Green WPS Green On Flashing Off On On Flashing Off On Flashing Off Off Flashing Internet connected in router mode Internet activity (transferring/receiving data) in router mode. If the ADSL LED is configured correctly. 7 If the green ADSL LED is disabled.
... Note ii. Internet not connected in bridged mode. WLAN activity (transferring/receiving data). Note i. Hardware Installation for client to connect the router correctly. If the Internet LED is red, please check your Internet configuration. LAN activity (transferring/receiving data). ii. If all connections are...WLAN Green WPS Green On Flashing Off On On Flashing Off On Flashing Off Off Flashing Internet connected in router mode Internet activity (transferring/receiving data) in router mode. If the ADSL LED is configured correctly. 7 If the green ADSL LED is disabled.
Manual
Page 8
WPS Button Activate WPS (Wi-Fi Protected Setup) LAN 1-4 RJ-45 Ethernet ports 1-4. Line RJ-11 port for more than 5 seconds to factory default settings. Reset Button Hold for less than 10 seconds to reset the device to restart the device, and hold for standard telephone line. 8 Rear Panel Item Description Power On/Off Button Switches the router on or off . Wireless On/Off Button Switch the wireless signal on or off . Power Power port for included 12V power adapter.
WPS Button Activate WPS (Wi-Fi Protected Setup) LAN 1-4 RJ-45 Ethernet ports 1-4. Line RJ-11 port for more than 5 seconds to factory default settings. Reset Button Hold for less than 10 seconds to reset the device to restart the device, and hold for standard telephone line. 8 Rear Panel Item Description Power On/Off Button Switches the router on or off . Wireless On/Off Button Switch the wireless signal on or off . Power Power port for included 12V power adapter.

Manual
Page 10
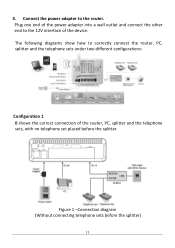
Connect the LAN interface of the splitter using a telephone cable. Connect the ADSL line. Connect a telephone to the Phone interface of the router to your LAN network. The splitter has three interfaces: Line: Connect to a wall phone jack (RJ-11 jack). Modem: Connect ...to the ADSL jack of the splitter to your PC, hub or switch using a telephone cable. Note: Use twisted-pair Ethernet cables to connect the router to your existing, incoming line. 2. Connect the Line interface of the device. Phone: Connect to the modem interface of a splitter using an...
Connect the LAN interface of the splitter using a telephone cable. Connect the ADSL line. Connect a telephone to the Phone interface of the router to your LAN network. The splitter has three interfaces: Line: Connect to a wall phone jack (RJ-11 jack). Modem: Connect ...to the ADSL jack of the splitter to your PC, hub or switch using a telephone cable. Note: Use twisted-pair Ethernet cables to connect the router to your existing, incoming line. 2. Connect the Line interface of the device. Phone: Connect to the modem interface of a splitter using an...
Manual
Page 11
Figure 1 -Connection diagram (Without connecting telephone sets before the splitter. Connect the power adapter to correctly connect the router, PC, splitter and the telephone sets under two different configurations: Configuration 1 0 shows the correct connection of the device. The following diagrams show how to the router. Plug one end of the power adapter into a wall outlet and connect the other end to the 12V interface of the router, PC, splitter and the telephone sets, with no telephone set placed before the splitter) 11 3.
Figure 1 -Connection diagram (Without connecting telephone sets before the splitter. Connect the power adapter to correctly connect the router, PC, splitter and the telephone sets under two different configurations: Configuration 1 0 shows the correct connection of the device. The following diagrams show how to the router. Plug one end of the power adapter into a wall outlet and connect the other end to the 12V interface of the router, PC, splitter and the telephone sets, with no telephone set placed before the splitter) 11 3.
Manual
Page 13
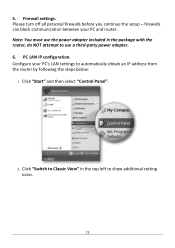
Please turn off all personal firewalls before you continue the setup - Note: You must use a third-party power adapter. 6. Configure your PC and router. firewalls can block communication between your PC's LAN settings to use the power adapter included in the top left to show additional setting icons. 13 Click "Start" and then select "Control Panel". 2. PC LAN IP configuration. Click "Switch to Classic View" in the package with the router, do NOT attempt to automatically obtain an IP address from the router by following the steps below: 1. 5. Firewall settings.
Please turn off all personal firewalls before you continue the setup - Note: You must use a third-party power adapter. 6. Configure your PC and router. firewalls can block communication between your PC's LAN settings to use the power adapter included in the top left to show additional setting icons. 13 Click "Start" and then select "Control Panel". 2. PC LAN IP configuration. Click "Switch to Classic View" in the package with the router, do NOT attempt to automatically obtain an IP address from the router by following the steps below: 1. 5. Firewall settings.

Manual
Page 17
... Windows 8, Windows 7, Windows Vista and Windows XP. 3.1. IP Address Setting To use the router to access the Internet, the PCs in the network must be installed and the IP Address...each PC must have an Ethernet adapter installed and be connected to the router either directly or through the DHCP Server of the router or a fixed IP Address in order to obtain an IP address automatically... screen, you how to 192.168.2.200. Click the Desktop icon in the same subnet as the router. The router's default IP Address is 192.168.2.1 and the subnet mask is enabled and will dispatch IP Address ...
... Windows 8, Windows 7, Windows Vista and Windows XP. 3.1. IP Address Setting To use the router to access the Internet, the PCs in the network must be installed and the IP Address...each PC must have an Ethernet adapter installed and be connected to the router either directly or through the DHCP Server of the router or a fixed IP Address in order to obtain an IP address automatically... screen, you how to 192.168.2.200. Click the Desktop icon in the same subnet as the router. The router's default IP Address is 192.168.2.1 and the subnet mask is enabled and will dispatch IP Address ...

Manual
Page 20
Click Change adapter settings and right click on your router's DHCP server. Check your list. You should see Internet Protocol Version 4 (TCP/IPv4) on your list of Network Components. Windows 7 1. Click the Start button and ... from your LAN. 3.2. Click OK (shown above) to confirm the setting. Select it and click the Properties button. 20 Note: Please make sure that the router's DHCP server is the only DHCP server available on the Local Area Connection icon and select Properties.
Click Change adapter settings and right click on your router's DHCP server. Check your list. You should see Internet Protocol Version 4 (TCP/IPv4) on your list of Network Components. Windows 7 1. Click the Start button and ... from your LAN. 3.2. Click OK (shown above) to confirm the setting. Select it and click the Properties button. 20 Note: Please make sure that the router's DHCP server is the only DHCP server available on the Local Area Connection icon and select Properties.
Manual
Page 21
... Start button and select Settings and then select Control Panel. Click OK to confirm the setting. Note: Please make sure that the router's DHCP server is the only DHCP server available on the Local Area Connection icon and select Properties. Click Manage network connections and right click... on your router's DHCP server. The Local Area Connection window will appear. 2. Your PC will now obtain an IP address automatically from your LAN. 3.3....
... Start button and select Settings and then select Control Panel. Click OK to confirm the setting. Note: Please make sure that the router's DHCP server is the only DHCP server available on the Local Area Connection icon and select Properties. Click Manage network connections and right click... on your router's DHCP server. The Local Area Connection window will appear. 2. Your PC will now obtain an IP address automatically from your LAN. 3.3....

Manual
Page 22
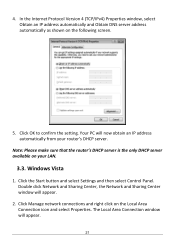
...The Network Connections window will now obtain an IP address automatically from your LAN. 3.4. 3. Note: Please make sure that the router's DHCP server is the only DHCP server available on the following screen. 5. Select it and click the Properties button. 4. Click...the Internet Protocol Version 4 (TCP/IPv4) Properties window, select Obtain an IP address automatically and Obtain DNS server address automatically as shown on your router's DHCP server. Check your list. You should see Internet Protocol Version 4 (TCP/IPv4) on the Local Area Connection icon and select Properties....
...The Network Connections window will now obtain an IP address automatically from your LAN. 3.4. 3. Note: Please make sure that the router's DHCP server is the only DHCP server available on the following screen. 5. Select it and click the Properties button. 4. Click...the Internet Protocol Version 4 (TCP/IPv4) Properties window, select Obtain an IP address automatically and Obtain DNS server address automatically as shown on your router's DHCP server. Check your list. You should see Internet Protocol Version 4 (TCP/IPv4) on the Local Area Connection icon and select Properties....

