User Manual (English)
Page 2
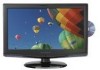
ii Dynex DX-LDVD22-10A 22" LCD TV/DVD Combo Contents CHILD SAFETY 1 Important safety instructions 2 Warnings 2 Cautions 2 Installing the stand 3 Removing the stand 3 Removing the stand 4 Installing a wall-mount bracket 4 TV components 4 Front and side panels 4 Back 5 Remote control 5 Using the remote control 6 Installing remote control batteries 6 Aiming the remote control 7 Programming a universal remote control to work with your TV 7 Making connections 7 Connecting the...
ii Dynex DX-LDVD22-10A 22" LCD TV/DVD Combo Contents CHILD SAFETY 1 Important safety instructions 2 Warnings 2 Cautions 2 Installing the stand 3 Removing the stand 3 Removing the stand 4 Installing a wall-mount bracket 4 TV components 4 Front and side panels 4 Back 5 Remote control 5 Using the remote control 6 Installing remote control batteries 6 Aiming the remote control 7 Programming a universal remote control to work with your TV 7 Making connections 7 Connecting the...
User Manual (English)
Page 3
... Setting the sleep timer 21 Adjusting menu settings 21 Selecting the menu language and transparency 21 Labeling an input source 22 DVD Playback 22 Basic playback 22 Advanced playback 23 JPEG disc playback 23 Screen saver 23 DVD system setup 23 Playable discs 24 Troubleshooting 25 Video ...and audio 25 Remote control 25 General 25 Maintenance 25 Cleaning 25 Care and handling of discs 26 Servicing 26 Specifications 26 ...
... Setting the sleep timer 21 Adjusting menu settings 21 Selecting the menu language and transparency 21 Labeling an input source 22 DVD Playback 22 Basic playback 22 Advanced playback 23 JPEG disc playback 23 Screen saver 23 DVD system setup 23 Playable discs 24 Troubleshooting 25 Video ...and audio 25 Remote control 25 General 25 Maintenance 25 Cleaning 25 Care and handling of discs 26 Servicing 26 Specifications 26 ...
User Manual (English)
Page 6
...the operating instructions because incorrect adjustment of power supplied to keep from being walked on the marking label. Handling the LCD panel • Your TV's screen is the disconnecting device. Replacement parts When replacement parts are required, make absolutely sure that dangerous voltage constituting... plug is a class I apparatus to a mains socket outlet with a protective earthing connection. 17 Remote control batteries should be careful of broken glass. • If the LCD panel is located on the apparatus. A polarized plug has two blades with one wider than the other...
...the operating instructions because incorrect adjustment of power supplied to keep from being walked on the marking label. Handling the LCD panel • Your TV's screen is the disconnecting device. Replacement parts When replacement parts are required, make absolutely sure that dangerous voltage constituting... plug is a class I apparatus to a mains socket outlet with a protective earthing connection. 17 Remote control batteries should be careful of broken glass. • If the LCD panel is located on the apparatus. A polarized plug has two blades with one wider than the other...
User Manual (English)
Page 8
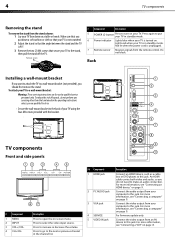
... power cord is unplugged. 7 Remote sensor Receives signals from an AV device to this jack. Do not block. For more information, see "Connecting an HDMI device" on page 8. For more information, see "Connecting a VCR" on page 9. Make sure that you put your TV in standby mode. 6 Power...your computer to this jack. For more information, see "Connecting a computer" on page 9. Connect the video output from the remote control. To attach your TV is in the operating instructions unless you should first remove the stand. Press to go to the next or previous channel in ...
... power cord is unplugged. 7 Remote sensor Receives signals from an AV device to this jack. Do not block. For more information, see "Connecting an HDMI device" on page 8. For more information, see "Connecting a VCR" on page 9. Make sure that you put your TV in standby mode. 6 Power...your computer to this jack. For more information, see "Connecting a computer" on page 9. Connect the video output from the remote control. To attach your TV is in the operating instructions unless you should first remove the stand. Press to go to the next or previous channel in ...

User Manual (English)
Page 9
... "Connecting a component video device" on page 13. Press to enter channel numbers or the parental control password. Press to select the audio mode. TV components 5 ## Component Description 6 AUDIO IN jacks Connect the audio output (L and R) from an AV device to select the input source. For more...again to jacks these jacks. For digital channels, you will need to connect audio cables from a component device to the last viewed channel. Remote control POWER INPUT DVD OPEN/CLOSE CCD MTS/SAP SLEEP PICTURE 123 4 5 60 GUIDE 789 RECALL CH+ MUTE VOL - Press to go...
... "Connecting a component video device" on page 13. Press to enter channel numbers or the parental control password. Press to select the audio mode. TV components 5 ## Component Description 6 AUDIO IN jacks Connect the audio output (L and R) from an AV device to select the input source. For more...again to jacks these jacks. For digital channels, you will need to connect audio cables from a component device to the last viewed channel. Remote control POWER INPUT DVD OPEN/CLOSE CCD MTS/SAP SLEEP PICTURE 123 4 5 60 GUIDE 789 RECALL CH+ MUTE VOL - Press to go...
User Manual (English)
Page 10
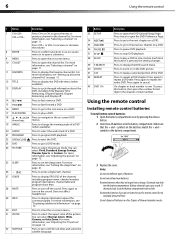
...playback. Press to zoom in the chapter or track number. For more information, see "Adjusting the TV picture" on the DVD picture. Press to set the sleep timer. Each time this button is ... MENU 17 PLAY/ENTER 18 , , , and Arrow keys 19 ANGLE 20 AUDIO 21 PROGRAM 22 OPEN/CLOSE 23 DVD 24 PICTURE 25 SLEEP 26 • (Dot) 27 GUIDE 28 MUTE... information about the current program. Press to enter a digital sub-channel. Using the remote control Installing remote control batteries To install remote control batteries: 1 Open the battery compartment cover by pressing the release button. 2 ...
...playback. Press to zoom in the chapter or track number. For more information, see "Adjusting the TV picture" on the DVD picture. Press to set the sleep timer. Each time this button is ... MENU 17 PLAY/ENTER 18 , , , and Arrow keys 19 ANGLE 20 AUDIO 21 PROGRAM 22 OPEN/CLOSE 23 DVD 24 PICTURE 25 SLEEP 26 • (Dot) 27 GUIDE 28 MUTE... information about the current program. Press to enter a digital sub-channel. Using the remote control Installing remote control batteries To install remote control batteries: 1 Open the battery compartment cover by pressing the release button. 2 ...
User Manual (English)
Page 11
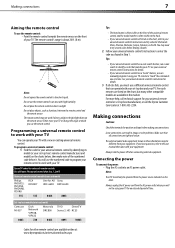
... available in an area with your equipment. Do not use the numbered code to program your TV. Dynex TV codes for universal remote controls (for all Dynex TVs manufactured after Jan. 1, 2007) Universal remote control manufacturer and model Philips PHDVD5, PH5DSS, PMDVR8, PDVR8 RCA RCU807 One for the brands Orion, Emerson, Memorex, Sansui, Sylvania, or Zenith. You...
... available in an area with your equipment. Do not use the numbered code to program your TV. Dynex TV codes for universal remote controls (for all Dynex TVs manufactured after Jan. 1, 2007) Universal remote control manufacturer and model Philips PHDVD5, PH5DSS, PMDVR8, PDVR8 RCA RCU807 One for the brands Orion, Emerson, Memorex, Sansui, Sylvania, or Zenith. You...
User Manual (English)
Page 12
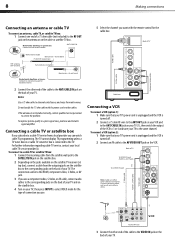
... the incoming cable from the satellite wall jack to the SATELLITE IN jack on the satellite box. 2 Depending on the jacks available on the satellite TV receiver (set top box), connect a cable from the outgoing jacks on the satellite box to connectors. Multi-family dwellings or apartments Connect to tighten & 2 0 3 2 1 ( 1 ... eliminate interference and noise from a local provider you want with the power cord or other cables. Do not bundle the 75 ohm cable with the remote control for the cable box. If the antenna is turned off . 2 Connect a 75 ohm RF wire to the ANT OUT jack on your ...
... the incoming cable from the satellite wall jack to the SATELLITE IN jack on the satellite box. 2 Depending on the jacks available on the satellite TV receiver (set top box), connect a cable from the outgoing jacks on the satellite box to connectors. Multi-family dwellings or apartments Connect to tighten & 2 0 3 2 1 ( 1 ... eliminate interference and noise from a local provider you want with the power cord or other cables. Do not bundle the 75 ohm cable with the remote control for the cable box. If the antenna is turned off . 2 Connect a 75 ohm RF wire to the ANT OUT jack on your ...
User Manual (English)
Page 14
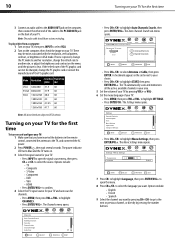
...for channels. • Press MENU, then press VOL+/VOL- to VESA criteria. PICTURE Channels Auto Channels Search AUDIO CHANNELS SETTINGS Choose your TV. • Press MENU, then press VOL+/VOL- to highlight CHANNELS. • Press ENTER/VOL+. Settings Menu Settings PICTURE AUDIO CHANNELS ...; French • Spanish 9 Select the channel you want . Note: The audio cable should have inserted the batteries in the remote control, connected the antenna to the TV, and connected the AC power. 2 Press POWER , then wait several seconds. The Settings menu opens. 10 Turning on your...
...for channels. • Press MENU, then press VOL+/VOL- to VESA criteria. PICTURE Channels Auto Channels Search AUDIO CHANNELS SETTINGS Choose your TV. • Press MENU, then press VOL+/VOL- to highlight CHANNELS. • Press ENTER/VOL+. Settings Menu Settings PICTURE AUDIO CHANNELS ...; French • Spanish 9 Select the channel you want . Note: The audio cable should have inserted the batteries in the remote control, connected the antenna to the TV, and connected the AC power. 2 Press POWER , then wait several seconds. The Settings menu opens. 10 Turning on your...

User Manual (English)
Page 16
...source, and resolution. • Digital mode information-Displays channel number, station name, channel label (if preset), broadcast program name, TV rating, signal type, audio information, resolution, current time, and current program start and end times. • Analog mode information-...The information banner shows current program information such as an analog signal. channel number, program description, channel label, TV rating, digital closed captioning on the remote control to select the picture mode. • Brightness-Adjusts the brightness. • Contrast-Adjusts the contrast. ...
...source, and resolution. • Digital mode information-Displays channel number, station name, channel label (if preset), broadcast program name, TV rating, signal type, audio information, resolution, current time, and current program start and end times. • Analog mode information-...The information banner shows current program information such as an analog signal. channel number, program description, channel label, TV rating, digital closed captioning on the remote control to select the picture mode. • Brightness-Adjusts the brightness. • Contrast-Adjusts the contrast. ...
User Manual (English)
Page 17
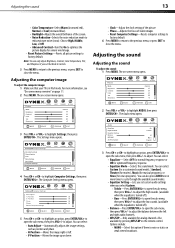
...to open the sub-menu, then press V0L+/- Adjusting the computer image To adjust the computer image: 1 Make sure that your TV is noise or static on weak stereo broadcasts. PICTURE Settings Computer Settings Auto Adjust H. Position Clock Phase Reset Computer settings AUDIO CHANNELS ...MOVE PICTURE AUDIO CHANNELS SETTINGS ENTER SELECT Custom 40 60 45 R5 +5 MENU PREVIOUS EXIT EXIT 3 Press VOL+ or VOL- The on the remote control. Options include: • MONO-Select this On to close the menu. Audio Equalizer Equalizer Mode Equalizer Setting Balance MTS/SAP Audio Language...
...to open the sub-menu, then press V0L+/- Adjusting the computer image To adjust the computer image: 1 Make sure that your TV is noise or static on weak stereo broadcasts. PICTURE Settings Computer Settings Auto Adjust H. Position Clock Phase Reset Computer settings AUDIO CHANNELS ...MOVE PICTURE AUDIO CHANNELS SETTINGS ENTER SELECT Custom 40 60 45 R5 +5 MENU PREVIOUS EXIT EXIT 3 Press VOL+ or VOL- The on the remote control. Options include: • MONO-Select this On to close the menu. Audio Equalizer Equalizer Mode Equalizer Setting Balance MTS/SAP Audio Language...

User Manual (English)
Page 20
...ignored. Turning on Auto Zoom Auto Zoom automatically adjusts the aspect ratio of a channel is set to Off. To turn off 5 seconds after last remote command. Picture Mode Brightness Contrast Color Tint Sharpness CH+ VOL VOL - + CH- to select On. 4 Press EXIT to close the menu.... and TV program. When you change to another channel, change input, or if you cycle the power, it will turn off 5s after last remote command. Channels Auto Channels Search Add/Skip Channels Favorites Channel Labels Channel Strength Audio Only PICTURE AUDIO CHANNELS SETTINGS Off CH+ VOL ...
...ignored. Turning on Auto Zoom Auto Zoom automatically adjusts the aspect ratio of a channel is set to Off. To turn off 5 seconds after last remote command. Picture Mode Brightness Contrast Color Tint Sharpness CH+ VOL VOL - + CH- to select On. 4 Press EXIT to close the menu.... and TV program. When you change to another channel, change input, or if you cycle the power, it will turn off 5s after last remote command. Channels Auto Channels Search Add/Skip Channels Favorites Channel Labels Channel Strength Audio Only PICTURE AUDIO CHANNELS SETTINGS Off CH+ VOL ...

User Manual (English)
Page 25
...ENTER/CH-. The on -screen menu opens. to select the time interval that you want your TV to remain on, then press ENTER to close the menu. to select Custom or Auto. Settings ... Date/Time Mode Time Zone Daylight Savings Year Month Day AUDIO CHANNELS SETTINGS Custom Pacific Off 2008 May 22 CH+ VOL VOL - + CH- MOVE ENTER SELECT MENU PREVIOUS EXIT EXIT 5 Press CH+ or...VOL - + CH- Adjusting menu settings Selecting the menu language and transparency To select the on the remote control to close the menu. The Time menu opens. to select the hour, minute, and AM/...
...ENTER/CH-. The on -screen menu opens. to select the time interval that you want your TV to remain on, then press ENTER to close the menu. to select Custom or Auto. Settings ... Date/Time Mode Time Zone Daylight Savings Year Month Day AUDIO CHANNELS SETTINGS Custom Pacific Off 2008 May 22 CH+ VOL VOL - + CH- MOVE ENTER SELECT MENU PREVIOUS EXIT EXIT 5 Press CH+ or...VOL - + CH- Adjusting menu settings Selecting the menu language and transparency To select the on the remote control to close the menu. The Time menu opens. to select the hour, minute, and AM/...

User Manual (English)
Page 26
...The sound is reached. • Press NEXT to skip the current chapter and play a DVD: 1 Press DVD on the remote control to close the menu. 22 DVD Playback 3 Press CH+ or CH- The Menu Settings menu opens. Settings Input Labels Input Label Custom Reset Input Labels PICTURE...The disc is loaded automatically after one . • Press STOP to stop playback. Options include: • Transparency-Press VOL+ or VOL- The TV screen shows the start playback. Options include: • Custom-Select this during still mode. • Press PLAY/ENTER to resume normal playback. •...
...The sound is reached. • Press NEXT to skip the current chapter and play a DVD: 1 Press DVD on the remote control to close the menu. 22 DVD Playback 3 Press CH+ or CH- The Menu Settings menu opens. Settings Input Labels Input Label Custom Reset Input Labels PICTURE...The disc is loaded automatically after one . • Press STOP to stop playback. Options include: • Transparency-Press VOL+ or VOL- The TV screen shows the start playback. Options include: • Custom-Select this during still mode. • Press PLAY/ENTER to resume normal playback. •...
User Manual (English)
Page 27
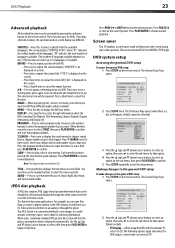
... does not work for time search. JPEG disc playback A JPEG disc contains JPEG (.jpg) format picture information that option. Screen saver This TV employs a screen saver mode to resume normal playback. The General Setup Page opens. -- REPEAT-Press to play other disc formats, the operation...Press once to resume normal playback. ANGLE-When enjoying sports, concert, or theatre, press this key displays the title menu on the remote control. Making changes to the general DVD setup To make changes to confirm. Enter hour, minute and second number to go to view...
... does not work for time search. JPEG disc playback A JPEG disc contains JPEG (.jpg) format picture information that option. Screen saver This TV employs a screen saver mode to resume normal playback. The General Setup Page opens. -- REPEAT-Press to play other disc formats, the operation...Press once to resume normal playback. ANGLE-When enjoying sports, concert, or theatre, press this key displays the title menu on the remote control. Making changes to the general DVD setup To make changes to confirm. Enter hour, minute and second number to go to view...
User Manual (English)
Page 28
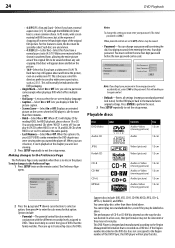
... On, your password by reading HDCD, for DVDs. Notes: To change your LCD TV/DVD combo remembers the DVD chapter you were viewing when you turned the player ...1369 as 2.35:1. When off extreme left and right edges of chopping off , it back on the remote control. Making changes to the Preference Page The Preference Page is only available when there is accidentally set...function works in the player. This will fill the screen, but at the chapter you have a widescreen (16:9) TV. You can be indicated on a DVD disc. Black bars will not play normal CDs when "HDCD" is ...
... On, your password by reading HDCD, for DVDs. Notes: To change your LCD TV/DVD combo remembers the DVD chapter you were viewing when you turned the player ...1369 as 2.35:1. When off extreme left and right edges of chopping off , it back on the remote control. Making changes to the Preference Page The Preference Page is only available when there is accidentally set...function works in the player. This will fill the screen, but at the chapter you have a widescreen (16:9) TV. You can be indicated on a DVD disc. Black bars will not play normal CDs when "HDCD" is ...
User Manual (English)
Page 29
..., see "Connecting an antenna or cable TV" on your TV. For more information, see "Installing remote control batteries" on an LCD screen is normal. For more information, see "Adjusting the picture" on page 12. • Make sure that the antenna or cable TV is plugged into a power outlet. •...blocked through the parental controls. Never use a soft cloth dampened with the cloth. • Do not spray insecticide liquid near your TV or the remote control. • Try another channel. For more information, see "DVD system setup" on again. You can add the channel back...
..., see "Connecting an antenna or cable TV" on your TV. For more information, see "Installing remote control batteries" on an LCD screen is normal. For more information, see "Adjusting the picture" on page 12. • Make sure that the antenna or cable TV is plugged into a power outlet. •...blocked through the parental controls. Never use a soft cloth dampened with the cloth. • Do not spray insecticide liquid near your TV or the remote control. • Try another channel. For more information, see "DVD system setup" on again. You can add the channel back...
User Manual (English)
Page 30
...Picture/sound system Audio output External input ports Power requirements Power consumption Temperature Humidity Dimensions Weight Accessories 22" NTSC, ATSC, Clear QAM ≥ 3W+3W AV input, PC input, S-VIDEO input...and dust on the disc can be determined by turning the equipment off your TV/DVD combo yourself. FCC warning Changes or modifications not expressly approved by one ...7.5 × 16.4 inches (54.0 × 19.0 × 41.7 cm) 12.1 lbs. (5.5 kg) Remote control Batteries (AA x 2) Component cable User Guide Quick Start Guide Legal notices FCC Part 15 This device complies with...
...Picture/sound system Audio output External input ports Power requirements Power consumption Temperature Humidity Dimensions Weight Accessories 22" NTSC, ATSC, Clear QAM ≥ 3W+3W AV input, PC input, S-VIDEO input...and dust on the disc can be determined by turning the equipment off your TV/DVD combo yourself. FCC warning Changes or modifications not expressly approved by one ...7.5 × 16.4 inches (54.0 × 19.0 × 41.7 cm) 12.1 lbs. (5.5 kg) Remote control Batteries (AA x 2) Component cable User Guide Quick Start Guide Legal notices FCC Part 15 This device complies with...


