
User Manual (English)
Page 5
... water. 6 Clean only with liquids, such as power-supply cord or plug is a Class I television to a grounding-type, three-prong outlet. 17 Remote control batteries should not be exposed to qualified service personnel. DX-L40-10A_09-0537_MAN_ENG_V1.book Page 2 Tuesday, July 28, 2009 10:07 AM 2 DX-L40-10A Important safety instructions Important safety instructions CAUTION RISK...
... water. 6 Clean only with liquids, such as power-supply cord or plug is a Class I television to a grounding-type, three-prong outlet. 17 Remote control batteries should not be exposed to qualified service personnel. DX-L40-10A_09-0537_MAN_ENG_V1.book Page 2 Tuesday, July 28, 2009 10:07 AM 2 DX-L40-10A Important safety instructions Important safety instructions CAUTION RISK...
User Manual (English)
Page 6
... Article 820 of other hazards. Article 810 of the TV. DX-L40-10A_09-0537_MAN_ENG_V1.book Page 3 Tuesday, July 28, 2009 10:07 AM Important safety instructions DX-L40-10A 3 characteristics as close to the breeze from the power outlet and refer servicing to qualified service personnel under the following... • If your area. Specifically, it states that your TV does not operate normally by following conditions: • When the power supply cord or plug is damaged or frayed. • If liquid has been spilled or objects have fallen into a warm room or if the...
... Article 820 of other hazards. Article 810 of the TV. DX-L40-10A_09-0537_MAN_ENG_V1.book Page 3 Tuesday, July 28, 2009 10:07 AM Important safety instructions DX-L40-10A 3 characteristics as close to the breeze from the power outlet and refer servicing to qualified service personnel under the following... • If your area. Specifically, it states that your TV does not operate normally by following conditions: • When the power supply cord or plug is damaged or frayed. • If liquid has been spilled or objects have fallen into a warm room or if the...
User Manual (English)
Page 7
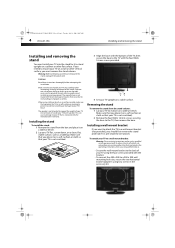
...provided with the four M6XL 16 mm screws provided. 4 Set your TV upright on a stable surface. DX-L40-10A_09-0537_MAN_ENG_V1.book Page 4 Tuesday, July 28, 2009 10:07 AM 4 DX-L40-10A Installing and removing the stand Installing and removing the stand You must install your TV into the stand for... flat, stable surface, such as an aid to assembly, make sure that occur due to support the weight of the stand, unplug the AC power cord. To attach your TV. Warning: Before attempting assembly or removal of your TV to a professional installer or service personnel. Installing a wall-mount ...
...provided with the four M6XL 16 mm screws provided. 4 Set your TV upright on a stable surface. DX-L40-10A_09-0537_MAN_ENG_V1.book Page 4 Tuesday, July 28, 2009 10:07 AM 4 DX-L40-10A Installing and removing the stand Installing and removing the stand You must install your TV into the stand for... flat, stable surface, such as an aid to assembly, make sure that occur due to support the weight of the stand, unplug the AC power cord. To attach your TV. Warning: Before attempting assembly or removal of your TV to a professional installer or service personnel. Installing a wall-mount ...

User Manual (English)
Page 8
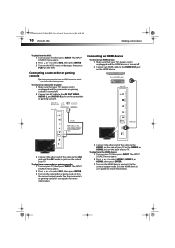
... "Connecting a component video device" on page 11. 6 AC IN Connect the AC power cord to put 6 Power/Standby Lights blue when your TV is turned on. DX-L40-10A_09-0537_MAN_ENG_V1.book Page 5 Tuesday, July 28, 2009 10:07 AM TV components DX-L40-10A 5 TV components Front and side controls 76 Back connections 1 2 3 8 4 ... to increase or decrease the volume. 4 CH / Press to go to the next or previous channel in the channel list. 5 (power) button Press to turn on your TV in standby mode. 7 Remote sensor Receives signals from the remote control. An HDMI cable carries both...
... "Connecting a component video device" on page 11. 6 AC IN Connect the AC power cord to put 6 Power/Standby Lights blue when your TV is turned on. DX-L40-10A_09-0537_MAN_ENG_V1.book Page 5 Tuesday, July 28, 2009 10:07 AM TV components DX-L40-10A 5 TV components Front and side controls 76 Back connections 1 2 3 8 4 ... to increase or decrease the volume. 4 CH / Press to go to the next or previous channel in the channel list. 5 (power) button Press to turn on your TV in standby mode. 7 Remote sensor Receives signals from the remote control. An HDMI cable carries both...

User Manual (English)
Page 11
... connect the power: • Connect the power cord to the AC in connector on the charts below, then make note of the numbered code below it using your TV for your universal remote control or set-top box manufacturer, or call the Dynex Customer Care Center at : ...shown in Step 1. If you will use a different universal remote control that came with your equipment. DX-L40-10A_09-0537_MAN_ENG_V1.book Page 8 Tuesday, July 28, 2009 10:07 AM 8 DX-L40-10A Making connections Programming a universal remote control to work with your TV. Making connections Cautions: Check the terminals...
... connect the power: • Connect the power cord to the AC in connector on the charts below, then make note of the numbered code below it using your TV for your universal remote control or set-top box manufacturer, or call the Dynex Customer Care Center at : ...shown in Step 1. If you will use a different universal remote control that came with your equipment. DX-L40-10A_09-0537_MAN_ENG_V1.book Page 8 Tuesday, July 28, 2009 10:07 AM 8 DX-L40-10A Making connections Programming a universal remote control to work with your TV. Making connections Cautions: Check the terminals...

User Manual (English)
Page 12
...the AV2 VIDEO and L and R audio jacks on the cable or satellite TV box. Likewise, if you are using an antenna with the power cord or other end of your TV. If the antenna is turned off the TV before connecting the antenna. 2 Connect one end of a coaxial ...a VCR To connect a VCR: 1 Make sure that your TV's power cord is unplugged and the VCR is not installed correctly, contact qualified service personnel to white. DX-L40-10A_09-0537_MAN_ENG_V1.book Page 9 Tuesday, July 28, 2009 10:07 AM Making connections DX-L40-10A 9 Connecting an antenna, cable TV, or satellite TV box Important:...
...the AV2 VIDEO and L and R audio jacks on the cable or satellite TV box. Likewise, if you are using an antenna with the power cord or other end of your TV. If the antenna is turned off the TV before connecting the antenna. 2 Connect one end of a coaxial ...a VCR To connect a VCR: 1 Make sure that your TV's power cord is unplugged and the VCR is not installed correctly, contact qualified service personnel to white. DX-L40-10A_09-0537_MAN_ENG_V1.book Page 9 Tuesday, July 28, 2009 10:07 AM Making connections DX-L40-10A 9 Connecting an antenna, cable TV, or satellite TV box Important:...
User Manual (English)
Page 13
... ENTER. 3 Turn on the VCR, insert a videotape, then press PLAY on the VCR. To play from the HDMI device: 1 Turn on your TV's power cord is unplugged and the HDMI device is turned off . 2 Connect an HDMI cable to the HDMI OUT jack on the HDMI device. Connecting a camcorder or... a camcorder or game: 1 Make sure that your TV, then press INPUT. DX-L40-10A_09-0537_MAN_ENG_V1.book Page 10 Tuesday, July 28, 2009 10:07 AM 10 DX-L40-10A Making connections To play from the VCR: 1 Turn on your TV's power cord is unplugged and the camcorder or gaming console is turned off . 2 Connect an...
... ENTER. 3 Turn on the VCR, insert a videotape, then press PLAY on the VCR. To play from the HDMI device: 1 Turn on your TV's power cord is unplugged and the HDMI device is turned off . 2 Connect an HDMI cable to the HDMI OUT jack on the HDMI device. Connecting a camcorder or... a camcorder or game: 1 Make sure that your TV, then press INPUT. DX-L40-10A_09-0537_MAN_ENG_V1.book Page 10 Tuesday, July 28, 2009 10:07 AM 10 DX-L40-10A Making connections To play from the VCR: 1 Turn on your TV's power cord is unplugged and the camcorder or gaming console is turned off . 2 Connect an...

User Manual (English)
Page 14
... are often color-coded to the COMPONENT OUT jacks on the back of your TV, then press INPUT. DX-L40-10A_09-0537_MAN_ENG_V1.book Page 11 Tuesday, July 28, 2009 10:07 AM Making connections DX-L40-10A 11 Connecting a component video device A component (Y, Pb, Pr) picture can be displayed only when a 480i...your TV. To connect a component video device: 1 Make sure that your TV. To play from a component device: 1 Turn on your TV's power cord is unplugged and the component video device is turned off . 2 Connect an S-Video cable to the COMP1 or COMP2 audio jacks on the component video...
... are often color-coded to the COMPONENT OUT jacks on the back of your TV, then press INPUT. DX-L40-10A_09-0537_MAN_ENG_V1.book Page 11 Tuesday, July 28, 2009 10:07 AM Making connections DX-L40-10A 11 Connecting a component video device A component (Y, Pb, Pr) picture can be displayed only when a 480i...your TV. To connect a component video device: 1 Make sure that your TV. To play from a component device: 1 Turn on your TV's power cord is unplugged and the component video device is turned off . 2 Connect an S-Video cable to the COMP1 or COMP2 audio jacks on the component video...
User Manual (English)
Page 15
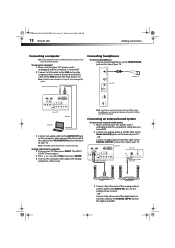
... headphones: • Connect your TV. - Connecting an external sound system To connect an external audio device: 1 Make sure that your TV's power cord is unplugged and the component video device is turned off . 2 Connect an analog audio (L and R) cable to the AUDIO IN jacks on ...7716; Digital optical (Toslink) audio cable Stereo Digital amplifier 3 Connect the other end of your TV. DX-L40-10A_09-0537_MAN_ENG_V1.book Page 12 Tuesday, July 28, 2009 10:07 AM 12 DX-L40-10A Making connections Connecting a computer Tip: Some computers have a stereo mini plug. To connect a computer: 1...
... headphones: • Connect your TV. - Connecting an external sound system To connect an external audio device: 1 Make sure that your TV's power cord is unplugged and the component video device is turned off . 2 Connect an analog audio (L and R) cable to the AUDIO IN jacks on ...7716; Digital optical (Toslink) audio cable Stereo Digital amplifier 3 Connect the other end of your TV. DX-L40-10A_09-0537_MAN_ENG_V1.book Page 12 Tuesday, July 28, 2009 10:07 AM 12 DX-L40-10A Making connections Connecting a computer Tip: Some computers have a stereo mini plug. To connect a computer: 1...

User Manual (English)
Page 16
.... 4 Press or to select Antenna or Cable, then press ENTER. Understanding the basics Turning your TV on or off (standby mode): 1 Plug the power cord into standby mode. The Tuner screen opens. Turning on your TV for the first time To configure your TV: 1 Make sure that you are using... several seconds. The INPUT SOURCE menu opens. 2 Press or to the correct output mode. DX-L40-10A_09-0537_MAN_ENG_V1.book Page 13 Tuesday, July 28, 2009 10:07 AM Turning on your TV for the first time DX-L40-10A 13 To play audio from an outside antenna to change from a digital sound system: 1 ...
.... 4 Press or to select Antenna or Cable, then press ENTER. Understanding the basics Turning your TV on or off (standby mode): 1 Plug the power cord into standby mode. The Tuner screen opens. Turning on your TV for the first time To configure your TV: 1 Make sure that you are using... several seconds. The INPUT SOURCE menu opens. 2 Press or to the correct output mode. DX-L40-10A_09-0537_MAN_ENG_V1.book Page 13 Tuesday, July 28, 2009 10:07 AM Turning on your TV for the first time DX-L40-10A 13 To play audio from an outside antenna to change from a digital sound system: 1 ...
User Manual (English)
Page 21
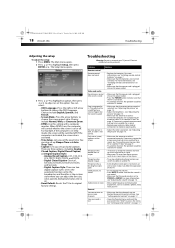
..."Adjusting the picture" on page 15. • Make sure the antenna or cable is not correct. DX-L40-10A_09-0537_MAN_ENG_V1.book Page 18 Tuesday, July 28, 2009 10:07 AM 18 DX-L40-10A Troubleshooting Adjusting the setup To adjust the setup: 1 Press MENU. You can adjust the font size, ..., see "Installing remote control batteries" on page 7. • Make sure that the power cord is plugged into an AC power outlet. • Make sure that the power cord is plugged into an AC power outlet. • Press the POWER button to Zoom. • DPMS-Use this TV. • Try increasing the volume...
..."Adjusting the picture" on page 15. • Make sure the antenna or cable is not correct. DX-L40-10A_09-0537_MAN_ENG_V1.book Page 18 Tuesday, July 28, 2009 10:07 AM 18 DX-L40-10A Troubleshooting Adjusting the setup To adjust the setup: 1 Press MENU. You can adjust the font size, ..., see "Installing remote control batteries" on page 7. • Make sure that the power cord is plugged into an AC power outlet. • Make sure that the power cord is plugged into an AC power outlet. • Press the POWER button to Zoom. • DPMS-Use this TV. • Try increasing the volume...
User Manual (English)
Page 22
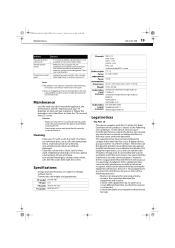
.... TV model TV type TV panel TV system DX-L40-10A LCD 40-inch TFT LCD NTSC-M, ATSC Channels Audio output Power requirement Power consumption Dimensions Weight Audio/video input terminals Audio/video...by calling DYNEX Customer Service at (800) 304-2204 (USA and Canada only). DX-L40-10A_09-0537_MAN_ENG_V1.book Page 19 Tuesday, July 28, 2009 10:07 AM Maintenance DX-L40-10A 19 Problem... these troubleshooting instructions, turn it on again. This is not a malfunction. • Unplug the power cord for help. Notes: If the problem is connected. • Consult the dealer or an experienced...
.... TV model TV type TV panel TV system DX-L40-10A LCD 40-inch TFT LCD NTSC-M, ATSC Channels Audio output Power requirement Power consumption Dimensions Weight Audio/video input terminals Audio/video...by calling DYNEX Customer Service at (800) 304-2204 (USA and Canada only). DX-L40-10A_09-0537_MAN_ENG_V1.book Page 19 Tuesday, July 28, 2009 10:07 AM Maintenance DX-L40-10A 19 Problem... these troubleshooting instructions, turn it on again. This is not a malfunction. • Unplug the power cord for help. Notes: If the problem is connected. • Consult the dealer or an experienced...


