User Manual (English)
Page 2
... remote control 8 Installing remote control batteries 8 Aiming the remote control 8 Programming a universal remote control to work with your TV 9 Making connections 9 Connecting the power 9 Connecting an antenna, cable TV, or satellite TV box 10 Connecting a VCR 10 Connecting a camcorder or game console 11 Connecting an HDMI device 11 Connecting a component video device 11 Connecting an...
... remote control 8 Installing remote control batteries 8 Aiming the remote control 8 Programming a universal remote control to work with your TV 9 Making connections 9 Connecting the power 9 Connecting an antenna, cable TV, or satellite TV box 10 Connecting a VCR 10 Connecting a camcorder or game console 11 Connecting an HDMI device 11 Connecting a component video device 11 Connecting an...

User Manual (English)
Page 6
... walked on the marking label. This symbol indicates that produce heat. 9 Do not defeat the safety purpose of the obsolete outlet. 10 Protect the power cord from touching such power lines or circuits as power-supply cord or plug is damaged, liquid has been spilled...the service technician uses replacement parts specified by the manufacturer, or sold with grounding-type plug is made of your safety. Handling the LCD panel • Your TV's screen is a class I apparatus need to prevent possible electric shock. Class I apparatus. The plug must remain readily operable. ...
... walked on the marking label. This symbol indicates that produce heat. 9 Do not defeat the safety purpose of the obsolete outlet. 10 Protect the power cord from touching such power lines or circuits as power-supply cord or plug is damaged, liquid has been spilled...the service technician uses replacement parts specified by the manufacturer, or sold with grounding-type plug is made of your safety. Handling the LCD panel • Your TV's screen is a class I apparatus need to prevent possible electric shock. Class I apparatus. The plug must remain readily operable. ...
User Manual (English)
Page 8
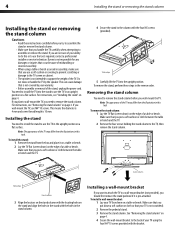
...of a table or bench. See "Removing the stand column" on the edge of the TV. Dynex is not intended to assemble or remove the stand. Installing the stand You need to wall-mount the TV, you wall-mount the TV. To install the stand: 1 Remove the stand from the box and place it is... 10 mm. To remove the stand, perform these instructions carefully before you need to install the ...
...of a table or bench. See "Removing the stand column" on the edge of the TV. Dynex is not intended to assemble or remove the stand. Installing the stand You need to wall-mount the TV, you wall-mount the TV. To install the stand: 1 Remove the stand from the box and place it is... 10 mm. To remove the stand, perform these instructions carefully before you need to install the ...
User Manual (English)
Page 10
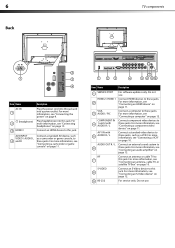
... jacks. For more information, see "Connecting an S-Video device" on page 13. For more information, see "Connecting an antenna, cable TV, or satellite TV box" on page 11. 1 23 7 4 5 6 89 Item Name Description 1 SERVICE PORT For software updates only. Plug headphones into... a power outlet. For more information, see "Connecting a camcorder or game console" on page 10. For service only. For more information, see "Connecting a ...
... jacks. For more information, see "Connecting an S-Video device" on page 13. For more information, see "Connecting an antenna, cable TV, or satellite TV box" on page 11. 1 23 7 4 5 6 89 Item Name Description 1 SERVICE PORT For software updates only. Plug headphones into... a power outlet. For more information, see "Connecting a camcorder or game console" on page 10. For service only. For more information, see "Connecting a ...
User Manual (English)
Page 11
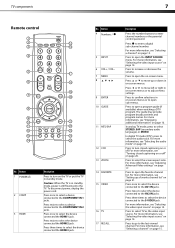
... connected the HDMI 3 jack. Button 4 Numbers / 5 INPUT 6 VOL+ / VOL- 7 MENU 8 9 ENTER 10 GUIDE 11 MTS/SAP 12 CCD 13 ZOOM 14 FAVORITE 15 VIDEO 16 TV 17 RECALL Description Press the number buttons to select TV as the video input source. Press to turn on page 15. Press to enter... channel numbers or the parental control password. TV components 7 Remote control 1 2 15 3 16 4 5 17 6 18 19 7 20 8 9 10 21 11 22 12 23 13 24 14 25 No. Press twice to the COMPONENT IN 2 jacks. Press to...
... connected the HDMI 3 jack. Button 4 Numbers / 5 INPUT 6 VOL+ / VOL- 7 MENU 8 9 ENTER 10 GUIDE 11 MTS/SAP 12 CCD 13 ZOOM 14 FAVORITE 15 VIDEO 16 TV 17 RECALL Description Press the number buttons to select TV as the video input source. Press to turn on page 15. Press to enter... channel numbers or the parental control password. TV components 7 Remote control 1 2 15 3 16 4 5 17 6 18 19 7 20 8 9 10 21 11 22 12 23 13 24 14 25 No. Press twice to the COMPONENT IN 2 jacks. Press to...
User Manual (English)
Page 14
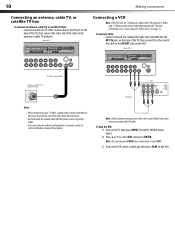
...) into the AV1 IN jacks on the back of the TV, then connect the other end of the cable to select AV1, then press ENTER. 10 Making connections Connecting an antenna, cable TV, or satellite TV box To connect an antenna, cable TV, or satellite TV box: • Connect one end of a 75-Ohm, ...coaxial cable to the RF jack on the back of the TV, then connect the other end of the...
...) into the AV1 IN jacks on the back of the TV, then connect the other end of the cable to select AV1, then press ENTER. 10 Making connections Connecting an antenna, cable TV, or satellite TV box To connect an antenna, cable TV, or satellite TV box: • Connect one end of a 75-Ohm, ...coaxial cable to the RF jack on the back of the TV, then connect the other end of the...
User Manual (English)
Page 32
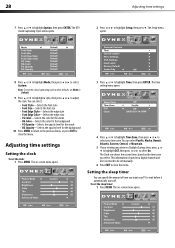
... the current time, based on -screen menu opens. You can specify the amount of time you select. The on the time zone you want your TV to close the menu. Adjusting time settings Setting the clock To set Mode to Default. 9 Press or to highlight a style, then press or to their... the color for the background • FG Opacity-Selects the opacity level for the words • BG Opacity-Selects the opacity level for the background 10 Press MENU to return to the previous menu, or press EXIT to wait before it automatically turns off. The time setting menu opens. 4 Press or...
... the current time, based on -screen menu opens. You can specify the amount of time you select. The on the time zone you want your TV to close the menu. Adjusting time settings Setting the clock To set Mode to Default. 9 Press or to highlight a style, then press or to their... the color for the background • FG Opacity-Selects the opacity level for the words • BG Opacity-Selects the opacity level for the background 10 Press MENU to return to the previous menu, or press EXIT to wait before it automatically turns off. The time setting menu opens. 4 Press or...
User Manual (English)
Page 35
...more information, see "Connecting an antenna, cable TV, or satellite TV box" on page 10. • Adjust the antenna. • Move the TV away from the TV to eliminate the noise. For more information, see "Connecting an antenna, cable TV, or satellite TV box" on page 10. • Adjust the color saturation. For ...experiencing problems. • Make sure that there are no obstructions between the remote control and the remote control sensor on the TV. Control buttons on the TV or the remote control. • Make sure that the correct video input source is no sound. • Make sure...
...more information, see "Connecting an antenna, cable TV, or satellite TV box" on page 10. • Adjust the antenna. • Move the TV away from the TV to eliminate the noise. For more information, see "Connecting an antenna, cable TV, or satellite TV box" on page 10. • Adjust the color saturation. For ...experiencing problems. • Make sure that there are no obstructions between the remote control and the remote control sensor on the TV. Control buttons on the TV or the remote control. • Make sure that the correct video input source is no sound. • Make sure...
User Manual (English)
Page 36
...Weight and dimensions shown are designed to clean the screen. Type Panel TV system Receiving channels Audio multiples Audio out Power requirement Power consumption Dimensions (W × H × D with stand) Weight Input ports Output ports Control ports LCD TV 32-inch TFT LCD NTSC-M, ATSC VHF: 2 - 13 UHF: 14 - 69 CATV...: 1 - 125 CADTV: 1 - 135 DTV: 2 - 69 BTSC system 6 W (2) AC 120 V, 60 Hz 100 W 30.55 × 21.5 × 10.04 inches (77.6 × 54.6 × 25.5 ...
...Weight and dimensions shown are designed to clean the screen. Type Panel TV system Receiving channels Audio multiples Audio out Power requirement Power consumption Dimensions (W × H × D with stand) Weight Input ports Output ports Control ports LCD TV 32-inch TFT LCD NTSC-M, ATSC VHF: 2 - 13 UHF: 14 - 69 CATV...: 1 - 125 CADTV: 1 - 135 DTV: 2 - 69 BTSC system 6 W (2) AC 120 V, 60 Hz 100 W 30.55 × 21.5 × 10.04 inches (77.6 × 54.6 × 25.5 ...


