User Manual (English)
Page 6
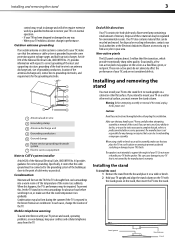
...complete this , let the TV stand in its normal operation. • If your TV has been dropped or damaged in your TV's finish. Stand groove Stand column Stand Article 810 of the National Electrical Code, ANSI/NFPA No. 70, provides information with your TV picture and sound, operating problems... sure that the room temperature rises gradually. Installing and removing the stand You must remove the stand column. Non-active pixels The LCD panel contains almost 3 million thin film transistors, which provide exceptionally sharp video quality. These non-active pixels do this, or to...
...complete this , let the TV stand in its normal operation. • If your TV has been dropped or damaged in your TV's finish. Stand groove Stand column Stand Article 810 of the National Electrical Code, ANSI/NFPA No. 70, provides information with your TV picture and sound, operating problems... sure that the room temperature rises gradually. Installing and removing the stand You must remove the stand column. Non-active pixels The LCD panel contains almost 3 million thin film transistors, which provide exceptionally sharp video quality. These non-active pixels do this, or to...
User Manual (English)
Page 10
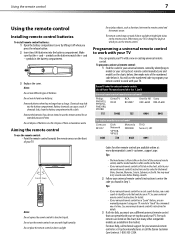
...or Zenith. You may need to "teach" the commands one at 1-800-305-2204. Tips: • If your TV remote to try codes for your TV. For more help, call the Dynex Customer Care Center at a time. Do not use a different universal remote control that can manually program it using your...Do not place the remote control in the battery compartment. 3 Replace the cover. Dynex TV codes for universal remote controls (for all else fails, you do not intend to use the numbered code to enter the code you press the release button. 2 Insert two AAA batteries into the battery compartment. ...
...or Zenith. You may need to "teach" the commands one at 1-800-305-2204. Tips: • If your TV remote to try codes for your TV. For more help, call the Dynex Customer Care Center at a time. Do not use a different universal remote control that can manually program it using your...Do not place the remote control in the battery compartment. 3 Replace the cover. Dynex TV codes for universal remote controls (for all else fails, you do not intend to use the numbered code to enter the code you press the release button. 2 Insert two AAA batteries into the battery compartment. ...

User Manual (English)
Page 11
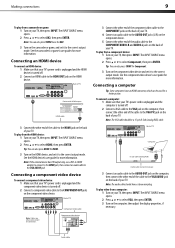
... end of the cable to the AV2 IN VIDEO, AUDIO-L, and AUDIO-R jacks on the side of TV Camcorder or game Note: Cables are often color-coded to the RF jack on the back of your TV, then press INPUT. Back of VCR AV cable S-Video cable 3 Connect the other end of the...: 1 Make sure that all connections are tight and secure. 8 Making connections Making connections Cautions: Check the terminals for an extended period of TV AV1 IN AUDI-L and AUDIO-R jacks AV1 IN VIDEO Note: Cables are often color-coded to the RF OUT jack on the antenna or on the cable or satellite...
... end of the cable to the AV2 IN VIDEO, AUDIO-L, and AUDIO-R jacks on the side of TV Camcorder or game Note: Cables are often color-coded to the RF jack on the back of your TV, then press INPUT. Back of VCR AV cable S-Video cable 3 Connect the other end of the...: 1 Make sure that all connections are tight and secure. 8 Making connections Making connections Cautions: Check the terminals for an extended period of TV AV1 IN AUDI-L and AUDIO-R jacks AV1 IN VIDEO Note: Cables are often color-coded to the RF OUT jack on the antenna or on the cable or satellite...
User Manual (English)
Page 12
...the computer, then adjust the display properties, if necessary. Tip: You can be a 15-pin D-Sub (analog RGB) cable. Back of TV Computer D-Sub cable (analog RGB) Audio cable (stereo mini plugs) 3 Connect an audio...Connect the other end of the component video cable to the COMPONENT jacks on the back of your TV. 4 Connect an audio cable to the AUDIO OUT jacks (L/R) on the component device. 5 Connect ...the other end of the cable to the VGA AUDIO jack on the back of TV Note: Cables are often color-coded to select AV2, then press ENTER. See the component video device's user guide for ...
...the computer, then adjust the display properties, if necessary. Tip: You can be a 15-pin D-Sub (analog RGB) cable. Back of TV Computer D-Sub cable (analog RGB) Audio cable (stereo mini plugs) 3 Connect an audio...Connect the other end of the component video cable to the COMPONENT jacks on the back of your TV. 4 Connect an audio cable to the AUDIO OUT jacks (L/R) on the component device. 5 Connect ...the other end of the cable to the VGA AUDIO jack on the back of TV Note: Cables are often color-coded to select AV2, then press ENTER. See the component video device's user guide for ...


