User Guide
Page 2
No part of this document or the software may be reproduced or transmitted in the US and other trademarks are registered marks in any form or by any means or translated into another language without the prior written consent of their respective holders. All rights reserved. All other countries. Copyright © 2011 Sanford, L.P. Trademarks DYMO and RHINO are the property of Sanford, L.P.
No part of this document or the software may be reproduced or transmitted in the US and other trademarks are registered marks in any form or by any means or translated into another language without the prior written consent of their respective holders. All rights reserved. All other countries. Copyright © 2011 Sanford, L.P. Trademarks DYMO and RHINO are the property of Sanford, L.P.

User Guide
Page 3
...Printer 7 Power 7 LCD Display 7 Using the Backlight 7 Adjusting the Display Contrast 7 Caption Bar 7 CAPS Mode 7 ALT Key 8 Escape Key 8 Navigation Keys 8 Backspace Key 8 Clear Key 8 Cutter Button 8 Hot Keys 8 Working with Labels 8 Creating a Label 8 Adding a Label 8 Removing a Label 8 Printing Labels 9 Formatting a Label 9 Changing the Text Size 9 Changing the Text Style 9 Rotating Text 9 Aligning Text 9 Creating Multi-Line Labels 9 Using International Characters 10 Creating Industrial Labels 10 Creating Fixed Length Labels 10 Creating Wire/Cable Labels 10 Creating...
...Printer 7 Power 7 LCD Display 7 Using the Backlight 7 Adjusting the Display Contrast 7 Caption Bar 7 CAPS Mode 7 ALT Key 8 Escape Key 8 Navigation Keys 8 Backspace Key 8 Clear Key 8 Cutter Button 8 Hot Keys 8 Working with Labels 8 Creating a Label 8 Adding a Label 8 Removing a Label 8 Printing Labels 9 Formatting a Label 9 Changing the Text Size 9 Changing the Text Style 9 Rotating Text 9 Aligning Text 9 Creating Multi-Line Labels 9 Using International Characters 10 Creating Industrial Labels 10 Creating Fixed Length Labels 10 Creating Wire/Cable Labels 10 Creating...
User Guide
Page 4
... Recalling Labels 14 Deleting Labels 14 Using the Favorites Key 14 Adding an Item to the Favorites List 14 Inserting Items from the Favorites List 14 Deleting Items from the Favorites list 14 Printing Options 14 Printing Multiple Copies 14 Collating Multiple Copies 14 Printing Separator Lines between Cells 15 Pausing Between Labels 15 Advancing the Label 15 Adjusting the Print Contrast 15 Cleaning Your Printer...
... Recalling Labels 14 Deleting Labels 14 Using the Favorites Key 14 Adding an Item to the Favorites List 14 Inserting Items from the Favorites List 14 Deleting Items from the Favorites list 14 Printing Options 14 Printing Multiple Copies 14 Collating Multiple Copies 14 Printing Separator Lines between Cells 15 Pausing Between Labels 15 Advancing the Label 15 Adjusting the Print Contrast 15 Cleaning Your Printer...
User Guide
Page 5
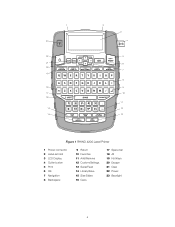
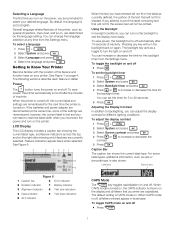
1 23 22 21 20 19 18 17 16 15 14 2 3 4 5 6 7 8 9 10 11 12 13 Figure 1 RHINO 4200 Label Printer 1 Power connector 2 Label exit slot 3 LCD Display 4 Cutter button 5 Print 6 OK 7 Navigation 8 Backspace 9 Return 10 Favorites 11 Add/Remove 12 Custom/Settings 13 Serial/Feed 14 Library/Save 15 Size/Styles 16 Caps 17 Space bar 18 Alt 19 Hot Keys 20 Escape 21 Clear 22 Power 23 Backlight 4
1 23 22 21 20 19 18 17 16 15 14 2 3 4 5 6 7 8 9 10 11 12 13 Figure 1 RHINO 4200 Label Printer 1 Power connector 2 Label exit slot 3 LCD Display 4 Cutter button 5 Print 6 OK 7 Navigation 8 Backspace 9 Return 10 Favorites 11 Add/Remove 12 Custom/Settings 13 Serial/Feed 14 Library/Save 15 Size/Styles 16 Caps 17 Space bar 18 Alt 19 Hot Keys 20 Escape 21 Clear 22 Power 23 Backlight 4

User Guide
Page 6
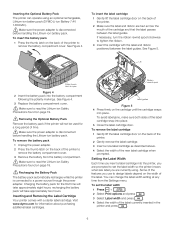
... label printer online. RHINO label cartridges are also available in this section to remove the battery compartment cover. During the registration process, you can operate using batteries or AC power. Getting Started Follow the instructions in a wide range of 1/4", 3/8", 1/2", or 3/4". Inserting the Batteries The printer can create a wide variety of the power adapter into a power outlet. 5 To insert the batteries 1 Press the thumb latch on the full line of time. See Figure 2. 3 Replace the battery...
... label printer online. RHINO label cartridges are also available in this section to remove the battery compartment cover. During the registration process, you can operate using batteries or AC power. Getting Started Follow the instructions in a wide range of 1/4", 3/8", 1/2", or 3/4". Inserting the Batteries The printer can create a wide variety of the power adapter into a power outlet. 5 To insert the batteries 1 Press the thumb latch on the full line of time. See Figure 2. 3 Replace the battery...
User Guide
Page 7
... markings. To remove the label cartridge 1 Gently lift the label cartridge door on the back of the new label cartridge when prompted. Make sure to remove the battery compartment cover. 3 Remove the battery from the Settings menu. Inserting the Optional Battery Pack The printer can change the label width setting at any time from the battery compartment. Make sure the power adapter is disconnected before handling the Lithium-ion battery pack. Ribbon rewind spool Label guides Figure 5 4 Press...
... markings. To remove the label cartridge 1 Gently lift the label cartridge door on the back of the new label cartridge when prompted. Make sure to remove the battery compartment cover. 3 Remove the battery from the Settings menu. Inserting the Optional Battery Pack The printer can change the label width setting at any time from the battery compartment. Make sure the power adapter is disconnected before handling the Lithium-ion battery pack. Ribbon rewind spool Label guides Figure 5 4 Press...
User Guide
Page 8
... the text that will need to reset the label width when you reconnect the power and turn on the printer. If the batteries and power adapter are disconnected at any key will turn the backlight back on again. Using the Backlight In low light conditions, you can adjust the display contrast for the next time the printer is shaded. The backlight key acts as size or barcode type...
... the text that will need to reset the label width when you reconnect the power and turn on the printer. If the batteries and power adapter are disconnected at any key will turn the backlight back on again. Using the Backlight In low light conditions, you can adjust the display contrast for the next time the printer is shaded. The backlight key acts as size or barcode type...

User Guide
Page 9
... display to the left in the display. Backspace Key The key deletes the character to the General label type. A new blank label is used to the current label or automatically using the keypad. 3 Format the text size and style. The selected labels are available for information about using serialization. For example, when you can move from the display. 8 Hot Keys A number of labels, adding barcodes, and formatting text. Adding a Label You can remove a label from a menu without making a selection...
... display to the left in the display. Backspace Key The key deletes the character to the General label type. A new blank label is used to the current label or automatically using the keypad. 3 Format the text size and style. The selected labels are available for information about using serialization. For example, when you can move from the display. 8 Hot Keys A number of labels, adding barcodes, and formatting text. Adding a Label You can remove a label from a menu without making a selection...
User Guide
Page 10
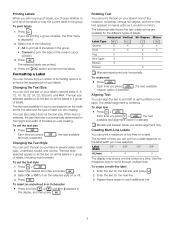
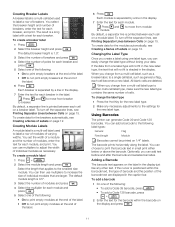
... or Off to turn the selected style on your label in the group. • Current to print the label at a time. To set the text size Press . Degree Mirror Label Type General X X X X Fixed X X X X Flag X X Wire/Cable X X Module X Breaker X Barcode labels print only horizontally. To align text Press + . Use the navigation keys to scroll through multiple lines. Each time you press text size is selected. Aligning Text You can print the text on or off...
... or Off to turn the selected style on your label in the group. • Current to print the label at a time. To set the text size Press . Degree Mirror Label Type General X X X X Fixed X X X X Flag X X Wire/Cable X X Module X Breaker X Barcode labels print only horizontally. To align text Press + . Use the navigation keys to scroll through multiple lines. Each time you press text size is selected. Aligning Text You can print the text on or off...
User Guide
Page 11
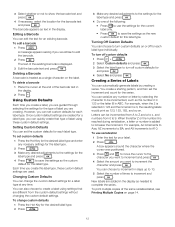
Any change you make a label for the flag portion automatically determined by the amount of text. 4 Press . Creating Wire/Cable Labels A wire/cable label is selected as the language and you hold down a letter key will display all the variations available. Creating Flag Labels A flag label wraps around the cable. Using International Characters The printer supports the extended Latin character set the label length 1 Press + . 2 Select the length of the label and press . For example, if French is placed around a wire...
Any change you make a label for the flag portion automatically determined by the amount of text. 4 Press . Creating Wire/Cable Labels A wire/cable label is selected as the language and you hold down a letter key will display all the variations available. Creating Flag Labels A flag label wraps around the cable. Using International Characters The printer supports the extended Latin character set the label length 1 Press + . 2 Select the length of the label and press . For example, if French is placed around a wire...
User Guide
Page 12
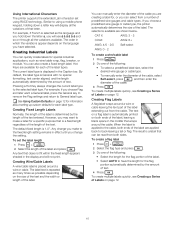
... new label type. 2 Make any other text. To create data for each cell on page 15. The default module length is 0.5". 3 Select the number of modules and press . 4 Select the multiplier for the barcode within the barcode text, the type of barcode and the position of the barcode text are displayed in the display just like any necessary adjustments to the settings for the modules automatically, see Printing Separator Lines between each breaker, and print. You can use...
... new label type. 2 Make any other text. To create data for each cell on page 15. The default module length is 0.5". 3 Select the number of modules and press . 4 Select the multiplier for the barcode within the barcode text, the type of barcode and the position of the barcode text are displayed in the display just like any necessary adjustments to the settings for the modules automatically, see Printing Separator Lines between each breaker, and print. You can use...
User Guide
Page 13
... character and press . You can choose to increment in 123 and the increment is displayed. 3 Edit the barcode text and press . Deleting a Barcode A barcode is added to increase the increment. Setting Custom Defaults You can change custom defaults 1 Press the Hot Key for the desired label type. 2 Press . 3 Make any number or letter by creating a series. Each time you are used. To turn off custom defaults 1 Press + . 2 Select Custom defaults and press . 3 Select...
... character and press . You can choose to increment in 123 and the increment is displayed. 3 Edit the barcode text and press . Deleting a Barcode A barcode is added to increase the increment. Setting Custom Defaults You can change custom defaults 1 Press the Hot Key for the desired label type. 2 Press . 3 Make any number or letter by creating a series. Each time you are used. To turn off custom defaults 1 Press + . 2 Select Custom defaults and press . 3 Select...
User Guide
Page 14
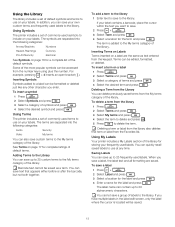
... save text that term or label from the library also deletes that appears either before or after the barcode, but not both together. Inserting Symbols Symbols added to 20 alphanumeric characters. See Terms on your labels. Using Terms The printer includes a set of the library for a complete list of the library. You cannot save . 2 Press + . 3 Select Term and press . 4 Select a location...
... save text that term or label from the library also deletes that appears either before or after the barcode, but not both together. Inserting Symbols Symbols added to 20 alphanumeric characters. See Terms on your labels. Using Terms The printer includes a set of the library for a complete list of the library. You cannot save . 2 Press + . 3 Select Term and press . 4 Select a location...
User Guide
Page 15
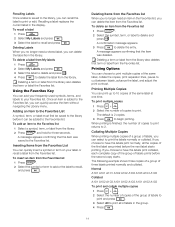
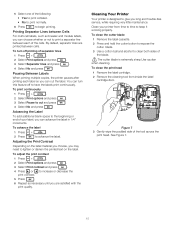
... an item in the display. Printing Options You can choose to print multiple copies of the same label, collate the copies, print separator lines, pause to 10 copies of the same label at one time. Printing Multiple Copies You can print up to cut between labels, advance the label, and adjust the print contrast. When printing is finished, the number of labels, you can select to print or edit. If you...
... an item in the display. Printing Options You can choose to print multiple copies of the same label, collate the copies, print separator lines, pause to 10 copies of the same label at one time. Printing Multiple Copies You can print up to cut between labels, advance the label, and adjust the print contrast. When printing is finished, the number of labels, you can select to print or edit. If you...
User Guide
Page 16
... the label cartridge door. to keep it working properly. Cleaning Your Printer Your printer is extremely sharp.Use caution when cleaning. The cutter blade is designed to cut the label. Figure 7 3 Gently wipe the padded side of the tool across the print head. To print continuously 1 Press + . 2 Select Print options and press . 3 Select Pause to give you long and trouble-free service, while requiring very little maintenance. To clean the cutter blade 1 Remove the label cassette. 2 Press...
... the label cartridge door. to keep it working properly. Cleaning Your Printer Your printer is extremely sharp.Use caution when cleaning. The cutter blade is designed to cut the label. Figure 7 3 Gently wipe the padded side of the tool across the print head. To print continuously 1 Press + . 2 Select Print options and press . 3 Select Pause to give you long and trouble-free service, while requiring very little maintenance. To clean the cutter blade 1 Remove the label cassette. 2 Press...

User Guide
Page 17
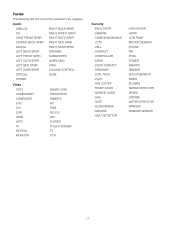
Symbols The following tables show the commonly used symbols by category. Arrows and Brackets Currency ()[ ] { } Hazard and Warning Pro AV and Security $ ¢£¥ € Electrical Numbers 16
Symbols The following tables show the commonly used symbols by category. Arrows and Brackets Currency ()[ ] { } Hazard and Warning Pro AV and Security $ ¢£¥ € Electrical Numbers 16
User Guide
Page 18
...lists the commonly used terms by category. Audio ANALOG RIGHT BACK SPKR CD RIGHT FRONT SPKR CENT FRONT SPKR RIGHT OUTD SPKR CENTER BACK SPKR RIGHT SIDE SPKR DIGITAL RIGHT SURR SPKR LEFT BACK SPKR SPEAKER LEFT FRONT SPKR SUBWOOFER LEFT OUTD SPKR SURROUND LEFT SIDE SPKR TAPE LEFT SURR SPKR VOLUME...DOOR CONTACT DRIVEWAY DUAL TECH DUCT FAN CUTOFF FRONT DOOR GARAGE DOOR GAS GATE GLASS BREAK GROUND HEAT DETECTOR HIGH WATER HORN LOW TEMP MOTION SENSOR PHONE PIR POOL POWER REMOTE SENSOR SHOCK SENSOR SIREN SLIDERS SMOKE DETECTOR SPARE STROBE WATER DETECTOR WINDOW WINDOW SENSOR 17
...lists the commonly used terms by category. Audio ANALOG RIGHT BACK SPKR CD RIGHT FRONT SPKR CENT FRONT SPKR RIGHT OUTD SPKR CENTER BACK SPKR RIGHT SIDE SPKR DIGITAL RIGHT SURR SPKR LEFT BACK SPKR SPEAKER LEFT FRONT SPKR SUBWOOFER LEFT OUTD SPKR SURROUND LEFT SIDE SPKR TAPE LEFT SURR SPKR VOLUME...DOOR CONTACT DRIVEWAY DUAL TECH DUCT FAN CUTOFF FRONT DOOR GARAGE DOOR GAS GATE GLASS BREAK GROUND HEAT DETECTOR HIGH WATER HORN LOW TEMP MOTION SENSOR PHONE PIR POOL POWER REMOTE SENSOR SHOCK SENSOR SIREN SLIDERS SMOKE DETECTOR SPARE STROBE WATER DETECTOR WINDOW WINDOW SENSOR 17

User Guide
Page 19
... label cartridge. Troubleshooting Review the following possible solutions if you need further assistance, visit the DYMO Web site at www.dymo.com. 18 See Adjusting the Print Contrast. Check battery level; Nothing shows in the display Ensure the printer is too light to -peel split back. 1 Locate the split on . Insert new batteries, charge battery pack, or plug in place. No label found No cartridge is inserted properly. Display text is turned...
... label cartridge. Troubleshooting Review the following possible solutions if you need further assistance, visit the DYMO Web site at www.dymo.com. 18 See Adjusting the Print Contrast. Check battery level; Nothing shows in the display Ensure the printer is too light to -peel split back. 1 Locate the split on . Insert new batteries, charge battery pack, or plug in place. No label found No cartridge is inserted properly. Display text is turned...
User Guide
Page 20
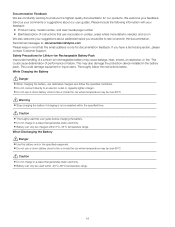
... with your feedback: Product name, model number, and User Guide page number Brief description of a Lithium-ion rechargeable battery may also damage the protection device installed in a place that are constantly working to produce the highest quality documentation for documentation feedback. Safety Precautions for Lithium-Ion Rechargeable Battery Pack Inaccurate handling of instructions that generates static electricity. ...
... with your feedback: Product name, model number, and User Guide page number Brief description of a Lithium-ion rechargeable battery may also damage the protection device installed in a place that are constantly working to produce the highest quality documentation for documentation feedback. Safety Precautions for Lithium-Ion Rechargeable Battery Pack Inaccurate handling of instructions that generates static electricity. ...

User Guide
Page 21
... A1:2001 + A2 :2003 UL/UCL 60950-1; Environmental Information The equipment that are hazardous to conform with the following international standards: Applied Tests or Technical Standards for R4200 printer: Emission: EN55022 (2006) EN 61000-3-2 (2000) + am 14 (2000) EN 61000-3-3 (1995) + am...Battery Pack: UL2054 EN61000-6-1 EN61000-6-3 Applied Tests or Technical Standards for DYMO AC/DC power supply: CISPR 13: 2001 + A1:2003; EN55020:2002 + A1:2003 EN 61000-3-2 :2000 + A2:2005 EN 61000-3-3 :1995 + A1:2001 CISPR 22: 1997 + A1:2000 + A2 :2002 Class B; It may contain substances that you to use...
... A1:2001 + A2 :2003 UL/UCL 60950-1; Environmental Information The equipment that are hazardous to conform with the following international standards: Applied Tests or Technical Standards for R4200 printer: Emission: EN55022 (2006) EN 61000-3-2 (2000) + am 14 (2000) EN 61000-3-3 (1995) + am...Battery Pack: UL2054 EN61000-6-1 EN61000-6-3 Applied Tests or Technical Standards for DYMO AC/DC power supply: CISPR 13: 2001 + A1:2003; EN55020:2002 + A1:2003 EN 61000-3-2 :2000 + A2:2005 EN 61000-3-3 :1995 + A1:2001 CISPR 22: 1997 + A1:2000 + A2 :2002 Class B; It may contain substances that you to use...


