User Guide
Page 4
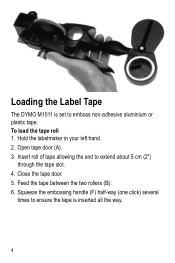
Feed the tape between the two rollers (B). 6. Open tape door (A). 3. Hold the labelmaker in your left hand. 2. Close the tape door. 5. Insert roll of tape allowing the end to emboss non-adhesive aluminium or plastic tape. Loading the Label Tape The DYMO M1011 is inserted all the way. 4 Squeeze the embossing handle (F) half-way (one click) several times to ensure the tape is set to extend about 5 cm (2") through the tape slot. 4. To load the tape roll 1.
Feed the tape between the two rollers (B). 6. Open tape door (A). 3. Hold the labelmaker in your left hand. 2. Close the tape door. 5. Insert roll of tape allowing the end to emboss non-adhesive aluminium or plastic tape. Loading the Label Tape The DYMO M1011 is inserted all the way. 4 Squeeze the embossing handle (F) half-way (one click) several times to ensure the tape is set to extend about 5 cm (2") through the tape slot. 4. To load the tape roll 1.
User Guide
Page 12
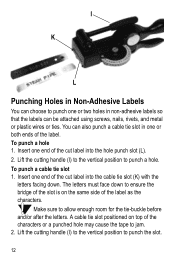
...facing down to punch one or two holes in one end of the characters or a punched hole may cause the tape to allow enough room for the tie-buckle before and/or after the letters. Lift the cutting handle (I ) ...to the vertical position to punch a hole. Make sure to jam. 2. Insert one or both ends of the label as the characters. The letters must face down . To punch a cable tie slot 1.... Holes in Non-Adhesive Labels You can be attached using screws, nails, rivets, and metal or plastic wires or ties. To punch a hole 1.
...facing down to punch one or two holes in one end of the characters or a punched hole may cause the tape to allow enough room for the tie-buckle before and/or after the letters. Lift the cutting handle (I ) ...to the vertical position to punch a hole. Make sure to jam. 2. Insert one or both ends of the label as the characters. The letters must face down . To punch a cable tie slot 1.... Holes in Non-Adhesive Labels You can be attached using screws, nails, rivets, and metal or plastic wires or ties. To punch a hole 1.

User Guide
Page 13
Unscrew the screw in the center and tighten. Insert the screw in the center of the embossing wheel (G) and remove the wheel. 3. Do not tighten the screw too tightly. 13 Position the new wheel. 4. G Changing the Wheel You can replace the character wheel with a Reverse Image Wheel. To change the wheel 1. Remove the label tape. 2.
Unscrew the screw in the center and tighten. Insert the screw in the center of the embossing wheel (G) and remove the wheel. 3. Do not tighten the screw too tightly. 13 Position the new wheel. 4. G Changing the Wheel You can replace the character wheel with a Reverse Image Wheel. To change the wheel 1. Remove the label tape. 2.


