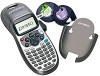

User Guide 1
Page 2
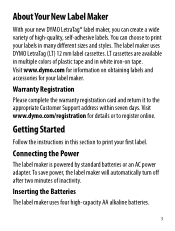
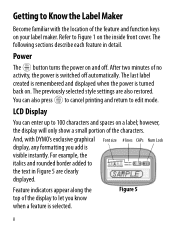
LetraTag User Guide Settings Power Insert Cancel Memory Save Memory Recall Label Exit LCD Display Cutter Print Format OK Navigation Num Lock CAPs Clear Space Bar Backspace Power Connector Figure 1 DYMO LetraTag Label Maker 2
LetraTag User Guide Settings Power Insert Cancel Memory Save Memory Recall Label Exit LCD Display Cutter Print Format OK Navigation Num Lock CAPs Clear Space Bar Backspace Power Connector Figure 1 DYMO LetraTag Label Maker 2
User Guide 1
Page 3
... the instructions in this section to print your new DYMO LetraTag® label maker, you can choose to the appropriate Customer Support address within seven days. LT cassettes are available in multiple colors of plastic tape and in many different sizes and styles. Visit www.dymo.com/registration for your labels in white iron-on obtaining labels and accessories for details or to register online. Inserting the Batteries The label maker uses four high-capacity...
... the instructions in this section to print your new DYMO LetraTag® label maker, you can choose to the appropriate Customer Support address within seven days. LT cassettes are available in multiple colors of plastic tape and in many different sizes and styles. Visit www.dymo.com/registration for your labels in white iron-on obtaining labels and accessories for details or to register online. Inserting the Batteries The label maker uses four high-capacity...
User Guide 1
Page 4
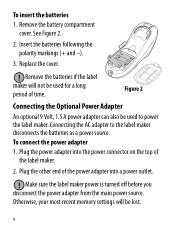
... label maker. 2. To insert the batteries 1. Remove the battery compartment cover. Insert the batteries following the polarity markings (+ and -). 3. Otherwise, your most recent memory settings will not be used to the label maker disconnects the batteries as a power source. Remove the batteries if the label maker will be used for a long period of time. See Figure 2. 2. Connecting the AC adapter to power the label maker. Make sure the label maker power is turned off before you disconnect the power adapter...
... label maker. 2. To insert the batteries 1. Remove the battery compartment cover. Insert the batteries following the polarity markings (+ and -). 3. Otherwise, your most recent memory settings will not be used to the label maker disconnects the batteries as a power source. Remove the batteries if the label maker will be used for a long period of time. See Figure 2. 2. Connecting the AC adapter to power the label maker. Make sure the label maker power is turned off before you disconnect the power adapter...
User Guide 1
Page 5
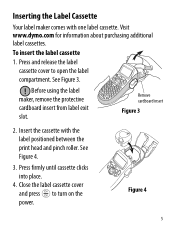
... release the label cassette cover to turn on the power. Insert the cassette with one label cassette. See Figure 3. ! Press firmly until cassette clicks into place. 4. Inserting the Label Cassette Your label maker comes with the label positioned between the print head and pinch roller. Remove cardboard insert Figure 3 2. To insert the label cassette 1. Figure 4 5 Before using the label maker, remove the protective cardboard insert from label exit slot. Visit www.dymo.com for information about purchasing additional label cassettes. See Figure...
... release the label cassette cover to turn on the power. Insert the cassette with one label cassette. See Figure 3. ! Press firmly until cassette clicks into place. 4. Inserting the Label Cassette Your label maker comes with the label positioned between the print head and pinch roller. Remove cardboard insert Figure 3 2. To insert the label cassette 1. Figure 4 5 Before using the label maker, remove the protective cardboard insert from label exit slot. Visit www.dymo.com for information about purchasing additional label cassettes. See Figure...
User Guide 1
Page 6
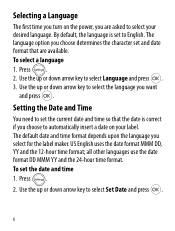
...-hour time format. The language option you select for the label maker. The default date and time format depends upon the language you choose determines the character set and date format that the date is set the date and time 1. Selecting a Language The first time you turn on your desired language. Use the up or down arrow key to select your label. Setting the Date and Time...
...-hour time format. The language option you select for the label maker. The default date and time format depends upon the language you choose determines the character set and date format that the date is set the date and time 1. Selecting a Language The first time you turn on your desired language. Use the up or down arrow key to select your label. Setting the Date and Time...
User Guide 1
Page 7
Press the cutter button to learn more about the options available for creating labels. 7 Use the left or right arrow key to move the cursor over each setting (hours and minutes) and use the up or down arrow keys to print your first label. Printing Your First Label You are now ready to increase or decrease the value. 4. To print a label 1. Congratulations! Press PRINT. 3. You printed your first...
Press the cutter button to learn more about the options available for creating labels. 7 Use the left or right arrow key to move the cursor over each setting (hours and minutes) and use the up or down arrow keys to print your first label. Printing Your First Label You are now ready to increase or decrease the value. 4. To print a label 1. Congratulations! Press PRINT. 3. You printed your first...
User Guide 1
Page 8
... button turns the power on the inside front cover. After two minutes of the feature and function keys on a label; For example, the italics and rounded border added to the text in detail. LCD Display You can also press to cancel printing and return to edit mode. You can enter up to 100 characters and spaces on your label maker. The previously selected...
... button turns the power on the inside front cover. After two minutes of the feature and function keys on a label; For example, the italics and rounded border added to the text in detail. LCD Display You can also press to cancel printing and return to edit mode. You can enter up to 100 characters and spaces on your label maker. The previously selected...
User Guide 1
Page 9
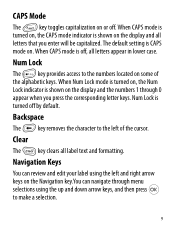
... menu selections using the left of the alphabetic keys. When Num Lock mode is turned on, the Num Lock indicator is shown on the display and all letters that you press the corresponding letter keys. Num Lock is off, all label text and formatting. When CAPS mode is turned off . Backspace The key removes the character to the numbers located on some of the cursor. Clear...
... menu selections using the left of the alphabetic keys. When Num Lock mode is turned on, the Num Lock indicator is shown on the display and all letters that you press the corresponding letter keys. Num Lock is off, all label text and formatting. When CAPS mode is turned off . Backspace The key removes the character to the numbers located on some of the cursor. Clear...
User Guide 1
Page 10
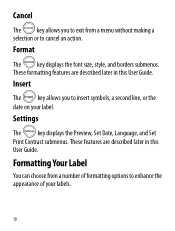
... in this User Guide. Settings The key displays the Preview, Set Date, Language, and Set Print Contrast submenus. Insert The key allows you to exit from a number of formatting options to enhance the appearance of your label. Cancel The key allows you to insert symbols, a second line, or the date on your labels. 10 Formatting Your Label You can choose from a menu without making a selection or to...
... in this User Guide. Settings The key displays the Preview, Set Date, Language, and Set Print Contrast submenus. Insert The key allows you to exit from a number of formatting options to enhance the appearance of your label. Cancel The key allows you to insert symbols, a second line, or the date on your labels. 10 Formatting Your Label You can choose from a menu without making a selection or to...
User Guide 1
Page 11
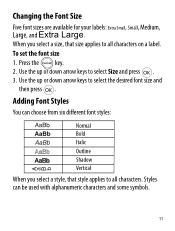
... Vertical When you select a size, that style applies to select Size and press . 3. When you select a style, that size applies to select the desired font size and then press . Press the key. 2. Use the up or down arrow keys to all characters. Adding Font Styles You can be used with alphanumeric characters and some symbols. 11 Changing the Font Size Five font sizes are available for your labels: Extra Small, Small, Medium, Large, and Extra Large. To set...
... Vertical When you select a size, that style applies to select Size and press . 3. When you select a style, that size applies to select the desired font size and then press . Press the key. 2. Use the up or down arrow keys to all characters. Adding Font Styles You can be used with alphanumeric characters and some symbols. 11 Changing the Font Size Five font sizes are available for your labels: Extra Small, Small, Medium, Large, and Extra Large. To set...
User Guide 1
Page 12
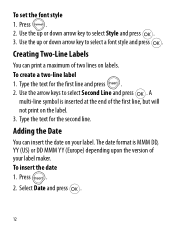
... not print on your label maker. Select Date and press . 12 Press . 2. To create a two-line label 1. Use the arrow keys to select Style and press . 3. To insert the date 1. Creating Two-Line Labels You can insert the date on the label. 3. Type the text for the second line. Type the text for the first line and press . 2. Use the up or down arrow key to select Second Line and press . Press . 2. To set the font...
... not print on your label maker. Select Date and press . 12 Press . 2. To create a two-line label 1. Use the arrow keys to select Style and press . 3. To insert the date 1. Creating Two-Line Labels You can insert the date on the label. 3. Type the text for the second line. Type the text for the first line and press . 2. Use the up or down arrow key to select Second Line and press . Press . 2. To set the font...
User Guide 1
Page 14
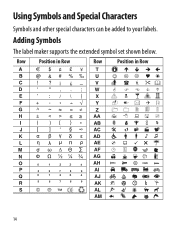
Adding Symbols The label maker supports the extended symbol set shown below. Row Position in Row Row Position in Row 14 Using Symbols and Special Characters Symbols and other special characters can be added to your labels.
Adding Symbols The label maker supports the extended symbol set shown below. Row Position in Row Row Position in Row 14 Using Symbols and Special Characters Symbols and other special characters can be added to your labels.
User Guide 1
Page 15
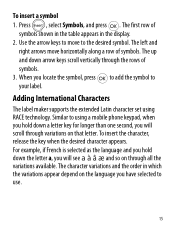
... the table appears in which the variations appear depend on the language you will see a à â æ and so on that letter. Adding International Characters The label maker supports the extended Latin character set using a mobile phone keypad, when you hold down a letter key for longer than one second, you have selected to using RACE technology. Press , select Symbols, and press . Similar to...
... the table appears in which the variations appear depend on the language you will see a à â æ and so on that letter. Adding International Characters The label maker supports the extended Latin character set using a mobile phone keypad, when you hold down a letter key for longer than one second, you have selected to using RACE technology. Press , select Symbols, and press . Similar to...
User Guide 1
Page 16
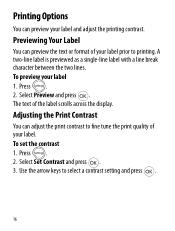
... 1. Use the arrow keys to printing. The text of your label prior to select a contrast setting and press . 16 To preview your label and adjust the printing contrast. Previewing Your Label You can preview the text or format of the label scrolls across the display. Select Preview and press . Press . 2. A two-line label is previewed as a single-line label with a line break character between the two lines. Select Set Contrast and press . 3. Adjusting the Print...
... 1. Use the arrow keys to printing. The text of your label prior to select a contrast setting and press . 16 To preview your label and adjust the printing contrast. Previewing Your Label You can preview the text or format of the label scrolls across the display. Select Preview and press . Press . 2. A two-line label is previewed as a single-line label with a line break character between the two lines. Select Set Contrast and press . 3. Adjusting the Print...
User Guide 1
Page 17
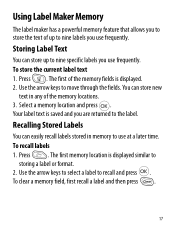
... current label text 1. Use the arrow keys to recall and press . Using Label Maker Memory The label maker has a powerful memory feature that allows you to store the text of up to nine specific labels you use frequently. The first of the memory locations. 3. The first memory location is displayed. 2. To clear a memory field, first recall a label and then press . 17 Select a memory location and press . Storing Label Text...
... current label text 1. Use the arrow keys to recall and press . Using Label Maker Memory The label maker has a powerful memory feature that allows you to store the text of up to nine specific labels you use frequently. The first of the memory locations. 3. The first memory location is displayed. 2. To clear a memory field, first recall a label and then press . 17 Select a memory location and press . Storing Label Text...
User Guide 1
Page 18
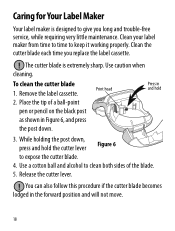
... cutter blade becomes lodged in and hold the cutter lever Figure 6 to keep it working properly. Use a cotton ball and alcohol to give you replace the label cassette. ! To clean the cutter blade 1. Release the cutter lever. ! Clean your label maker from time to time to expose the cutter blade. 4. Print head Press in the forward position and will not move. 18 Use caution when cleaning. Remove the label cassette. The cutter blade is designed to clean...
... cutter blade becomes lodged in and hold the cutter lever Figure 6 to keep it working properly. Use a cotton ball and alcohol to give you replace the label cassette. ! To clean the cutter blade 1. Release the cutter lever. ! Clean your label maker from time to time to expose the cutter blade. 4. Print head Press in the forward position and will not move. 18 Use caution when cleaning. Remove the label cassette. The cutter blade is designed to clean...
User Guide 1
Page 19
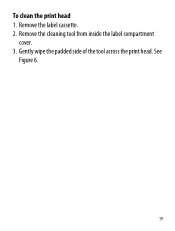
See Figure 6. 19 Gently wipe the padded side of the tool across the print head. To clean the print head 1. Remove the label cassette. 2. Remove the cleaning tool from inside the label compartment cover. 3.
See Figure 6. 19 Gently wipe the padded side of the tool across the print head. To clean the print head 1. Remove the label cassette. 2. Remove the cleaning tool from inside the label compartment cover. 3.
User Guide 1
Page 20
... characters Exceeded maximum number of Delete some or all of this User Guide to label jam. • Clean cutter blade. Replace batteries or connect AC power adapter. See Contacting Customer Support at the back of the buffer text. See Caring for your label maker. Motor is installed properly. • Clean the print head. • Replace the label cassette. Message disappears when printing is turned on. • Replace discharged batteries. Battery low Batteries almost discharged. If you encounter a problem while using your country. 20 Troubleshooting Review...
... characters Exceeded maximum number of Delete some or all of this User Guide to label jam. • Clean cutter blade. Replace batteries or connect AC power adapter. See Contacting Customer Support at the back of the buffer text. See Caring for your label maker. Motor is installed properly. • Clean the print head. • Replace the label cassette. Message disappears when printing is turned on. • Replace discharged batteries. Battery low Batteries almost discharged. If you encounter a problem while using your country. 20 Troubleshooting Review...
User Guide 1
Page 21
...model number, and User Guide page number • Brief description of instructions that this email address is needed, and so on We also welcome your suggestions about our user guides. RoHS 2002/95/EC 21 This product is CE marked in accordance with the EMC directive and the low voltage directive and is designed to : documentation@dymo.com...quality documentation for residential, commercial and light industrial environments. We welcome your comments or suggestions about additional topics you have a technical question, please contact Customer Support. Send us your feedback. EN ...
...model number, and User Guide page number • Brief description of instructions that this email address is needed, and so on We also welcome your suggestions about our user guides. RoHS 2002/95/EC 21 This product is CE marked in accordance with the EMC directive and the low voltage directive and is designed to : documentation@dymo.com...quality documentation for residential, commercial and light industrial environments. We welcome your comments or suggestions about additional topics you have a technical question, please contact Customer Support. Send us your feedback. EN ...

User Guide 1
Page 69
Country Telephone Fax Internationala Mexico United States +32 (0) 205040566 +01 5368 2066 (203) 588-2500 a. Contacting Customer Support The following table provides a list of telephone numbers for all countries where no specific support number is listed. You can also reach DYMO at www.dymo.com. Use the International number for DYMO Support departments.
Country Telephone Fax Internationala Mexico United States +32 (0) 205040566 +01 5368 2066 (203) 588-2500 a. Contacting Customer Support The following table provides a list of telephone numbers for all countries where no specific support number is listed. You can also reach DYMO at www.dymo.com. Use the International number for DYMO Support departments.


