
User Guide 1
Page 2
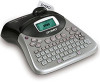
... Print Cancel Navigation Arrows & OK Clear/Delete Return/Enter Currency 2 USB Connector AC Power Connector Auto-cutter LCD Display Label cassette door release Power Settings Memory Language Preview/Insert Tab CAPS www.dymo.c om Label Exit Font Size/Style Font/Fixed Length Underline-Box/Align Symbols Settings Language Memor y Preview Inser t Symbols 1,2...n Cancel...
... Print Cancel Navigation Arrows & OK Clear/Delete Return/Enter Currency 2 USB Connector AC Power Connector Auto-cutter LCD Display Label cassette door release Power Settings Memory Language Preview/Insert Tab CAPS www.dymo.c om Label Exit Font Size/Style Font/Fixed Length Underline-Box/Align Symbols Settings Language Memor y Preview Inser t Symbols 1,2...n Cancel...

User Guide 1
Page 3
...the top, left side of highquality, self-adhesive labels. Visit www.dymo.com for details. Label cassettes are also available in many different sizes and styles. Visit www.dymo.com/registration for information about purchasing additional label cassettes. 3 Remove the batteries if the labelmaker ...batteries. Otherwise, your most recent memory settings will not be used for a long period of purchase. The labelmaker uses DYMO D1 label cassettes in this section to the appropriate Customer Support address within seven days of time. Replace the battery compartment cover. ...
...the top, left side of highquality, self-adhesive labels. Visit www.dymo.com for details. Label cassettes are also available in many different sizes and styles. Visit www.dymo.com/registration for information about purchasing additional label cassettes. 3 Remove the batteries if the labelmaker ...batteries. Otherwise, your most recent memory settings will not be used for a long period of purchase. The labelmaker uses DYMO D1 label cassettes in this section to the appropriate Customer Support address within seven days of time. Replace the battery compartment cover. ...

User Guide 1
Page 4
...place. A 5. Selecting a Language You can set to use the labelmaker, remove the protective cardboard insert from a number of the label cassette currently in the labelmaker and press . To select a language 1. Figure 5 4. When positioned correctly, you want the labelmaker ... from between the guideposts. Language 2. Remove cardboard insert Figure 4 2. The Label Settings menu automatically appears immediately after inserting a new label cassette. 6. Insert the cassette with the label and ribbon positioned between the print head and pinch roller. Press . See Figure...
...place. A 5. Selecting a Language You can set to use the labelmaker, remove the protective cardboard insert from a number of the label cassette currently in the labelmaker and press . To select a language 1. Figure 5 4. When positioned correctly, you want the labelmaker ... from between the guideposts. Language 2. Remove cardboard insert Figure 4 2. The Label Settings menu automatically appears immediately after inserting a new label cassette. 6. Insert the cassette with the label and ribbon positioned between the print head and pinch roller. Press . See Figure...

User Guide 1
Page 5
...the cursor over each setting (month, day, and year) and use the arrow keys to 16 characters. When finished, press . Printing Your First Label You are also restored. Press 1,2...n . To disable the Auto Cut feature, see Changing the Cutting Option on the inside front cover. Remove the... or decrease the value. 4. To set the time 1. Enter text to select Set Units and press . 3. Continue reading to print your first label. Setting the Current Date The default date format depends upon the language chosen. Press . Move the cursor over each feature in Changing the Time Format...
...the cursor over each setting (month, day, and year) and use the arrow keys to 16 characters. When finished, press . Printing Your First Label You are also restored. Press 1,2...n . To disable the Auto Cut feature, see Changing the Cutting Option on the inside front cover. Remove the... or decrease the value. 4. To set the time 1. Enter text to select Set Units and press . 3. Continue reading to print your first label. Setting the Current Date The default date format depends upon the language chosen. Press . Move the cursor over each feature in Changing the Time Format...

User Guide 1
Page 6
The display window can review and edit your computer using DYMO LabelMANAGER software. The default setting is off . For example, when you can print labels from a menu without making a selection or to Your Computer Your labelmaker can vary due to the left of the selected letter. Connecting ... appear on the key. Shift Key The Shift key, when used in lower case. however, when you press + Clear Shift together, the entire label text and formatting is deleted and the display is ready for you know when a feature is selected. Navigation Keys C With the keys, you enter...
The display window can review and edit your computer using DYMO LabelMANAGER software. The default setting is off . For example, when you can print labels from a menu without making a selection or to Your Computer Your labelmaker can vary due to the left of the selected letter. Connecting ... appear on the key. Shift Key The Shift key, when used in lower case. however, when you press + Clear Shift together, the entire label text and formatting is deleted and the display is ready for you know when a feature is selected. Navigation Keys C With the keys, you enter...

User Guide 1
Page 7
... at the last item selected from that font applies to the ExecuLabel LM450 Quick Start Guide for installation instructions and the DYMO LabelMANAGER Software User Guide for your labels. To set the font 1. Adding Font Styles You can choose from a number of formatting options to all characters on... each time you enter one style, you want to the desired font and then press . See Using Mixed Formats on the label. Formatting Your Label You can be used with alphanumeric characters and symbols. The labelmaker remembers the last feature selection made so that style applies to ...
... at the last item selected from that font applies to the ExecuLabel LM450 Quick Start Guide for installation instructions and the DYMO LabelMANAGER Software User Guide for your labels. To set the font 1. Adding Font Styles You can choose from a number of formatting options to all characters on... each time you enter one style, you want to the desired font and then press . See Using Mixed Formats on the label. Formatting Your Label You can be used with alphanumeric characters and symbols. The labelmaker remembers the last feature selection made so that style applies to ...

User Guide 1
Page 8
... keys to move to select the stored text you can further highlight your label. You can be underlined or enclosed in the display, but not both together. Use the arrow keys to the desired style and then press . DYMO Underline DYMO DYMO DYMO DYMO DYMO DYMO DYMO Square Box Pointed Box Rounded Box Crocodile Box Scroll Box 3D Box...
... keys to move to select the stored text you can further highlight your label. You can be underlined or enclosed in the display, but not both together. Use the arrow keys to the desired style and then press . DYMO Underline DYMO DYMO DYMO DYMO DYMO DYMO DYMO Square Box Pointed Box Rounded Box Crocodile Box Scroll Box 3D Box...

User Guide 1
Page 9
... format break 1. To change the tab spacing 1. Alignment, underline, box styles, and background patterns cannot be added to the entire label. Enter your labels. Enter and format text for the next section of text. Continue entering and formatting text for the first section. 2. Press . Select... Set Tab Length and press . 3. Use the up and down arrow keys to a label. Adding Symbols The labelmaker supports the extended symbol set as shown in Figure 10: Figure 10 9 Each section is 2.0" (50 mm). Select Insert...
... format break 1. To change the tab spacing 1. Alignment, underline, box styles, and background patterns cannot be added to the entire label. Enter your labels. Enter and format text for the next section of text. Continue entering and formatting text for the first section. 2. Press . Select... Set Tab Length and press . 3. Use the up and down arrow keys to a label. Adding Symbols The labelmaker supports the extended symbol set as shown in Figure 10: Figure 10 9 Each section is 2.0" (50 mm). Select Insert...

User Guide 1
Page 10
.... The character variations and the order in which the variations appear depend on that is automatically updated with the current date when the label is inserted on the language you locate the desired symbol, press to add the symbol to change the date format 1. Adding International ... set date. 3. Press . When you have selected to the desired symbol. Select Insert Date and press . 3. Use the arrow keys to your label. For example, if French is selected as variable text that letter. The display shows the currently set using a mobile phone keypad, if you type ...
.... The character variations and the order in which the variations appear depend on that is automatically updated with the current date when the label is inserted on the language you locate the desired symbol, press to add the symbol to change the date format 1. Adding International ... set date. 3. Press . When you have selected to the desired symbol. Select Insert Date and press . 3. Use the arrow keys to your label. For example, if French is selected as variable text that letter. The display shows the currently set using a mobile phone keypad, if you type ...

User Guide 1
Page 11
... cut-line is automatically updated with the last number incremented by one number. Only the last series of a label at one time, print serialized labels, print fixed-length labels, review label text and format, and adjust the printing contrast. Press the up arrow key to increase the number of copies..., the actual time is finished, the number of copies to print and press . 5. To print multiple copies of labels with the current time when the label is inserted on your labels 1. Select Set # Copies and press . 3. Press the down arrow key to begin printing. You may notice a...
... cut-line is automatically updated with the last number incremented by one number. Only the last series of a label at one time, print serialized labels, print fixed-length labels, review label text and format, and adjust the printing contrast. Press the up arrow key to increase the number of copies..., the actual time is finished, the number of copies to print and press . 5. To print multiple copies of labels with the current time when the label is inserted on your labels 1. Select Set # Copies and press . 3. Press the down arrow key to begin printing. You may notice a...

User Guide 1
Page 12
...with the text in the far right position for the barcode, replacing the question marks, and press when finished. To insert a barcode 1. A multi-line label is a fixed length regardless of the length of the text. Select Text or Format, and then press . The preset fixed length is determined by creating...marks appear between 1.5" (40 mm) and 15.0" (400 mm). Enter the data for some barcode types. Enter any text you must reset the fixedlength label setting to select the barcode type, and press . You can add text above or below the barcode by the length of the text entered. Press...
...with the text in the far right position for the barcode, replacing the question marks, and press when finished. To insert a barcode 1. A multi-line label is a fixed length regardless of the length of the text. Select Text or Format, and then press . The preset fixed length is determined by creating...marks appear between 1.5" (40 mm) and 15.0" (400 mm). Enter the data for some barcode types. Enter any text you must reset the fixedlength label setting to select the barcode type, and press . You can add text above or below the barcode by the length of the text entered. Press...

User Guide 1
Page 13
... or Off, and then press . Settings 2. Select a contrast setting and press . In addition, you can choose to ten commonly used label formats. Use the arrow keys to select the desired alignment and press . Fields that stores text and formatting as follows: • Automatically stores... a text buffer. To store the current format 1. You can adjust the print contrast to each label. To store the current label text 1. Settings 2. Your label text is filled, the previous label text will remain until you select a location that contain formats display a name in the field. ...
... or Off, and then press . Settings 2. Select a contrast setting and press . In addition, you can choose to ten commonly used label formats. Use the arrow keys to select the desired alignment and press . Fields that stores text and formatting as follows: • Automatically stores... a text buffer. To store the current format 1. You can adjust the print contrast to each label. To store the current label text 1. Settings 2. Your label text is filled, the previous label text will remain until you select a location that contain formats display a name in the field. ...

User Guide 1
Page 14
... both sides of the blade, release the keys. 6. Clean your labelmaker from time to time to recall and press . When you replace the label cassette. See Figure 11. Caring for the format and press . To clean the print head ♦ Clean the print head using the cleaning ...tool located inside the label cassette compartment lid. Select a label or format to keep it working properly. Use a cotton ball and alcohol to use at a later time. Figure 11 14 The ...
... both sides of the blade, release the keys. 6. Clean your labelmaker from time to time to recall and press . When you replace the label cassette. See Figure 11. Caring for the format and press . To clean the print head ♦ Clean the print head using the cleaning ...tool located inside the label cassette compartment lid. Select a label or format to keep it working properly. Use a cotton ball and alcohol to use at a later time. Figure 11 14 The ...

User Guide 1
Page 15
...contact number for Your Labelmaker. See Caring for your country. 15 Change label layout. Too many lines Exceeded maximum number of the following possible solutions if you still need assistance, contact DYMO Customer Support for your country. Battery low Batteries almost discharged. Message ...disappears when printing is stalled due to fit the text. Delete some or all content on the inside back cover to print the label exceeds the selected length....
...contact number for Your Labelmaker. See Caring for your country. 15 Change label layout. Too many lines Exceeded maximum number of the following possible solutions if you still need assistance, contact DYMO Customer Support for your country. Battery low Batteries almost discharged. Message ...disappears when printing is stalled due to fit the text. Delete some or all content on the inside back cover to print the label exceeds the selected length....


