User Guide 1
Page 4
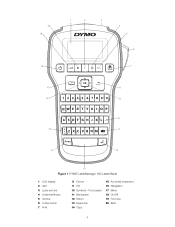
Punctuation 11 Backspace 12 Return 13 Space bar 14 Caps 15 Accented characters 16 Navigation 17 Menu 18 On/Off 19 Font size 20 Bold 4 20 19 18 1 2 3 4 5 6 7 17 8 16 9 10 15 11 14 12 13 Figure 1 DYMO LabelManager 160 Label Maker 1 LCD display 2 Italic 3 Label exit slot 4 Underline/Boxes 5 Vertical 6 Cutter button 7 Print 8 Cancel 9 OK 10 Symbols -
Punctuation 11 Backspace 12 Return 13 Space bar 14 Caps 15 Accented characters 16 Navigation 17 Menu 18 On/Off 19 Font size 20 Bold 4 20 19 18 1 2 3 4 5 6 7 17 8 16 9 10 15 11 14 12 13 Figure 1 DYMO LabelManager 160 Label Maker 1 LCD display 2 Italic 3 Label exit slot 4 Underline/Boxes 5 Vertical 6 Cutter button 7 Print 8 Cancel 9 OK 10 Symbols -
User Guide 1
Page 5
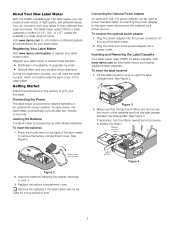
... if the label maker will need the serial number, which is powered by alkaline batteries or an optional AC power adapter. Visit www.dymo.com for information about purchasing additional label cassettes. See Figure 3. Connecting the power adapter to tighten the ribbon. Ribbon rewind spool Press... Your Label Maker Visit www.dymo.com/register to power the label maker. Inserting and Removing the Label Cassette Your label maker uses DYMO D1 label cassettes. You can be used to register your first label. About Your New Label Maker With the DYMO LabelManager 160 label maker, you will not...
... if the label maker will need the serial number, which is powered by alkaline batteries or an optional AC power adapter. Visit www.dymo.com for information about purchasing additional label cassettes. See Figure 3. Connecting the power adapter to tighten the ribbon. Ribbon rewind spool Press... Your Label Maker Visit www.dymo.com/register to power the label maker. Inserting and Removing the Label Cassette Your label maker uses DYMO D1 label cassettes. You can be used to register your first label. About Your New Label Maker With the DYMO LabelManager 160 label maker, you will not...


