
User Guide 1
Page 2
All rights reserved. All other countries. No part of their respective holders. Copyright © 2011 Sanford, L.P. Trademarks DYMO and LabelManager are the property of this document may be reproduced or transmitted in the US and other trademarks are registered marks in any form or by any means or translated into another language without the prior written consent of Sanford, L.P.
All rights reserved. All other countries. No part of their respective holders. Copyright © 2011 Sanford, L.P. Trademarks DYMO and LabelManager are the property of this document may be reproduced or transmitted in the US and other trademarks are registered marks in any form or by any means or translated into another language without the prior written consent of Sanford, L.P.
User Guide 1
Page 3
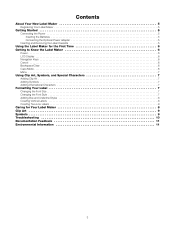
... Power Adapter 5 Inserting and Removing the Label Cassette 5 Using the Label Maker for the First Time 6 Getting to Know the Label Maker 6 Power 6 LCD Display 6 Navigation Keys 6 Cancel 6 Backspace/Clear 6 Caps Mode 6 Menu 7 Using Clip Art, Symbols, and Special Characters 7 Adding Clip Art 7 Adding Symbols 7 Adding International Characters 7 Formatting Your Label 7 Changing the Font Size 7 Changing the Font Style 7 Adding Box and Underline Styles 8 Creating Vertical Labels 8 Creating Two-Line Labels 8 Caring for Your Label Maker 8 Clip Art 9 Symbols 9 Troubleshooting...
... Power Adapter 5 Inserting and Removing the Label Cassette 5 Using the Label Maker for the First Time 6 Getting to Know the Label Maker 6 Power 6 LCD Display 6 Navigation Keys 6 Cancel 6 Backspace/Clear 6 Caps Mode 6 Menu 7 Using Clip Art, Symbols, and Special Characters 7 Adding Clip Art 7 Adding Symbols 7 Adding International Characters 7 Formatting Your Label 7 Changing the Font Size 7 Changing the Font Style 7 Adding Box and Underline Styles 8 Creating Vertical Labels 8 Creating Two-Line Labels 8 Caring for Your Label Maker 8 Clip Art 9 Symbols 9 Troubleshooting...
User Guide 1
Page 4
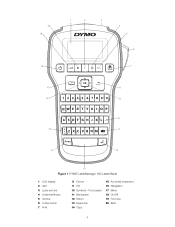
Punctuation 11 Backspace 12 Return 13 Space bar 14 Caps 15 Accented characters 16 Navigation 17 Menu 18 On/Off 19 Font size 20 Bold 4 20 19 18 1 2 3 4 5 6 7 17 8 16 9 10 15 11 14 12 13 Figure 1 DYMO LabelManager 160 Label Maker 1 LCD display 2 Italic 3 Label exit slot 4 Underline/Boxes 5 Vertical 6 Cutter button 7 Print 8 Cancel 9 OK 10 Symbols -
Punctuation 11 Backspace 12 Return 13 Space bar 14 Caps 15 Accented characters 16 Navigation 17 Menu 18 On/Off 19 Font size 20 Bold 4 20 19 18 1 2 3 4 5 6 7 17 8 16 9 10 15 11 14 12 13 Figure 1 DYMO LabelManager 160 Label Maker 1 LCD display 2 Italic 3 Label exit slot 4 Underline/Boxes 5 Vertical 6 Cutter button 7 Print 8 Cancel 9 OK 10 Symbols -
User Guide 1
Page 5
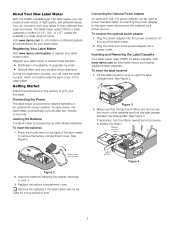
... 3. If necessary, turn the ribbon rewind spool clockwise to the label maker disconnects the batteries as a power source. Connecting the Optional Power Adapter An optional 9 Volt, 2 A power adapter can create a wide variety of high-quality, self-adhesive labels. The label maker uses DYMO D1 label cassettes in this section to print your label maker to receive these benefits: Notification of availability of upgrades by email Special offers and new product announcements During...
... 3. If necessary, turn the ribbon rewind spool clockwise to the label maker disconnects the batteries as a power source. Connecting the Optional Power Adapter An optional 9 Volt, 2 A power adapter can create a wide variety of high-quality, self-adhesive labels. The label maker uses DYMO D1 label cassettes in this section to print your label maker to receive these benefits: Notification of availability of upgrades by email Special offers and new product announcements During...

User Guide 1
Page 6
... review and edit your first label. Backspace/Clear The key deletes the character to cut the label. When CAPS mode is off automatically. Refer to the left of the printer. 2 Remove the label cassette. 3 Insert a new label cassette as printing. The following sections describe each feature in lowercase. Pressing and holding the key quickly deletes the characters to Figure 1 on and off . Split backing 4 Remove the backing from a menu without making a selection...
... review and edit your first label. Backspace/Clear The key deletes the character to cut the label. When CAPS mode is off automatically. Refer to the left of the printer. 2 Remove the label cassette. 3 Insert a new label cassette as printing. The following sections describe each feature in lowercase. Pressing and holding the key quickly deletes the characters to Figure 1 on and off . Split backing 4 Remove the backing from a menu without making a selection...
User Guide 1
Page 7
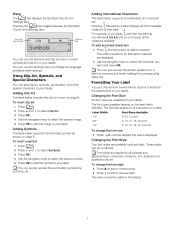
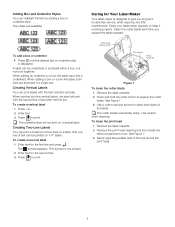
... International Characters The label maker supports the extended Latin character set shown on a label. To add accented characters 1 Press and then press an alpha character. To change the font size Press until the desired font size is instantly visible in the display. 7 The accent variations for that letter. The font sizes available depend on page 9. Adding Clip Art The label maker includes the clip art shown on the label width selected. To insert...
... International Characters The label maker supports the extended Latin character set shown on a label. To add accented characters 1 Press and then press an alpha character. To change the font size Press until the desired font size is instantly visible in the display. 7 The accent variations for that letter. The font sizes available depend on page 9. Adding Clip Art The label maker includes the clip art shown on the label width selected. To insert...
User Guide 1
Page 8
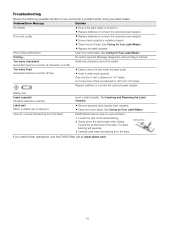
... trouble-free service, while requiring very little maintenance. Only one line of text can be underlined or enclosed within a box, but not both sides of the blade. Print head cleaning tool Print head Press and hold Figure 7 To clean the cutter blade 1 Remove the label cassette. 2 Press and hold the cutter button to print. Use caution when cleaning. Creating Vertical Labels You can be printed on 1/4" labels. When printing two-line vertical labels, the label will not print on a vertical label. Caring for the first line...
... trouble-free service, while requiring very little maintenance. Only one line of text can be underlined or enclosed within a box, but not both sides of the blade. Print head cleaning tool Print head Press and hold Figure 7 To clean the cutter blade 1 Remove the label cassette. 2 Press and hold the cutter button to print. Use caution when cleaning. Creating Vertical Labels You can be printed on 1/4" labels. When printing two-line vertical labels, the label will not print on a vertical label. Caring for the first line...
User Guide 1
Page 10
...Label Maker. Printing... Exceeded maximum number of the label. DYMO labels have an easy-to label jam. See Inserting and Removing the Label Cassette. Remove jammed label; No action required. Motor is finished. replace label cassette. Clean the cutter blade. Split backing If you encounter a problem while using your label maker. Message disappears when printing is stalled due to -peel split back. 1 Locate the split on . Replace batteries or connect the optional power adapter. No label cassette is installed properly. Clean...
...Label Maker. Printing... Exceeded maximum number of the label. DYMO labels have an easy-to label jam. See Inserting and Removing the Label Cassette. Remove jammed label; No action required. Motor is finished. replace label cassette. Clean the cutter blade. Split backing If you encounter a problem while using your label maker. Message disappears when printing is stalled due to -peel split back. 1 Locate the split on . Replace batteries or connect the optional power adapter. No label cassette is installed properly. Clean...
User Guide 1
Page 11
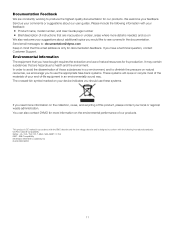
...Support. The crossed-bin symbol marked on your suggestions about our user guides. EMI Compatibility EN 55022; Documentation Feedback We are constantly working to produce the highest quality documentation for its production. Please include the following information with the following international standards: US FCC Class B Compatibility Safety - You can also contact DYMO... name, model number, and User Guide page number Brief description of instructions that you to : documentation@dymo.com Keep in accordance with the EMC directive and the low voltage directive and is...
...Support. The crossed-bin symbol marked on your suggestions about our user guides. EMI Compatibility EN 55022; Documentation Feedback We are constantly working to produce the highest quality documentation for its production. Please include the following information with the following international standards: US FCC Class B Compatibility Safety - You can also contact DYMO... name, model number, and User Guide page number Brief description of instructions that you to : documentation@dymo.com Keep in accordance with the EMC directive and the low voltage directive and is...


