
User Guide
Page 2
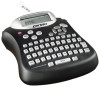
LM150 WEUdef.qxd 23-09-2003 16:07 Pagina 2 DC Power Connector Tape Exit LCD Display On/Off Style Key Frame/Align Key Font/Fixed Length Key Extra Key Numeric Keys Alpha Keys CAPS Key 150 Cutter Button Print Key Arrow Keys with OK Key Cancel Key Backspace/ New Label Key Return/OK Key Symbols Key Space Bar Shift Keys Figure 1 LabelMANAGER 150 Electronic Labelmaker
LM150 WEUdef.qxd 23-09-2003 16:07 Pagina 2 DC Power Connector Tape Exit LCD Display On/Off Style Key Frame/Align Key Font/Fixed Length Key Extra Key Numeric Keys Alpha Keys CAPS Key 150 Cutter Button Print Key Arrow Keys with OK Key Cancel Key Backspace/ New Label Key Return/OK Key Symbols Key Space Bar Shift Keys Figure 1 LabelMANAGER 150 Electronic Labelmaker

User Guide
Page 3
... Your LabelMANAGER 150 Electronic Labelmaker The LabelMANAGER 150 electronic labelmaker allows you unplug the adapter from the main power source. Visit www.dymo.com for information on the top, left side of time. Otherwise, the most recent memory settings will not be lost. Inserting the Tape Cassette To insert the tape cassette 1. Getting Started Follow the instructions in this section to get started printing your labels in many different sizes and styles...
... Your LabelMANAGER 150 Electronic Labelmaker The LabelMANAGER 150 electronic labelmaker allows you unplug the adapter from the main power source. Visit www.dymo.com for information on the top, left side of time. Otherwise, the most recent memory settings will not be lost. Inserting the Tape Cassette To insert the tape cassette 1. Getting Started Follow the instructions in this section to get started printing your labels in many different sizes and styles...

User Guide
Page 4
.../OFF button. 2. Congratulations! Selecting Units of the cassette and that you want and press OK. To select your first label. Become familiar with the tape and ribbon positioned between inches and millimeters, and press OK. If necessary, turn the spool clockwise to the language you are taut across the text. (See Figure 5.) The number of different language options. Print head and roller Figure 4 5. Use the...
.../OFF button. 2. Congratulations! Selecting Units of the cassette and that you want and press OK. To select your first label. Become familiar with the tape and ribbon positioned between inches and millimeters, and press OK. If necessary, turn the spool clockwise to the language you are taut across the text. (See Figure 5.) The number of different language options. Print head and roller Figure 4 5. Use the...

User Guide
Page 5
... power is ready for your labels. You can choose from a number of formatting options to the desired font and then press OK. When CAPS mode is turned back on , the CAPS indicator is deleted; When used in lower case. Formatting Your Label You can review and edit your text. To set the font size 1. Adding Font Styles You can navigate through the menu selections using the left...
... power is ready for your labels. You can choose from a number of formatting options to the desired font and then press OK. When CAPS mode is turned back on , the CAPS indicator is deleted; When used in lower case. Formatting Your Label You can review and edit your text. To set the font size 1. Adding Font Styles You can navigate through the menu selections using the left...

User Guide
Page 6
Figure 7 To set as shown in the display, but not both together. Creating Two-Line Labels You can create two-line labels using 9 mm or 12 mm) label tape. 6 mm labels are shown in the display. 2. Type the text for the first line, and press Return. Figure 8 To add a symbol 1. The left and right arrows scroll horizontally along the row of symbols. When you want. 3. Use the arrow keys to...
Figure 7 To set as shown in the display, but not both together. Creating Two-Line Labels You can create two-line labels using 9 mm or 12 mm) label tape. 6 mm labels are shown in the display. 2. Type the text for the first line, and press Return. Figure 8 To add a symbol 1. The left and right arrows scroll horizontally along the row of symbols. When you want. 3. Use the arrow keys to...
User Guide
Page 7
... select ON & press OK 3. To preview your label prior to the default value of the label 1. Aligning the Text When you print a fixed length label you make a label for a label in 2 mm increments from 16. 4. To align the text 1. Press Shift-Frame/Align. 2. Press Clear to increase the number of the text. Printing Options You can print multiple copies of the label. Press the Up arrow key to turn off the alignment setting. 7 Press Print...
... select ON & press OK 3. To preview your label prior to the default value of the label 1. Aligning the Text When you print a fixed length label you make a label for a label in 2 mm increments from 16. 4. To align the text 1. Press Shift-Frame/Align. 2. Press Clear to increase the number of the text. Printing Options You can print multiple copies of the label. Press the Up arrow key to turn off the alignment setting. 7 Press Print...

User Guide
Page 8
Caring for Your Labelmaker Your labelmaker is designed to keep it working properly. Cleaning the Labelmaker Clean your label. Insert the tip of a ball-point pen or pencil between the L-shaped piece and the guide pin. To set the contrast 1. Press Extra. 2. To clean the cutter blade 1. Release the cutter lever. DYMO D1 label cassettes Width: Length: Black/Clear Blue/Clear Red/Clear Black/White Blue/White Red/White Black/Blue Black/Red Black/Yellow Black...
Caring for Your Labelmaker Your labelmaker is designed to keep it working properly. Cleaning the Labelmaker Clean your label. Insert the tip of a ball-point pen or pencil between the L-shaped piece and the guide pin. To set the contrast 1. Press Extra. 2. To clean the cutter blade 1. Release the cutter lever. DYMO D1 label cassettes Width: Length: Black/Clear Blue/Clear Red/Clear Black/White Blue/White Red/White Black/Blue Black/Red Black/Yellow Black...

User Guide
Page 9
...batteries or connect DC power adapter. ! Following this message, a fixed-length value is stalled due to fit the text. Poor Cutter Performance Clean the cutter blade. See Caring for each country. 9 Tape Jam Motor is displayed which indicates the minimum label length necessary to tape jam Remove jammed tape and replace tape cassette. If you encounter a problem while using your labelmaker. Problem/Error Message Solution No DISPLAY • Ensure the printer is installed properly. • Clean the print head. • Replace the tape cassette. Insert Tape Cassette Tape...
...batteries or connect DC power adapter. ! Following this message, a fixed-length value is stalled due to fit the text. Poor Cutter Performance Clean the cutter blade. See Caring for each country. 9 Tape Jam Motor is displayed which indicates the minimum label length necessary to tape jam Remove jammed tape and replace tape cassette. If you encounter a problem while using your labelmaker. Problem/Error Message Solution No DISPLAY • Ensure the printer is installed properly. • Clean the print head. • Replace the tape cassette. Insert Tape Cassette Tape...


