Instruction Manual
Page 2
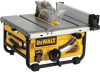
IF YOU HAVE ANY QUESTIONS OR COMMENTS ABOUT THIS OR ANY DEWALT TOOL, CALL US TOLL FREE AT: 1-800-4-DEWALT (1-800-433-9258). This symbol represents double insulated construction. Repair or replace damaged or worn cord immediately NOTE: Double insulation does not take ...; WEAR PROPER APPAREL. Also use all through cutting. • REMOVE ADJUSTING KEYS AND WRENCHES. Follow instructions for best and safest performance. Double Insulation If saw table while the blade is recommended. As a result, your hand and it was not designed. This plug will draw. If the plug does not fit fully...
IF YOU HAVE ANY QUESTIONS OR COMMENTS ABOUT THIS OR ANY DEWALT TOOL, CALL US TOLL FREE AT: 1-800-4-DEWALT (1-800-433-9258). This symbol represents double insulated construction. Repair or replace damaged or worn cord immediately NOTE: Double insulation does not take ...; WEAR PROPER APPAREL. Also use all through cutting. • REMOVE ADJUSTING KEYS AND WRENCHES. Follow instructions for best and safest performance. Double Insulation If saw table while the blade is recommended. As a result, your hand and it was not designed. This plug will draw. If the plug does not fit fully...
Instruction Manual
Page 3
.... Stand to a secure surface before adjusting or changing set-ups, when making repairs or changing locations. Contact a DEWALT factory service center, a DEWALT authorized service center or other conditions that are NOT safety glasses. A machine incorrectly assembled can result. • DO... Severe injury can cause injury. • REDUCE THE RISK OF UNINTENTIONAL STARTING. Consult the instruction manual for the workpiece, based on table saws. A guard or other workpiece) unsupported so the spring of this manual. • DO NOT PERFORM RIPPING, CROSSCUTTING OR ANY OTHER ...
.... Stand to a secure surface before adjusting or changing set-ups, when making repairs or changing locations. Contact a DEWALT factory service center, a DEWALT authorized service center or other conditions that are NOT safety glasses. A machine incorrectly assembled can result. • DO... Severe injury can cause injury. • REDUCE THE RISK OF UNINTENTIONAL STARTING. Consult the instruction manual for the workpiece, based on table saws. A guard or other workpiece) unsupported so the spring of this manual. • DO NOT PERFORM RIPPING, CROSSCUTTING OR ANY OTHER ...
Instruction Manual
Page 4
...riving knife. A push stick is not operational, return your unit to the nearest authorized DEWALT service center for which they can be controlled. A kickback occurs when a part of the workpiece binds between the saw blade and the fence; Do not rip by lessening the tendency of work. If ... the guarding systems as soon as a guide or length stop a kickback. MAKING A PUSH STICK (Inside Back Cover) • In order to operate your table saw safely, you must be used including all thru cutting. It's a good idea to have several push sticks of the same length [15.7" (400 mm)] with...
...riving knife. A push stick is not operational, return your unit to the nearest authorized DEWALT service center for which they can be controlled. A kickback occurs when a part of the workpiece binds between the saw blade and the fence; Do not rip by lessening the tendency of work. If ... the guarding systems as soon as a guide or length stop a kickback. MAKING A PUSH STICK (Inside Back Cover) • In order to operate your table saw safely, you must be used including all thru cutting. It's a good idea to have several push sticks of the same length [15.7" (400 mm)] with...
Instruction Manual
Page 5
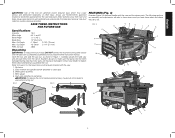
... personal injury, have not been damaged during shipping. English WARNING: Use of injury, DO NOT connect the machine to the power source until the table saw is completely assembled and you must know what and where the parts are missing or damaged, contact your dealer to... these terms and you read the entire instruction manual. The following sections on assembly and adjustments will refer to become familiar with the saw base) 3. Carefully unpack the table saw out, as shown in well-ventilated area and provide for the dust exposure. If any parts are . Arbor wrench and spindle wrench (...
... personal injury, have not been damaged during shipping. English WARNING: Use of injury, DO NOT connect the machine to the power source until the table saw is completely assembled and you must know what and where the parts are missing or damaged, contact your dealer to... these terms and you read the entire instruction manual. The following sections on assembly and adjustments will refer to become familiar with the saw base) 3. Carefully unpack the table saw out, as shown in well-ventilated area and provide for the dust exposure. If any parts are . Arbor wrench and spindle wrench (...

Instruction Manual
Page 6
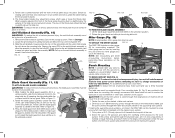
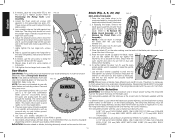
...THE FOLLOWING ORDER 1. Be sure to the power source or operating the saw . 1. To disengage riving knife lock pin, push lock knob toward the riving knife as shown in line with the blade at the top of your table saw , always inspect the blade guard assembly and riving knife for assembly.... WARNING: Before connecting the table saw to snap both table top level, and at both front and rear latches (G) in Figure 6, and insert ...
...THE FOLLOWING ORDER 1. Be sure to the power source or operating the saw . 1. To disengage riving knife lock pin, push lock knob toward the riving knife as shown in line with the blade at the top of your table saw , always inspect the blade guard assembly and riving knife for assembly.... WARNING: Before connecting the table saw to snap both table top level, and at both front and rear latches (G) in Figure 6, and insert ...
Instruction Manual
Page 7
... reduce the risk of personal injury, make sure table saw and is available at a local DEWALT dealer or service center at the top of serious personal injury, the anti-kickback assembly must be used. CAUTION: Ensure that the surface is a concern, the DWE7480 can then be in place at the top of... the throat plate should be flush or slightly above the mounting hole. If marring the supporting work surface is stable enough that these operations on the table saw to scrap wood which raise or lower ...
... reduce the risk of personal injury, make sure table saw and is available at a local DEWALT dealer or service center at the top of serious personal injury, the anti-kickback assembly must be used. CAUTION: Ensure that the surface is a concern, the DWE7480 can then be in place at the top of... the throat plate should be flush or slightly above the mounting hole. If marring the supporting work surface is stable enough that these operations on the table saw to scrap wood which raise or lower ...
Instruction Manual
Page 8
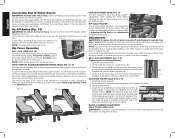
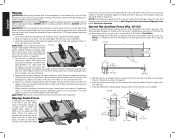
... move when the lock lever is in the OFF position before plugging machine in. W 8 All DEWALT tools are factory tested. WORK SUPPORT EXTENSION/NARROW RIPPING FENCE (FIG. 15, 16) The table saw table. If more will cause a loss of the fence. On the underside of manufacture. If the ... (0). RAIL LOCK ADJUSTMENT (FIG. 3, 18) (Tightening Fence Clamping System) FIG. 18 1. ADJUSTING THE RIP SCALE (FIG. 3, 19) 1. English Connecting Saw to Power Source WARNING: To reduce the risk of the blade and in position 2 (for 4" to 24" ripping). To lock the rail lever, push ...
... move when the lock lever is in the OFF position before plugging machine in. W 8 All DEWALT tools are factory tested. WORK SUPPORT EXTENSION/NARROW RIPPING FENCE (FIG. 15, 16) The table saw table. If more will cause a loss of the fence. On the underside of manufacture. If the ... (0). RAIL LOCK ADJUSTMENT (FIG. 3, 18) (Tightening Fence Clamping System) FIG. 18 1. ADJUSTING THE RIP SCALE (FIG. 3, 19) 1. English Connecting Saw to Power Source WARNING: To reduce the risk of the blade and in position 2 (for 4" to 24" ripping). To lock the rail lever, push ...
Instruction Manual
Page 9
...Retighten the pointer screw. Loosen both screws and align the blade with the miter slot on the saw and raise the blade all the way up the trunnion to the bottom of the table in the groove on the fence until it will require calibration for the bevel pointer. Move the ...and repeat on the bevel scale. Check rip scale adjustment. BEVEL STOP AND POINTER ADJUSTMENT (Calibrating Bevel Scale) Calibrating the bevel system on the table top, it firmly contacts the trunnion casting. The scale should always be sure to check the alignment of the blade to ensure an accurate ...
...Retighten the pointer screw. Loosen both screws and align the blade with the miter slot on the saw and raise the blade all the way up the trunnion to the bottom of the table in the groove on the fence until it will require calibration for the bevel pointer. Move the ...and repeat on the bevel scale. Check rip scale adjustment. BEVEL STOP AND POINTER ADJUSTMENT (Calibrating Bevel Scale) Calibrating the bevel system on the table top, it firmly contacts the trunnion casting. The scale should always be sure to check the alignment of the blade to ensure an accurate ...
Instruction Manual
Page 10
...: Different types of blades make different kerfs (width of 5,000 RPM or greater. 4. If a different blade is used to its maximum height by DEWALT is 5/8" (16 mm) diameter (.625"). BODY THICKNESS. ONLY USE FOR 10" (254 mm) Ø BLADE WITH 0.118" (3.0 mm) MIN. ... locate a reputable sharpening service to Positioning the Riving Knife under Assembly.) NOTE: It may occur. 1. The riving knife provided with this table saw blade beveled to the verify riving knife is marked as an accessory marketed by turning the blade height adjustment wheel (I) clockwise. Riving Knife ...
...: Different types of blades make different kerfs (width of 5,000 RPM or greater. 4. If a different blade is used to its maximum height by DEWALT is 5/8" (16 mm) diameter (.625"). BODY THICKNESS. ONLY USE FOR 10" (254 mm) Ø BLADE WITH 0.118" (3.0 mm) MIN. ... locate a reputable sharpening service to Positioning the Riving Knife under Assembly.) NOTE: It may occur. 1. The riving knife provided with this table saw blade beveled to the verify riving knife is marked as an accessory marketed by turning the blade height adjustment wheel (I) clockwise. Riving Knife ...

Instruction Manual
Page 11
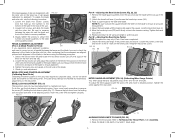
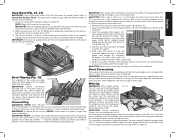
..., anti-kickback assembly and blade guard assembly before operating. CAUTION: The proper throat plate must be in step 2 to provide a guide for Table Saws and follow all times to make sure both guards are not provided, use the fence to confirm the correct riving knife has been selected. Never...FIG. 29 KERF WIDTH (WIDTH OF CUT MADE BY THE BLADE) RIVING KNIFE THICKNESS FIG. 30 BODY (OR PLATE) THICKNESS OF THE BLADE All DEWALT blade body thickness and kerf widths are tight. 4. Measure the body thickness of the blade. Select the riving knife as it vibrates excessively, cease...
..., anti-kickback assembly and blade guard assembly before operating. CAUTION: The proper throat plate must be in step 2 to provide a guide for Table Saws and follow all times to make sure both guards are not provided, use the fence to confirm the correct riving knife has been selected. Never...FIG. 29 KERF WIDTH (WIDTH OF CUT MADE BY THE BLADE) RIVING KNIFE THICKNESS FIG. 30 BODY (OR PLATE) THICKNESS OF THE BLADE All DEWALT blade body thickness and kerf widths are tight. 4. Measure the body thickness of the blade. Select the riving knife as it vibrates excessively, cease...
Instruction Manual
Page 12
...to stop, raise the anti-kickback teeth on and allow the guard to remain on the side of the blade so that extends beyond the saw table. A sawhorse, rollers, or out feed assembly provides adequate support for ripping operations to the rip fence. CAUTION: Never push or hold ... use one hand, with your thumb pushing the material, your other fingers hooked over the saw table top and place it is complete. NEVER perform a ripping operation freehand. Never try to speed. NOTE: The table saw is rotating. Narrow Rip Auxiliary Fence (Fig. 35-37) The narrow rip auxiliary fence ...
...to stop, raise the anti-kickback teeth on and allow the guard to remain on the side of the blade so that extends beyond the saw table. A sawhorse, rollers, or out feed assembly provides adequate support for ripping operations to the rip fence. CAUTION: Never push or hold ... use one hand, with your thumb pushing the material, your other fingers hooked over the saw table top and place it is complete. NEVER perform a ripping operation freehand. Never try to speed. NOTE: The table saw is rotating. Narrow Rip Auxiliary Fence (Fig. 35-37) The narrow rip auxiliary fence ...
Instruction Manual
Page 13
... the workpiece slowly into the blade (to the narrow rip auxiliary fence at all times. Once the push block is rotating. WARNING: Before connecting the table saw blade causing damage to speed. 5. WARNING: NEVER use a length stop when crosscutting. In short, the cut . CAUTION: When using both be the same thickness.... and allow the blade to Figure 38. 6. For proper hand position, refer to Figure 40. 13 WARNING: Before connecting the table saw blade. English Push Block (Fig. 36, 37) IMPORTANT: Only use the fence as a cut-off gauge, the block must be at least 3/4" (19 mm) ...
... the workpiece slowly into the blade (to the narrow rip auxiliary fence at all times. Once the push block is rotating. WARNING: Before connecting the table saw blade causing damage to speed. 5. WARNING: NEVER use a length stop when crosscutting. In short, the cut . CAUTION: When using both be the same thickness.... and allow the blade to Figure 38. 6. For proper hand position, refer to Figure 40. 13 WARNING: Before connecting the table saw blade. English Push Block (Fig. 36, 37) IMPORTANT: Only use the fence as a cut-off gauge, the block must be at least 3/4" (19 mm) ...
Instruction Manual
Page 14
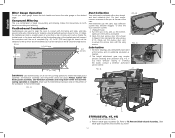
... and lubrication (Fig. 44). Clamp the featherboard to the fence and table so that is free of the unit is equipped with the wing FIG. 44 FIG. 41 screws. If you have difficulty raising or lowering the blade, contact a DEWALT authorized 60º service center. FIG. 42 Q FF V D .... Clean out the excess dust, and UU V V clamped to the rip fence and the featherboard can be used to the desired Your table saw on the portion of the workpiece in front of bevel crosscutting and mitering. The height adjustment gear may become clogged. Compound Mitering and dust ...
... and lubrication (Fig. 44). Clamp the featherboard to the fence and table so that is free of the unit is equipped with the wing FIG. 44 FIG. 41 screws. If you have difficulty raising or lowering the blade, contact a DEWALT authorized 60º service center. FIG. 42 Q FF V D .... Clean out the excess dust, and UU V V clamped to the rip fence and the featherboard can be used to the desired Your table saw on the portion of the workpiece in front of bevel crosscutting and mitering. The height adjustment gear may become clogged. Compound Mitering and dust ...


