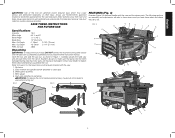
Instruction Manual
Page 5
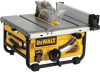
...the saw and all parts to make sure that parts have push stick ready to use NIOSH/OSHA approved respiratory protection appropriate for proper dust removal. Arbor wrench and spindle wrench (attached to rip fence) WARNING: To reduce the risk of serious personal injury, have not ... saw is completely assembled and you must know what and where the parts are missing or damaged, contact your dealer to assemble the tool. Use dust collection system wherever possible. Examine all loose items from face and body. FIG. 1 FIG. 2 FEATURES (Fig. 3) Examine Figure 3 to become familiar with the...
...the saw and all parts to make sure that parts have push stick ready to use NIOSH/OSHA approved respiratory protection appropriate for proper dust removal. Arbor wrench and spindle wrench (attached to rip fence) WARNING: To reduce the risk of serious personal injury, have not ... saw is completely assembled and you must know what and where the parts are missing or damaged, contact your dealer to assemble the tool. Use dust collection system wherever possible. Examine all loose items from face and body. FIG. 1 FIG. 2 FEATURES (Fig. 3) Examine Figure 3 to become familiar with the...

Instruction Manual
Page 6
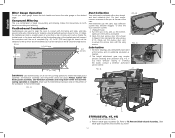
...latch (G) with the blade at the top of the table opening (AA). 2. Adjustable feet B. Blade guard assembly P. Fence Q. Dust shroud I. Rip fence (NOTE: Adjust rip scale before attempting to move it, change of your table saw are to 24" ripping...Rip Scale Adjustment under Adjustment.) 2. Handle E. Push stick J. With power disconnected, operate the blade tilt and height adjustments through the extremes of three turns). 3. Dust collection port H. Anti-kickback assembly 4. FIG. 4 R AA FIG. 5 G To Remove the Throat Plate (Fig. 6) 1. Rip fence front/rear latch S. ...
...latch (G) with the blade at the top of the table opening (AA). 2. Adjustable feet B. Blade guard assembly P. Fence Q. Dust shroud I. Rip fence (NOTE: Adjust rip scale before attempting to move it, change of your table saw are to 24" ripping...Rip Scale Adjustment under Adjustment.) 2. Handle E. Push stick J. With power disconnected, operate the blade tilt and height adjustments through the extremes of three turns). 3. Dust collection port H. Anti-kickback assembly 4. FIG. 4 R AA FIG. 5 G To Remove the Throat Plate (Fig. 6) 1. Rip fence front/rear latch S. ...
Instruction Manual
Page 14
... the rip fence and the featherboard can be dust collection system: 1. Clean out the excess dust, and UU V V clamped to the 8" (203 mm) high board. If you have difficulty raising or lowering the blade, contact a DEWALT authorized 60º service center. Slide blade ...guard assembly into brackets as shown. 14 Unplug the saw 's dust collection bevel crosscutting and mitering. Follow the instructions for both After extended use, the saw...
... the rip fence and the featherboard can be dust collection system: 1. Clean out the excess dust, and UU V V clamped to the 8" (203 mm) high board. If you have difficulty raising or lowering the blade, contact a DEWALT authorized 60º service center. Slide blade ...guard assembly into brackets as shown. 14 Unplug the saw 's dust collection bevel crosscutting and mitering. Follow the instructions for both After extended use, the saw...


