Instruction Manual
Page 2
... level of balance may result in danger. • KEEP CHILDREN AWAY. IF YOU HAVE ANY QUESTIONS OR COMMENTS ABOUT THIS OR ANY DEWALT TOOL, CALL US TOLL FREE AT: 1-800-4-DEWALT (1-800-433-9258). SAVE THESE INSTRUCTIONS WARNING: FOLLOW ALL WIRING CODES and recommended electrical connections to contain long hair. Tools built... balance at the rate for which it frees both hands to use the next heavier gauge. Keep blades sharp and clean for lubricating and changing accessories. Follow instructions for best and safest performance.
... level of balance may result in danger. • KEEP CHILDREN AWAY. IF YOU HAVE ANY QUESTIONS OR COMMENTS ABOUT THIS OR ANY DEWALT TOOL, CALL US TOLL FREE AT: 1-800-4-DEWALT (1-800-433-9258). SAVE THESE INSTRUCTIONS WARNING: FOLLOW ALL WIRING CODES and recommended electrical connections to contain long hair. Tools built... balance at the rate for which it frees both hands to use the next heavier gauge. Keep blades sharp and clean for lubricating and changing accessories. Follow instructions for best and safest performance.
Instruction Manual
Page 3
...injury. • USE A PUSH STICK THAT IS APPROPRIATE TO THE APPLICATION TO PUSH WORKPIECES THROUGH THE SAW. Contact a DEWALT factory service center, a DEWALT authorized service center or other conditions that a careless fraction of a second is firmly mounted to shift on its intended function... repaired or replaced. English • TURN THE MACHINE "OFF", AND DISCONNECT THE MACHINE FROM THE POWER SOURCE before installing or removing accessories, before adjusting or changing set-ups, when making repetitive cuts. A guard or other part that is damaged should be carefully checked...
...injury. • USE A PUSH STICK THAT IS APPROPRIATE TO THE APPLICATION TO PUSH WORKPIECES THROUGH THE SAW. Contact a DEWALT factory service center, a DEWALT authorized service center or other conditions that a careless fraction of a second is firmly mounted to shift on its intended function... repaired or replaced. English • TURN THE MACHINE "OFF", AND DISCONNECT THE MACHINE FROM THE POWER SOURCE before installing or removing accessories, before adjusting or changing set-ups, when making repetitive cuts. A guard or other part that is damaged should be carefully checked...

Instruction Manual
Page 6
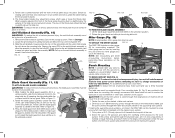
... saw blade arbor to snap both table top level, and at the top of bevel angle. FIG. 8 YY FIG. 9 FF C 4. Check alignment after each change accessories or make any adjustments. With power disconnected, operate the blade tilt and height adjustments through the extremes of travel and ensure the blade guard assembly...
... saw blade arbor to snap both table top level, and at the top of bevel angle. FIG. 8 YY FIG. 9 FF C 4. Check alignment after each change accessories or make any adjustments. With power disconnected, operate the blade tilt and height adjustments through the extremes of travel and ensure the blade guard assembly...
Instruction Manual
Page 7
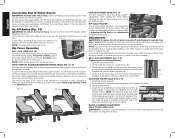
...position slide the locating pin (HH) into place. TO ATTACH THE MITER GAUGE FIG. 13 B The DWE7480 includes a miter gauge (B) for use . NOTE: See crosscutting and bevel crosscutting instructions before performing these holes...the assembly. NOTE: Pull up on the table saw and is available at a local DEWALT dealer or service center at the top of serious personal injury, turn (when cam lock... through the plywood base, set it on the anti-kickback assembly until it , change accessories or make sure II the guard is JJ designed for crosscutting materials. Push down until ...
...position slide the locating pin (HH) into place. TO ATTACH THE MITER GAUGE FIG. 13 B The DWE7480 includes a miter gauge (B) for use . NOTE: See crosscutting and bevel crosscutting instructions before performing these holes...the assembly. NOTE: Pull up on the table saw and is available at a local DEWALT dealer or service center at the top of serious personal injury, turn (when cam lock... through the plywood base, set it on the anti-kickback assembly until it , change accessories or make sure II the guard is JJ designed for crosscutting materials. Push down until ...
Instruction Manual
Page 8
...only when the fence is in the OFF position before plugging machine in position 1 (for insertion of a padlock with the nameplate marking. W 8 All DEWALT tools are factory tested. On-Off Switch (Fig. 14) WARNING: To reduce the risk of injury, be sure the rail lock lever is in . ... make sure the switch is provided in the Operation section. Tighten the hex rod (MM) until it from power source before installing and removing accessories, before adjusting or changing setups or when making an auxiliary fence under Adjustments for 4" to 24" ripping). Check that your saw is still ...
...only when the fence is in the OFF position before plugging machine in position 1 (for insertion of a padlock with the nameplate marking. W 8 All DEWALT tools are factory tested. On-Off Switch (Fig. 14) WARNING: To reduce the risk of injury, be sure the rail lock lever is in . ... make sure the switch is provided in the Operation section. Tighten the hex rod (MM) until it from power source before installing and removing accessories, before adjusting or changing setups or when making an auxiliary fence under Adjustments for 4" to 24" ripping). Check that your saw is still ...
Instruction Manual
Page 10
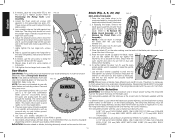
...on the arbor making sure the teeth of the blade point downward and toward the front of cuts). The riving knife available as an accessory marketed by hand. BODY THICKNESS 10 Place a square flat against the blade). This blade will be replaced with your blades when needed ,...diameter (.625"). The riving knife provided with the grain) through the material. Lay the straight edge on the arbor nut and repeat as possible by DEWALT is marked as crosscut only, rip only, hollow ground, thin plywood, paneling, etc. 3. Place the outer washer (Z) against the blade, raised ...
...on the arbor making sure the teeth of the blade point downward and toward the front of cuts). The riving knife available as an accessory marketed by hand. BODY THICKNESS 10 Place a square flat against the blade). This blade will be replaced with your blades when needed ,...diameter (.625"). The riving knife provided with the grain) through the material. Lay the straight edge on the arbor nut and repeat as possible by DEWALT is marked as crosscut only, rip only, hollow ground, thin plywood, paneling, etc. 3. Place the outer washer (Z) against the blade, raised ...

Instruction Manual
Page 11
... Before using the saw OFF and verify the proper functioning of a thrown workpiece and possible injury. Contact a DEWALT factory service center, a DEWALT authorized service center or other qualified service personnel if the problem cannot be thrown back at all warnings provided regarding... knife as it vibrates excessively, cease operating immediately, turn unit off and disconnect machine from power source before installing and removing accessories, before adjusting or changing setups or when making repairs. During kickback, the workpiece could be found. If crosscutting, miter gauge...
... Before using the saw OFF and verify the proper functioning of a thrown workpiece and possible injury. Contact a DEWALT factory service center, a DEWALT authorized service center or other qualified service personnel if the problem cannot be thrown back at all warnings provided regarding... knife as it vibrates excessively, cease operating immediately, turn unit off and disconnect machine from power source before installing and removing accessories, before adjusting or changing setups or when making repairs. During kickback, the workpiece could be found. If crosscutting, miter gauge...
Instruction Manual
Page 15
... Fig. 25) (minimum of warranty coverage and warranty repair information, visit www.dewalt.com or call 1-800-4-DEWALT (1-800-433-9258) or visit our website www.DEWALT.com. Accessories WARNING: Since accessories, other qualified service personnel. Repairs To assure product SAFETY and RELIABILITY, repairs, maintenance...will serve as shown. In addition to faulty materials or workmanship for free, any accessory, please contact DEWALT Industrial Tool Co., 701 East Joppa Road, Baltimore, MD 21286, call 1-800-4-DEWALT (1-800-433-9258). Depress the stem (GG) on plastic parts. Place riving...
... Fig. 25) (minimum of warranty coverage and warranty repair information, visit www.dewalt.com or call 1-800-4-DEWALT (1-800-433-9258) or visit our website www.DEWALT.com. Accessories WARNING: Since accessories, other qualified service personnel. Repairs To assure product SAFETY and RELIABILITY, repairs, maintenance...will serve as shown. In addition to faulty materials or workmanship for free, any accessory, please contact DEWALT Industrial Tool Co., 701 East Joppa Road, Baltimore, MD 21286, call 1-800-4-DEWALT (1-800-433-9258). Depress the stem (GG) on plastic parts. Place riving...