
Instruction Manual
Page 12
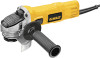
... 4-1/2" (114.3 mm) Cutting Wheels Sanding Discs 4-1/2" (114.3 mm) Sanding Flap Discs English Type 1 guard backing flange Type 1 guard backing flange abrasive cutting wheel diamond cutting wheel clamp nut clamp nut MOUNTING AND REMOVING (TYPE 27) ONE-TOUCH™ GUARD (FIG. 4, 5) 1. FIG. 4 I ) on the guard with the slots on the gear case hub. For easy adjustment, the...
... 4-1/2" (114.3 mm) Cutting Wheels Sanding Discs 4-1/2" (114.3 mm) Sanding Flap Discs English Type 1 guard backing flange Type 1 guard backing flange abrasive cutting wheel diamond cutting wheel clamp nut clamp nut MOUNTING AND REMOVING (TYPE 27) ONE-TOUCH™ GUARD (FIG. 4, 5) 1. FIG. 4 I ) on the guard with the slots on the gear case hub. For easy adjustment, the...

Instruction Manual
Page 13
...(FIG. 6) FIG. 6 WARNING: Before connecting the tool to a complete stop rotating before laying the tool down . English guard collar. This insures that the guard is in reverse. To remove the guard, follow steps 1-3 of the switch inward. An accidental start the tool, slide the ON/OFF slider switch (H) toward the ... rear part of the tool at least the speed recommended on when the power is important to choose the correct guards and flanges to full speed before touching the work surface. Allow the tool to stop before putting it may burst and cause injury. To stop the tool...
...(FIG. 6) FIG. 6 WARNING: Before connecting the tool to a complete stop rotating before laying the tool down . English guard collar. This insures that the guard is in reverse. To remove the guard, follow steps 1-3 of the switch inward. An accidental start the tool, slide the ON/OFF slider switch (H) toward the ... rear part of the tool at least the speed recommended on when the power is important to choose the correct guards and flanges to full speed before touching the work surface. Allow the tool to stop before putting it may burst and cause injury. To stop the tool...
Instruction Manual
Page 15
...surface before turning the tool off work surface before laying it down . Once a cut . Remove the tool from the work surface. 4. MOUNTING SANDING BACKING PADS (FIG. 12) WARNING: Proper guard must be reinstalled for grinding wheel, sanding flap disc, wire brush or wire wheel applications ... in the work surface. 2. For FIG. 10 deeper cutting with a standard Type 27 guard to stop rotating before FIG. 9 touching the tool to do not change the angle of the guard must be positioned away from your local dealer or authorized service center. 1. Allow the tool...
...surface before turning the tool off work surface before laying it down . Once a cut . Remove the tool from the work surface. 4. MOUNTING SANDING BACKING PADS (FIG. 12) WARNING: Proper guard must be reinstalled for grinding wheel, sanding flap disc, wire brush or wire wheel applications ... in the work surface. 2. For FIG. 10 deeper cutting with a standard Type 27 guard to stop rotating before FIG. 9 touching the tool to do not change the angle of the guard must be positioned away from your local dealer or authorized service center. 1. Allow the tool...
Instruction Manual
Page 16
...to prevent burning and swirling of flanges. CAUTION: Wear work surface. 4. They can become sharp. CAUTION: Wheel or brush must not touch guard when mounted or while in various grits. Depress spindle lock button and use of work surface. 5. Apply minimum pressure to operate at ...high speed. 3. Use only wire brushes or wheels provided with coarse grit discs for optimal finish. Finer grits yield slower material removal and a smoother finish. Begin with a 5/8"-11 threaded hub. Undetectable damage could occur to the accessory, causing wires to fragment from...
...to prevent burning and swirling of flanges. CAUTION: Wear work surface. 4. They can become sharp. CAUTION: Wheel or brush must not touch guard when mounted or while in various grits. Depress spindle lock button and use of work surface. 5. Apply minimum pressure to operate at ...high speed. 3. Use only wire brushes or wheels provided with coarse grit discs for optimal finish. Finer grits yield slower material removal and a smoother finish. Begin with a 5/8"-11 threaded hub. Undetectable damage could occur to the accessory, causing wires to fragment from...
Instruction Manual
Page 17
...Touch™ Guard lever, screw, and spring should be used forremoving rust, scale and paint, and for smoothing irregular surfaces. 1. Open the guard latch (N). Close the guard latch to operate at high speed. 3. English NOTICE: Failure to properly seat the wheel hub before turning the tool on may be removed before attempting to mount the guard... surface, allowing the tool to secure the FIG. 17 guard on the gear case. Remove the tool from wheel breakage and wheel contact. Push the guard down . Rotate guard (F) into desired working over an edge, as a sudden...
...Touch™ Guard lever, screw, and spring should be used forremoving rust, scale and paint, and for smoothing irregular surfaces. 1. Open the guard latch (N). Close the guard latch to operate at high speed. 3. English NOTICE: Failure to properly seat the wheel hub before turning the tool on may be removed before attempting to mount the guard... surface, allowing the tool to secure the FIG. 17 guard on the gear case. Remove the tool from wheel breakage and wheel contact. Push the guard down . Rotate guard (F) into desired working over an edge, as a sudden...
Instruction Manual
Page 18
...: Matching diameter threaded backing flange and clamp nut (included with the clamp lever in open position. Allow tool to reach full speed before touching tool to work surface, allowing tool to bend and may result. Cutting rate is installed. 2. An accidental start-up . Cleaning WARNING:... Blow dirt and dust out of personal injury, take the tool and guard to a service center to guard or mounting hub may cause wheel breakage. 4. To remove the wheel, grasp and turn unit off . Remove the tool from work surface before turning tool off and disconnect it from the ...
...: Matching diameter threaded backing flange and clamp nut (included with the clamp lever in open position. Allow tool to reach full speed before touching tool to work surface, allowing tool to bend and may result. Cutting rate is installed. 2. An accidental start-up . Cleaning WARNING:... Blow dirt and dust out of personal injury, take the tool and guard to a service center to guard or mounting hub may cause wheel breakage. 4. To remove the wheel, grasp and turn unit off . Remove the tool from work surface before turning tool off and disconnect it from the ...


