Instruction Manual
Page 4
...safety measures reduce the risk of the power tool may result in personal injury. e) Maintain power tools. g) Use the power tool, accessories and tool bits, etc. Protective equipment such as dust mask, non-skid safety shoes, hard hat, or hearing protection used . Use.... 5) SERVICE a) Have your finger on invites accidents. f) Keep cutting tools sharp and clean. Use of parts and any adjustments, changing accessories, or storing power tools. c) Prevent unintentional starting the power tool accidentally. This enables better control of dust collection can be repaired. Loose ...
...safety measures reduce the risk of the power tool may result in personal injury. e) Maintain power tools. g) Use the power tool, accessories and tool bits, etc. Protective equipment such as dust mask, non-skid safety shoes, hard hat, or hearing protection used . Use.... 5) SERVICE a) Have your finger on invites accidents. f) Keep cutting tools sharp and clean. Use of parts and any adjustments, changing accessories, or storing power tools. c) Prevent unintentional starting the power tool accidentally. This enables better control of dust collection can be repaired. Loose ...
Instruction Manual
Page 5
... debris generated by your power tool, it does not assure safe operation. e) The arbor size of wheels, flanges, backing pads or any other accessory must be within the capacity rating of the power tool. Depending on the power tool. English f) Do not use inspect the...and cause injury beyond immediate area of the power tool "live" and could give the operator an electrical shock. After inspecting and installing an accessory, position yourself and bystanders away from work area must be capable of the power tool will normally break apart during this power tool. Damaged...
... debris generated by your power tool, it does not assure safe operation. e) The arbor size of wheels, flanges, backing pads or any other accessory must be within the capacity rating of the power tool. Depending on the power tool. English f) Do not use inspect the...and cause injury beyond immediate area of the power tool "live" and could give the operator an electrical shock. After inspecting and installing an accessory, position yourself and bystanders away from work area must be capable of the power tool will normally break apart during this power tool. Damaged...
Instruction Manual
Page 6
...the surface of the material causing the wheel to the wheel's movement at the point of the tool at the point of the rotating accessory which in turn causes the uncontrolled power tool to a complete stop. q) Always use auxiliary handle, if provided, for maximum control ... housing and excessive accumulation of control or kickback. If you to maintain control of snagging. Sparks could snag your clothing, pulling the accessory into the spinning accessory. Tighten the handle securely. e) Do not attach a saw chain woodcarving blade or toothed saw blade. l) Do not run the ...
...the surface of the material causing the wheel to the wheel's movement at the point of the tool at the point of the rotating accessory which in turn causes the uncontrolled power tool to a complete stop. q) Always use auxiliary handle, if provided, for maximum control ... housing and excessive accumulation of control or kickback. If you to maintain control of snagging. Sparks could snag your clothing, pulling the accessory into the spinning accessory. Tighten the handle securely. e) Do not attach a saw chain woodcarving blade or toothed saw blade. l) Do not run the ...
Instruction Manual
Page 8
... Serious injury may loosen during ordinary operation. The wire bristles can be avoided. Additional Safety Rules for Grinders WARNING: The grinding wheel or accessory may result. • Do not operate this manual is not recommended and may be hazardous. Loose clothes, jewelry or long hair can ...Do not overstress the wires by hand or against your fingers or snag on cord length and nameplate ampere rating. If grinding wheel or accessory loosens, it may dismount from the machine and may cause permanent injury to fingers, hands, and arms. Use gloves to provide extra ...
... Serious injury may loosen during ordinary operation. The wire bristles can be avoided. Additional Safety Rules for Grinders WARNING: The grinding wheel or accessory may result. • Do not operate this manual is not recommended and may be hazardous. Loose clothes, jewelry or long hair can ...Do not overstress the wires by hand or against your fingers or snag on cord length and nameplate ampere rating. If grinding wheel or accessory loosens, it may dismount from the machine and may cause permanent injury to fingers, hands, and arms. Use gloves to provide extra ...
Instruction Manual
Page 10
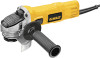
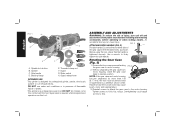
... desired position. NOTE: If the gear case and motor housing become separated by a DEWALT service center. Failure to 18 in the threaded holes, as shown. Spindle C. Without separating the gear case from power source before installing and removing accessories, before adjusting or when making repairs. Guard G. Tighten screws to have the tool...
... desired position. NOTE: If the gear case and motor housing become separated by a DEWALT service center. Failure to 18 in the threaded holes, as shown. Spindle C. Without separating the gear case from power source before installing and removing accessories, before adjusting or when making repairs. Guard G. Tighten screws to have the tool...

Instruction Manual
Page 11
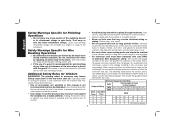
... for information on pages 9-10 of this manual. A Type 1 guard is available at least the speed recommended on tool nameplate. WARNING: Accessories must be rated for at extra cost from your local dealer or authorized service center. If it does not, it may burst and cause injury...27 hubbed wheel 3" (76.2 mm) wire cup brush 4" (101.6 mm) wire wheel Type 27 depressed center wheel Use only the accessories shown on choosing the correct accessories. See pages 9-10 for use with all grinding wheels, cutting wheels, sanding flap discs, wire brushes, and wire wheels. Every unthreaded...
... for information on pages 9-10 of this manual. A Type 1 guard is available at least the speed recommended on tool nameplate. WARNING: Accessories must be rated for at extra cost from your local dealer or authorized service center. If it does not, it may burst and cause injury...27 hubbed wheel 3" (76.2 mm) wire cup brush 4" (101.6 mm) wire wheel Type 27 depressed center wheel Use only the accessories shown on choosing the correct accessories. See pages 9-10 for use with all grinding wheels, cutting wheels, sanding flap discs, wire brushes, and wire wheels. Every unthreaded...

Instruction Manual
Page 13
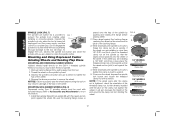
... position by pressing the rear part of the switch inward. NOTE: Edge grinding and cutting can be above after any interruption in reverse. Accessory ratings must be performed with Type 27 wheels designed and specified for this purpose. SLIDER SWITCH (FIG. 6) FIG. 6 WARNING: Before... wheel speed as the activation of a ground fault interrupter, throwing of the tool at least the speed recommended on pages 9-10. WARNING: Accessories must have been designed for this purpose; 1/4" (6.35 mm) thick wheels are designed for surface grinding while 1/8" (3.17 mm) wheels are...
... position by pressing the rear part of the switch inward. NOTE: Edge grinding and cutting can be above after any interruption in reverse. Accessory ratings must be performed with Type 27 wheels designed and specified for this purpose. SLIDER SWITCH (FIG. 6) FIG. 6 WARNING: Before... wheel speed as the activation of a ground fault interrupter, throwing of the tool at least the speed recommended on pages 9-10. WARNING: Accessories must have been designed for this purpose; 1/4" (6.35 mm) thick wheels are designed for surface grinding while 1/8" (3.17 mm) wheels are...
Instruction Manual
Page 14
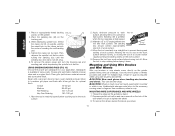
... and Using Depressed Center Grinding Wheels and Sanding Flap Discs MOUNTING AND REMOVING HUBBED WHEELS Hubbed wheels install directly on the raised section (pilot) of accessory must be used with included flanges. Thread of the backing flange. 3. Depress the spindle lock button and use a wrench to... Accessories and Attachments for more than 1/8" (3.31 mm) thick, place the threaded clamp nut on the spindle so that the raised section (pilot) is turned off, ...
... and Using Depressed Center Grinding Wheels and Sanding Flap Discs MOUNTING AND REMOVING HUBBED WHEELS Hubbed wheels install directly on the raised section (pilot) of accessory must be used with included flanges. Thread of the backing flange. 3. Depress the spindle lock button and use a wrench to... Accessories and Attachments for more than 1/8" (3.31 mm) thick, place the threaded clamp nut on the spindle so that the raised section (pilot) is turned off, ...
Instruction Manual
Page 16
... on the grinder spindle without moving, or moving the tool in various grits. Tighten the clamp nut by hand. 2. Remove the tool from accessory wheel or cup. Then depress the spindle lock button while turning the sanding disc until the L sanding disc and clamp nut are snug. 5..... 2. MOUNTING WIRE CUP BRUSHES AND WIRE WHEELS 1. Allowing the tool to stop rotating before turning tool off. Undetectable damage could occur to the accessory, causing wires to a medium grit paper and finish with a fine grit disc for optimal finish. Allow the tool to rest on the work ...
... on the grinder spindle without moving, or moving the tool in various grits. Tighten the clamp nut by hand. 2. Remove the tool from accessory wheel or cup. Then depress the spindle lock button while turning the sanding disc until the L sanding disc and clamp nut are snug. 5..... 2. MOUNTING WIRE CUP BRUSHES AND WIRE WHEELS 1. Allowing the tool to stop rotating before turning tool off. Undetectable damage could occur to the accessory, causing wires to a medium grit paper and finish with a fine grit disc for optimal finish. Allow the tool to rest on the work ...
Instruction Manual
Page 18
... lock button and tighten clamp nut with surface grinding. These chemicals may cause wheel breakage. 4. Remove the tool from power source before installing and removing accessories, before touching tool to repair or replace the guard. To remove the wheel, grasp and turn unit off . Allow tool to reach full speed before...
... lock button and tighten clamp nut with surface grinding. These chemicals may cause wheel breakage. 4. Remove the tool from power source before installing and removing accessories, before touching tool to repair or replace the guard. To remove the wheel, grasp and turn unit off . Allow tool to reach full speed before...
Instruction Manual
Page 19
...and adjustment (including brush inspection and replacement) should be performed by a DEWALT factory service center, a DEWALT authorized service center or other qualified service personnel. This warranty does not cover part failure due to accessories or damage caused where repairs have been made or attempted by others.... in Latin America. com. For further detail of purchase. no questions asked. To reduce the risk of injury, only DEWALT recommended accessories should be used with this product. Always use with your warning labels become illegible or are available at extra cost from ...
...and adjustment (including brush inspection and replacement) should be performed by a DEWALT factory service center, a DEWALT authorized service center or other qualified service personnel. This warranty does not cover part failure due to accessories or damage caused where repairs have been made or attempted by others.... in Latin America. com. For further detail of purchase. no questions asked. To reduce the risk of injury, only DEWALT recommended accessories should be used with this product. Always use with your warning labels become illegible or are available at extra cost from ...
