Owners Manual
Page 2
... CORRESPONDANTE DE LA PRISE ET POUSSER JUSQU' AU FOND. This Class B digital apparatus complies with the manufacture's instructions. 8. A grounding type plug has two blades and a third grounding prong. Only use this manual, meets FCC requirements. CAUTION: 1. Please, record and retain the Model name and serial number of the obsolete outlet. 10. Cet appareil numérique de la...
... CORRESPONDANTE DE LA PRISE ET POUSSER JUSQU' AU FOND. This Class B digital apparatus complies with the manufacture's instructions. 8. A grounding type plug has two blades and a third grounding prong. Only use this manual, meets FCC requirements. CAUTION: 1. Please, record and retain the Model name and serial number of the obsolete outlet. 10. Cet appareil numérique de la...
Owners Manual
Page 5
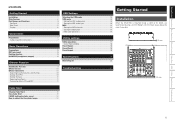
... Started Installation 1 Main Features 2 Part Names and Functions 3 Top Panel 3 Rear Panel 5 Display 6 Connections Preparations 7 Cables Used for Connections 7 Basic Operations Preparations 8 MIC (mic input 8 Ducking function 8 MONITOR (headphones output 8 Effector Function BeatBreaker Function 9 Effecter Screen 10 Effecter Operations 10 Selecting the effector units and channels 10 Setting the BPM 10 Setting the beat 11 Selecting the effects 11 Turning the effects ON and OFF 11 USB Settings Selecting the USB mode 13 USB audio 13 Setting the USB audio output 13 Setting...
... Started Installation 1 Main Features 2 Part Names and Functions 3 Top Panel 3 Rear Panel 5 Display 6 Connections Preparations 7 Cables Used for Connections 7 Basic Operations Preparations 8 MIC (mic input 8 Ducking function 8 MONITOR (headphones output 8 Effector Function BeatBreaker Function 9 Effecter Screen 10 Effecter Operations 10 Selecting the effector units and channels 10 Setting the BPM 10 Setting the beat 11 Selecting the effects 11 Turning the effects ON and OFF 11 USB Settings Selecting the USB mode 13 USB audio 13 Setting the USB audio output 13 Setting...
Owners Manual
Page 6
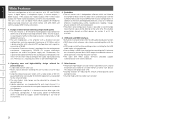
... • Isolator equalizers are linked to configure the audio signal processing unit. MIDI output is a MIDI layer function for each input channel. Getting Started Connections Basic Operations Effector Function Fader Start USB Utility Specifications Troubleshooting Main Features The basic configuration of this unit consists of 4 CD and PHONO inputs, 4 digital inputs, 2 microphone inputs, 2 master outputs, 1 booth output, 1 REC output and 1 digital output while 1 effect input/ output and 4 USB audio input/output systems are used in the power supply unit. Operating ease and high...
... • Isolator equalizers are linked to configure the audio signal processing unit. MIDI output is a MIDI layer function for each input channel. Getting Started Connections Basic Operations Effector Function Fader Start USB Utility Specifications Troubleshooting Main Features The basic configuration of this unit consists of 4 CD and PHONO inputs, 4 digital inputs, 2 microphone inputs, 2 master outputs, 1 booth output, 1 REC output and 1 digital output while 1 effect input/ output and 4 USB audio input/output systems are used in the power supply unit. Operating ease and high...
Owners Manual
Page 7
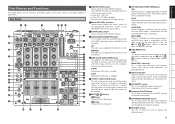
r USB ASSIGN CH/MASTER button This is stopped. STOP: Sending the MIDI clock is used to 4). i TAP LOCK/AUTO/INPUT BPM button TAP: When this button is tapped repeatedly, the BPM (Beats Per Minute) value is released. When it is pressed again, the mode is measured using the intervals between the taps. Refer to adjust the ratio of original and effected sound. 3 e BOOTH LEVEL control Adjusts the level of the MASTER outputs. MASTER: The signals are assigned to the channels (1 to control the ON and OFF settings of...
r USB ASSIGN CH/MASTER button This is stopped. STOP: Sending the MIDI clock is used to 4). i TAP LOCK/AUTO/INPUT BPM button TAP: When this button is tapped repeatedly, the BPM (Beats Per Minute) value is released. When it is pressed again, the mode is measured using the intervals between the taps. Refer to adjust the ratio of original and effected sound. 3 e BOOTH LEVEL control Adjusts the level of the MASTER outputs. MASTER: The signals are assigned to the channels (1 to control the ON and OFF settings of...

Owners Manual
Page 8
...the mic input signals. Also, the EQ control rings light up blue. Getting Started Connections Basic Operations Effector Function Fader Start USB Utility Specifications Troubleshooting Q5 Effect ON/OFF button This sets the effects of the Main Mic input. W1 SPLIT CUE button There are monitored using the headphones. Stereo mode (SPLIT CUE OFF): The cue signals and master signals can be monitored in stereo. W6 MIC SEND LEVEL control This is used to be selected for each of all the bands are displayed. E8 Channel EFX SEND 1, 2 buttons These buttons enable...
...the mic input signals. Also, the EQ control rings light up blue. Getting Started Connections Basic Operations Effector Function Fader Start USB Utility Specifications Troubleshooting Q5 Effect ON/OFF button This sets the effects of the Main Mic input. W1 SPLIT CUE button There are monitored using the headphones. Stereo mode (SPLIT CUE OFF): The cue signals and master signals can be monitored in stereo. W6 MIC SEND LEVEL control This is used to be selected for each of all the bands are displayed. E8 Channel EFX SEND 1, 2 buttons These buttons enable...
Owners Manual
Page 9
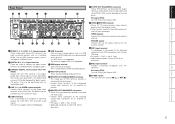
...) terminals • This stereo pair of CD/Media Players and digital players. Hot, 3. SEND (output): Connect this balanced combo jack with XLR connector or with 1/4" terminals. w DIGITAL IN 1, 2, 3, 4 input terminals These are adjusted using the 3.5 mm stereo mini cord. i REC OUT terminals These are not affected by the master level adjustments. Q4 MIC1 input terminal A microphone is connected to this to send and receive the USB MIDI, HID and USB audio signals. The terminal supports USB 2.0 HighSpeed. Pin...
...) terminals • This stereo pair of CD/Media Players and digital players. Hot, 3. SEND (output): Connect this balanced combo jack with XLR connector or with 1/4" terminals. w DIGITAL IN 1, 2, 3, 4 input terminals These are adjusted using the 3.5 mm stereo mini cord. i REC OUT terminals These are not affected by the master level adjustments. Q4 MIC1 input terminal A microphone is connected to this to send and receive the USB MIDI, HID and USB audio signals. The terminal supports USB 2.0 HighSpeed. Pin...
Owners Manual
Page 10
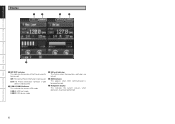
w USB A/USB B indicator This indicates the current USB mode. r MIDI indicator This appears when MIDI communication is being used. USB A: USB host mode USB B: USB device mode e EQ Lock indicator This flashes when the equalizers and faders are locked. INT: The internal Preset information is being used. t Navigation display This indicates the current statuses when operations have been performed. 6 Getting Started Connections Basic Operations Effector Function Fader Start USB Utility Specifications Troubleshooting Display q w e r t q INT/EXT indicator This...
w USB A/USB B indicator This indicates the current USB mode. r MIDI indicator This appears when MIDI communication is being used. USB A: USB host mode USB B: USB device mode e EQ Lock indicator This flashes when the equalizers and faders are locked. INT: The internal Preset information is being used. t Navigation display This indicates the current statuses when operations have been performed. 6 Getting Started Connections Basic Operations Effector Function Fader Start USB Utility Specifications Troubleshooting Display q w e r t q INT/EXT indicator This...
Owners Manual
Page 11
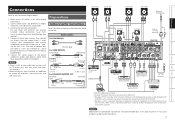
... input units. Getting Started Connections Basic Operations Effector Function Fader Start USB Utility Specifications Troubleshooting Connections Refer to the power amplifier(s) and/or tape deck(s) and/or Solid State recorder(s) and/or CD recorder(s). Use high-quality, audio cables. 3. Connect your mixer, and finally any effects into the stereo Effect, if used. Make sure all stereo input sources. Loose connections cause hum, noise, or intermittence that can be connected to the DN-X1700 by turning...
... input units. Getting Started Connections Basic Operations Effector Function Fader Start USB Utility Specifications Troubleshooting Connections Refer to the power amplifier(s) and/or tape deck(s) and/or Solid State recorder(s) and/or CD recorder(s). Use high-quality, audio cables. 3. Connect your mixer, and finally any effects into the stereo Effect, if used. Make sure all stereo input sources. Loose connections cause hum, noise, or intermittence that can be connected to the DN-X1700 by turning...
Owners Manual
Page 12
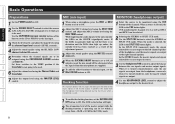
...the mic sound will light. 2 The attenuation level of the master output while the ducking function is not going to be used . Getting Started Connections Basic Operations Effector Function Fader Start USB Utility Specifications Troubleshooting Basic Operations Preparations MIC (mic input) MONITOR (headphones output) 1 Set the POWER switch to ON. 2 Use the SOURCE SELECT controls to select the sources (LN1-LN4, D1-D4, USB) of channels 1 to 4 which are to be used . 6 Adjust the volume level using the Channel Fader and Crossfader. 7 Adjust the output level using the MASTER LEVEL control...
...the mic sound will light. 2 The attenuation level of the master output while the ducking function is not going to be used . Getting Started Connections Basic Operations Effector Function Fader Start USB Utility Specifications Troubleshooting Basic Operations Preparations MIC (mic input) MONITOR (headphones output) 1 Set the POWER switch to ON. 2 Use the SOURCE SELECT controls to select the sources (LN1-LN4, D1-D4, USB) of channels 1 to 4 which are to be used . 6 Adjust the volume level using the Channel Fader and Crossfader. 7 Adjust the output level using the MASTER LEVEL control...
Owners Manual
Page 13
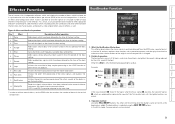
... acoustic effects as well. The beat pattern is being played lights up blue. Getting Started Connections Basic Operations Effector Function Fader Start USB Utility Specifications Troubleshooting Effector Function BeatBreaker Function The unit comes with 2 independent effectors which are linked to ON at the beginning is added. Adds echo signals which makes it can be selected at a time into 16 sections, replaces these blocks are lighted, the sound is selected using...
... acoustic effects as well. The beat pattern is being played lights up blue. Getting Started Connections Basic Operations Effector Function Fader Start USB Utility Specifications Troubleshooting Effector Function BeatBreaker Function The unit comes with 2 independent effectors which are linked to ON at the beginning is added. Adds echo signals which makes it can be selected at a time into 16 sections, replaces these blocks are lighted, the sound is selected using...
Owners Manual
Page 14
... be input manually. The insertion operation is initiated and just the one channel is selected. * It is not possible to be selected for over 2 seconds. The BPM can now be used . w BPM mode indicator AUTO : AUTO is displayed when the INPUT mode has been selected. r Lock icon This lights when BPM is displayed when the TAP input mode has been selected. With the mic input and master output: Using the EFX INS 1 or 2 button, select the effect unit...
... be input manually. The insertion operation is initiated and just the one channel is selected. * It is not possible to be selected for over 2 seconds. The BPM can now be used . w BPM mode indicator AUTO : AUTO is displayed when the INPUT mode has been selected. r Lock icon This lights when BPM is displayed when the TAP input mode has been selected. With the mic input and master output: Using the EFX INS 1 or 2 button, select the effect unit...

Owners Manual
Page 15
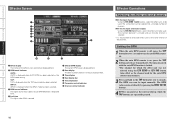
... CD or LINE4 CD. 2 Turn on CD player. Getting Started Connections Basic Operations Effector Function Fader Start USB Utility Specifications Troubleshooting Setting the beat 1 Press the BEAT , buttons to set to Assign A.) 5 Set the standby mode on CD player. 6 Use the CROSSFADER CONTOUR control to start the player, move up the Channel input fader (CH FADER) and the CD player will begin playing. The time can be adjusted by pressing the BEAT , buttons. 3 When the TIME button is pressed again, the...
... CD or LINE4 CD. 2 Turn on CD player. Getting Started Connections Basic Operations Effector Function Fader Start USB Utility Specifications Troubleshooting Setting the beat 1 Press the BEAT , buttons to set to Assign A.) 5 Set the standby mode on CD player. 6 Use the CROSSFADER CONTOUR control to start the player, move up the Channel input fader (CH FADER) and the CD player will begin playing. The time can be adjusted by pressing the BEAT , buttons. 3 When the TIME button is pressed again, the...

Owners Manual
Page 16
...; Getting Started Connections Basic Operations Effector Function Fader Start USB Utility Specifications Troubleshooting FADER (setting the fader curve) How to the far right until the screw head becomes visible. 3 Insert a screwdriver, and adjust the sliding torque. At the center position, curve characteristics between the two will be produced. * The same curve characteristics apply to channels 1 to 4. 2 Crossfader When the CH FADER CONTOUR control is turned counterclockwise...
...; Getting Started Connections Basic Operations Effector Function Fader Start USB Utility Specifications Troubleshooting FADER (setting the fader curve) How to the far right until the screw head becomes visible. 3 Insert a screwdriver, and adjust the sliding torque. At the center position, curve characteristics between the two will be produced. * The same curve characteristics apply to channels 1 to 4. 2 Crossfader When the CH FADER CONTOUR control is turned counterclockwise...
Owners Manual
Page 17
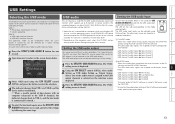
... channel 1 Input channel 2 Input channel 3 Input channel 4 w MASTER mode Select this mode when mixing sound using only the DN-X1700 without using the mixer functions of the DJ software. USB audio This unit features a 24-bit 96 kHz USB audio input/output sound card function which runs Windows XP, Vista or a similar operating system, install DENON DJ ASIO driver Ver2 contained on can be selected by a Utility setting. (Factory setting: USB A) To switch from USB-A to USB-B, and the device mode is established. (* When a specific period of time elapses with no computer connected to the USB...
... channel 1 Input channel 2 Input channel 3 Input channel 4 w MASTER mode Select this mode when mixing sound using only the DN-X1700 without using the mixer functions of the DJ software. USB audio This unit features a 24-bit 96 kHz USB audio input/output sound card function which runs Windows XP, Vista or a similar operating system, install DENON DJ ASIO driver Ver2 contained on can be selected by a Utility setting. (Factory setting: USB A) To switch from USB-A to USB-B, and the device mode is established. (* When a specific period of time elapses with no computer connected to the USB...

Owners Manual
Page 18
... OUTPUT CH. CUE buttons; channel EFX SEND 1, 2 buttons; Getting Started Connections Basic Operations Effector Function Fader Start USB Utility Specifications Troubleshooting MIDI MIDI layer operations This unit comes with the BPM value set. (60 to 300 BPM) 1 Press the MIDI CLOCK START/STOP button. 2 The MIDI clock is output from the internal statuses of the DN-X1700, the DN-X1700 locks its internal statuses without reflecting the positions of the controls. Set the MIDI channels. Channel Fader • MIDI input operation block The channel level meter; These functions support...
... OUTPUT CH. CUE buttons; channel EFX SEND 1, 2 buttons; Getting Started Connections Basic Operations Effector Function Fader Start USB Utility Specifications Troubleshooting MIDI MIDI layer operations This unit comes with the BPM value set. (60 to 300 BPM) 1 Press the MIDI CLOCK START/STOP button. 2 The MIDI clock is output from the internal statuses of the DN-X1700, the DN-X1700 locks its internal statuses without reflecting the positions of the controls. Set the MIDI channels. Channel Fader • MIDI input operation block The channel level meter; These functions support...

Owners Manual
Page 19
...TAP TIME CUE EFFECT SELECT KNOB SW PARAMETER SW EFFECT ON/OFF EFFECT SELECT KNOB PARAMETER VR DRY/WET VR BEAT UP BEAT DOWN TAP TIME CUE EFFECT SELECT KNOB SW PARAMETER SW EFFECT ON/OFF EFFECT SELECT KNOB PARAMETER VR DRY/WET VR MIC EQ HIGH VR MIC EQ LOW VR MIC SEND LEVEL VR MIC1 ON/OFF MIC2 ON/OFF MIC EFFECT INSERT1 MIC EFFECT INSERT2 DUCKING Utility mode MIDI command Command Number... : 0x40 / SW OFF : 0x00 0xBn 0x4A Utility mode on : 0x7F Utility mode off : 0x00 15 Getting Started Connections Basic Operations Effector Function Fader Start USB Utility Specifications Troubleshooting
...TAP TIME CUE EFFECT SELECT KNOB SW PARAMETER SW EFFECT ON/OFF EFFECT SELECT KNOB PARAMETER VR DRY/WET VR BEAT UP BEAT DOWN TAP TIME CUE EFFECT SELECT KNOB SW PARAMETER SW EFFECT ON/OFF EFFECT SELECT KNOB PARAMETER VR DRY/WET VR MIC EQ HIGH VR MIC EQ LOW VR MIC SEND LEVEL VR MIC1 ON/OFF MIC2 ON/OFF MIC EFFECT INSERT1 MIC EFFECT INSERT2 DUCKING Utility mode MIDI command Command Number... : 0x40 / SW OFF : 0x00 0xBn 0x4A Utility mode on : 0x7F Utility mode off : 0x00 15 Getting Started Connections Basic Operations Effector Function Fader Start USB Utility Specifications Troubleshooting
Owners Manual
Page 21
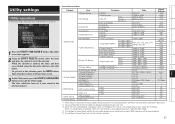
... 1 Audio Setting 2 System Setting 3 MIDI Setting 4 Other Setting 5 Owner Setting Item 1 Master Setting 2 Mic Setting 3 Isolator EQ 4 Cue Setting 5 Head Phones EQ 6 EFX Send/Rtn 7 USB Audio Setting 8 Digital I/O Setting 9 X-Fader Setting 10 Beat Breaker Setting 1 Sampling Frequency 2 Display Brightness 3 Display Backlight 4 Display Contrast 5 PC/MAC*³ 6 Version(SYS) 1 MIDI INPUT CH 2 MIDI OUTPUT CH 3 MIDI Output Enable 4 MIDI CLK 1 Preset Export 2 DN-X1700 Initialize Display only Parameter 1 MONO 1 Ducking Level 2 Mic EQ 3 Mic to Booth/Rec 1 X.Over Hi 2 X.Over Low 3 Default 1 Cue Mode...
... 1 Audio Setting 2 System Setting 3 MIDI Setting 4 Other Setting 5 Owner Setting Item 1 Master Setting 2 Mic Setting 3 Isolator EQ 4 Cue Setting 5 Head Phones EQ 6 EFX Send/Rtn 7 USB Audio Setting 8 Digital I/O Setting 9 X-Fader Setting 10 Beat Breaker Setting 1 Sampling Frequency 2 Display Brightness 3 Display Backlight 4 Display Contrast 5 PC/MAC*³ 6 Version(SYS) 1 MIDI INPUT CH 2 MIDI OUTPUT CH 3 MIDI Output Enable 4 MIDI CLK 1 Preset Export 2 DN-X1700 Initialize Display only Parameter 1 MONO 1 Ducking Level 2 Mic EQ 3 Mic to Booth/Rec 1 X.Over Hi 2 X.Over Low 3 Default 1 Cue Mode...
Owners Manual
Page 22
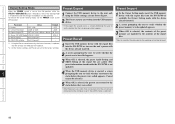
... externally, the internal memory is updated, and the settings are reflected in mind that the data prior to the ON position while the UTILITY/-USB A/USB B button is held down, the Owner Setting mode is established, and the settings listed below can be selected. Preset Import Exit / Execute*1 6. Limiter Threshold 20dB to the factory settings. Preset Recall 1 Insert the USB memory device with the device already inserted. 2 A screen prompting the user...
... externally, the internal memory is updated, and the settings are reflected in mind that the data prior to the ON position while the UTILITY/-USB A/USB B button is held down, the Owner Setting mode is established, and the settings listed below can be selected. Preset Import Exit / Execute*1 6. Limiter Threshold 20dB to the factory settings. Preset Recall 1 Insert the USB memory device with the device already inserted. 2 A screen prompting the user...
Owners Manual
Page 23
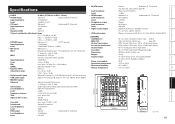
... impedance: 10 kΩ/kohms Level: -10 dBV • BOOTH output Load impedance: Level: • SEND output Load impedance: Level: • Headphones output Load impedance: Level: • Digital coaxial output • USB audio output n GENERAL USB MIDI I/O: MIDI OUT: Channel level meters: Cue master level meters: Channel Fader: Crossfader: Dimensions: Weight: Supply voltage: Power consumption: Operational temperature: Operational humidity: Storage temperature: Stereo Balanced 1/4" TS terminal (Tip: hot; and Canada models) AC 230 V, 50 Hz (European models) 43 W +5ºC to +35...
... impedance: 10 kΩ/kohms Level: -10 dBV • BOOTH output Load impedance: Level: • SEND output Load impedance: Level: • Headphones output Load impedance: Level: • Digital coaxial output • USB audio output n GENERAL USB MIDI I/O: MIDI OUT: Channel level meters: Cue master level meters: Channel Fader: Crossfader: Dimensions: Weight: Supply voltage: Power consumption: Operational temperature: Operational humidity: Storage temperature: Stereo Balanced 1/4" TS terminal (Tip: hot; and Canada models) AC 230 V, 50 Hz (European models) 43 W +5ºC to +35...
Owners Manual
Page 25
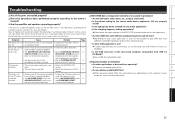
...;cations Troubleshooting Troubleshooting n Are all the parts connected properly? the position which are connected, try connecting only DN-X1700 to the ON position. switch to the owner's manual? n DN-X1700 does not operate normally or no sound is low. • The SOURCE SEL LN1/LN2/LN3/ • Set the SOURCE SEL LN1/LN2/ 3 LN4/D1-4/USB controls have and CROSSFADER START not been set to • The AC power cable is too • Adjust the MASTER LEVEL...
...;cations Troubleshooting Troubleshooting n Are all the parts connected properly? the position which are connected, try connecting only DN-X1700 to the ON position. switch to the owner's manual? n DN-X1700 does not operate normally or no sound is low. • The SOURCE SEL LN1/LN2/LN3/ • Set the SOURCE SEL LN1/LN2/ 3 LN4/D1-4/USB controls have and CROSSFADER START not been set to • The AC power cable is too • Adjust the MASTER LEVEL...


