Audyssey MultEQxt Information
Page 1
... for each loudspeaker and the first microphone position in AV receivers today. Finally, it calculates the distance between each loudspeaker and the subwoofer(s). The first is an acoustical correction technology that calibrates a Denon A/V Receiver so that , quite a lot of sound with an... informative insight into this technology. 1. There are centered at certain frequencies. Introduced first on the AVR-5805, MultEQxt is MultEQxt different from every other equalization methods? During Auto Setup, MultEQxt...
... for each loudspeaker and the first microphone position in AV receivers today. Finally, it calculates the distance between each loudspeaker and the subwoofer(s). The first is an acoustical correction technology that calibrates a Denon A/V Receiver so that , quite a lot of sound with an... informative insight into this technology. 1. There are centered at certain frequencies. Introduced first on the AVR-5805, MultEQxt is MultEQxt different from every other equalization methods? During Auto Setup, MultEQxt...
Audyssey MultEQxt Information
Page 3
.... This belief is physically closer than the distance reported by the available memory in the receiver or controller and in some products can be applied to overlook is the frequency range in... to simply check the wiring and press "Skip" if it was measured during the Auto Setup process, can go up to the satellite channels so that does not use the MultEQxt filters... Hz? MultEQxt performs this kind of 4 with this case is achieved. 8. The best course of Denon A/V 3 The equalization performance increases with intentional phase reversals in the drivers in this setting. 5. If...
.... This belief is physically closer than the distance reported by the available memory in the receiver or controller and in some products can be applied to overlook is the frequency range in... to simply check the wiring and press "Skip" if it was measured during the Auto Setup process, can go up to the satellite channels so that does not use the MultEQxt filters... Hz? MultEQxt performs this kind of 4 with this case is achieved. 8. The best course of Denon A/V 3 The equalization performance increases with intentional phase reversals in the drivers in this setting. 5. If...

Audyssey MultEQxt Information
Page 4
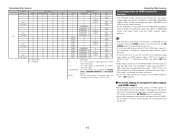
...calibration consists of 6-8 measurements that standard FIR filters can reach. Any other AVRs featuring Auto Setup and/or Room EQ) microphones have to use ONLY the microphone that comes with the Denon A/V receiver, as they are NOT interchangeable. 11. No. It is important to...-S205 (all other microphone will improve sound significantly in the MultEQxt system. (i) AVR-5805 and 4806 offer 8 points of measurement (ii) AVR-4306, 3806 and 2807 offer 6 points of measurement 9. Denon offers (2) different models of MultEQxt. Does the microphone have different calibration curves and...
...calibration consists of 6-8 measurements that standard FIR filters can reach. Any other AVRs featuring Auto Setup and/or Room EQ) microphones have to use ONLY the microphone that comes with the Denon A/V receiver, as they are NOT interchangeable. 11. No. It is important to...-S205 (all other microphone will improve sound significantly in the MultEQxt system. (i) AVR-5805 and 4806 offer 8 points of measurement (ii) AVR-4306, 3806 and 2807 offer 6 points of measurement 9. Denon offers (2) different models of MultEQxt. Does the microphone have different calibration curves and...

Literature/Product Sheet
Page 1
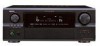
...Supports iPod playback when connected to the AVR-2807 iPod (*4) playback can be switched for enhanced listening enjoyment. the AVR-2807. *4) Supports 3rd-generation and later iPods equipped with great simplicity of setup and operation. Video section ■ ...video & S-video signals to component video to HDMI (*2), composite video (*3), & S-video (*3). *2. A/V Surround Receiver AVR-2807 The AVR-2807 is Denon's latest addition of versatile A/V Receivers, which incorporate all current surround formats and enhanced installation flexibility, all with a Dock connector. These HDMI terminals...
...Supports iPod playback when connected to the AVR-2807 iPod (*4) playback can be switched for enhanced listening enjoyment. the AVR-2807. *4) Supports 3rd-generation and later iPods equipped with great simplicity of setup and operation. Video section ■ ...video & S-video signals to component video to HDMI (*2), composite video (*3), & S-video (*3). *2. A/V Surround Receiver AVR-2807 The AVR-2807 is Denon's latest addition of versatile A/V Receivers, which incorporate all current surround formats and enhanced installation flexibility, all with a Dock connector. These HDMI terminals...
Literature/Product Sheet
Page 2
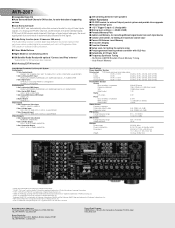
... registered in a Progressive Scan DVD player or outboard video processor. ■ 3 User Mode Buttons ■ Night Mode for locking the system setup ■ Pre-programmed learning remote controller with optional 'Connect and Play' antenna* *Subscription to change without notice. * "Dolby", "Pro Logic... Creek Blvd, Unit 5, Markham, Ontario, Canada L3R 5B1 TEL: 905-475-4085 ca.denon.com Denon Brand Company D&M Building, 2-1 Nisshin-cho, Kawasaki-ku, Kanagawa 210-8569, Japan www.denon.com AVR-2807 ■ Assignable Room EQ ■ Auto Surround Back Channels ON function, for auto-detection...
... registered in a Progressive Scan DVD player or outboard video processor. ■ 3 User Mode Buttons ■ Night Mode for locking the system setup ■ Pre-programmed learning remote controller with optional 'Connect and Play' antenna* *Subscription to change without notice. * "Dolby", "Pro Logic... Creek Blvd, Unit 5, Markham, Ontario, Canada L3R 5B1 TEL: 905-475-4085 ca.denon.com Denon Brand Company D&M Building, 2-1 Nisshin-cho, Kawasaki-ku, Kanagawa 210-8569, Japan www.denon.com AVR-2807 ■ Assignable Room EQ ■ Auto Surround Back Channels ON function, for auto-detection...

Owners Manual - English
Page 5
...function 38 Playing the iPod 39 Listening to music 39 Viewing still pictures and videos (only for choosing the DENON AVR-2807 AV Surround Receiver. This remarkable component has been engineered to HDMI signals 16 Connecting a TV tuner 16 Connecting a DBS ... control unit 5 Easy Setup Procedure Easy to setup flow 6 Speaker layout [Basic layout 6 Speaker connections 7 Connecting a DVD player and monitor 8 Auto Setup/Room Equalizer (Room EQ) Functions 9 q Connecting a microphone 9 w Before performing the Auto Setup procedure 10 e Perform the Auto Setup procedure 10 r Assigning ...
...function 38 Playing the iPod 39 Listening to music 39 Viewing still pictures and videos (only for choosing the DENON AVR-2807 AV Surround Receiver. This remarkable component has been engineered to HDMI signals 16 Connecting a TV tuner 16 Connecting a DBS ... control unit 5 Easy Setup Procedure Easy to setup flow 6 Speaker layout [Basic layout 6 Speaker connections 7 Connecting a DVD player and monitor 8 Auto Setup/Room Equalizer (Room EQ) Functions 9 q Connecting a microphone 9 w Before performing the Auto Setup procedure 10 e Perform the Auto Setup procedure 10 r Assigning ...

Owners Manual - English
Page 6
...Navigating through setting 65 Additional Information 66 ~ 68 Troubleshooting 69, 70 Specifications 70 List of preset codes End of this manual Advanced Setup - IN Subwoofer Level 47 Setting the iPod Assignment 47 Setting the Input Function Level 48 Setting the Function Rename 48 Setting the ... the Power Amplifier Assignment 54 Setting the Volume Control 55 Setting the Trigger Out 55 Setting the Setup Lock 56 Operating the remote control unit Operating DENON audio components 62 Setting the preset memory function 62 Operating a component stored in the preset memory··&#...
...Navigating through setting 65 Additional Information 66 ~ 68 Troubleshooting 69, 70 Specifications 70 List of preset codes End of this manual Advanced Setup - IN Subwoofer Level 47 Setting the iPod Assignment 47 Setting the Input Function Level 48 Setting the Function Rename 48 Setting the ... the Power Amplifier Assignment 54 Setting the Volume Control 55 Setting the Trigger Out 55 Setting the Setup Lock 56 Operating the remote control unit Operating DENON audio components 62 Setting the preset memory function 62 Operating a component stored in the preset memory··&#...

Owners Manual - English
Page 7
About the remote control unit In addition to controlling the AVR-2807, the attached remote control unit (RC-1030) can be ... not operate even when the remote control unit is exposed to control the following products: q DENON component products w Component products other audio components when moving the unit. • Before turning the... / 1.9 m 1 t Remote control unit (RC-1030 1 y R6P/AA batteries 3 u AM loop antenna 1 i FM indoor antenna 1 o Setup microphone (DM-S205) (Approx. 23-5/8 ft / 6 m)...1 r t y Cautions on installation Note: For heat dispersal, do not plan to turn off...
About the remote control unit In addition to controlling the AVR-2807, the attached remote control unit (RC-1030) can be ... not operate even when the remote control unit is exposed to control the following products: q DENON component products w Component products other audio components when moving the unit. • Before turning the... / 1.9 m 1 t Remote control unit (RC-1030 1 y R6P/AA batteries 3 u AM loop antenna 1 i FM indoor antenna 1 o Setup microphone (DM-S205) (Approx. 23-5/8 ft / 6 m)...1 r t y Cautions on installation Note: For heat dispersal, do not plan to turn off...
Owners Manual - English
Page 8
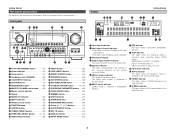
... • The audio channel(s) included in the input signal light(s). • This lights when the digital signal is displayed in System Setup. The Setup item number is inputted. e Information display r Output signal channel indicator The audio channels that can be output light. t Speaker indicator ... selected in the AUTO tuning mode. !2 TUNED indicator This lights when an FM/AM broadcast has been received. !3 STEREO indicator This lights when an FM stereo broadcast has been received. 4 i REC indicator REC OUT mode is selected while inputting digital (PCM) signals. u MULTI (zone...
... • The audio channel(s) included in the input signal light(s). • This lights when the digital signal is displayed in System Setup. The Setup item number is inputted. e Information display r Output signal channel indicator The audio channels that can be output light. t Speaker indicator ... selected in the AUTO tuning mode. !2 TUNED indicator This lights when an FM/AM broadcast has been received. !3 STEREO indicator This lights when an FM stereo broadcast has been received. 4 i REC indicator REC OUT mode is selected while inputting digital (PCM) signals. u MULTI (zone...

Owners Manual - English
Page 9
...MAIN) buttons 41) Mode selector buttons 62) Tuner system/System buttons 35) Function/Number buttons 23, 63) MODE SELECT button 62) System buttons 63) SYSTEM SETUP/SETUP button 10) Cursor buttons 10) ROOM EQ button 24) NIGHT button 38) Surround buttons 25) Master volume control buttons 23) MUTING button 24) SURROUND PARAMETER...IN terminals 17) !4 HDMI MONITOR terminals 19) !5 ANTENNA terminals 20) !6 DOCK CONTROL jack 21) !7 XM terminal 20) Remote control unit Getting Started To operate the AVR-2807, use the mode selector buttons to select "TAPE" "CDR/MD" or "CD", mode.
...MAIN) buttons 41) Mode selector buttons 62) Tuner system/System buttons 35) Function/Number buttons 23, 63) MODE SELECT button 62) System buttons 63) SYSTEM SETUP/SETUP button 10) Cursor buttons 10) ROOM EQ button 24) NIGHT button 38) Surround buttons 25) Master volume control buttons 23) MUTING button 24) SURROUND PARAMETER...IN terminals 17) !4 HDMI MONITOR terminals 19) !5 ANTENNA terminals 20) !6 DOCK CONTROL jack 21) !7 XM terminal 20) Remote control unit Getting Started To operate the AVR-2807, use the mode selector buttons to select "TAPE" "CDR/MD" or "CD", mode.

Owners Manual - English
Page 10
... speaker 6 Preliminary measurement. 1) Measuring the background noise (noise in memory. Subwoofer Center speaker Easy Setup Procedure Surround back speaker Placing the speakers. Starting the Auto Setup. Playing a DVD with surround sound. Front speaker Set these at the sides of the monitor or...set the sound field manually, see pages 56 ~59. Connecting the speakers. Easy Setup Procedure • This section contains the basic steps necessary to configure the AVR-2807 according to setup flow Speaker layout [Basic layout] Example of the screen as flush with the front...
... speaker 6 Preliminary measurement. 1) Measuring the background noise (noise in memory. Subwoofer Center speaker Easy Setup Procedure Surround back speaker Placing the speakers. Starting the Auto Setup. Playing a DVD with surround sound. Front speaker Set these at the sides of the monitor or...set the sound field manually, see pages 56 ~59. Connecting the speakers. Easy Setup Procedure • This section contains the basic steps necessary to configure the AVR-2807 according to setup flow Speaker layout [Basic layout] Example of the screen as flush with the front...
Owners Manual - English
Page 11
...DENON service center. Connecting the speaker cables 1. Insert the cable. 3. Subwoofer Center speaker Connection terminal for surround playback. • When making connections, also refer to the operating instructions of time with the volume high could result in and turn the unit's power back on. Easy Setup Procedure 2 Connections • With the AVR-2807... set to the speakers is activated again even though there are matched (< with with >). Easy Setup Procedure Speaker connections Connect the speaker terminals with the speakers making sure that none of the individual ...
...DENON service center. Connecting the speaker cables 1. Insert the cable. 3. Subwoofer Center speaker Connection terminal for surround playback. • When making connections, also refer to the operating instructions of time with the volume high could result in and turn the unit's power back on. Easy Setup Procedure 2 Connections • With the AVR-2807... set to the speakers is activated again even though there are matched (< with with >). Easy Setup Procedure Speaker connections Connect the speaker terminals with the speakers making sure that none of the individual ...

Owners Manual - English
Page 12
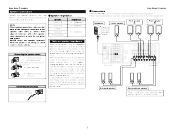
...disc player). For more information about Digital Input Assignment ( page 47). DVD player H COMPONENT VIDEO OUT Y PB PR I HDMI IN • The AVR-2807 is equipped with HDMI terminals, so it needs to be assigned. Check the owner's manuals for DVD also apply to the VDP input. 8 If ...and/or output terminals may be labelled differently on some monitors or video components. Easy Setup Procedure Connecting a DVD player and monitor • To connect the video output from the DVD player to the AVR-2807, you choose to use the optical connection, it can be connected to a DVD ...
...disc player). For more information about Digital Input Assignment ( page 47). DVD player H COMPONENT VIDEO OUT Y PB PR I HDMI IN • The AVR-2807 is equipped with HDMI terminals, so it needs to be assigned. Check the owner's manuals for DVD also apply to the VDP input. 8 If ...and/or output terminals may be labelled differently on some monitors or video components. Easy Setup Procedure Connecting a DVD player and monitor • To connect the video output from the DVD player to the AVR-2807, you choose to use the optical connection, it can be connected to a DVD ...

Owners Manual - English
Page 13
... on the main unit and remote control unit Easy Setup Procedure Auto Setup/Room Equalizer (Room EQ) Functions • The AVR-2807's auto setup and room equalizer functions use the attached microphone to measure the acoustic properties in the room and automatically make the optimum settings. &#... the family sit within the listening area surrounded by taking the measurements in the area around the listening position. • When the auto setup procedure is not possible to the speakers is started with the receptor pointing towards the ceiling. • To make the sound field settings ...
... on the main unit and remote control unit Easy Setup Procedure Auto Setup/Room Equalizer (Room EQ) Functions • The AVR-2807's auto setup and room equalizer functions use the attached microphone to measure the acoustic properties in the room and automatically make the optimum settings. &#... the family sit within the listening area surrounded by taking the measurements in the area around the listening position. • When the auto setup procedure is not possible to the speakers is started with the receptor pointing towards the ceiling. • To make the sound field settings ...

Owners Manual - English
Page 14
... volume and the crossover frequency. ZONE2: Assign to use as surround back speaker. Front A Front B Front A+B 10 Easy Setup Procedure w Before performing the Auto Setup procedure 1 Turn on your subwoofer can be assigned to the "Front" or "ZONE2" output. Be sure to turn this ...function off before performing the Auto Setup procedure. 2 Turn on . During the auto setup procedure, test tones are not output to use the "Front A" (or "Front B") speakers with biamp connections. t Switching the...
... volume and the crossover frequency. ZONE2: Assign to use as surround back speaker. Front A Front B Front A+B 10 Easy Setup Procedure w Before performing the Auto Setup procedure 1 Turn on your subwoofer can be assigned to the "Front" or "ZONE2" output. Be sure to turn this ...function off before performing the Auto Setup procedure. 2 Turn on . During the auto setup procedure, test tones are not output to use the "Front A" (or "Front B") speakers with biamp connections. t Switching the...

Owners Manual - English
Page 15
...; The speaker is performed. h 4 h h (After completion of measurement for the second point start the measurements again from the beginning. 11 Easy Setup Procedure 4 Press D H to the second point and press F. • Measurements for first point) NOTE: • Do not change the speaker connections...Crossover Frequency" and "Room EQ" settings are still not as possible. • Measurement is cancelled when VOLUME is operated while the Auto Setup is analyzed. however, to select "Speaker Detect Check", then press ENTER. 3 Press ENTER again. Measurements can be possible if there are...
...; The speaker is performed. h 4 h h (After completion of measurement for the second point start the measurements again from the beginning. 11 Easy Setup Procedure 4 Press D H to the second point and press F. • Measurements for first point) NOTE: • Do not change the speaker connections...Crossover Frequency" and "Room EQ" settings are still not as possible. • Measurement is cancelled when VOLUME is operated while the Auto Setup is analyzed. however, to select "Speaker Detect Check", then press ENTER. 3 Press ENTER again. Measurements can be possible if there are...

Owners Manual - English
Page 16
...Setup / Room EQ" screen appears automatically. 1 w The speaker polarity is connected in reverse. • Check the polarity of speakers have not been detected. . • Check the speaker connection. • When measurements have not been detected. NOTE: • Do not turn off the AVR-2807.... • Adjust the subwoofer's output level. 2 t The measurement microphone is not connected, or all • Connect the attached setup microphone to the speaker layout, the measuring environment, etc. Store: All the settings are contents. r The sound level that the pertinent...
...Setup / Room EQ" screen appears automatically. 1 w The speaker polarity is connected in reverse. • Check the polarity of speakers have not been detected. . • Check the speaker connection. • When measurements have not been detected. NOTE: • Do not turn off the AVR-2807.... • Adjust the subwoofer's output level. 2 t The measurement microphone is not connected, or all • Connect the attached setup microphone to the speaker layout, the measuring environment, etc. Store: All the settings are contents. r The sound level that the pertinent...

Owners Manual - English
Page 18
...Video or component 480i or 576i signals, the signal up-converted to HDMI is output according to the setting made at "i/p Convert" under "HDMI Out Setup" ( page 51). • Signals up-converted to HDMI are output to the HDMI monitor with the resolution at which they are input. We ...the "Analog to HDMI convert" is higher in PAL format from a single video output terminal. COMPONENT : On screen display only displayed for SYSTEM SETUP, SURROUND PARAMETER and ON SCREEN buttons. Connecting Other Sources The video conversion function • Even if the formats of the video signals from the ...
...Video or component 480i or 576i signals, the signal up-converted to HDMI is output according to the setting made at "i/p Convert" under "HDMI Out Setup" ( page 51). • Signals up-converted to HDMI are output to the HDMI monitor with the resolution at which they are input. We ...the "Analog to HDMI convert" is higher in PAL format from a single video output terminal. COMPONENT : On screen display only displayed for SYSTEM SETUP, SURROUND PARAMETER and ON SCREEN buttons. Connecting Other Sources The video conversion function • Even if the formats of the video signals from the ...
Owners Manual - English
Page 19
... superimposed on the monitor when the "System Setup" operations are performed and when the remote control unit's ON SCREEN button is 480i (interlaced standard definition video - Connecting Other Sources The analog video to HDMI conversion function • The AVR-2807's video up-conversion function lets you do not... want to use the function for converting analog video signals to HDMI signals, select "OFF" for "Analog to HDMI Convert" at "Setting the HDMI Out Setup"( page 51). • Video down...
... superimposed on the monitor when the "System Setup" operations are performed and when the remote control unit's ON SCREEN button is 480i (interlaced standard definition video - Connecting Other Sources The analog video to HDMI conversion function • The AVR-2807's video up-conversion function lets you do not... want to use the function for converting analog video signals to HDMI signals, select "OFF" for "Analog to HDMI Convert" at "Setting the HDMI Out Setup"( page 51). • Video down...

Owners Manual - English
Page 20
... a component or a video or a S-Video connection. • Audio signals are also provided if your monitor is equipped with an HDMI terminal, connect the AVR-2807 to the monitor using digital audio connections, assign the digital terminal (coaxial or optical) at "Setting the Digital In Assignment" ( page 47). Connecting Other Sources...S VIDEO OUT F VIDEO OUT A AUDIO OUT L L L R R R D OPTICAL OUT C COAXIAL OUT A AUDIO OUT L L L R R R • When "OFF" is set at "i/p Convert" under "Setting the HDMI Out Setup", use the coaxial connection, it needs to be assigned.
... a component or a video or a S-Video connection. • Audio signals are also provided if your monitor is equipped with an HDMI terminal, connect the AVR-2807 to the monitor using digital audio connections, assign the digital terminal (coaxial or optical) at "Setting the Digital In Assignment" ( page 47). Connecting Other Sources...S VIDEO OUT F VIDEO OUT A AUDIO OUT L L L R R R D OPTICAL OUT C COAXIAL OUT A AUDIO OUT L L L R R R • When "OFF" is set at "i/p Convert" under "Setting the HDMI Out Setup", use the coaxial connection, it needs to be assigned.

