IR Codes
Page 1
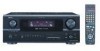
Data (C6~C11) Key Name No. DENON AVR2805 RC CODE FORMAT SHARP DATA CONSTRUCTION 15bits C14 0 C15 0=NOT INVERTED,1=INVERTED SYSTEM ADDRESS(C1~C5 EXTENSION BIT(C12,C13) : 11 No. ... TONE 58 43 SB/SBL LEVEL DOWN 59 44 SW LEVEL UP 60 45 SPEAKER 61 46 62 47 63 Key Name MUTING MASTER VOLUME UP MASTER VOLUME DOWN SL LEVEL UP SL LEVEL DOWN CENTER LEVEL UP CENTER LEVEL DOWN SBR LEVEL UP SBR LEVEL DOWN TONE DEFEAT ON TONE DEFEAT...
Data (C6~C11) Key Name No. DENON AVR2805 RC CODE FORMAT SHARP DATA CONSTRUCTION 15bits C14 0 C15 0=NOT INVERTED,1=INVERTED SYSTEM ADDRESS(C1~C5 EXTENSION BIT(C12,C13) : 11 No. ... TONE 58 43 SB/SBL LEVEL DOWN 59 44 SW LEVEL UP 60 45 SPEAKER 61 46 62 47 63 Key Name MUTING MASTER VOLUME UP MASTER VOLUME DOWN SL LEVEL UP SL LEVEL DOWN CENTER LEVEL UP CENTER LEVEL DOWN SBR LEVEL UP SBR LEVEL DOWN TONE DEFEAT ON TONE DEFEAT...
Literature/Product Sheet
Page 2
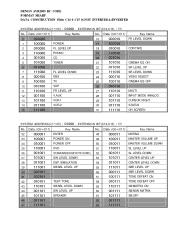
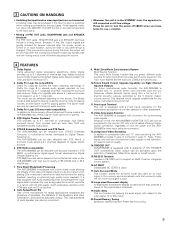
...Pre-programmed remote controller with learning feature s Designed for high sound quality • Pure Direct and AL24 Processing DENON's Pure Direct mode was developed for the AVR-2805 to ensure a rock stable supply of power. • Detachable AC Power Cord s Frequency Synthesis Tuning •...BUNKYO-KU, TOKYO 113-0034 JAPAN 13450404 A Depending on Movie mode: On DENON A/V receivers, this design allows the AVR-2805 to achieve high output power of 100 W for each of the 7 channels. • Variable Gain Volume S/N in the usable area has been improved. ZONE2 VIDEO x 1 Specifications ...
...Pre-programmed remote controller with learning feature s Designed for high sound quality • Pure Direct and AL24 Processing DENON's Pure Direct mode was developed for the AVR-2805 to ensure a rock stable supply of power. • Detachable AC Power Cord s Frequency Synthesis Tuning •...BUNKYO-KU, TOKYO 113-0034 JAPAN 13450404 A Depending on Movie mode: On DENON A/V receivers, this design allows the AVR-2805 to achieve high output power of 100 W for each of the 7 channels. • Variable Gain Volume S/N in the usable area has been improved. ZONE2 VIDEO x 1 Specifications ...
Owners Manual
Page 1
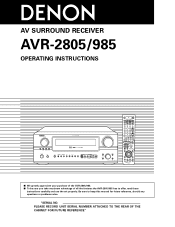
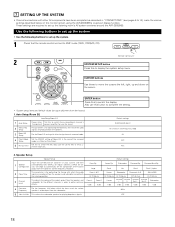
Be sure to offer, read these instructions carefully and use the set properly. "SERIAL NO. AV SURROUND RECEIVER AVR-2805/985 OPERATING INSTRUCTIONS FUNCTION SOURCE TUNING PRESET ZONE 2 / REC SELECT VIDEO SELECT ON / STANDBY MODE ANALOG EXT. PLEASE RECORD UNIT SERIAL NUMBER ATTACHED TO THE REAR OF THE CABINET FOR FUTURE REFERENCE" IN MASTER VOLUME 2 We greatly appreciate your purchase of the AVR-2805/985. 2 To be sure you take maximum advantage of all the features the AVR-2805/985 has to keep this manual for future reference, should any questions or problems arise.
Be sure to offer, read these instructions carefully and use the set properly. "SERIAL NO. AV SURROUND RECEIVER AVR-2805/985 OPERATING INSTRUCTIONS FUNCTION SOURCE TUNING PRESET ZONE 2 / REC SELECT VIDEO SELECT ON / STANDBY MODE ANALOG EXT. PLEASE RECORD UNIT SERIAL NUMBER ATTACHED TO THE REAR OF THE CABINET FOR FUTURE REFERENCE" IN MASTER VOLUME 2 We greatly appreciate your purchase of the AVR-2805/985. 2 To be sure you take maximum advantage of all the features the AVR-2805/985 has to keep this manual for future reference, should any questions or problems arise.
Owners Manual
Page 5
... the subroom (ZONE2) simultaneously. 10.Future Sound Format Upgrade Capability via Eight Channel Inputs & Outputs For future multi-channel audio format(s), the AVR-2805/985 is provided with 7.1 channel (seven main channels, plus one set of component video outputs to 5.1 channels of 96 kHz/24 bits ..., the distance to the previously offered Music and Cinema modes, the AVR-2805/985 also offers a Game mode optimum for games. 4. Because of 7.1 channel pre-amp outputs, controlled by Digital Theater Systems Inc. If the volume is turned up to support an AMX, Crestron integrated control system. ...
... the subroom (ZONE2) simultaneously. 10.Future Sound Format Upgrade Capability via Eight Channel Inputs & Outputs For future multi-channel audio format(s), the AVR-2805/985 is provided with 7.1 channel (seven main channels, plus one set of component video outputs to 5.1 channels of 96 kHz/24 bits ..., the distance to the previously offered Music and Cinema modes, the AVR-2805/985 also offers a Game mode optimum for games. 4. Because of 7.1 channel pre-amp outputs, controlled by Digital Theater Systems Inc. If the volume is turned up to support an AMX, Crestron integrated control system. ...

Owners Manual
Page 12
... jacks to this unit's V. AUX jacks To connect the video signal, connect using a 75 Ω/ohms video signal cable cord. AUX INPUT jacks. 12 MASTER VOLUME Video game OUTPUT R L OPTICAL VIDEO OUT S-VIDEO OUT RL Connecting a Video game component • Connect the Video game component's output jacks to this unit's V. AUX...
... jacks to this unit's V. AUX jacks To connect the video signal, connect using a 75 Ω/ohms video signal cable cord. AUX INPUT jacks. 12 MASTER VOLUME Video game OUTPUT R L OPTICAL VIDEO OUT S-VIDEO OUT RL Connecting a Video game component • Connect the Video game component's output jacks to this unit's V. AUX...
Owners Manual
Page 13
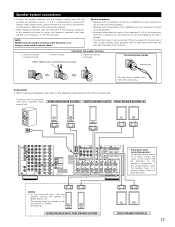
... conductors, or with the rear panel. Connection jack for use as surround speakers. • Be careful when using two pairs of front speakers (A + B) at high volumes when speakers with an impedance lower than 8 Ω/ohms will result in weak central sound, unclear orientation of the various instruments, and the sense of...
... conductors, or with the rear panel. Connection jack for use as surround speakers. • Be careful when using two pairs of front speakers (A + B) at high volumes when speakers with an impedance lower than 8 Ω/ohms will result in weak central sound, unclear orientation of the various instruments, and the sense of...

Owners Manual
Page 14
... is inadvertently short-circuited and a large current flows, when the temperature surrounding the unit becomes unusually high, or when the unit is used at high volumes when speakers with an impedance lower than 4 Ω/ohms) are connected. Protector circuit • This unit is equipped with the wiring or the ventilation around...
... is inadvertently short-circuited and a large current flows, when the temperature surrounding the unit becomes unusually high, or when the unit is used at high volumes when speakers with an impedance lower than 4 Ω/ohms) are connected. Protector circuit • This unit is equipped with the wiring or the ventilation around...

Owners Manual
Page 15
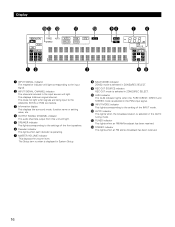
...) !6 SURROUND PARAMETER button 70 ~ 80) !7 SELECT knob 60, 63, 69 ~ 74, 78, 80) !8 TONE DEFEAT button 63) !9 TONE CONTROL button 63, 80) @0 MASTER VOLUME control 60) @1 MASTER VOLUME indicator 60) @2 Display @3 Remote control sensor (REMOTE SENSOR 48) @4 FUNCTION knob 59, 67, 72, 74, 83, 85) @5 VIDEO SELECT button 63) @6 ZONE2/REC SELECT...
...) !6 SURROUND PARAMETER button 70 ~ 80) !7 SELECT knob 60, 63, 69 ~ 74, 78, 80) !8 TONE DEFEAT button 63) !9 TONE CONTROL button 63, 80) @0 MASTER VOLUME control 60) @1 MASTER VOLUME indicator 60) @2 Display @3 Remote control sensor (REMOTE SENSOR 48) @4 FUNCTION knob 59, 67, 72, 74, 83, 85) @5 VIDEO SELECT button 63) @6 ZONE2/REC SELECT...
Owners Manual
Page 16
... selected in the AUTO tuning mode. !3 TUNED indicator This lights when an FM/AM broadcast has been received. !4 STEREO indicator This lights when an FM stereo broadcast has been received. 16 Display !4!3 !2 !1 !0 oi uy qw e rt q INPUT SIGNAL indicator The respective indicator ... selected in the input source will light. w INPUT SIGNAL CHANNEL indicator The channels included in ZONE2/REC SELECT. u MASTER VOLUME indicator This displays the volume level. o REC OUT SOURCE indicator. i MULTI(ZONE) indicator ZONE2 mode is selected in System Setup. The Setup item number...
... selected in the AUTO tuning mode. !3 TUNED indicator This lights when an FM/AM broadcast has been received. !4 STEREO indicator This lights when an FM stereo broadcast has been received. 16 Display !4!3 !2 !1 !0 oi uy qw e rt q INPUT SIGNAL indicator The respective indicator ... selected in the input source will light. w INPUT SIGNAL CHANNEL indicator The channels included in ZONE2/REC SELECT. u MASTER VOLUME indicator This displays the volume level. o REC OUT SOURCE indicator. i MULTI(ZONE) indicator ZONE2 mode is selected in System Setup. The Setup item number...
Owners Manual
Page 17
... SCREEN/DISPLAY button ..........(64, 73) TEST TONE button 68) SYSTEM CALL buttons 54) USE/LEARN button 53, 56) Surround buttons 62, 69, ,71, 77) Master volume control buttons 60, 67) MUTING button 63) SURROUND PARAMETER button 70 ~ 80) CH SELECT/ENTER button 18, 68, 69) RETURN button 51, 52) FRONT SPEAKER...
... SCREEN/DISPLAY button ..........(64, 73) TEST TONE button 68) SYSTEM CALL buttons 54) USE/LEARN button 53, 56) Surround buttons 62, 69, ,71, 77) Master volume control buttons 60, 67) MUTING button 63) SURROUND PARAMETER button 70 ~ 80) CH SELECT/ENTER button 18, 68, 69) RETURN button 51, 52) FRONT SPEAKER...
Owners Manual
Page 18
... timing with which the audio signals are produced from the speakers and subwoofer according to the listening position. 3 Channel Level This adjusts the volume of speakers in your system and their 1 Speaker Configuration corresponding sizes (SMALL for regular speakers, LARGE for playing deep bass signals. Speaker...in Direct or Pure Direct. 5 Mic Input Select Set this to move the cursors the left, right, up the listening room's AV system centered around the AVR-2805/985. Center Sp. Use the following buttons to set up the system • Use the following buttons to set up the system...
... timing with which the audio signals are produced from the speakers and subwoofer according to the listening position. 3 Channel Level This adjusts the volume of speakers in your system and their 1 Speaker Configuration corresponding sizes (SMALL for regular speakers, LARGE for playing deep bass signals. Speaker...in Direct or Pure Direct. 5 Mic Input Select Set this to move the cursors the left, right, up the listening room's AV system centered around the AVR-2805/985. Center Sp. Use the following buttons to set up the system • Use the following buttons to set up the system...

Owners Manual
Page 21
... Setup / Room EQ 1 Select "Auto Setup / Room EQ" at the same height as your room to the listening position. MODE ANALOG EXT. e : This sets the volume that is output from each speaker. When performing Auto Setup, an optional microphone is output during the measurement.
... Setup / Room EQ 1 Select "Auto Setup / Room EQ" at the same height as your room to the listening position. MODE ANALOG EXT. e : This sets the volume that is output from each speaker. When performing Auto Setup, an optional microphone is output during the measurement.
Owners Manual
Page 23
...the speaker arrangement, measurement environment, or other factors. Please check the following matters, reset the pertinent items, and measure again. Lower the volume of the pertinent speakers. About automatic retry Remeasurement starts automatically to the front speakers (A) once measurements are completed. 2 Subwoofer speaker is not ... suitable reproduction have not been detected. Even if the front speakers (B) is set, the setting automatically switches to receive proper result of each channel is measured. Should this is performed as follows. Measurement of measurement.
...the speaker arrangement, measurement environment, or other factors. Please check the following matters, reset the pertinent items, and measure again. Lower the volume of the pertinent speakers. About automatic retry Remeasurement starts automatically to the front speakers (A) once measurements are completed. 2 Subwoofer speaker is not ... suitable reproduction have not been detected. Even if the front speakers (B) is set, the setting automatically switches to receive proper result of each channel is measured. Should this is performed as follows. Measurement of measurement.
Owners Manual
Page 30
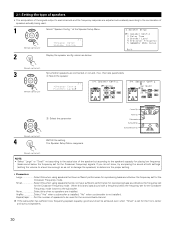
... sufficient performance for reproducing bass sound below the frequency set for the Crossover Frequency mode is sent to the subwoofer. at both settings (setting the volume to a level low enough so as below the frequency set for the Crossover Frequency mode. Center Sp. 2-1 Setting the type of speakers • The composition...
... sufficient performance for reproducing bass sound below the frequency set for the Crossover Frequency mode is sent to the subwoofer. at both settings (setting the volume to a level low enough so as below the frequency set for the Crossover Frequency mode. Center Sp. 2-1 Setting the type of speakers • The composition...

Owners Manual
Page 33
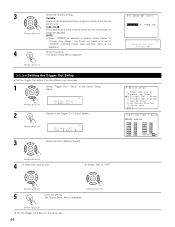
... first time and second time around and on: (Remote control unit) 1spkr SB Flashing FL C FR SR SBR SBL SL SW 2spkrs Example: When the volume is set to -11.5 dB When the surround back speaker setting is set to "SB". TestTone Auto FL : -11.5dB b. while the test tone ...is set to "1spkr" for "Speaker Configuration", this is being produced from which you want to produce the test tone to the same volume. (Remote control unit) 33 3 Select the mode. second intervals the third time around , 2- When the "Manual" mode is selected: Test tones are emitted from ...
... first time and second time around and on: (Remote control unit) 1spkr SB Flashing FL C FR SR SBR SBL SL SW 2spkrs Example: When the volume is set to -11.5 dB When the surround back speaker setting is set to "SB". TestTone Auto FL : -11.5dB b. while the test tone ...is set to "1spkr" for "Speaker Configuration", this is being produced from which you want to produce the test tone to the same volume. (Remote control unit) 33 3 Select the mode. second intervals the third time around , 2- When the "Manual" mode is selected: Test tones are emitted from ...

Owners Manual
Page 34
... each of those modes. The "Channel Level" screen reappears. (Remote control unit) To cancel the settings, press the CURSOR down to adjust the subwoofer's own volume control. 7 Enter the setting. When you may also need to select "Level Clear" and "Yes" on the "Channel Level" screen, then make the settings again...
... each of those modes. The "Channel Level" screen reappears. (Remote control unit) To cancel the settings, press the CURSOR down to adjust the subwoofer's own volume control. 7 Enter the setting. When you may also need to select "Level Clear" and "Yes" on the "Channel Level" screen, then make the settings again...

Owners Manual
Page 35
... This screen is not displayed when not using small speakers, however, setting the crossover frequency to a high frequency may result in a decrease of the actual volume of the low frequency range. • Selection of the "LFE " play mode will play mode that provides bass reproduction with a frequency below which the bass...
... This screen is not displayed when not using small speakers, however, setting the crossover frequency to a high frequency may result in a decrease of the actual volume of the low frequency range. • Selection of the "LFE " play mode will play mode that provides bass reproduction with a frequency below which the bass...
Owners Manual
Page 44
... 1 2 Display to "Variable" including preout level and this menu is not displayed. 4 Enter the setting. NOTE: • When "ZONE2" is all set level and the volume can be adjusted. Level is selected at System Setup Menu "5- 1.Power Amp Assign", the Zone2 vol. Variable (Remote control unit) (Remote control unit) 5 Enter the...
... 1 2 Display to "Variable" including preout level and this menu is not displayed. 4 Enter the setting. NOTE: • When "ZONE2" is all set level and the volume can be adjusted. Level is selected at System Setup Menu "5- 1.Power Amp Assign", the Zone2 vol. Variable (Remote control unit) (Remote control unit) 5 Enter the...

Owners Manual
Page 45
... Muting Level • This sets the amount of the on-screen display when there is no video signal. Mode 2: Flickering is turned down the volume to the TV being used. 1 Select "On Screen Display" at the Option Setup Menu . (Remote control unit) *Option Setup Muting Level 2 Display...Level screen. (Remote control unit) 3 Select the desired setting. *Muting Level ---dB (Remote control unit) • -20 dB: It is turned down the volume to -20 dB from the present level. • -40 dB: It is not prevented. The Option Setup Menu reappears. (Remote control unit) 5-6 Setting ...
... Muting Level • This sets the amount of the on-screen display when there is no video signal. Mode 2: Flickering is turned down the volume to the TV being used. 1 Select "On Screen Display" at the Option Setup Menu . (Remote control unit) *Option Setup Muting Level 2 Display...Level screen. (Remote control unit) 3 Select the desired setting. *Muting Level ---dB (Remote control unit) • -20 dB: It is turned down the volume to -20 dB from the present level. • -40 dB: It is not prevented. The Option Setup Menu reappears. (Remote control unit) 5-6 Setting ...

Owners Manual
Page 52
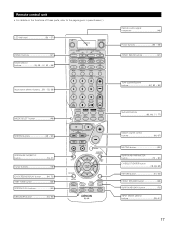
... •, ª, 0, 1 : Cursor up, down, left and right ENTER : Enter CHANNEL : Switch channels +, - 0~9, +10 : Channels TV/VCR : Switch between TV and video player TV VOL +, - : Volume up/down DISPLAY : Switch display RETURN : Return NOTES: • For this CD, CDR, MD and TAPE components, buttons can be operated in the same way...
... •, ª, 0, 1 : Cursor up, down, left and right ENTER : Enter CHANNEL : Switch channels +, - 0~9, +10 : Channels TV/VCR : Switch between TV and video player TV VOL +, - : Volume up/down DISPLAY : Switch display RETURN : Return NOTES: • For this CD, CDR, MD and TAPE components, buttons can be operated in the same way...


