Owners Manual
Page 23
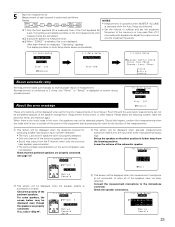
...be displayed ...screen will be displayed when the measurement microphone is displayed on screen during ...below may not be displayed when the speakers required...display switches to the microphone connector. Please check the following matters, reset... the pertinent items, and measure again. Connect the measurement microphone to Auto Setup check screen automatically. After each channel is not displayed... select "Skip0". 5 Start the measurements. Display 1 2 3 FL FR C SW SL ... will be displayed when accurate measurements cannot be displayed when the ...displayed even though the speakers are...
...be displayed ...screen will be displayed when the measurement microphone is displayed on screen during ...below may not be displayed when the speakers required...display switches to the microphone connector. Please check the following matters, reset... the pertinent items, and measure again. Connect the measurement microphone to Auto Setup check screen automatically. After each channel is not displayed... select "Skip0". 5 Start the measurements. Display 1 2 3 FL FR C SW SL ... will be displayed when accurate measurements cannot be displayed when the ...displayed even though the speakers are...
Owners Manual
Page 32
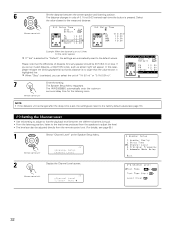
...less. The Speaker Setup Menu reappears. The AVR-2805/985 automatically sets the optimum surround delay time for the listening room. (Remote control unit) NOTE: • If the distance unit is changed after the delay time is set, the settings are automatically reset to the default values. 6 Set the distance... values (see page 68.) 1 Select "Channel Level" at the Speaker Setup Menu. (Remote control unit) *Speaker Setup Channel Level 2 Display the Channel Level screen. (Remote control unit) *Channel Level T.Tone: Auto 32 In this setting to adjust so that the playback level between...
...less. The Speaker Setup Menu reappears. The AVR-2805/985 automatically sets the optimum surround delay time for the listening room. (Remote control unit) NOTE: • If the distance unit is changed after the delay time is set, the settings are automatically reset to the default values. 6 Set the distance... values (see page 68.) 1 Select "Channel Level" at the Speaker Setup Menu. (Remote control unit) *Speaker Setup Channel Level 2 Display the Channel Level screen. (Remote control unit) *Channel Level T.Tone: Auto 32 In this setting to adjust so that the playback level between...
Owners Manual
Page 37
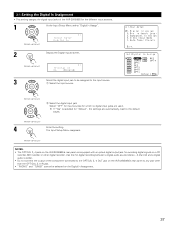
... input source (Remote control unit) w Select the digital input jack Select "OFF" for input sources for "Default", the settings are automatically reset to the default values. (Remote control unit) 4 Enter the setting. If "Yes" is selected for which no digital input jacks are...) and a digital audio recorder. • Do not connect the output of the AVR-2805/985 for the different input sources. 1 At the Input Setup Menu select "Digital In Assign". (Remote control unit) *Input Setup Digital In 2 Display the Digital Inputs screen. (Remote control unit) *Digital In CD : COAX1 3 ...
... input source (Remote control unit) w Select the digital input jack Select "OFF" for input sources for "Default", the settings are automatically reset to the default values. (Remote control unit) 4 Enter the setting. If "Yes" is selected for which no digital input jacks are...) and a digital audio recorder. • Do not connect the output of the AVR-2805/985 for the different input sources. 1 At the Input Setup Menu select "Digital In Assign". (Remote control unit) *Input Setup Digital In 2 Display the Digital Inputs screen. (Remote control unit) *Digital In CD : COAX1 3 ...

Owners Manual
Page 39
...Setting the Video Input Mode 1 Select "Video Input Mode" at the Input Setup Menu . (Remote control unit) *Input Setup Video In Mode 2 Display the Video Input Mode screen. (Remote control unit) *Video In Mode DVD : Auto 3 q Select the input source for which you want to ... follows. (Remote control unit) (Remote control unit) AUTO: Component: S-Video: Video: When there are multiple input signals, the input signals are reset to the component terminal. q Select the source w Select the component selection. Video conversion is not conducted, so no input signal to the factory...
...Setting the Video Input Mode 1 Select "Video Input Mode" at the Input Setup Menu . (Remote control unit) *Input Setup Video In Mode 2 Display the Video Input Mode screen. (Remote control unit) *Video In Mode DVD : Auto 3 q Select the input source for which you want to ... follows. (Remote control unit) (Remote control unit) AUTO: Component: S-Video: Video: When there are multiple input signals, the input signals are reset to the component terminal. q Select the source w Select the component selection. Video conversion is not conducted, so no input signal to the factory...
Owners Manual
Page 72
...NOTE: • When "Default" is selected and the cursor left button is pressed, "MODE" and "TONE" are automatically finalized and the normal display reappears after completing the settings. CENTER IMAGE (0.0 to 1.0: default 0.3): The center image parameter for playing movies. MODE (Remote control unit) (Main ...digital input) and DTS Surround mode (only with a digital input q Select an input source set to finish. The settings are automatically reset to the default values and "CINEMA EQ" is performed with emphasis on the remote control unit, press the "ENTER" or "SURROUND ...
...NOTE: • When "Default" is selected and the cursor left button is pressed, "MODE" and "TONE" are automatically finalized and the normal display reappears after completing the settings. CENTER IMAGE (0.0 to 1.0: default 0.3): The center image parameter for playing movies. MODE (Remote control unit) (Main ...digital input) and DTS Surround mode (only with a digital input q Select an input source set to finish. The settings are automatically reset to the default values and "CINEMA EQ" is performed with emphasis on the remote control unit, press the "ENTER" or "SURROUND ...
Owners Manual
Page 73
... remote control unit. 5 Select the various parameters. 6 Adjust the parameter settings. Light (Remote control unit) (Main unit) NOTE: The display on the screen differs depending on /off , "LFE" is reset, and the tone is displayed for different program sources, such as DVD, DTV and other future formats that will use Dolby Digital. Not...
... remote control unit. 5 Select the various parameters. 6 Adjust the parameter settings. Light (Remote control unit) (Main unit) NOTE: The display on the screen differs depending on /off , "LFE" is reset, and the tone is displayed for different program sources, such as DVD, DTV and other future formats that will use Dolby Digital. Not...

Owners Manual
Page 85
...initialized. 1, 2 2 NOTES: • If step 3 does not work, start over from step 1. • If the microprocessor has been reset, all the settings are reset to select the desired preset channel. 1 (Remote control unit) • Recalling preset stations from the factory). 85 TUNING PRESET (Main unit) 2...Hold the following INPUT MODE button and ANALOG button, and turn the main unit's power operation switch on. 3 Check that the entire display is flashing with a last function memory which stores the input and output setting conditions as they were immediately before the power is switched...
...initialized. 1, 2 2 NOTES: • If step 3 does not work, start over from step 1. • If the microprocessor has been reset, all the settings are reset to select the desired preset channel. 1 (Remote control unit) • Recalling preset stations from the factory). 85 TUNING PRESET (Main unit) 2...Hold the following INPUT MODE button and ANALOG button, and turn the main unit's power operation switch on. 3 Check that the entire display is flashing with a last function memory which stores the input and output setting conditions as they were immediately before the power is switched...


