Owners Manual
Page 2
...sold with the limits for help. Unplug this product from heat sources such as this manual, meets FCC requirements. Replacement Parts - The product should be determined by turning the ...the plug. If this product through openings as an improper adjustment of any interference received, including interference that to which can radiate radio frequency energy and, if not ...or cable system. Lightning - this product near water - Modification not expressly approved by DENON may touch dangerous voltage points or short-out parts that produce heat. Outdoor Antenna Grounding...
...sold with the limits for help. Unplug this product from heat sources such as this manual, meets FCC requirements. Replacement Parts - The product should be determined by turning the ...the plug. If this product through openings as an improper adjustment of any interference received, including interference that to which can radiate radio frequency energy and, if not ...or cable system. Lightning - this product near water - Modification not expressly approved by DENON may touch dangerous voltage points or short-out parts that produce heat. Outdoor Antenna Grounding...
Owners Manual
Page 4
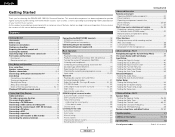
...to the radio Auto preset memory 29 Auto tuning 29 Manual tuning 30 Preset stations 30 Checking the preset stations 30 Recalling preset stations 30 1 ENGLISH Getting Started Advanced Operation Remote control unit Operating DENON audio components 31 Preset memory 32 Operating a component stored... superb surround sound listening with an immense array of features, before you begin hookup and operation that you for choosing the DENON AVR-1906 A/V Surround Receiver. Part 2 Speaker Setup Setting the Speaker Config 45, 46 Setting the Delay Time 46 Setting the Channel Level 46, ...
...to the radio Auto preset memory 29 Auto tuning 29 Manual tuning 30 Preset stations 30 Checking the preset stations 30 Recalling preset stations 30 1 ENGLISH Getting Started Advanced Operation Remote control unit Operating DENON audio components 31 Preset memory 32 Operating a component stored... superb surround sound listening with an immense array of features, before you begin hookup and operation that you for choosing the DENON AVR-1906 A/V Surround Receiver. Part 2 Speaker Setup Setting the Speaker Config 45, 46 Setting the Delay Time 46 Setting the Channel Level 46, ...
Owners Manual
Page 7
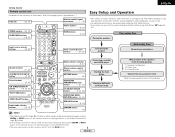
...32) Tuner system/System buttons 29, 33) ENGLISH Easy Setup and Operation • This section contains the basic steps necessary to configure the AVR-1906 according to the pages given in the listening position. 1) Speaker Configuration 2) Delay Time 3) Channel Level Check of these parts, refer to your... using. • For optimum performance, we recommend using the Auto Setup function. • If you wish, you can set the various settings manually without using Auto Setup ( page 45 ~ 47). System buttons 31~33) SYSTEM SETUP/SETUP button 9, 32) Master volume control buttons 18, 37...
...32) Tuner system/System buttons 29, 33) ENGLISH Easy Setup and Operation • This section contains the basic steps necessary to configure the AVR-1906 according to the pages given in the listening position. 1) Speaker Configuration 2) Delay Time 3) Channel Level Check of these parts, refer to your... using. • For optimum performance, we recommend using the Auto Setup function. • If you wish, you can set the various settings manually without using Auto Setup ( page 45 ~ 47). System buttons 31~33) SYSTEM SETUP/SETUP button 9, 32) Master volume control buttons 18, 37...
Owners Manual
Page 9
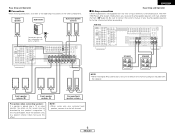
... this effect. Be sure to remove the short-circuiting bar included with two amplifier channels ( page 44). The AVR1906 Power Amp Assign. AVR-1906 SPEAKER SPEAKER (L) (R) >< (L) (R) >< (L) (R) > < Front speaker systems (B) Front speaker systems (A) Surround back speaker systems Precautions...speaker is placed near a TV or video monitor, the colors on the screen may be sure to consult the owner's manual of input terminals, for further information before proceeding. Center speaker Subwoofer Surround speaker systems >< IN Connection terminal for a subwoofer...
... this effect. Be sure to remove the short-circuiting bar included with two amplifier channels ( page 44). The AVR1906 Power Amp Assign. AVR-1906 SPEAKER SPEAKER (L) (R) >< (L) (R) >< (L) (R) > < Front speaker systems (B) Front speaker systems (A) Surround back speaker systems Precautions...speaker is placed near a TV or video monitor, the colors on the screen may be sure to consult the owner's manual of input terminals, for further information before proceeding. Center speaker Subwoofer Surround speaker systems >< IN Connection terminal for a subwoofer...
Owners Manual
Page 10
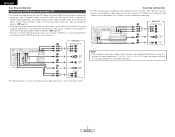
... function ( page 12). • To connect the digital audio output from the DVD player, you can choose from the DVD player to the AVR-1906, you choose to use the coaxial connection, it needs to the DVD/VDP terminals in the same way. Monitor TV H COMPONENT VIDEO IN Y... Connecting a DVD player and monitor TV • To connect the video output from either the coaxial or optical connections. Check the owner's manuals for further information. S-Video and composite video outputs are also provided if your monitor TV. video signal flow is shown with progressive DVD and...
... function ( page 12). • To connect the digital audio output from the DVD player, you can choose from the DVD player to the AVR-1906, you choose to use the coaxial connection, it needs to the DVD/VDP terminals in the same way. Monitor TV H COMPONENT VIDEO IN Y... Connecting a DVD player and monitor TV • To connect the video output from either the coaxial or optical connections. Check the owner's manuals for further information. S-Video and composite video outputs are also provided if your monitor TV. video signal flow is shown with progressive DVD and...
Owners Manual
Page 21
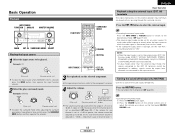
...) cannot be reproduced. w Press the VOLUME button on the remote control unit, or adjust the volume up to 18 dB. (In this to the component's manual. 4 Adjust the volume. (Main unit) (Remote control unit) The volume level is displayed on the selected component.
...) cannot be reproduced. w Press the VOLUME button on the remote control unit, or adjust the volume up to 18 dB. (In this to the component's manual. 4 Adjust the volume. (Main unit) (Remote control unit) The volume level is displayed on the selected component.
Owners Manual
Page 22
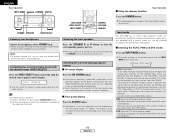
...the speaker output) is being input, the analog input terminals are selected. Press the ON SCREEN button. The display brightness changes in the AVR-1906's surround decoder is pressed: AUTO PCM DTS AUTO (auto mode): In this mode to monitor a video source other than the audio source....source to the component connected to play Dolby Digital signals. Input mode The AVR-1906 has an AUTO signal detection mode that automatically identifies the type of incoming audio signals, but is also equipped with a manual mode that operation appears on the display. The front speaker A, B setting...
...the speaker output) is being input, the analog input terminals are selected. Press the ON SCREEN button. The display brightness changes in the AVR-1906's surround decoder is pressed: AUTO PCM DTS AUTO (auto mode): In this mode to monitor a video source other than the audio source....source to the component connected to play Dolby Digital signals. Input mode The AVR-1906 has an AUTO signal detection mode that automatically identifies the type of incoming audio signals, but is also equipped with a manual mode that operation appears on the display. The front speaker A, B setting...
Owners Manual
Page 24
... this mode to select the Dolby Pro Logic IIx mode. • The Dolby Pro Logic II indicator lights. setting. For operating instructions, refer to the manuals of the various parameters. 21 ENGLISH Press the DIRECT/STEREO button on the main unit or the STEREO button on the remote control unit to... mode to select the DIRECT mode. ENTER SURROUND PARAMETER CURSOR SURROUND PARAMETER SELECT Surround Playing audio sources (CDs and DVDs) 2-channel playback modes • The AVR-1906 is set "S.
... this mode to select the Dolby Pro Logic IIx mode. • The Dolby Pro Logic II indicator lights. setting. For operating instructions, refer to the manuals of the various parameters. 21 ENGLISH Press the DIRECT/STEREO button on the main unit or the STEREO button on the remote control unit to... mode to select the DIRECT mode. ENTER SURROUND PARAMETER CURSOR SURROUND PARAMETER SELECT Surround Playing audio sources (CDs and DVDs) 2-channel playback modes • The AVR-1906 is set "S.

Owners Manual
Page 32
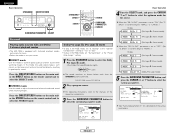
.... Channel A1 is tuned in the preset memory. • The "Auto tuner preset" operation can also be preset automatically due to poor reception, use the "Manual tuning" operation to set the auto tuning mode. 4 Press the TUNING (+) or (-) button. At open frequencies, the noise is completed. 2 DEFAULT SETTINGS A1 ~ A8 B1... MODE button to tune in . When the first FM broadcast station is found, that station is tuned in the station, then preset it using the manual "Preset memory" operation. • To interrupt this function, press the ON/STANDBY switch. 29 ENGLISH
.... Channel A1 is tuned in the preset memory. • The "Auto tuner preset" operation can also be preset automatically due to poor reception, use the "Manual tuning" operation to set the auto tuning mode. 4 Press the TUNING (+) or (-) button. At open frequencies, the noise is completed. 2 DEFAULT SETTINGS A1 ~ A8 B1... MODE button to tune in . When the first FM broadcast station is found, that station is tuned in the station, then preset it using the manual "Preset memory" operation. • To interrupt this function, press the ON/STANDBY switch. 29 ENGLISH

Owners Manual
Page 33
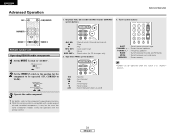
...MODE button to 4. The frequency changes continuously when the button is held in. • When the manual tuning mode is set the manual tuning mode. Preset stations 1 Use the "Auto tuning" or "Manual tuning" operation to tune in the station to be preset in the memory. 2 Press the MEMORY button... - 8 stations (channels 1 to 8) in the preset memory. • To preset other channels, repeat steps 1 to set , FM stereo broadcasts are received in monaural and the "STEREO" indicator turns off . 4 Press the TUNING (+) or (-) button to tune in the desired station. Basic Operation Checking the ...
...MODE button to 4. The frequency changes continuously when the button is held in. • When the manual tuning mode is set the manual tuning mode. Preset stations 1 Use the "Auto tuning" or "Manual tuning" operation to tune in the station to be preset in the memory. 2 Press the MEMORY button... - 8 stations (channels 1 to 8) in the preset memory. • To preset other channels, repeat steps 1 to set , FM stereo broadcasts are received in monaural and the "STEREO" indicator turns off . 4 Press the TUNING (+) or (-) button to tune in the desired station. Basic Operation Checking the ...
Owners Manual
Page 34
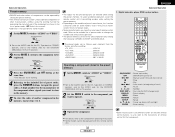
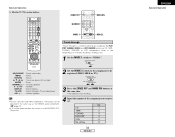
...) system buttons 3. ENGLISH Advanced Operation OFF ON/SOURCE NUMBER 1. Tuner system buttons Advanced Operation MODE 1 MODE 2 Remote control unit Operating DENON audio components 1 Set the MODE 1 switch to "AUDIO". 6, 7 2 1 8, 9 3 DISC SKIP + : Manual search (forward and reverse) : Stop : Play : Auto search (cue) : Pause : Switch discs (for the component to be operated when the...
...) system buttons 3. ENGLISH Advanced Operation OFF ON/SOURCE NUMBER 1. Tuner system buttons Advanced Operation MODE 1 MODE 2 Remote control unit Operating DENON audio components 1 Set the MODE 1 switch to "AUDIO". 6, 7 2 1 8, 9 3 DISC SKIP + : Manual search (forward and reverse) : Stop : Play : Auto search (cue) : Pause : Switch discs (for the component to be operated when the...
Owners Manual
Page 35
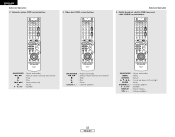
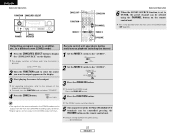
...and DBS/CABLE. To avoid accidental operation, cover the remote control unit's transmitting window while setting the preset memory. • Depending on /standby OFF : DENON DVD power off 6, 7 : Manual search (forward and reverse) 2 : Stop 1 : Play 8, 9 : Auto search (to beginning of preset codes to change the number and verify correct...control unit can be set for one type of remote control code. ON/SOURCE : Power on the model and year of manufacture, this manual). • Operation is not possible for some models, even if they are as shown in the list of preset codes ( End of ...
...and DBS/CABLE. To avoid accidental operation, cover the remote control unit's transmitting window while setting the preset memory. • Depending on /standby OFF : DENON DVD power off 6, 7 : Manual search (forward and reverse) 2 : Stop 1 : Play 8, 9 : Auto search (to beginning of preset codes to change the number and verify correct...control unit can be set for one type of remote control code. ON/SOURCE : Power on the model and year of manufacture, this manual). • Operation is not possible for some models, even if they are as shown in the list of preset codes ( End of ...
Owners Manual
Page 36
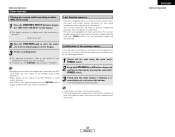
... Advanced Operation 2. Digital broadcast satellite (DBS) tuner and cable (CABLE) system buttons ON/SOURCE : Power on/standby 6, 7 : Manual search (forward and reverse) 2 : Stop 1 : Play 8, 9 : Auto search (cue) 3 : Pause 0 ~ 9, +10 : Number ON/SOURCE : Power on/standby 6, 7 : Manual search (forward and reverse) 2 : Stop 1 : Play 3 : Pause Channel +, - : Channel up/down ON/SOURCE : Power on/standby...
... Advanced Operation 2. Digital broadcast satellite (DBS) tuner and cable (CABLE) system buttons ON/SOURCE : Power on/standby 6, 7 : Manual search (forward and reverse) 2 : Stop 1 : Play 8, 9 : Auto search (cue) 3 : Pause 0 ~ 9, +10 : Number ON/SOURCE : Power on/standby 6, 7 : Manual search (forward and reverse) 2 : Stop 1 : Play 3 : Pause Channel +, - : Channel up/down ON/SOURCE : Power on/standby...
Owners Manual
Page 37
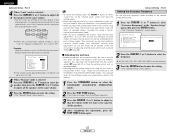
Monitor TV (TV) system buttons ZONE2 OFF NUMBER MAIN ON MODE 1 MODE 2 Punch through "Punch Through" is a function allowing you to operate the PLAY, STOP, MANUAL SEARCH and AUTO SEARCH buttons on /standby MENU : Menu RETURN : Return •, ª, 0, 1 : Cursor up, down, left and right ENTER : Enter CHANNEL +, - : Channel up/down 0 ~ ...34 ENGLISH ENGLISH Advanced Operation ON/SOURCE : Power on CD, TAPE, CDR/MD, DVD/VDP or VCR components when in the same way as for DENON audio components ( page 31). • A TV can be operated when the switch is set . Advanced Operation 5.
Monitor TV (TV) system buttons ZONE2 OFF NUMBER MAIN ON MODE 1 MODE 2 Punch through "Punch Through" is a function allowing you to operate the PLAY, STOP, MANUAL SEARCH and AUTO SEARCH buttons on /standby MENU : Menu RETURN : Return •, ª, 0, 1 : Cursor up, down, left and right ENTER : Enter CHANNEL +, - : Channel up/down 0 ~ ...34 ENGLISH ENGLISH Advanced Operation ON/SOURCE : Power on CD, TAPE, CDR/MD, DVD/VDP or VCR components when in the same way as for DENON audio components ( page 31). • A TV can be operated when the switch is set . Advanced Operation 5.
Owners Manual
Page 40
... "ZONE2". 3 Start playing the source to TUNER, the preset channel can be output. Lights 3 Press the ZONE2 ON button. Set the MODE 1 switch to the manuals of the respective components. For operating instructions, refer to the "AUDIO". The ZONE2 source switches directly. 5 The output level of the source selected in the...
... "ZONE2". 3 Start playing the source to TUNER, the preset channel can be output. Lights 3 Press the ZONE2 ON button. Set the MODE 1 switch to the manuals of the respective components. For operating instructions, refer to the "AUDIO". The ZONE2 source switches directly. 5 The output level of the source selected in the...
Owners Manual
Page 41
For operating instructions, refer to the manual of the component on which stores the input and output setting conditions as follows each time the button is pressed. The display switches as they ...
For operating instructions, refer to the manual of the component on which stores the input and output setting conditions as follows each time the button is pressed. The display switches as they ...

Owners Manual
Page 48
...to finalize the setting and exit the system setup mode. • When the setup lock function is no need to change them unless different AV components are connected or the speakers are unsure, try comparing the sound at both settings (setting the volume to a level low enough so ...as to make manual changes to select "Speaker Config.", then press the ENTER button. • The "Speaker Config." Subwoofer Surround Sp. ENGLISH Advanced Setup - ENTER CURSOR Speaker ...
...to finalize the setting and exit the system setup mode. • When the setup lock function is no need to change them unless different AV components are connected or the speakers are unsure, try comparing the sound at both settings (setting the volume to a level low enough so ...as to make manual changes to select "Speaker Config.", then press the ENTER button. • The "Speaker Config." Subwoofer Surround Sp. ENGLISH Advanced Setup - ENTER CURSOR Speaker ...

Owners Manual
Page 49
... when "Small" is set the delay time for the various speaker settings must not be set. 3 Press the CURSOR F or G button to select "Auto" or "Manual". Manual: Select the speaker from each time the button is sent to the measured distance.
... when "Small" is set the delay time for the various speaker settings must not be set. 3 Press the CURSOR F or G button to select "Auto" or "Manual". Manual: Select the speaker from each time the button is sent to the measured distance.
Owners Manual
Page 50
.... • To cancel the settings, press the CURSOR H button to adjust so that mode will be remembered for just that the volume of 1 dB. 4 When "Manual" mode is selected: Press the CURSOR F or G button to adjust the subwoofer's own volume control. • When you activate a particular surround sound mode, your preferred...
.... • To cancel the settings, press the CURSOR H button to adjust so that mode will be remembered for just that the volume of 1 dB. 4 When "Manual" mode is selected: Press the CURSOR F or G button to adjust the subwoofer's own volume control. • When you activate a particular surround sound mode, your preferred...
Owners Manual
Page 56
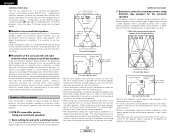
Furthermore, all the DENON original surround modes ( page 26) are direct-radiating (monopolar), then place them at the back facing the front at a narrower distance than the front left ... signals from the surround channels reflect off the monitor or screen at a slightly higher position 0 to 0.7 feet than the front speakers. • Consult the owner's manual for your system according to the type of speakers used and the main usage purpose. [1] DTS-ES compatible system (using surround back speakers) q Basic setting...
Furthermore, all the DENON original surround modes ( page 26) are direct-radiating (monopolar), then place them at the back facing the front at a narrower distance than the front left ... signals from the surround channels reflect off the monitor or screen at a slightly higher position 0 to 0.7 feet than the front speakers. • Consult the owner's manual for your system according to the type of speakers used and the main usage purpose. [1] DTS-ES compatible system (using surround back speakers) q Basic setting...


