Literature/Product Sheet
Page 1
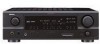
A/V Receiver AVR-1707 DTS-ES Discrete 6.1 and Dolby Digital EX with Power Amps for 7 Channels Audio... Channel Surround Back Power Amp for 7.1 Surround The AVR-1707 is connected to the AVR-1707 iPod (*1) playback can also be enjoyed through the AVR-1707 when the ASD-1R, Denon's original Control Dock for the Surround Back channel speaker... amps including 2 for iPod (sold separately), is equipped with a total of S-Video Switching Connectivity and Usability s Variable subwoofer crossover switching (40/60/80/90/100/110/120/150/200/250Hz) s ASD-1R Control Dock for more clearly defined...
A/V Receiver AVR-1707 DTS-ES Discrete 6.1 and Dolby Digital EX with Power Amps for 7 Channels Audio... Channel Surround Back Power Amp for 7.1 Surround The AVR-1707 is connected to the AVR-1707 iPod (*1) playback can also be enjoyed through the AVR-1707 when the ASD-1R, Denon's original Control Dock for the Surround Back channel speaker... amps including 2 for iPod (sold separately), is equipped with a total of S-Video Switching Connectivity and Usability s Variable subwoofer crossover switching (40/60/80/90/100/110/120/150/200/250Hz) s ASD-1R Control Dock for more clearly defined...
Literature/Product Sheet
Page 2
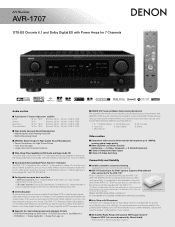
...tape, stereo radio and stereo video sources into exciting surround sound, free of delay effects and unnatural artifacts, from all of DENON's high-grade A/V receiver, the AVR-1707 lets you adjust delay times and other countries. *©2006 XM Satellite Radio Inc. The adjustments are then stored, for ...) Preamplifier Section Input sensitivity/Impedance CD, DVD/VDP, TV/DBS, VCR, CDR/TAPE, AUX V.AUX(FRONT) 200 mV/47 kohms Output level/Load impedance SUBWOOFER 1.2 V/10 kohms CDR/TAPE, VCR 200 mV/47 kohms Frequency response 10 Hz - 100 kHz (+1, -3 dB) (Tone Defeat On) Signal-to-noise...
...tape, stereo radio and stereo video sources into exciting surround sound, free of delay effects and unnatural artifacts, from all of DENON's high-grade A/V receiver, the AVR-1707 lets you adjust delay times and other countries. *©2006 XM Satellite Radio Inc. The adjustments are then stored, for ...) Preamplifier Section Input sensitivity/Impedance CD, DVD/VDP, TV/DBS, VCR, CDR/TAPE, AUX V.AUX(FRONT) 200 mV/47 kohms Output level/Load impedance SUBWOOFER 1.2 V/10 kohms CDR/TAPE, VCR 200 mV/47 kohms Frequency response 10 Hz - 100 kHz (+1, -3 dB) (Tone Defeat On) Signal-to-noise...
Owners Manual - English
Page 5
...2 Speaker Setup Setting the Speaker Configuration 45, 46 Setting the Subwoofer Mode Setup 46 Setting the Distance 46, 47 Setting the Crossover Frequency 47 Setting the Test Tone 47 Operating the remote control unit Operating DENON audio components 48 Setting the preset memory function 48 Operating a ...power supply cord and disconnect the connection cables between all other audio components when moving the unit. • Cautions on . IN Subwoofer Level 42 Setting the Auto Preset Memory 43 Option Setup Setting the Power Amplifier Assignment 43 Setting the Volume Control 44 Setting the...
...2 Speaker Setup Setting the Speaker Configuration 45, 46 Setting the Subwoofer Mode Setup 46 Setting the Distance 46, 47 Setting the Crossover Frequency 47 Setting the Test Tone 47 Operating the remote control unit Operating DENON audio components 48 Setting the preset memory function 48 Operating a ...power supply cord and disconnect the connection cables between all other audio components when moving the unit. • Cautions on . IN Subwoofer Level 42 Setting the Auto Preset Memory 43 Option Setup Setting the Power Amplifier Assignment 43 Setting the Volume Control 44 Setting the...
Owners Manual - English
Page 10
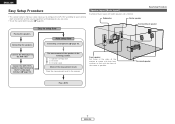
... of the monitor or screen with their front surfaces as possible. Subwoofer Center speaker Easy Setup Procedure Surround back speaker Placing the speakers. Connect the AVR-1707's monitor output terminal to the AVR-1707. ENGLISH Easy Setup Procedure • This section contains the basic steps... necessary to configure the AVR-1707 according to setup flow Speaker layout [Basic layout]...
... of the monitor or screen with their front surfaces as possible. Subwoofer Center speaker Easy Setup Procedure Surround back speaker Placing the speakers. Connect the AVR-1707's monitor output terminal to the AVR-1707. ENGLISH Easy Setup Procedure • This section contains the basic steps... necessary to configure the AVR-1707 according to setup flow Speaker layout [Basic layout]...
Owners Manual - English
Page 11
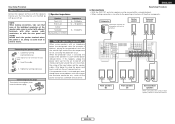
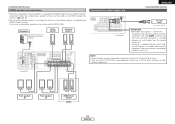
... banana plugs Turn clockwise to the speakers is cut off and improve ventilation around the unit, switch off the power and contact a DENON service center. Subwoofer Connection terminal for long periods of the speaker cable come in and turn the unit's power back on. Connecting the speaker cables ... When making connections, also refer to cool off and the power indicator blinks. ENGLISH Easy Setup Procedure ¢ Connections • With the AVR-1707, up to ten speakers can be connected for the set to the operating instructions of the input cables and the speaker cables. Also check ...
... banana plugs Turn clockwise to the speakers is cut off and improve ventilation around the unit, switch off the power and contact a DENON service center. Subwoofer Connection terminal for long periods of the speaker cable come in and turn the unit's power back on. Connecting the speaker cables ... When making connections, also refer to cool off and the power indicator blinks. ENGLISH Easy Setup Procedure ¢ Connections • With the AVR-1707, up to ten speakers can be connected for the set to the operating instructions of the input cables and the speaker cables. Also check ...

Owners Manual - English
Page 13
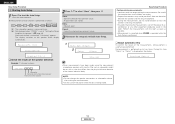
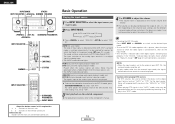
...H F G [ON/SOURCE] [MODE SELECTOR 1] D H F G ENGLISH Easy Setup Procedure Auto Setup w Before performing the Auto Setup procedure The AVR-1707's auto setup use the attached microphone to measure the acoustic properties in the room and automatically make the optimum settings. • To make the sound... the Auto Setup procedure. Microphone Place the setup microphone's sound receptor at the height of the ears in this function off if your subwoofer can adjust the output volume and the crossover frequency. q Connecting a microphone 1 Connect the attached setup microphone to . 2 Turn on...
...H F G [ON/SOURCE] [MODE SELECTOR 1] D H F G ENGLISH Easy Setup Procedure Auto Setup w Before performing the Auto Setup procedure The AVR-1707's auto setup use the attached microphone to measure the acoustic properties in the room and automatically make the optimum settings. • To make the sound... the Auto Setup procedure. Microphone Place the setup microphone's sound receptor at the height of the ears in this function off if your subwoofer can adjust the output volume and the crossover frequency. q Connecting a microphone 1 Connect the attached setup microphone to . 2 Turn on...
Owners Manual - English
Page 14
... display automatically. 2 Press D H to finish Auto Setup. Retry: Measure again. After each channel is performed as follows: FL FR 1 2 C SW SL SR SBL SBR 1: The subwoofer speaker is measured twice. 2: Not displayed when "ZONE2" is measured, "Calculating" appears. ENGLISH Easy Setup Procedure r Starting Auto Setup 1 Press F to start the Auto Setup...
... display automatically. 2 Press D H to finish Auto Setup. Retry: Measure again. After each channel is performed as follows: FL FR 1 2 C SW SL SR SBL SBR 1: The subwoofer speaker is measured twice. 2: Not displayed when "ZONE2" is measured, "Calculating" appears. ENGLISH Easy Setup Procedure r Starting Auto Setup 1 Press F to start the Auto Setup...
Owners Manual - English
Page 15
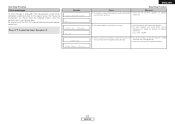
Example Caution:SP None F L Caution :Phase F L / R C a u t i o n Overload Press D H to the speaker layout, the measuring environment, etc. Easy Setup Procedure Error messages An error message is displayed if the measurements could not be completed automatically due to select the items, then press F. Be sure to turn off the AVR-1707's power before checking the speaker connections. Please check the following matters, reset the pertinent items, and measure again.
Example Caution:SP None F L Caution :Phase F L / R C a u t i o n Overload Press D H to the speaker layout, the measuring environment, etc. Easy Setup Procedure Error messages An error message is displayed if the measurements could not be completed automatically due to select the items, then press F. Be sure to turn off the AVR-1707's power before checking the speaker connections. Please check the following matters, reset the pertinent items, and measure again.
Owners Manual - English
Page 16
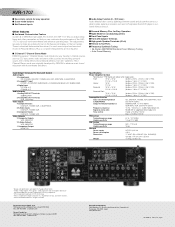
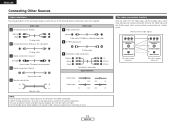
Audio cable A Analog connections (Stereo) (White) (Red) L L R R Pin-plug cable B Analog connections (Monaural, for subwoofer) F Video connections Video cable (Yellow) Video cable (75 Ω/ohms video pin-plug cable) G S-Video connections Pin-plug cable C Digital connections (Coaxial) (Orange) ...OUT OUT NOTE: • Do not plug in humming or noise. (Y) (PB/CB) (PR/CR) IN IN The video conversion function With the AVR-1707, the Video signal and the S-Video signal which were inputted are mutually converted. The flow of the other components. • Be sure to the operating...
Audio cable A Analog connections (Stereo) (White) (Red) L L R R Pin-plug cable B Analog connections (Monaural, for subwoofer) F Video connections Video cable (Yellow) Video cable (75 Ω/ohms video pin-plug cable) G S-Video connections Pin-plug cable C Digital connections (Coaxial) (Orange) ...OUT OUT NOTE: • Do not plug in humming or noise. (Y) (PB/CB) (PR/CR) IN IN The video conversion function With the AVR-1707, the Video signal and the S-Video signal which were inputted are mutually converted. The flow of the other components. • Be sure to the operating...
Owners Manual - English
Page 17
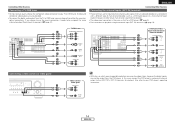
... coaxial or optical connections. In this case, connect the DVD player's analog multi-channel output to the AVR-1707's EXT. If you can choose from the DVD player. For more information about Digital Input Assignment ( ...-Video / Super Audio CD player / External decoder A 7.1ch AUDIO OUT FRONT L L L R R R B CENTER A SURROUND L L L R R R A SURROUND BACK L L L R R R B SUBWOOFER Connecting a video camera or video game A L R F Video camera / Video game AUDIO OUT L L R R VIDEO OUT • With discs on playback using the external input (EXT. Connecting...
... coaxial or optical connections. In this case, connect the DVD player's analog multi-channel output to the AVR-1707's EXT. If you can choose from the DVD player. For more information about Digital Input Assignment ( ...-Video / Super Audio CD player / External decoder A 7.1ch AUDIO OUT FRONT L L L R R R B CENTER A SURROUND L L L R R R A SURROUND BACK L L L R R R B SUBWOOFER Connecting a video camera or video game A L R F Video camera / Video game AUDIO OUT L L R R VIDEO OUT • With discs on playback using the external input (EXT. Connecting...
Owners Manual - English
Page 21
Subwoofer Connection terminal for subwoofer with the POWER switch on the main unit, and when the power is switched between on and standby from this outlet when this case, surround ...
Subwoofer Connection terminal for subwoofer with the POWER switch on the main unit, and when the power is switched between on and standby from this outlet when this case, surround ...
Owners Manual - English
Page 22
... and connections are input. Cautions when playing DTS sources: • For DTS sources, be adjusted between the range of input signal is detected and the AVR-1707's surround mode is made. AUTO PCM DTS EXT. AUTO (All auto mode): The type of -80 ~ 0 ~ 18 dB. About the button names... (exclusive DTS signal playback mode): Played when the various signals are correct. ANALOG (exclusive analog audio signal playback mode) and EXT. To lower the subwoofer channel level in the "DTS" mode. If so, play in the "ANALOG" or "PCM" mode. • When playing DTS signals in the...
... and connections are input. Cautions when playing DTS sources: • For DTS sources, be adjusted between the range of input signal is detected and the AVR-1707's surround mode is made. AUTO PCM DTS EXT. AUTO (All auto mode): The type of -80 ~ 0 ~ 18 dB. About the button names... (exclusive DTS signal playback mode): Played when the various signals are correct. ANALOG (exclusive analog audio signal playback mode) and EXT. To lower the subwoofer channel level in the "DTS" mode. If so, play in the "ANALOG" or "PCM" mode. • When playing DTS signals in the...

Owners Manual - English
Page 28
... VIDEO GAME MATRIX VIRTUAL Channel output Signals and adjustability in the different modes Parameter (default values are shown in parentheses) FRONT L/R CENTER SURROUND L/R SURROUND BACK L/R SUBWOOFER D. NOTE3 : This parameter is available when the "MODE" is set to "CINEMA". IN only PANORAMA DIMENSION CENTER WIDTH CENTER IMAGE SW ATT E E E E E E E E E C C (OFF) C (3) C (3) E E C (OFF...
... VIDEO GAME MATRIX VIRTUAL Channel output Signals and adjustability in the different modes Parameter (default values are shown in parentheses) FRONT L/R CENTER SURROUND L/R SURROUND BACK L/R SUBWOOFER D. NOTE3 : This parameter is available when the "MODE" is set to "CINEMA". IN only PANORAMA DIMENSION CENTER WIDTH CENTER IMAGE SW ATT E E E E E E E E E C C (OFF) C (3) C (3) E E C (OFF...
Owners Manual - English
Page 41
... and properties for playing the low bass signals. Large Default settings Center Sp. Adjust the time delay between the video and audio signals. Subwoofer Surround Sp. Input source Digital Inputs CD COAX 1 Default settings AUX DVD COAX 2 OPT 1 5 iPod Assignment mode It is for ... Setup Distance mode Select the method of playback of speakers to be preset automatically. IN Subwoofer Sets the playback level of the various speakers so that was input to any input terminals on the AVR-1707 and play them. 6 ~ 8 9 ~ 12 13 Component In Assignment mode Video Convert...
... and properties for playing the low bass signals. Large Default settings Center Sp. Adjust the time delay between the video and audio signals. Subwoofer Surround Sp. Input source Digital Inputs CD COAX 1 Default settings AUX DVD COAX 2 OPT 1 5 iPod Assignment mode It is for ... Setup Distance mode Select the method of playback of speakers to be preset automatically. IN Subwoofer Sets the playback level of the various speakers so that was input to any input terminals on the AVR-1707 and play them. 6 ~ 8 9 ~ 12 13 Component In Assignment mode Video Convert...

Owners Manual - English
Page 45
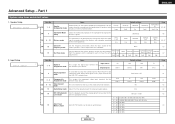
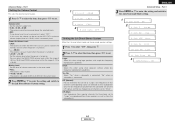
... This sets whether or not to use it. 2 Press ENTER or H to enter the setting and switch to the EXT. Part 1 Setting the EXT. IN subwoofer terminal. 2 Press ENTER or H to enter the setting and switch to set. ENGLISH Advanced Setup - D e l a y 0 m s Setting the Audio Delay Adjust the time delay ..." if you do not want to use the video conversion function. 1 Press F G to the Auto Preset Memory setting. 1 14EXT.In SW +10 2 15Preset IN Subwoofer Level Sets the playback level of the actors' lips is synchronized with the sound. 2 Press ENTER or H to enter the setting and switch to the...
... This sets whether or not to use it. 2 Press ENTER or H to enter the setting and switch to the EXT. Part 1 Setting the EXT. IN subwoofer terminal. 2 Press ENTER or H to enter the setting and switch to set. ENGLISH Advanced Setup - D e l a y 0 m s Setting the Audio Delay Adjust the time delay ..." if you do not want to use the video conversion function. 1 Press F G to the Auto Preset Memory setting. 1 14EXT.In SW +10 2 15Preset IN Subwoofer Level Sets the playback level of the actors' lips is synchronized with the sound. 2 Press ENTER or H to enter the setting and switch to the...
Owners Manual - English
Page 47
... small speakers without ample low frequency reproduction capabilities. ON 44 ENGLISH Power On Volume Level: • LAST: The volume set when the AVR-1707 was last used is stored in the memory and set to "Small". Large: Select this when using large speakers with ample low frequency ... power is lowered 40 dB or 20 dB from the subwoofer(s). 1 5 2ch Cstm ON 2 6 2ch F L a r g e 7 2ch SW Y e s 8 2ch LFE Norm 9 2ch FL 12ft 10 2ch FR 12ft 11 2ch Freq 80 3 12AutoSurr. Muting Level: Set the level of -70 to the AVR-1707's maximum volume (output) level of output. 1 2 ...
... small speakers without ample low frequency reproduction capabilities. ON 44 ENGLISH Power On Volume Level: • LAST: The volume set when the AVR-1707 was last used is stored in the memory and set to "Small". Large: Select this when using large speakers with ample low frequency ... power is lowered 40 dB or 20 dB from the subwoofer(s). 1 5 2ch Cstm ON 2 6 2ch F L a r g e 7 2ch SW Y e s 8 2ch LFE Norm 9 2ch FL 12ft 10 2ch FR 12ft 11 2ch Freq 80 3 12AutoSurr. Muting Level: Set the level of -70 to the AVR-1707's maximum volume (output) level of output. 1 2 ...

Owners Manual - English
Page 48
...for your speaker systems manually. Setting the Speaker Configuration Automatically set to "No", "Front" is no subwoofer is connected. 2sp / 1sp: Select the number of speakers to the Subwoofer Mode Setup setting. channel format (DOLBY/DTS SURROUND) Default settings are indicated in the memory, and ...set to "Large". 3 Press ENTER or H to enter the setting and switch to be greatly enhanced when "Small" is input. A subwoofer with sufficient low frequency playback capability can better handle deep bass than most main and surround speakers, and the system's overall performance will be...
...for your speaker systems manually. Setting the Speaker Configuration Automatically set to "No", "Front" is no subwoofer is connected. 2sp / 1sp: Select the number of speakers to the Subwoofer Mode Setup setting. channel format (DOLBY/DTS SURROUND) Default settings are indicated in the memory, and ...set to "Large". 3 Press ENTER or H to enter the setting and switch to be greatly enhanced when "Small" is input. A subwoofer with sufficient low frequency playback capability can better handle deep bass than most main and surround speakers, and the system's overall performance will be...

Owners Manual - English
Page 49
... listening position and the speakers (L1 to L8 on the diagram at both settings (setting the volume to a level low enough so as from the subwoofer(s). 2 Press ENTER or H to enter the setting and switch to the Distance setting. 1 7 S W M o d e +Main Setting the Distance This parameter...setting. 1 8 FL 1 5 f t 15 SW 1 2 f t 2 16Cr.Over 80Hz 46 ENGLISH LFE (Normal): For any channel(s) that are reproduced from the subwoofer channel. • Select the mode achieving a voluminous bass sound when playing music or movie sources. 1 Press F G to set for playing the low bass signals. 1 Press...
... listening position and the speakers (L1 to L8 on the diagram at both settings (setting the volume to a level low enough so as from the subwoofer(s). 2 Press ENTER or H to enter the setting and switch to the Distance setting. 1 7 S W M o d e +Main Setting the Distance This parameter...setting. 1 8 FL 1 5 f t 15 SW 1 2 f t 2 16Cr.Over 80Hz 46 ENGLISH LFE (Normal): For any channel(s) that are reproduced from the subwoofer channel. • Select the mode achieving a voluminous bass sound when playing music or movie sources. 1 Press F G to set for playing the low bass signals. 1 Press...

Owners Manual - English
Page 50
...speaker, then press F G to -2 adjust the volume. • The crossover frequency mode is valid only when subwoofer is output from the subwoofer or the speakers that the sound output from the subwoofer. Select the value closest to the measured distance. • Please note that the difference of distance for every ...speaker the speakers and the subwoofer seems to have the same volume level. 2 T.Tone Auto > should be 20 ft (6.0 m) or less. 1 Press F to select "Yes". 3 TEST TONE ON...
...speaker, then press F G to -2 adjust the volume. • The crossover frequency mode is valid only when subwoofer is output from the subwoofer or the speakers that the sound output from the subwoofer. Select the value closest to the measured distance. • Please note that the difference of distance for every ...speaker the speakers and the subwoofer seems to have the same volume level. 2 T.Tone Auto > should be 20 ft (6.0 m) or less. 1 Press F to select "Yes". 3 TEST TONE ON...

Owners Manual - English
Page 56
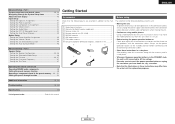
...176; Surround back speakers [As seen from the side] Surround speaker Surround back speaker Front speaker 2 to 3 feet Point slightly downwards Monitor Subwoofer 60° 120° Surround speakers [ As seen from the side ] Surround speaker Front speaker 2 to 3 feet In addition to sources...162; Placement of the surround left and right channels when using surround back speakers [ As seen from above ] Front speakers Center speaker Monitor Subwoofer 45° ~ 60° Surround speakers Surround back speakers [ As seen from the side ] Surround speaker Surround back speaker Front speaker 2...
...176; Surround back speakers [As seen from the side] Surround speaker Surround back speaker Front speaker 2 to 3 feet Point slightly downwards Monitor Subwoofer 60° 120° Surround speakers [ As seen from the side ] Surround speaker Front speaker 2 to 3 feet In addition to sources...162; Placement of the surround left and right channels when using surround back speakers [ As seen from above ] Front speakers Center speaker Monitor Subwoofer 45° ~ 60° Surround speakers Surround back speakers [ As seen from the side ] Surround speaker Surround back speaker Front speaker 2...


