
Owners Manual - English
Page 6
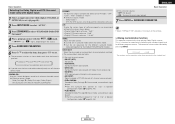
...For heat dispersal, do not install this unit in a confined space such as a bookcase or similar enclosure. Note In addition to controlling the AVR-1707, the attached remote control unit (RC-1048) can also be used from a distance of approximately 23 feet/7 meters, at a horizontal angle of...be in flames. • Remove the batteries from the remote control unit when you do so in the proper direction, following products: q DENON component products w Component products other than DENON: • Set using the preset memory function ( page 48). • Point the remote control unit at the remote ...
...For heat dispersal, do not install this unit in a confined space such as a bookcase or similar enclosure. Note In addition to controlling the AVR-1707, the attached remote control unit (RC-1048) can also be used from a distance of approximately 23 feet/7 meters, at a horizontal angle of...be in flames. • Remove the batteries from the remote control unit when you do so in the proper direction, following products: q DENON component products w Component products other than DENON: • Set using the preset memory function ( page 48). • Point the remote control unit at the remote ...

Owners Manual - English
Page 13
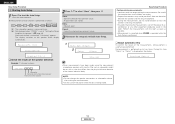
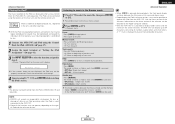
... ENGLISH Easy Setup Procedure Auto Setup w Before performing the Auto Setup procedure The AVR-1707's auto setup use the attached microphone to measure the acoustic properties in the room and automatically make the optimum settings. • To make the sound field settings manually ( page 45). 1 Turn on your monitor. 3 Press . ¢... and set with the receptor pointing towards the ceiling. 4 Press or [ON/SOURCE]. • The power indicator blinks green and the power turns on the main unit and remote control unit • Auto Setup mode is not possible to measure properly if there...
... ENGLISH Easy Setup Procedure Auto Setup w Before performing the Auto Setup procedure The AVR-1707's auto setup use the attached microphone to measure the acoustic properties in the room and automatically make the optimum settings. • To make the sound field settings manually ( page 45). 1 Turn on your monitor. 3 Press . ¢... and set with the receptor pointing towards the ceiling. 4 Press or [ON/SOURCE]. • The power indicator blinks green and the power turns on the main unit and remote control unit • Auto Setup mode is not possible to measure properly if there...
Owners Manual - English
Page 14
Retry: Measure again. Measurement of each channel is set at "Setting the Power Amplifier Assignment" ( page 43). Measure:FL Store: Store the checked measurement values. All parameters are stored. Cancel: Cancel the checked measurement values. 3 Disconnect ...
Retry: Measure again. Measurement of each channel is set at "Setting the Power Amplifier Assignment" ( page 43). Measure:FL Store: Store the checked measurement values. All parameters are stored. Cancel: Cancel the checked measurement values. 3 Disconnect ...
Owners Manual - English
Page 15
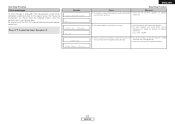
Be sure to select the items, then press F. Press D H to turn off the AVR-1707's power before checking the speaker connections. Easy Setup Procedure Error messages An error message is displayed if the measurements could not be completed automatically due to the speaker layout, the measuring environment, etc. Example Caution:SP None F L Caution :Phase F L / R C a u t i o n Overload Please check the following matters, reset the pertinent items, and measure again.
Be sure to select the items, then press F. Press D H to turn off the AVR-1707's power before checking the speaker connections. Easy Setup Procedure Error messages An error message is displayed if the measurements could not be completed automatically due to the speaker layout, the measuring environment, etc. Example Caution:SP None F L Caution :Phase F L / R C a u t i o n Overload Please check the following matters, reset the pertinent items, and measure again.
Owners Manual - English
Page 22
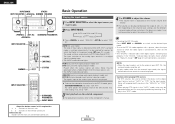
... (All auto mode): The type of input signal is detected and the AVR-1707's surround mode is made. The mode switches automatically to the various input...cannot be sure to connect the device to the analog input terminals is no digital signals are being input properly. To lower the subwoofer channel level in the "AUTO" mode, noise may seen strong. IN mode... input source you want to which the Digital In Assignment mode ( page 41) is switched automatically. IN". If so, set . • The INPUT mode indicator lights. For operating instructions, refer to the component's manual. 4 Use VOLUME to...
... (All auto mode): The type of input signal is detected and the AVR-1707's surround mode is made. The mode switches automatically to the various input...cannot be sure to connect the device to the analog input terminals is no digital signals are being input properly. To lower the subwoofer channel level in the "AUTO" mode, noise may seen strong. IN mode... input source you want to which the Digital In Assignment mode ( page 41) is switched automatically. IN". If so, set . • The INPUT mode indicator lights. For operating instructions, refer to the component's manual. 4 Use VOLUME to...
Owners Manual - English
Page 25
...tone defeat mode. O f f s e t - 4 d B The numbers are the correction value when corrected to reset all the settings. ¢ Dialog normalization function This operates automatically when playing Dolby Digital sources. This is a function for automatically correcting the standard signal level... 45, 46). (2) For 2-channel sources • OFF: Not played. • ON: Surround channel signal played. Select one of software properly, we recommend setting to set ( page 41). 2 Press INPUT MODE to select "AUTO". 3 Press [STANDARD] to select "STANDARD (Dolby/DTS Surround)". 4 Play a...
...tone defeat mode. O f f s e t - 4 d B The numbers are the correction value when corrected to reset all the settings. ¢ Dialog normalization function This operates automatically when playing Dolby Digital sources. This is a function for automatically correcting the standard signal level... 45, 46). (2) For 2-channel sources • OFF: Not played. • ON: Surround channel signal played. Select one of software properly, we recommend setting to set ( page 41). 2 Press INPUT MODE to select "AUTO". 3 Press [STANDARD] to select "STANDARD (Dolby/DTS Surround)". 4 Play a...
Owners Manual - English
Page 37
...Press [ENTER] for at least 2 seconds during playback. Check the connections and settings. 4 Operate using the buttons on the type of the functions may not be reproduced and played by law. 1 Connect the AVR-1707 and iPod using a Control Dock for loss or damage of data on an ...version, it may be properly connected. Manual search: Press and hold in the U.S. The mode switches as follows each time [MODE] is used . The AVR-1707 can be used connected to the AVR-1707. • Some of iPod and the software version. 34 ENGLISH NOTE: • DENON will accept no responsibility ...
...Press [ENTER] for at least 2 seconds during playback. Check the connections and settings. 4 Operate using the buttons on the type of the functions may not be reproduced and played by law. 1 Connect the AVR-1707 and iPod using a Control Dock for loss or damage of data on an ...version, it may be properly connected. Manual search: Press and hold in the U.S. The mode switches as follows each time [MODE] is used . The AVR-1707 can be used connected to the AVR-1707. • Some of iPod and the software version. 34 ENGLISH NOTE: • DENON will accept no responsibility ...

Owners Manual - English
Page 49
...which the audio signals are reproduced from the subwoofer(s). 2 Press ENTER or H to enter the setting and switch to the Distance setting. 1 7 S W M o d e +Main Setting the Distance This parameter is set for playing low frequency (bass sound below ). Preparations: Measure the distances between the listening position and... Select the "LFE+Main" mode if you do not know, try comparing the sound at the below the frequency set . 2 Press ENTER or H to enter the setting and switch to determine the proper setting. FL C FR SW SL L1 L3 L2 L4 Listening position L5 L6 L7 L8 SR 2 8 FL 1...
...which the audio signals are reproduced from the subwoofer(s). 2 Press ENTER or H to enter the setting and switch to the Distance setting. 1 7 S W M o d e +Main Setting the Distance This parameter is set for playing low frequency (bass sound below ). Preparations: Measure the distances between the listening position and... Select the "LFE+Main" mode if you do not know, try comparing the sound at the below the frequency set . 2 Press ENTER or H to enter the setting and switch to determine the proper setting. FL C FR SW SL L1 L3 L2 L4 Listening position L5 L6 L7 L8 SR 2 8 FL 1...
Owners Manual - English
Page 58
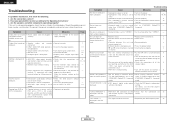
...-compatible. • Use a DTS-compatible player. - • AVR-1707's input setting is • Switch to the proper position. 19 not appropriate. • Volume control set to • Set to "YES". displayed. connected. Should the problem persist, there may be received. • Reposition your store of batteries inserted • Insert batteries properly. 3 in reverse. Disconnect the power immediately and...
...-compatible. • Use a DTS-compatible player. - • AVR-1707's input setting is • Switch to the proper position. 19 not appropriate. • Volume control set to • Set to "YES". displayed. connected. Should the problem persist, there may be received. • Reposition your store of batteries inserted • Insert batteries properly. 3 in reverse. Disconnect the power immediately and...


