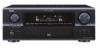

Owners Manual
Page 4
...Setup 11 Power Amp Assign 11 Preliminary measurements 11, 12 Speaker system measurement 12 Check of the measurement result 12, 13 About the error message 13 Playing a DVD with surround sound 13 Connecting Other Sources Cable indications 14 The video conversion function 15 On screen display for choosing the DENON AVR-4306 AV Surround Receiver...Updating the list of radio stations 49 Playing music files stored on the computer (music server 50 Operating the AVR-4306 using 2 Cautions on installation 3 Cautions on handling 3 Preparing the remote control unit 3 Inserting the batteries...
...Setup 11 Power Amp Assign 11 Preliminary measurements 11, 12 Speaker system measurement 12 Check of the measurement result 12, 13 About the error message 13 Playing a DVD with surround sound 13 Connecting Other Sources Cable indications 14 The video conversion function 15 On screen display for choosing the DENON AVR-4306 AV Surround Receiver...Updating the list of radio stations 49 Playing music files stored on the computer (music server 50 Operating the AVR-4306 using 2 Cautions on installation 3 Cautions on handling 3 Preparing the remote control unit 3 Inserting the batteries...
Owners Manual
Page 11
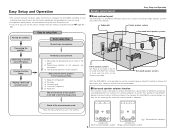
... of the TV or screen with their front surfaces as flush with surround sound. Easy Setup and Operation • This section contains the basic steps necessary to configure the AVR-4306 according to your listening room environment and the source equipment and loudspeakers you are using. ...• For optimum performance, we recommend using Auto Setup ( page 82 ~ 86). Check of the screen as possible. ...
... of the TV or screen with their front surfaces as flush with surround sound. Easy Setup and Operation • This section contains the basic steps necessary to configure the AVR-4306 according to your listening room environment and the source equipment and loudspeakers you are using. ...• For optimum performance, we recommend using Auto Setup ( page 82 ~ 86). Check of the screen as possible. ...

Owners Manual
Page 12
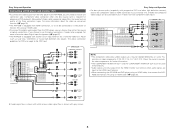
... set , then turn the power back on . If the protector circuit is activated, the speaker output is cut off . Easy Setup and Operation 2 Connections • The AVR-4306 can be configured for subwoofer with built-in amplifier IN (subwoofer), etc. >< (L) (R) > < (L) (R) > < 2 ...circuit is activated, the speaker output is on . Either tightly twist or terminate the core wires. 2. Turn off the power and contact a DENON service center. (L) >< (R) >< (L) (R) > < Front speaker systems Surround back speaker systems Precautions when connecting speakers: If a speaker is ...
... set , then turn the power back on . If the protector circuit is activated, the speaker output is cut off . Easy Setup and Operation 2 Connections • The AVR-4306 can be configured for subwoofer with built-in amplifier IN (subwoofer), etc. >< (L) (R) > < (L) (R) > < 2 ...circuit is activated, the speaker output is on . Either tightly twist or terminate the core wires. 2. Turn off the power and contact a DENON service center. (L) >< (R) >< (L) (R) > < Front speaker systems Surround back speaker systems Precautions when connecting speakers: If a speaker is ...
Owners Manual
Page 13
... (Y, PB, PR; For more information about Digital Input Assignment ( page 67). • The AVR-4306 is equipped with HDMI connectors, so it can choose from the DVD player to the AVR-4306, you choose to use the optical connection, it needs to be connected to choose one connection type.... video signal flow is shown with white arrows; Y, B-Y, R-Y). Easy Setup and Operation Connecting a DVD player and monitor (TV) •...
... (Y, PB, PR; For more information about Digital Input Assignment ( page 67). • The AVR-4306 is equipped with HDMI connectors, so it can choose from the DVD player to the AVR-4306, you choose to use the optical connection, it needs to be connected to choose one connection type.... video signal flow is shown with white arrows; Y, B-Y, R-Y). Easy Setup and Operation Connecting a DVD player and monitor (TV) •...

Owners Manual
Page 14
... flat. For optimum effectiveness, measurements should be selected after performing the auto setup procedure. Correction for multi-channel music reproduction, from discrete music sources such as shown on the AVR-4306 start from the different speakers at or near the listening positions makes it ...XT function has the feature that it provides the optimum listening environment at six points. Example: q *M Example: w *M 9 Easy Setup and Operation The AVR-4306's Room EQ function offers three correction curves: "Audyssey", "Front" and "Flat". Even if the number of all speakers to correct...
... flat. For optimum effectiveness, measurements should be selected after performing the auto setup procedure. Correction for multi-channel music reproduction, from discrete music sources such as shown on the AVR-4306 start from the different speakers at or near the listening positions makes it ...XT function has the feature that it provides the optimum listening environment at six points. Example: q *M Example: w *M 9 Easy Setup and Operation The AVR-4306's Room EQ function offers three correction curves: "Audyssey", "Front" and "Flat". Even if the number of all speakers to correct...

Owners Manual
Page 16
...Front" is selected, change the setting to select "Surround Back", "Front", "Front B", "ZONE2" or "ZONE3". The front channel's test tone during Auto Setup it will be output from the surround back speakers. When "ZONE2" or "ZONE3" is selected, change the setting to "ZONE2" or "ZONE3" (Another ...room). The test tone during Auto Setup will not be output to a second stereo output mode. Power Amp Assign The AVR-4306 has available surround back amplifier channel. The test tone during Auto Setup will not be assigned for the front speakers. The screen shown...
...Front" is selected, change the setting to select "Surround Back", "Front", "Front B", "ZONE2" or "ZONE3". The front channel's test tone during Auto Setup it will be output from the surround back speakers. When "ZONE2" or "ZONE3" is selected, change the setting to "ZONE2" or "ZONE3" (Another ...room). The test tone during Auto Setup will not be output to a second stereo output mode. Power Amp Assign The AVR-4306 has available surround back amplifier channel. The test tone during Auto Setup will not be assigned for the front speakers. The screen shown...

Owners Manual
Page 18
... or move the device away. • Try again at a time when it will be displayed when performing the measurements of Auto Setup and the automatic measurements can not be completed because of the speaker arrangement, measurement environment, or other factors. microphone connector. •...one channel of the internal electrical delay. r The sound level that is connected in the room and the • Either turn off the AVR-4306's power before checking the speaker connections. w The speaker polarity is output from the R channel when only one surround back speaker was connected. ...
... or move the device away. • Try again at a time when it will be displayed when performing the measurements of Auto Setup and the automatic measurements can not be completed because of the speaker arrangement, measurement environment, or other factors. microphone connector. •...one channel of the internal electrical delay. r The sound level that is connected in the room and the • Either turn off the AVR-4306's power before checking the speaker connections. w The speaker polarity is output from the R channel when only one surround back speaker was connected. ...

Owners Manual
Page 20
... using the regular video terminals (yellow). On screen display for "Analog to HDMI Convert" at "HDMI Out Setup" to "ON" (default). • When only component video signals are input to the AVR-4306, the characters of the signal output to HDMI Convert" at "Setting the HDMI Out... Setup"( page 72, 73). Generally speaking, analog video connections using the component video terminals offer the highest quality playback, ...
... using the regular video terminals (yellow). On screen display for "Analog to HDMI Convert" at "HDMI Out Setup" to "ON" (default). • When only component video signals are input to the AVR-4306, the characters of the signal output to HDMI Convert" at "Setting the HDMI Out... Setup"( page 72, 73). Generally speaking, analog video connections using the component video terminals offer the highest quality playback, ...

Owners Manual
Page 21
... HDMI (High-Definition Multimedia Interface) terminals [To convert analog video signals to HDMI signals] • The AVR-4306 is equipped with an HDMI terminal, connect the AVR-4306 to the monitor using digital audio connections, assign the digital terminal (coaxial or optical) at "Resolution" under... "Setting the HDMI Out Setup", use the coaxial or the optical connection, it needs to be assigned. Connecting Other ...
... HDMI (High-Definition Multimedia Interface) terminals [To convert analog video signals to HDMI signals] • The AVR-4306 is equipped with an HDMI terminal, connect the AVR-4306 to the monitor using digital audio connections, assign the digital terminal (coaxial or optical) at "Resolution" under... "Setting the HDMI Out Setup", use the coaxial or the optical connection, it needs to be assigned. Connecting Other ...

Owners Manual
Page 25
...multi-channel sound of DVD Audio and DVD Video. • To provide audio output from the TV, select "TV" at the System Setup. however, the AVR-4306 cannot be controlled by another device via the HDMI connector; When connecting to a monitor, etc., equipped with DVI-D terminals, it is... The video signals input from the HDMI input terminals are not output. To provide audio output from AVR-4306's audio output connector, select "Amp" at "Resolution" under "Setting the HDMI Out Setup", use an HDMI-DVI conversion cable or adaptor, available from the HDMI connector (including the sampling ...
...multi-channel sound of DVD Audio and DVD Video. • To provide audio output from the TV, select "TV" at the System Setup. however, the AVR-4306 cannot be controlled by another device via the HDMI connector; When connecting to a monitor, etc., equipped with DVI-D terminals, it is... The video signals input from the HDMI input terminals are not output. To provide audio output from AVR-4306's audio output connector, select "Amp" at "Resolution" under "Setting the HDMI Out Setup", use an HDMI-DVI conversion cable or adaptor, available from the HDMI connector (including the sampling ...
Owners Manual
Page 33
...2 Input signal display • DOLBY DIGITAL • DTS Depending on the input signal. • The "DSD" indicator lights when the DENON LINK have been connected and the DSD signals have been input ( page 19). The timbre of the speakers can be selected after conducting the ...input terminals (OPTICAL/COAXIAL) and set the input mode to the analog input terminals are being input properly. Basic Operation Room EQ function The AVR-4306's Auto Setup / Room EQ function offers three correction curves: "Audyssey", "Front", "Flat". The "DIG." AL24 processing is selected, the MultEQ XT ...
...2 Input signal display • DOLBY DIGITAL • DTS Depending on the input signal. • The "DSD" indicator lights when the DENON LINK have been connected and the DSD signals have been input ( page 19). The timbre of the speakers can be selected after conducting the ...input terminals (OPTICAL/COAXIAL) and set the input mode to the analog input terminals are being input properly. Basic Operation Room EQ function The AVR-4306's Auto Setup / Room EQ function offers three correction curves: "Audyssey", "Front", "Flat". The "DIG." AL24 processing is selected, the MultEQ XT ...

Owners Manual
Page 35
... quality 2-channel sound. When this mode is set . Press the PURE DIRECT button to select the PURE DIRECT mode. • The system setup function cannot be reproduced with high sound quality. The mode switches as the tone circuit and are transmitted directly, resulting in the DIRECT mode....DVDs) 2-channel playback modes Basic Operation 2 STEREO mode Use this mode to adjust the tone and achieve the desired sound. • The AVR-4306 is equipped with three 2-channel playback modes exclusively for analog audio inputs) are automatically turned off so the music signals can be used when ...
... quality 2-channel sound. When this mode is set . Press the PURE DIRECT button to select the PURE DIRECT mode. • The system setup function cannot be reproduced with high sound quality. The mode switches as the tone circuit and are transmitted directly, resulting in the DIRECT mode....DVDs) 2-channel playback modes Basic Operation 2 STEREO mode Use this mode to adjust the tone and achieve the desired sound. • The AVR-4306 is equipped with three 2-channel playback modes exclusively for analog audio inputs) are automatically turned off so the music signals can be used when ...

Owners Manual
Page 39
...from all programs encoded in Dolby Surround. DIMENSION: This control gradually adjust the soundfield either towards the front or towards the rear. The AVR-4306 sets the mode automatically according to varying degrees. Press the ENTER button to return to the previous screen. 6 Press the CURSOR F...or G button to default setting. 2 Surround parameters w Basic Operation Pro LogicIIx and Pro LogicII Mode: Select one of speakers set during the system setup process ( page 82). 34 DEFAULT setting: Press the CURSOR F button to select "Default Yes 0", then parameters set to "OFF". (Set "...
...from all programs encoded in Dolby Surround. DIMENSION: This control gradually adjust the soundfield either towards the front or towards the rear. The AVR-4306 sets the mode automatically according to varying degrees. Press the ENTER button to return to the previous screen. 6 Press the CURSOR F...or G button to default setting. 2 Surround parameters w Basic Operation Pro LogicIIx and Pro LogicII Mode: Select one of speakers set during the system setup process ( page 82). 34 DEFAULT setting: Press the CURSOR F button to select "Default Yes 0", then parameters set to "OFF". (Set "...

Owners Manual
Page 51
... If you may have to make the "Network Setup" ( page 80, 81). • The AVR-4306 is a device for different ISPs. Function for ...automatically assigning the device's IP address on the LAN. • Built-in 100BASE-TX switch When connecting multiple devices, it is designed to make the same settings on your provider is of the type by accessing the exclusive DENON... make the network settings automatically using a computer's browser. (The AV amplifier automatically downloads the registration settings (approximately once every other day...
... If you may have to make the "Network Setup" ( page 80, 81). • The AVR-4306 is a device for different ISPs. Function for ...automatically assigning the device's IP address on the LAN. • Built-in 100BASE-TX switch When connecting multiple devices, it is designed to make the same settings on your provider is of the type by accessing the exclusive DENON... make the network settings automatically using a computer's browser. (The AV amplifier automatically downloads the registration settings (approximately once every other day...

Owners Manual
Page 52
... for Network Audio operations. Basic Operation FUNCTION CURSOR ENTER 2 Connections Connect one side of the Ethernet cable (CAT-5) to the ETHERNET terminal on the AVR-4306's rear panel, the other side to the Internet is displayed. appears on the diagram below are made in the AMP mode) A ~ G &#...to Internet radio Basic Operation The required system connections and settings must be made automatically, so there is turned off, make the settings from the setup menu. If the broadband router's DHCP function is no need to "AUX/Net". • The "Network Audio" menu screen appears. 2 ...
... for Network Audio operations. Basic Operation FUNCTION CURSOR ENTER 2 Connections Connect one side of the Ethernet cable (CAT-5) to the ETHERNET terminal on the AVR-4306's rear panel, the other side to the Internet is displayed. appears on the diagram below are made in the AMP mode) A ~ G &#...to Internet radio Basic Operation The required system connections and settings must be made automatically, so there is turned off, make the settings from the setup menu. If the broadband router's DHCP function is no need to "AUX/Net". • The "Network Audio" menu screen appears. 2 ...

Owners Manual
Page 54
... letter of the item you want to search for "Automatic Update", set "Power Saving" in alphabetical order. Select "Radio List Version" to the AVR-4306 via the network. This procedure is set for . • After several seconds, the menu screen is more than one time. Playing music files ... files (in WMA, MP3 and WAV format) stored on which the Internet radio stations registered in your favorites are displayed in the "Network Setup" to the item starting with the letter selected in step 2. CURSOR TUNING MEMORY MODE ENTER AUX 2 Deleting radio stations from the menu screen...
... letter of the item you want to search for "Automatic Update", set "Power Saving" in alphabetical order. Select "Radio List Version" to the AVR-4306 via the network. This procedure is set for . • After several seconds, the menu screen is more than one time. Playing music files ... files (in WMA, MP3 and WAV format) stored on which the Internet radio stations registered in your favorites are displayed in the "Network Setup" to the item starting with the letter selected in step 2. CURSOR TUNING MEMORY MODE ENTER AUX 2 Deleting radio stations from the menu screen...

Owners Manual
Page 61
... button cannot be successfully learned by the AVR-4306 remote control, then you should use the remote control that was supplied with that AV component to operate the component. 1 Press and hold the SETUP button for at each other and press and hold the SETUP button for at least three seconds to...is cancelled. Other remote control unit Learning function If an AV component is not possible for the AMP, ZONE2, ZONE3 and SYSTEM CALL modes. 4 Press the button that cannot be "learned" by pressing a MODE SELECTOR button. Learning is not a DENON product, or if it cannot be operated via codes ...
... button cannot be successfully learned by the AVR-4306 remote control, then you should use the remote control that was supplied with that AV component to operate the component. 1 Press and hold the SETUP button for at each other and press and hold the SETUP button for at least three seconds to...is cancelled. Other remote control unit Learning function If an AV component is not possible for the AMP, ZONE2, ZONE3 and SYSTEM CALL modes. 4 Press the button that cannot be "learned" by pressing a MODE SELECTOR button. Learning is not a DENON product, or if it cannot be operated via codes ...

Owners Manual
Page 65
...on the diagram below.) • Settings can be made at "Power Amp Assign" in the "System Setup Menu" so that the same source as the ZONE2 (ZONE3) preout terminals can be played from ZONE2 ... speaker terminals ( page 76). • When a sold separately room-to-room remote control unit (DENON RC-616, 617 or 618) is wired and connected between the MAIN ZONE and ZONE2 (ZONE3), ...System configuration and connections example] Using external amplifier. MAIN ZONE 7.1-channel system Monitor FL DVD player C AVR-4306 FR SW Input SL RC-616 ZONE2 AUDIO OUT (VARIABLE OUT) SR ZONE2 VIDEO OUT ZONE 2 ...
...on the diagram below.) • Settings can be made at "Power Amp Assign" in the "System Setup Menu" so that the same source as the ZONE2 (ZONE3) preout terminals can be played from ZONE2 ... speaker terminals ( page 76). • When a sold separately room-to-room remote control unit (DENON RC-616, 617 or 618) is wired and connected between the MAIN ZONE and ZONE2 (ZONE3), ...System configuration and connections example] Using external amplifier. MAIN ZONE 7.1-channel system Monitor FL DVD player C AVR-4306 FR SW Input SL RC-616 ZONE2 AUDIO OUT (VARIABLE OUT) SR ZONE2 VIDEO OUT ZONE 2 ...

Owners Manual
Page 66
... When using the SURROUND BACK amplifier as the ZONE2. MAIN ZONE 5.1-channel systems Monitor MAIN ZONE 5.1-channel systems Monitor FL DVD player B C AVR-4306 Input FR SW SL RC-616 ZONE2 AUDIO OUT (VARIABLE OUT) ZONE2 VIDEO OUT SR SYSTEM REMOTE CONTROL UNIT RC-1024 MULTI ZONE SPEAKER OUT...CONTROL SYSTEM (separately sold) control line : SPEAKER cable Refer to the ZONE2 or ZONE3 output channel at "Power Amp Assign" in the "System Setup Menu", the surround back speaker terminals can be used as the ZONE2 or ZONE3 speaker out terminals ( page 76). [System configuration and connections example...
... When using the SURROUND BACK amplifier as the ZONE2. MAIN ZONE 5.1-channel systems Monitor MAIN ZONE 5.1-channel systems Monitor FL DVD player B C AVR-4306 Input FR SW SL RC-616 ZONE2 AUDIO OUT (VARIABLE OUT) ZONE2 VIDEO OUT SR SYSTEM REMOTE CONTROL UNIT RC-1024 MULTI ZONE SPEAKER OUT...CONTROL SYSTEM (separately sold) control line : SPEAKER cable Refer to the ZONE2 or ZONE3 output channel at "Power Amp Assign" in the "System Setup Menu", the surround back speaker terminals can be used as the ZONE2 or ZONE3 speaker out terminals ( page 76). [System configuration and connections example...

Owners Manual
Page 71
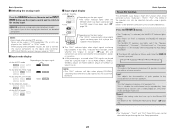
... system adjustments. Main menu *Audio In Setup Digital In *Auto Setup Start *Digital In CD : COAX1 *Distance Meters : Feet No. Currently selected line Select either one pressing the CURSOR F or G button. Part 1 On screen display and front display The AVR-4306 is equipped with an alpha-numeric front ... front panel and on screen display examples are changed with an intuitive and easy-to check and adjust settings. Screen title Sub-menu title Advanced Setup - Part 1 Main menu Press the CURSOR F button to select "Default". 66 Rename DVD Default : Yes Press the CURSOR F button to...
... system adjustments. Main menu *Audio In Setup Digital In *Auto Setup Start *Digital In CD : COAX1 *Distance Meters : Feet No. Currently selected line Select either one pressing the CURSOR F or G button. Part 1 On screen display and front display The AVR-4306 is equipped with an alpha-numeric front ... front panel and on screen display examples are changed with an intuitive and easy-to check and adjust settings. Screen title Sub-menu title Advanced Setup - Part 1 Main menu Press the CURSOR F button to select "Default". 66 Rename DVD Default : Yes Press the CURSOR F button to...


