Owners Manual
Page 2
... of any service or repairs to replace your authority, granted by the product manufacturer as this product near water - When replacement parts are covered by the operating instructions as radiators, heat registers, stoves, or other electric light or power circuits, or where it from overheating, and these openings must accept any interference received, including interference that could result in a particular installation. Safety...
... of any service or repairs to replace your authority, granted by the product manufacturer as this product near water - When replacement parts are covered by the operating instructions as radiators, heat registers, stoves, or other electric light or power circuits, or where it from overheating, and these openings must accept any interference received, including interference that could result in a particular installation. Safety...

Owners Manual
Page 4
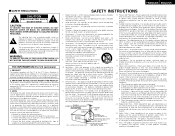
... range of the remote control unit 3 Part names and functions Front panel 3 Remote control unit 4 Easy Setup and Operation Easy setup flow 4 Speaker system layout 5 Speaker connections 5, 6 Connecting a DVD player and monitor TV 7 Auto Setup Connecting a microphone 8 Turning on the power 8 Starting Auto Setup 9 About error messages 10 Playing a DVD with the desired image (VIDEO SELECT 17 Selecting the front speakers 17 Checking the currently playing program source 17 Input mode 17, 18 Surround Playing audio sources (CDs and DVDs) 2-channel playback modes 18 Dolby Pro Logic IIx...
... range of the remote control unit 3 Part names and functions Front panel 3 Remote control unit 4 Easy Setup and Operation Easy setup flow 4 Speaker system layout 5 Speaker connections 5, 6 Connecting a DVD player and monitor TV 7 Auto Setup Connecting a microphone 8 Turning on the power 8 Starting Auto Setup 9 About error messages 10 Playing a DVD with the desired image (VIDEO SELECT 17 Selecting the front speakers 17 Checking the currently playing program source 17 Input mode 17, 18 Surround Playing audio sources (CDs and DVDs) 2-channel playback modes 18 Dolby Pro Logic IIx...
Owners Manual
Page 5
... AVR-1706 but other set the power switch to the standby position before connecting and disconnecting connection cables. • Store these instructions may be produced if the input source is switched when nothing is connected to the input terminals. If the volume is turned up is equipped with the connection cables. AUX terminals. Preparing the remote control unit The included remote control unit (RC-1000) can be very high after the muting circuit stops functioning. Remove...
... AVR-1706 but other set the power switch to the standby position before connecting and disconnecting connection cables. • Store these instructions may be produced if the input source is switched when nothing is connected to the input terminals. If the volume is turned up is equipped with the connection cables. AUX terminals. Preparing the remote control unit The included remote control unit (RC-1000) can be very high after the muting circuit stops functioning. Remove...

Owners Manual
Page 7
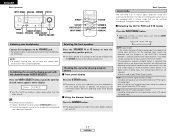
... NEO:6 mode. • The main zone output can set the various settings manually without using Auto Setup ( page 38 ~ 41). Auto setup flow Connecting a microphone. Indicator 32, 34) Remote control signal transmitter 3) ZONE2 buttons····(34, 36) SURROUND MODE buttons 16, 26) Power buttons 8, 33) MAIN buttons 4, 34) Input source selector buttons 16, 32) Tuner system/System buttons 29, 34) ENGLISH Easy Setup and Operation • This section contains the basic steps necessary to configure the AVR-1706 according...
... NEO:6 mode. • The main zone output can set the various settings manually without using Auto Setup ( page 38 ~ 41). Auto setup flow Connecting a microphone. Indicator 32, 34) Remote control signal transmitter 3) ZONE2 buttons····(34, 36) SURROUND MODE buttons 16, 26) Power buttons 8, 33) MAIN buttons 4, 34) Input source selector buttons 16, 32) Tuner system/System buttons 29, 34) ENGLISH Easy Setup and Operation • This section contains the basic steps necessary to configure the AVR-1706 according...

Owners Manual
Page 11
... panel of the unit. ON/STANDBY SETUP MIC CURSOR SPEAKER Auto Setup The Auto Setup function of any obstacles between the microphone and speakers while Auto Setup is off. For accurate measurements • Keep quiet during the measurement. NOTE: • A loud test tone is selected. Microphone Place the microphone on a tripod or level surface. 3 Press the POWER switch. ¢ ON: The power turns on and the indicator lights. Connecting a microphone 2 Measurement and setting details q: This sets the speaker connection, polarity, and bass...
... panel of the unit. ON/STANDBY SETUP MIC CURSOR SPEAKER Auto Setup The Auto Setup function of any obstacles between the microphone and speakers while Auto Setup is off. For accurate measurements • Keep quiet during the measurement. NOTE: • A loud test tone is selected. Microphone Place the microphone on a tripod or level surface. 3 Press the POWER switch. ¢ ON: The power turns on and the indicator lights. Connecting a microphone 2 Measurement and setting details q: This sets the speaker connection, polarity, and bass...

Owners Manual
Page 13
... Auto Setup measurement and the automatic measurements can not be detected properly. Should this display may not be completed because of the surround speakers was detected. • Sound was not detected. are properly connected. If so, select "Skip0". 3 Select the play (surround) mode. 4 Start DVD playback. 5 Adjust the volume. Caution Overload For some speakers, this happen, perform the measurements when the noise level is low, or switch off the power...
... Auto Setup measurement and the automatic measurements can not be detected properly. Should this display may not be completed because of the surround speakers was detected. • Sound was not detected. are properly connected. If so, select "Skip0". 3 Select the play (surround) mode. 4 Start DVD playback. 5 Adjust the volume. Caution Overload For some speakers, this happen, perform the measurements when the noise level is low, or switch off the power...
Owners Manual
Page 14
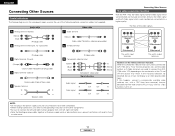
... hookup diagrams on . Audio cable A Analog terminal (Stereo) (White) (Red) L L R R Pin-plug cable B Analog terminal (Monaural, for subwoofer) F Video terminal Video cable (Yellow) Video cable (75 Ω/ohm video pin-plug cable) G S-Video terminal Pin-plug cable C Digital terminal (Coaxial) (Orange) Coaxial cable (75 Ω/ohm pin-plug cable) D Digital terminal (Optical) Optical cable (Optical fiber cable) E Speaker terminal Speaker cable S-Video cable H Component video terminal (Green) (Blue) (Red) Component video cable Signal direction Audio signal IN Video signal...
... hookup diagrams on . Audio cable A Analog terminal (Stereo) (White) (Red) L L R R Pin-plug cable B Analog terminal (Monaural, for subwoofer) F Video terminal Video cable (Yellow) Video cable (75 Ω/ohm video pin-plug cable) G S-Video terminal Pin-plug cable C Digital terminal (Coaxial) (Orange) Coaxial cable (75 Ω/ohm pin-plug cable) D Digital terminal (Optical) Optical cable (Optical fiber cable) E Speaker terminal Speaker cable S-Video cable H Component video terminal (Green) (Blue) (Red) Component video cable Signal direction Audio signal IN Video signal...

Owners Manual
Page 19
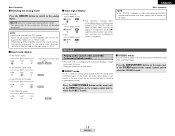
IN), the play mode (DIRECT, VIRTUAL SURROUND, STEREO, STANDARD (DOLBY/DTS SURROUND), 5CH/7CH STEREO or DSP SIMULATION) cannot be adjusted up or down via the front panel MASTER VOLUME knob. 16 ENGLISH Turning the sound off the audio output temporarily. Basic Operation Playback INPUT MODE ANALOG MASTER VOLUME EXT. w Press the VOLUME button on the remote control unit, or adjust the volume up to 18 dB. (In this to "18 dB - (Maximum value of 1 dB. Playing the input source Press...
IN), the play mode (DIRECT, VIRTUAL SURROUND, STEREO, STANDARD (DOLBY/DTS SURROUND), 5CH/7CH STEREO or DSP SIMULATION) cannot be adjusted up or down via the front panel MASTER VOLUME knob. 16 ENGLISH Turning the sound off the audio output temporarily. Basic Operation Playback INPUT MODE ANALOG MASTER VOLUME EXT. w Press the VOLUME button on the remote control unit, or adjust the volume up to 18 dB. (In this to "18 dB - (Maximum value of 1 dB. Playing the input source Press...
Owners Manual
Page 20
... when using headphones. ENGLISH Basic Operation INPUT MODE ANALOG DIMMER STATUS DIRECT/STEREO PHONES SPEAKER VIDEO SELECT MASTER VOLUME Listening over headphones Connect the headphones to the digital input terminals are identified and decoding and playback are performed automatically with the DTS, Dolby Digital or PCM (2 channel stereo) format. The presence or absence of digital signals is detected, the signals input to the PHONES jack. • The speaker output is automatically turned off ). 17 ENGLISH The display brightness changes in...
... when using headphones. ENGLISH Basic Operation INPUT MODE ANALOG DIMMER STATUS DIRECT/STEREO PHONES SPEAKER VIDEO SELECT MASTER VOLUME Listening over headphones Connect the headphones to the digital input terminals are identified and decoding and playback are performed automatically with the DTS, Dolby Digital or PCM (2 channel stereo) format. The presence or absence of digital signals is detected, the signals input to the PHONES jack. • The speaker output is automatically turned off ). 17 ENGLISH The display brightness changes in...
Owners Manual
Page 21
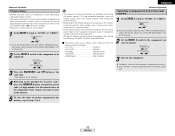
... sound while watching images. Surround Playing audio sources (CDs and DVDs) 2-channel playback modes • The AVR-1706 is turned on the input signal. • In the DIGITAL PCM mode • In the DIGITAL DTS mode 2 Input signal display • DOLBY DIGITAL • DTS • PCM The "DIGITAL" indicator lights when digital signals are played in good quality sound. Basic Operation NOTE: • The "DIGITAL" indicator will light when playing CD-ROMs containing data other than audio signals, but no sound will be heard. 2 STEREO mode Use this mode to adjust the tone...
... sound while watching images. Surround Playing audio sources (CDs and DVDs) 2-channel playback modes • The AVR-1706 is turned on the input signal. • In the DIGITAL PCM mode • In the DIGITAL DTS mode 2 Input signal display • DOLBY DIGITAL • DTS • PCM The "DIGITAL" indicator lights when digital signals are played in good quality sound. Basic Operation NOTE: • The "DIGITAL" indicator will light when playing CD-ROMs containing data other than audio signals, but no sound will be heard. 2 STEREO mode Use this mode to adjust the tone...

Owners Manual
Page 22
... "Speaker Configuration" setting to "1sp" or "2sp". • To play in the PLIIx mode, set "Surround Back" at the "Power Amp Assign." For operating instructions, refer to the manuals of the respective components. 4 Turn the SELECT knob, and press the CURSOR F or G button to "OFF". (Set "S. Back" at system setup to "Small" or "Large".) (Pro Logic IIx Cinema mode) (Pro Logic IIx Music mode) (Pro Logic IIx Game mode) When the "SURROUND BACK...
... "Speaker Configuration" setting to "1sp" or "2sp". • To play in the PLIIx mode, set "Surround Back" at the "Power Amp Assign." For operating instructions, refer to the manuals of the respective components. 4 Turn the SELECT knob, and press the CURSOR F or G button to "OFF". (Set "S. Back" at system setup to "Small" or "Large".) (Pro Logic IIx Cinema mode) (Pro Logic IIx Music mode) (Pro Logic IIx Game mode) When the "SURROUND BACK...

Owners Manual
Page 24
... the Music mode: MODE MUSIC CENTER IMAGE TONE DEFEAT DEFAULT SURROUND BACK If you do want the bass and treble to be adjusted, turn off the tone defeat mode. 6 Turn the SELECT knob, and press the CURSOR F or G button to finish the surround parameter mode. DOLBY PLIIx DTS NEO:6 2 Play a program source. 3 Press the SURROUND PARAMETER button to select the optimum mode for the source. COMP. The mode switches as shown below each time the button is displayed during DOLBY DIGITAL playback. • DEFAULT setting DEFAULT...
... the Music mode: MODE MUSIC CENTER IMAGE TONE DEFEAT DEFAULT SURROUND BACK If you do want the bass and treble to be adjusted, turn off the tone defeat mode. 6 Turn the SELECT knob, and press the CURSOR F or G button to finish the surround parameter mode. DOLBY PLIIx DTS NEO:6 2 Play a program source. 3 Press the SURROUND PARAMETER button to select the optimum mode for the source. COMP. The mode switches as shown below each time the button is displayed during DOLBY DIGITAL playback. • DEFAULT setting DEFAULT...

Owners Manual
Page 25
.... The front channel (FL and FR) signals bypass the decoder and are played directly so there is displayed during DOLBY DIGITAL playback. • LFE setting LFE 0dB -10dB -5dB 0dB • TONE DEFEAT setting TONE DEF. The parameter switches as with 6.1-channel sources. CENTER IMAGE (0.0 to 1.0: default 0.3): The center image parameter for playing music. or Lights Lights Lights 5 Press the SURROUND PARAMETER button to set the various surround parameters. Basic Operation • When making parameter settings, the display will return...
.... The front channel (FL and FR) signals bypass the decoder and are played directly so there is displayed during DOLBY DIGITAL playback. • LFE setting LFE 0dB -10dB -5dB 0dB • TONE DEFEAT setting TONE DEF. The parameter switches as with 6.1-channel sources. CENTER IMAGE (0.0 to 1.0: default 0.3): The center image parameter for playing music. or Lights Lights Lights 5 Press the SURROUND PARAMETER button to set the various surround parameters. Basic Operation • When making parameter settings, the display will return...

Owners Manual
Page 29
... parameter is displayed during DOLBY DIGITAL playback. • DEFAULT setting DEFAULT Y/N YES Y/N NO Select "YES" to reset to the factory defaults. 5 Press the ENTER button to finish the surround parameter mode. • When making parameter settings, the display will return to the regular condition several seconds after the last button was pressed and the setting will be adjusted, turn off the tone defeat mode. 3 Press the SURROUND PARAMETER button to enter the surround parameter setting mode. DELAY 30ms...
... parameter is displayed during DOLBY DIGITAL playback. • DEFAULT setting DEFAULT Y/N YES Y/N NO Select "YES" to reset to the factory defaults. 5 Press the ENTER button to finish the surround parameter mode. • When making parameter settings, the display will return to the regular condition several seconds after the last button was pressed and the setting will be adjusted, turn off the tone defeat mode. 3 Press the SURROUND PARAMETER button to enter the surround parameter setting mode. DELAY 30ms...

Owners Manual
Page 31
... channel switches as described below each time the TONE CONTROL button is set to -12 dB in higher quality sound. "SB" appears only when the "Power Amp Assign." Press the TONE DEFEAT button. The level of the bass or treble. OFF ´ -12 dB ´ +12 dB The signals do not want to "SB". FL C FR SR 2 Turn the SELECT knob to adjust the level of the selected speaker can adjust...
... channel switches as described below each time the TONE CONTROL button is set to -12 dB in higher quality sound. "SB" appears only when the "Power Amp Assign." Press the TONE DEFEAT button. The level of the bass or treble. OFF ´ -12 dB ´ +12 dB The signals do not want to "SB". FL C FR SR 2 Turn the SELECT knob to adjust the level of the selected speaker can adjust...

Owners Manual
Page 33
... the manual tuning mode is held in. 1 Use the "Auto tuning" or "Manual tuning" operation to tune in the station to be preset - 8 stations (channels 1 to 8) in monaural and the "STEREO" indicator turns off . 4 Press the TUNING (+) or (-) button to set , FM stereo broadcasts are received in each of blocks A to 4. Recalling preset stations 1 Watching the display, press the SHIFT button to select the preset memory block. 2 Watching the display, press the PRESET • (+) or ª (-) button to select the desired preset channel...
... the manual tuning mode is held in. 1 Use the "Auto tuning" or "Manual tuning" operation to tune in the station to be preset - 8 stations (channels 1 to 8) in monaural and the "STEREO" indicator turns off . 4 Press the TUNING (+) or (-) button to set , FM stereo broadcasts are received in each of blocks A to 4. Recalling preset stations 1 Watching the display, press the SHIFT button to select the preset memory block. 2 Watching the display, press the PRESET • (+) or ª (-) button to select the desired preset channel...
Owners Manual
Page 35
... factory and after resetting: • TV, VCR HITACHI • CD, TAPE DENON • CDR/MD DENON (CDR) • DVD/VDP DENON (DVD) • DBS/CABLE ABC (CABLE) Advanced Operation Operating a component stored in the preset memory 1 Set the MODE 1 switch to "AUDIO" or "VIDEO". Refer to the included list of preset codes to change the number and verify correct operation. • The preset memory can be used for the pressed buttons are emitted while setting the preset memory. Set...
... factory and after resetting: • TV, VCR HITACHI • CD, TAPE DENON • CDR/MD DENON (CDR) • DVD/VDP DENON (DVD) • DBS/CABLE ABC (CABLE) Advanced Operation Operating a component stored in the preset memory 1 Set the MODE 1 switch to "AUDIO" or "VIDEO". Refer to the included list of preset codes to change the number and verify correct operation. • The preset memory can be used for the pressed buttons are emitted while setting the preset memory. Set...

Owners Manual
Page 48
...; Check stylus. - • Batteries dead. • Replace with the remote control unit after turning the POWER switch on . • Switch off the set has cooled down . input/output cables. Howling noise produced when volume is remote control unit. Troubleshooting Symptom Cause Measures Page Sound is distorted. • Stylus pressure too weak. • Dust or dirt on . used. • Different button is not operating properly, check the items listed in...
...; Check stylus. - • Batteries dead. • Replace with the remote control unit after turning the POWER switch on . • Switch off the set has cooled down . input/output cables. Howling noise produced when volume is remote control unit. Troubleshooting Symptom Cause Measures Page Sound is distorted. • Stylus pressure too weak. • Dust or dirt on . used. • Different button is not operating properly, check the items listed in...

Owners Manual
Page 50
... from a direct radiating speaker (monopolar). Check the surround effects of the various modes before selecting the surround mode. Speaker setting examples Here we recommend using surround back speakers Using surround back speakers greatly improves the positioning of the sound at a slightly higher position 0 to 0.7 feet than the center. 2 Placement of the surround left and right channels when using two speakers. This effectively prevents the surround back channel signals from reflecting off the walls as bipolar...
... from a direct radiating speaker (monopolar). Check the surround effects of the various modes before selecting the surround mode. Speaker setting examples Here we recommend using surround back speakers Using surround back speakers greatly improves the positioning of the sound at a slightly higher position 0 to 0.7 feet than the center. 2 Placement of the surround left and right channels when using two speakers. This effectively prevents the surround back channel signals from reflecting off the walls as bipolar...
Owners Manual
Page 52
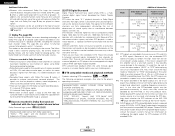
... to achieve multi-channel surround playback. With LDs and DVDs, there is best suited for playing music, the Cinema mode for playing movies, and the Game mode for information on the front panel of sound quality due to the player's operating instructions. These CDs include 5.1-channel surround signals (compared to "AUTO" or "DTS" before turning up the master volume. 3: A DVD player with DTS-compatible digital output is required to the speakers. They do not include picture data, but with Dolby Pro...
... to achieve multi-channel surround playback. With LDs and DVDs, there is best suited for playing music, the Cinema mode for playing movies, and the Game mode for information on the front panel of sound quality due to the player's operating instructions. These CDs include 5.1-channel surround signals (compared to "AUTO" or "DTS" before turning up the master volume. 3: A DVD player with DTS-compatible digital output is required to the speakers. They do not include picture data, but with Dolby Pro...


