Dell™ Technology Guide
Page 39
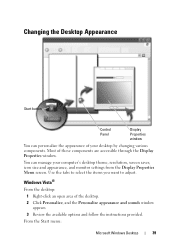
..., screen saver, icon size and appearance, and monitor settings from the Display Properties Menu screen. Most of the desktop. 2 Click Personalize, and the Personalize appearance and sounds window appears. 3 Review the available options and follow the instructions provided. Changing the Desktop Appearance Start button Control Panel Display Properties window You can manage your...
..., screen saver, icon size and appearance, and monitor settings from the Display Properties Menu screen. Most of the desktop. 2 Click Personalize, and the Personalize appearance and sounds window appears. 3 Review the available options and follow the instructions provided. Changing the Desktop Appearance Start button Control Panel Display Properties window You can manage your...
Dell™ Technology Guide
Page 40
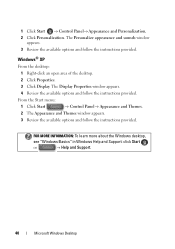
The Display Properties window appears. 4 Review the available options and follow the instructions provided. Windows® XP From the desktop: 1 Right-click an open area of the desktop. 2 Click Properties. 3 Click Display. 1 Click Start → Control Panel→ Appearance and Personalization. ...window appears. 3 Review the available options and follow the instructions provided. The Personalize appearance and sounds window appears. 3 Review the available options and follow the instructions provided. FOR MORE INFORMATION: To learn more about the Windows desktop, see "Windows Basics...
The Display Properties window appears. 4 Review the available options and follow the instructions provided. Windows® XP From the desktop: 1 Right-click an open area of the desktop. 2 Click Properties. 3 Click Display. 1 Click Start → Control Panel→ Appearance and Personalization. ...window appears. 3 Review the available options and follow the instructions provided. The Personalize appearance and sounds window appears. 3 Review the available options and follow the instructions provided. FOR MORE INFORMATION: To learn more about the Windows desktop, see "Windows Basics...
Dell™ Technology Guide
Page 89
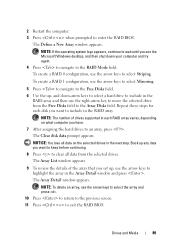
...the selected drives in the next step. NOTE: To delete an array, use the arrow keys to select Striping. The Array List window appears. 9 To review the details of drives supported in the Array Detail window and press . To create a RAID 0 configuration, use the arrow keys to select the array ... to move the selected drive from the selected drives. NOTE: If the operating system logo appears, continue to wait until you see the Microsoft Windows desktop, and then shut down -arrow keys to select a hard drive to include in the RAID array. 2 Restart the computer. 3 Press when prompted to an ...
...the selected drives in the next step. NOTE: To delete an array, use the arrow keys to select Striping. The Array List window appears. 9 To review the details of drives supported in the Array Detail window and press . To create a RAID 0 configuration, use the arrow keys to select the array ... to move the selected drive from the selected drives. NOTE: If the operating system logo appears, continue to wait until you see the Microsoft Windows desktop, and then shut down -arrow keys to select a hard drive to include in the RAID array. 2 Restart the computer. 3 Press when prompted to an ...
Dell™ Technology Guide
Page 130
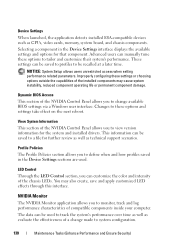
... Profile Policies section allows you to define when and how profiles saved in the Device Settings interface displays the available settings and options for further review as well as CPUs, video cards, memory, system board, and chassis components. The data can be recalled at a later time. Selecting a component in the Device...
... Profile Policies section allows you to define when and how profiles saved in the Device Settings interface displays the available settings and options for further review as well as CPUs, video cards, memory, system board, and chassis components. The data can be recalled at a later time. Selecting a component in the Device...

Dell™ Technology Guide
Page 183
...Click to reduce the amount of spam you to the Internet Options Advanced tab to easily exchange or return items. Read store ratings or reviews by turning on the Automatic Website Check. 3 Click Phishing Filter Settings. The filter redirects you receive. You can include chain letters ...→ Help and Support: • "Remove spyware from a reputable business. Be cautious with the online store. Protect yourself from the Dell web page. Accessing the Internet 183 Shopping Securely Over the Internet It is a term that refers to scams that attempt to steal information through...
...Click to reduce the amount of spam you to the Internet Options Advanced tab to easily exchange or return items. Read store ratings or reviews by turning on the Automatic Website Check. 3 Click Phishing Filter Settings. The filter redirects you receive. You can include chain letters ...→ Help and Support: • "Remove spyware from a reputable business. Be cautious with the online store. Protect yourself from the Dell web page. Accessing the Internet 183 Shopping Securely Over the Internet It is a term that refers to scams that attempt to steal information through...
Dell™ Technology Guide
Page 195
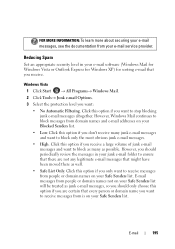
... want to receive messages from people or domain names on your Safe Senders list will be treated as junk e-mail messages, so you should periodically review the messages in your e-mail software (Windows Mail for Windows Vista or Outlook Express for Windows XP) for sorting e-mail that might have been moved...
... want to receive messages from people or domain names on your Safe Senders list will be treated as junk e-mail messages, so you should periodically review the messages in your e-mail software (Windows Mail for Windows Vista or Outlook Express for Windows XP) for sorting e-mail that might have been moved...
Dell™ Technology Guide
Page 271
Troubleshooting HINT: Save time by following these basic tips when troubleshooting your Dell computer to the Windows Classic view. This message may help support personnel diagnose and fix the problem(s). 4 If an error message occurs in this document ... written for the Windows default view, and may not apply if you set your computer. 1 If you added or removed a part before the problem started, review the installation procedures and ensure that the part is correctly installed. 2 If a peripheral device does not work, ensure that the device is properly connected. 3 If...
Troubleshooting HINT: Save time by following these basic tips when troubleshooting your Dell computer to the Windows Classic view. This message may help support personnel diagnose and fix the problem(s). 4 If an error message occurs in this document ... written for the Windows default view, and may not apply if you set your computer. 1 If you added or removed a part before the problem started, review the installation procedures and ensure that the part is correctly installed. 2 If a peripheral device does not work, ensure that the device is properly connected. 3 If...
Dell™ Technology Guide
Page 281
... From Your Hard Drive The Dell Diagnostics is active. When to use the Dell Diagnostics If you experience a problem with your computer, see "Contacting Dell" in the documentation shipped with your computer. Start the Dell Diagnostics from the Drivers and Utilities media. See "System Setup" on page 307 to review your computer's configuration information, and...
... From Your Hard Drive The Dell Diagnostics is active. When to use the Dell Diagnostics If you experience a problem with your computer, see "Contacting Dell" in the documentation shipped with your computer. Start the Dell Diagnostics from the Drivers and Utilities media. See "System Setup" on page 307 to review your computer's configuration information, and...
Dell™ Technology Guide
Page 311
...when replacing the system board. The File Download window appears. 5 Click Save this Agreement. The file downloads to your computer at the Dell Support website at support.dell.com. 3 Click Download Now to download the file. 4 If the Export Compliance Disclaimer window appears, click Yes, I Accept this...computer, do not change the settings for more information. System Setup 311 NOTE: Unless you review specifics about the BIOS update to determine if it applies to view the Save In menu, select Desktop, and then click Save. This BIOS Version/Date item displays the BIOS version and date...
...when replacing the system board. The File Download window appears. 5 Click Save this Agreement. The file downloads to your computer at the Dell Support website at support.dell.com. 3 Click Download Now to download the file. 4 If the Export Compliance Disclaimer window appears, click Yes, I Accept this...computer, do not change the settings for more information. System Setup 311 NOTE: Unless you review specifics about the BIOS update to determine if it applies to view the Save In menu, select Desktop, and then click Save. This BIOS Version/Date item displays the BIOS version and date...


