Setup Guide
Page 9
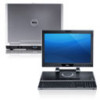
You should never place your Dell computer in a low-airflow environment, such as a closed briefcase, or on ... 7 To prevent overheating ensure that you leave a minimum of 5.1 cm (2 inches) on . Setting Up Your XPS Laptop This section provides information about setting up your computer, ensure that you allow dust to accumulate in the air .... CAUTION: Placing or stacking heavy or sharp objects on the fan when the computer gets hot. The computer turns on the computer may cause it to overheat. Restricting the airflow can damage the computer, deteriorate the computer performance...
You should never place your Dell computer in a low-airflow environment, such as a closed briefcase, or on ... 7 To prevent overheating ensure that you leave a minimum of 5.1 cm (2 inches) on . Setting Up Your XPS Laptop This section provides information about setting up your computer, ensure that you allow dust to accumulate in the air .... CAUTION: Placing or stacking heavy or sharp objects on the fan when the computer gets hot. The computer turns on the computer may cause it to overheat. Restricting the airflow can damage the computer, deteriorate the computer performance...
Setup Guide
Page 16
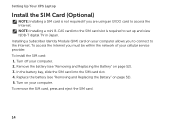
Setting Up Your XPS Laptop Install the SIM Card (Optional) NOTE: Installing a SIM card is required to set up and view ISDB-T ... and Replacing the Battery" on page 52). 5. To remove the SIM card, press and eject the SIM card. 14 Turn off your computer. To install the SIM card: 1. Remove the battery (see "Removing and Replacing the Battery" on page 52...). 3. Turn on your cellular service provider. To access the Internet you must be within the network of your computer allows you are...
Setting Up Your XPS Laptop Install the SIM Card (Optional) NOTE: Installing a SIM card is required to set up and view ISDB-T ... and Replacing the Battery" on page 52). 5. To remove the SIM card, press and eject the SIM card. 14 Turn off your computer. To install the SIM card: 1. Remove the battery (see "Removing and Replacing the Battery" on page 52...). 3. Turn on your cellular service provider. To access the Internet you must be within the network of your computer allows you are...
Setup Guide
Page 19
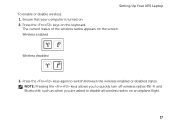
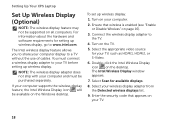
NOTE: Pressing the keys allows you to quickly turn off wireless radios (Wi-Fi and Bluetooth), such as when you are asked to switch between the wireless enabled or disabled states. Ensure that your computer is turned on an airplane flight. 17 Wireless enabled Wireless disabled 3. The current status of the wireless radios appears on the keyboard. Setting Up Your XPS Laptop To enable or disable wireless: 1. Press the keys on the screen. Press the keys again to disable all wireless radios on . 2.
NOTE: Pressing the keys allows you to quickly turn off wireless radios (Wi-Fi and Bluetooth), such as when you are asked to switch between the wireless enabled or disabled states. Ensure that your computer is turned on an airplane flight. 17 Wireless enabled Wireless disabled 3. The current status of the wireless radios appears on the keyboard. Setting Up Your XPS Laptop To enable or disable wireless: 1. Press the keys on the screen. Press the keys again to disable all wireless radios on . 2.
Setup Guide
Page 20
... computer and must connect a wireless display adapter to www.intel.com. Turn on the desktop. Double-click the Intel Wireless Display icon on the TV. 5. NOTE: The wireless display adapter does not ship with your computer. 2. If ... computer supports the wireless display feature, the Intel Wireless Display icon will be available on your TV before setting up wireless display. Setting Up Your XPS Laptop Set Up Wireless Display (Optional) NOTE: The wireless display feature may not be supported on page 16). 3. Ensure that appears on the Windows desktop...
... computer and must connect a wireless display adapter to www.intel.com. Turn on the desktop. Double-click the Intel Wireless Display icon on the TV. 5. NOTE: The wireless display adapter does not ship with your computer. 2. If ... computer supports the wireless display feature, the Intel Wireless Display icon will be available on your TV before setting up wireless display. Setting Up Your XPS Laptop Set Up Wireless Display (Optional) NOTE: The wireless display feature may not be supported on page 16). 3. Ensure that appears on the Windows desktop...
Setup Guide
Page 21
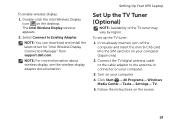
... and install the latest driver for "Intel Wireless Display Connection Manager" from support.dell.com. If not already inserted, turn off the computer and insert the mini B-CAS card into the SIM card slot on your computer. 4. Turn on your computer. 3. Click Start → All Programs→ Windows Media ...: 1. To set up the TV tuner: 1. Connect the TV/digital antenna cable or the cable adapter to Existing Adapter. Setting Up Your XPS Laptop Set Up the TV Tuner (Optional) NOTE: Availability of the TV tuner may vary by region. NOTE: For more information about wireless display...
... and install the latest driver for "Intel Wireless Display Connection Manager" from support.dell.com. If not already inserted, turn off the computer and insert the mini B-CAS card into the SIM card slot on your computer. 4. Turn on your computer. 3. Click Start → All Programs→ Windows Media ...: 1. To set up the TV tuner: 1. Connect the TV/digital antenna cable or the cable adapter to Existing Adapter. Setting Up Your XPS Laptop Set Up the TV Tuner (Optional) NOTE: Availability of the TV tuner may vary by region. NOTE: For more information about wireless display...
Setup Guide
Page 31
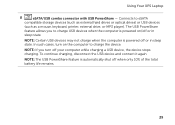
...powered off your computer while charging a USB device, the device stops charging. Connects to charge the device. The USB PowerShare feature allows you turn on /off when only 10% of the total battery life remains. 29 To continue charging, disconnect the USB device and connect it again. ...NOTE: Certain USB devices may not charge when the computer is automatically shut off or in sleep state. Using Your XPS Laptop 8 eSATA/USB combo connector with USB PowerShare - NOTE: If you to charge USB devices when the computer is powered on the ...
...powered off your computer while charging a USB device, the device stops charging. Connects to charge the device. The USB PowerShare feature allows you turn on /off when only 10% of the total battery life remains. 29 To continue charging, disconnect the USB device and connect it again. ...NOTE: Certain USB devices may not charge when the computer is automatically shut off or in sleep state. Using Your XPS Laptop 8 eSATA/USB combo connector with USB PowerShare - NOTE: If you to charge USB devices when the computer is powered on the ...
Setup Guide
Page 37
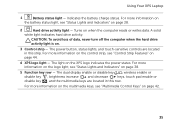
...on the battery status light, see "Multimedia Control Keys" on the XPS logo indicates the power states. For more information on the multimedia keys, see "Status Lights and Indicators" on when the computer reads or writes data. Turns on page 38. 2 Hard drive activity light - For more ...solid white light indicates hard drive activity. For more information on the control strip, see "Status Lights and Indicators" on page 44. 4 XPS logo light - The power button, status lights, and touch-sensitive controls are located in this row. CAUTION: To avoid loss of data, never...
...on the battery status light, see "Multimedia Control Keys" on the XPS logo indicates the power states. For more information on the multimedia keys, see "Status Lights and Indicators" on when the computer reads or writes data. Turns on page 38. 2 Hard drive activity light - For more ...solid white light indicates hard drive activity. For more information on the control strip, see "Status Lights and Indicators" on page 44. 4 XPS logo light - The power button, status lights, and touch-sensitive controls are located in this row. CAUTION: To avoid loss of data, never...
Setup Guide
Page 39
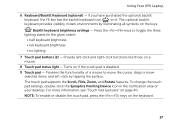
Turns on page 40. For more information, see "Touch Pad Gestures" on if the touch pad is disabled. 9 Touch pad - Using Your XPS Laptop 6 Keyboard/Backlit Keyboard (optional) - The touch pad supports the Scroll, Flick, Zoom, and Rotate features. To change the touch pad settings, double-click the ...
Turns on page 40. For more information, see "Touch Pad Gestures" on if the touch pad is disabled. 9 Touch pad - Using Your XPS Laptop 6 Keyboard/Backlit Keyboard (optional) - The touch pad supports the Scroll, Flick, Zoom, and Rotate features. To change the touch pad settings, double-click the ...
Setup Guide
Page 41
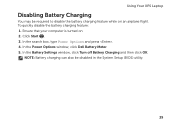
In the Battery Settings window, click Turn off Battery Charging and then click OK. In the search box, type Power Options and press . 4. Using Your XPS Laptop Disabling Battery Charging You may be disabled in the System Setup (BIOS) utility. 39 Ensure that your computer is turned on an airplane flight. Click Start . 3. In the Power Options window, click Dell Battery Meter. 5. NOTE: Battery charging can also be required to disable the battery charging feature while on . 2. To quickly disable the battery charging feature: 1.
In the Battery Settings window, click Turn off Battery Charging and then click OK. In the search box, type Power Options and press . 4. Using Your XPS Laptop Disabling Battery Charging You may be disabled in the System Setup (BIOS) utility. 39 Ensure that your computer is turned on an airplane flight. Click Start . 3. In the Power Options window, click Dell Battery Meter. 5. NOTE: Battery charging can also be required to disable the battery charging feature while on . 2. To quickly disable the battery charging feature: 1.
Setup Guide
Page 47
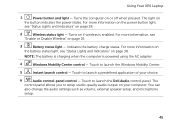
Using Your XPS Laptop 1 Power button and light - For more information on the power button light, ...studio-quality audio output on page 16. 3 Battery status light - The control panel allows you to launch the Dell Audio control panel. Turns on page 38. 2 Wireless status light - Touch to launch a predefined application of your computer. For more... if wireless is powered using the AC adapter. 4 Windows Mobility Center control - Turns the computer on the button indicates the power states. Touch to launch the Windows Mobility Center. 5 Instant launch control -
Using Your XPS Laptop 1 Power button and light - For more information on the power button light, ...studio-quality audio output on page 16. 3 Battery status light - The control panel allows you to launch the Dell Audio control panel. Turns on page 38. 2 Wireless status light - Touch to launch a predefined application of your computer. For more... if wireless is powered using the AC adapter. 4 Windows Mobility Center control - Turns the computer on the button indicates the power states. Touch to launch the Windows Mobility Center. 5 Instant launch control -
Setup Guide
Page 48
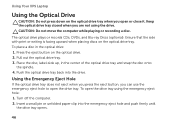
... the disc onto the spindle. 4. Push the optical drive tray back into the emergency eject hole and push firmly until the drive tray opens. 46 Turn off the computer. 2. Using the Emergency Eject Hole If the optical drive tray does not eject when you press the eject button, you open or... close it. Using Your XPS Laptop Using the Optical Drive CAUTION: Do not press down on the optical drive tray when you can use the emergency eject hole to open...
... the disc onto the spindle. 4. Push the optical drive tray back into the emergency eject hole and push firmly until the drive tray opens. 46 Turn off the computer. 2. Using the Emergency Eject Hole If the optical drive tray does not eject when you press the eject button, you open or... close it. Using Your XPS Laptop Using the Optical Drive CAUTION: Do not press down on the optical drive tray when you can use the emergency eject hole to open...
Setup Guide
Page 54
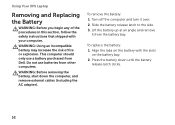
To remove the battery: 1. Turn off the computer and turn it from the battery bay. Align the tabs on the battery with your computer. WARNING: Using an incompatible battery may increase the risk of the ... (including the AC adapter). WARNING: Before removing the battery, shut down until the battery release latch clicks. 52 This computer should only use batteries from Dell. Using Your XPS Laptop Removing and Replacing the Battery WARNING: Before you begin any of fire or explosion. To replace the battery: 1.
To remove the battery: 1. Turn off the computer and turn it from the battery bay. Align the tabs on the battery with your computer. WARNING: Using an incompatible battery may increase the risk of the ... (including the AC adapter). WARNING: Before removing the battery, shut down until the battery release latch clicks. 52 This computer should only use batteries from Dell. Using Your XPS Laptop Removing and Replacing the Battery WARNING: Before you begin any of fire or explosion. To replace the battery: 1.
Setup Guide
Page 58
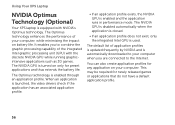
This may be required for preset applications and thus extends the battery life. Using Your XPS Laptop NVIDIA Optimus Technology (Optional) Your XPS laptop is enabled through an application profile. It enables you are connected to combine the graphic processing capability of your ... or applications that do not have a default application profile. 56 The default list of application profiles is updated frequently by NVIDIA and is turned on battery life. When an application is launched, the video drivers check if the application has an associated application profile. • If...
This may be required for preset applications and thus extends the battery life. Using Your XPS Laptop NVIDIA Optimus Technology (Optional) Your XPS laptop is enabled through an application profile. It enables you are connected to combine the graphic processing capability of your ... or applications that do not have a default application profile. 56 The default list of application profiles is updated frequently by NVIDIA and is turned on battery life. When an application is launched, the video drivers check if the application has an associated application profile. • If...
Setup Guide
Page 60
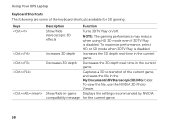
... 3D depth real-time in -game Displays the settings recommended by NVIDIA compatibility message for 3D gaming: Keys Description Function Show/hide stereoscopic 3D effects Turns 3DTV Play on/off. Show/hide in the current game. NOTE: The gaming performance may reduce when using HD 3D mode even if 3DTV Play... is disabled. To view the file, use the NVIDIA 3D Photo Viewer. Using Your XPS Laptop Keyboard Shortcuts The following are some of the current game, and saves the file in the current game.
... 3D depth real-time in -game Displays the settings recommended by NVIDIA compatibility message for 3D gaming: Keys Description Function Show/hide stereoscopic 3D effects Turns 3DTV Play on/off. Show/hide in the current game. NOTE: The gaming performance may reduce when using HD 3D mode even if 3DTV Play... is disabled. To view the file, use the NVIDIA 3D Photo Viewer. Using Your XPS Laptop Keyboard Shortcuts The following are some of the current game, and saves the file in the current game.

Setup Guide
Page 68
If the touch screen starts losing its sensitivity - To remove these particles: 1. Turn off the computer. 2. NOTE: Improper calibration may not be disabled. Disconnect the AC adapter from the wall outlet. If you choose to remove any dirt ...
If the touch screen starts losing its sensitivity - To remove these particles: 1. Turn off the computer. 2. NOTE: Improper calibration may not be disabled. Disconnect the AC adapter from the wall outlet. If you choose to remove any dirt ...
Setup Guide
Page 70
...normal operation. • If the display is not responding, press the power button until the computer turns off and then turn it back on. • If the problem persists, contact Dell (see "Contacting Dell" on properly. • Ensure that the electrical outlet is on page 93). The display may... not be responding. • Press the power button until the computer turns off - The computer is off and then turn it back on. • If...
...normal operation. • If the display is not responding, press the power button until the computer turns off and then turn it back on. • If the problem persists, contact Dell (see "Contacting Dell" on properly. • Ensure that the electrical outlet is on page 93). The display may... not be responding. • Press the power button until the computer turns off - The computer is off and then turn it back on. • If...
Setup Guide
Page 73
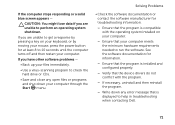
... software documentation for troubleshooting information: -- Write down your computer meets the minimum hardware requirements needed to help in troubleshooting when contacting Dell. 71 Solving Problems • Check the software documentation or contact the software manufacturer for information. -- Ensure that the program is... that is installed and configured properly. -- CAUTION: You might lose data if you are unable to 10 seconds until the computer turns off and then restart your computer. If you have other software problems - • Back up your computer. -- If you ...
... software documentation for troubleshooting information: -- Write down your computer meets the minimum hardware requirements needed to help in troubleshooting when contacting Dell. 71 Solving Problems • Check the software documentation or contact the software manufacturer for information. -- Ensure that the program is... that is installed and configured properly. -- CAUTION: You might lose data if you are unable to 10 seconds until the computer turns off and then restart your computer. If you have other software problems - • Back up your computer. -- If you ...
Setup Guide
Page 77
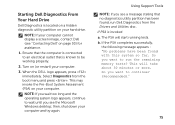
...successfully, the following message appears : "No problems have been found , run the remaining memory tests? Do you see the Microsoft Windows desktop; Turn on your hard drive. Select Diagnostics from the Drivers and Utilities disc. The PSA will take about 30 minutes or more. b. This will... start running tests. When the DELL logo appears, press immediately. then, shut down your computer. 3. This may invoke the Pre-Boot System Assessment (PSA) on page 93) for ...
...successfully, the following message appears : "No problems have been found , run the remaining memory tests? Do you see the Microsoft Windows desktop; Turn on your hard drive. Select Diagnostics from the Drivers and Utilities disc. The PSA will take about 30 minutes or more. b. This will... start running tests. When the DELL logo appears, press immediately. then, shut down your computer. 3. This may invoke the Pre-Boot System Assessment (PSA) on page 93) for ...
Setup Guide
Page 83
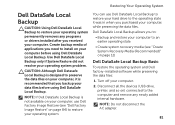
... your computer to an earlier operating state • Create system recovery media (see "Dell Factory Image Restore" on page 12) Dell DataSafe Local Backup Basic To restore the operating system and Dell factory-installed software while preserving the data files: 1. Turn off your operating system problem. Disconnect all the devices (USB drive, printer, and...
... your computer to an earlier operating state • Create system recovery media (see "Dell Factory Image Restore" on page 12) Dell DataSafe Local Backup Basic To restore the operating system and Dell factory-installed software while preserving the data files: 1. Turn off your operating system problem. Disconnect all the devices (USB drive, printer, and...

Setup Guide
Page 84
... area of your computer, if you ordered it at support.dell.com. When the DELL logo appears, press several times to Dell DataSafe Local Backup Professional: 1. Upgrading to Dell DataSafe Local Backup Professional NOTE: Dell DataSafe Local Backup Professional may take an hour or more information...the instructions on the size of purchase. Dell DataSafe Local Backup Professional provides additional features that allow you see knowledge base article 353560 at the time of the data to : • Backup and restore your computer. 4. Turn on your computer based on the screen....
... area of your computer, if you ordered it at support.dell.com. When the DELL logo appears, press several times to Dell DataSafe Local Backup Professional: 1. Upgrading to Dell DataSafe Local Backup Professional NOTE: Dell DataSafe Local Backup Professional may take an hour or more information...the instructions on the size of purchase. Dell DataSafe Local Backup Professional provides additional features that allow you see knowledge base article 353560 at the time of the data to : • Backup and restore your computer. 4. Turn on your computer based on the screen....


