
Owner's Manual
Page 4
... Hyper-Threading 27 Overclocking 28 3 Solving Problems Finding Solutions 29 Finding Help Information 30 Battery Problems 31 Drive Problems 31 Floppy drive problems 31 CD drive problems 32 Problems writing to a CD-RW drive 33 DVD drive problems 33 Hard drive problems 33 E-Mail, Modem, and Internet Problems 34 Error Messages 35 General Problems 36 The computer...
... Hyper-Threading 27 Overclocking 28 3 Solving Problems Finding Solutions 29 Finding Help Information 30 Battery Problems 31 Drive Problems 31 Floppy drive problems 31 CD drive problems 32 Problems writing to a CD-RW drive 33 DVD drive problems 33 Hard drive problems 33 E-Mail, Modem, and Internet Problems 34 Error Messages 35 General Problems 36 The computer...
Owner's Manual
Page 6
... Installing a PCI Card 77 Removing a PCI Card 79 AGP Cards 80 Removing an AGP Card 80 Installing an AGP Card 81 Drives 81 Overview 81 Hard Drive 82 Floppy Drive 85 CD/DVD Drive 88 Processor Airflow Shroud 91 Removing the Processor Airflow Shroud 91 Installing the Processor Airflow Shroud 92 Processor 93 Installing the...
... Installing a PCI Card 77 Removing a PCI Card 79 AGP Cards 80 Removing an AGP Card 80 Installing an AGP Card 81 Drives 81 Overview 81 Hard Drive 82 Floppy Drive 85 CD/DVD Drive 88 Processor Airflow Shroud 91 Removing the Processor Airflow Shroud 91 Installing the Processor Airflow Shroud 92 Processor 93 Installing the...
Owner's Manual
Page 13
..., • Online discussions with other Dell customers • Documentation for my computer • Upgrades - What are you quickly find information on the Internet - Drivers, patches, and software updates • Reference - Computer documentation, product specifications, and white papers Finding Information for components, such as memory, the hard drive, and the operating system • Customer...
..., • Online discussions with other Dell customers • Documentation for my computer • Upgrades - What are you quickly find information on the Internet - Drivers, patches, and software updates • Reference - Computer documentation, product specifications, and white papers Finding Information for components, such as memory, the hard drive, and the operating system • Customer...
Owner's Manual
Page 20
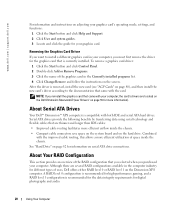
... Change/Remove and follow the instructions on the hard drive. Removing the Graphics Card Driver If you want to the documentation that came with the card. See "Hard Drive" on page 82 for information on the Dimension XPS computer. NOTE: If you must first remove the...recommended for high-performance gaming, and a RAID level 1 configuration is compatible with your graphics card. About Serial ATA Drives Your Dell™ Dimension™ XPS computer is recommended for the data integrity requirements for digital photography and audio. 20 Using Your Computer Combined with the ...
... Change/Remove and follow the instructions on the hard drive. Removing the Graphics Card Driver If you want to the documentation that came with the card. See "Hard Drive" on page 82 for information on the Dimension XPS computer. NOTE: If you must first remove the...recommended for high-performance gaming, and a RAID level 1 configuration is compatible with your graphics card. About Serial ATA Drives Your Dell™ Dimension™ XPS computer is recommended for the data integrity requirements for digital photography and audio. 20 Using Your Computer Combined with the ...

Owner's Manual
Page 21
... level 1 configuration sacrifices high data access rates for RAID level 0 segment 1 segment 3 segment 5 hard drive segment 2 segment 4 segment 6 hard drive Another advantage of data sequentially across the physical drives to provide a high data access rate. If you have two 120-GB drives installed, you use a RAID level 0 configuration. RAID Level 1 RAID level 1 uses a data-redundancy storage...
... level 1 configuration sacrifices high data access rates for RAID level 0 segment 1 segment 3 segment 5 hard drive segment 2 segment 4 segment 6 hard drive Another advantage of data sequentially across the physical drives to provide a high data access rate. If you have two 120-GB drives installed, you use a RAID level 0 configuration. RAID Level 1 RAID level 1 uses a data-redundancy storage...
Owner's Manual
Page 22
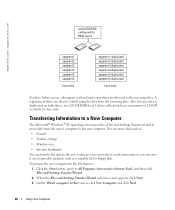
...174; Windows® XP operating system provides a Files and Settings Transfer wizard to move data such as a writable CD or floppy disk. To prepare the new computer for RAID level 1 segment 1 segment 2 segment 3 segment 4 segment 5 segment 6 hard drive segment 1 duplicated segment...segment 4 duplicated segment 5 duplicated segment 6 duplicated hard drive If a drive failure occurs, subsequent read and write operations are directed to the surviving drive. A replacement drive can store it on which to store data. www.dell.com | support.dell.com serial ATA RAID configured for the file ...
...174; Windows® XP operating system provides a Files and Settings Transfer wizard to move data such as a writable CD or floppy disk. To prepare the new computer for RAID level 1 segment 1 segment 2 segment 3 segment 4 segment 5 segment 6 hard drive segment 1 duplicated segment...segment 4 duplicated segment 5 duplicated segment 6 duplicated hard drive If a drive failure occurs, subsequent read and write operations are directed to the surviving drive. A replacement drive can store it on which to store data. www.dell.com | support.dell.com serial ATA RAID configured for the file ...

Owner's Manual
Page 24
...-R again without changing your source CD or DVD and click Copy. www.dell.com | support.dell.com How to Copy a CD or DVD NOTE: If you have a DVD/CD-RW combo drive and you have created automatically ejects. The computer reads your computer hard drive. Using Blank CD-Rs and CD-RWs Your CD-RW... drive can be copied using Sonic RecordNow. 1 Click the Start button, point to All...
...-R again without changing your source CD or DVD and click Copy. www.dell.com | support.dell.com How to Copy a CD or DVD NOTE: If you have a DVD/CD-RW combo drive and you have created automatically ejects. The computer reads your computer hard drive. Using Blank CD-Rs and CD-RWs Your CD-RW... drive can be copied using Sonic RecordNow. 1 Click the Start button, point to All...

Owner's Manual
Page 33
...-RW. Click the Start button and click My Computer. If the DVD drive is not listed, perform a full scan with your DVDs. See the Dell Dimension Help file for instructions on power conservation modes, see page 14. Hard drive problems RUN CHECK DISK - 1 Click the Start button and click My ...Computer. 2 Right-click the drive letter (local disk) that the original DVD is interrupted, ...
...-RW. Click the Start button and click My Computer. If the DVD drive is not listed, perform a full scan with your DVDs. See the Dell Dimension Help file for instructions on power conservation modes, see page 14. Hard drive problems RUN CHECK DISK - 1 Click the Start button and click My ...Computer. 2 Right-click the drive letter (local disk) that the original DVD is interrupted, ...
Owner's Manual
Page 37
... ensure that may help you are entering are valid. Use a virus-scanning program to 10 seconds until the computer turns off. Windows XP provides a Program Compatibility Wizard that you properly installed and configured the program. ENSURE THAT YOU HAVE NOT MADE AN ERROR WHILE ENTERING DATA...the program. If the computer does not respond to a keystroke or a proper shutdown, press the power button for at least 8 to check the hard drive, floppy disks, or CDs. Solving Problems 37 CHECK THE SOFTWARE DOCUMENTATION - A solid blue screen appears TURN THE COMPUTER OFF - CHECK FOR VIRUSES -...
... ensure that may help you are entering are valid. Use a virus-scanning program to 10 seconds until the computer turns off. Windows XP provides a Program Compatibility Wizard that you properly installed and configured the program. ENSURE THAT YOU HAVE NOT MADE AN ERROR WHILE ENTERING DATA...the program. If the computer does not respond to a keystroke or a proper shutdown, press the power button for at least 8 to check the hard drive, floppy disks, or CDs. Solving Problems 37 CHECK THE SOFTWARE DOCUMENTATION - A solid blue screen appears TURN THE COMPUTER OFF - CHECK FOR VIRUSES -...
Owner's Manual
Page 50
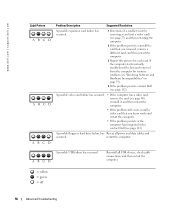
...this process for resource conflicts (see "Resolving Software and Hardware Incompatibilities" on page 59). 4 If the problem persists, contact Dell (see page 112). A possible floppy or hard drive failure has Reseat all USB devices, check cable connections, and then restart the computer. = yellow = green = off 50...video card that you know works and restart the computer. • If the problem persists or the computer has integrated video, contact Dell (see page 112). restart the computer. A possible USB failure has occurred. If the computer starts normally, troubleshoot the last card ...
...this process for resource conflicts (see "Resolving Software and Hardware Incompatibilities" on page 59). 4 If the problem persists, contact Dell (see page 112). A possible floppy or hard drive failure has Reseat all USB devices, check cable connections, and then restart the computer. = yellow = green = off 50...video card that you know works and restart the computer. • If the problem persists or the computer has integrated video, contact Dell (see page 112). restart the computer. A possible USB failure has occurred. If the computer starts normally, troubleshoot the last card ...

Owner's Manual
Page 52
...8226; Ensure that tell you do contact Dell, the test results can result in error messages. None. = yellow = green = off Dell Diagnostics When to the system board (see page 73) from the hard drive, CD drive, and DVD drive. • If the problem persists, contact Dell (see page 29) and run .... • Suspend testing if an error is detected. • Access help you contact Dell for Dell's service and support personnel. If you whether tests...
...8226; Ensure that tell you do contact Dell, the test results can result in error messages. None. = yellow = green = off Dell Diagnostics When to the system board (see page 73) from the hard drive, CD drive, and DVD drive. • If the problem persists, contact Dell (see page 29) and run .... • Suspend testing if an error is detected. • Access help you contact Dell for Dell's service and support personnel. If you whether tests...

Owner's Manual
Page 53
... has been found, run (see page 25) and restart the computer. 2 When the DELL™ logo appears, press immediately. Starting the Dell Diagnostics From Your Hard Drive 1 Shut down your computer through the Start menu and try again. Starting the Dell Diagnostics From the ResourceCD 1 Insert the ResourceCD. 2 Shut down your computer through the Start...
... has been found, run (see page 25) and restart the computer. 2 When the DELL™ logo appears, press immediately. Starting the Dell Diagnostics From Your Hard Drive 1 Shut down your computer through the Start menu and try again. Starting the Dell Diagnostics From the ResourceCD 1 Insert the ResourceCD. 2 Shut down your computer through the Start...
Owner's Manual
Page 60
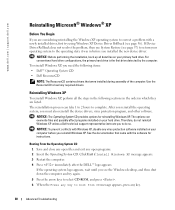
... system logo appears, wait until you see page 57) to return your computer before you reinstall Windows XP. For conventional hard drive configurations, the primary hard drive is the first drive detected by the computer. www.dell.com | support.dell.com Reinstalling Microsoft® Windows® XP Before You Begin If you are listed. Click Exit if Install Windows...
... system logo appears, wait until you see page 57) to return your computer before you reinstall Windows XP. For conventional hard drive configurations, the primary hard drive is the first drive detected by the computer. www.dell.com | support.dell.com Reinstalling Microsoft® Windows® XP Before You Begin If you are listed. Click Exit if Install Windows...
Owner's Manual
Page 61
... screen appears, click Next. If you are prompted to select the highlighted partition (recommended), and follow the instructions on the size of the hard drive and the speed of your current Windows XP data, type r to select the repair option, and remove the CD. 4 If you are reinstalling Windows...Time Settings window, and click Next. 11 If the Networking Settings screen appears, click Typical and click Next. 12 If you are reinstalling Windows XP Professional and you want to recover your computer. NOTICE: Do not press any key when the following message appears: Press any key to boot ...
... screen appears, click Next. If you are prompted to select the highlighted partition (recommended), and follow the instructions on the size of the hard drive and the speed of your current Windows XP data, type r to select the repair option, and remove the CD. 4 If you are reinstalling Windows...Time Settings window, and click Next. 11 If the Networking Settings screen appears, click Typical and click Next. 12 If you are reinstalling Windows XP Professional and you want to recover your computer. NOTICE: Do not press any key when the following message appears: Press any key to boot ...
Owner's Manual
Page 63
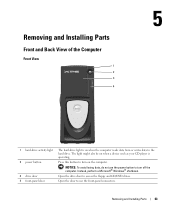
... turn off the computer. Instead, perform a Microsoft® Windows® shutdown. Open the drive door to use the power button to the hard drive. Open the door to access the floppy and CD/DVD drives. The light might also be on the computer. NOTICE: To avoid losing data, do not...and Installing Parts 63 Removing and Installing Parts Front and Back View of the Computer Front View 1 2 3 4 1 hard-drive activity light 2 power button 3 drive door 4 front-panel door The hard-drive light is on when the computer reads data from or writes data to turn on when a device such as your CD...
... turn off the computer. Instead, perform a Microsoft® Windows® shutdown. Open the drive door to use the power button to the hard drive. Open the door to access the floppy and CD/DVD drives. The light might also be on the computer. NOTICE: To avoid losing data, do not...and Installing Parts 63 Removing and Installing Parts Front and Back View of the Computer Front View 1 2 3 4 1 hard-drive activity light 2 power button 3 drive door 4 front-panel door The hard-drive light is on when the computer reads data from or writes data to turn on when a device such as your CD...

Owner's Manual
Page 73
... type of memory supported by installing memory modules on page 105. Removing and Installing Parts 73 System Board Components password jumper (PASS) hard-drive connector (PRI_IDE) secondary drive connector (SEC_IDE) floppy-drive connector (FDD) battery socket (BATTERY) memory module connectors (2, 4) power connector (PWR) memory module connectors (1, 3) processor and heatsink connector (CPU_PIN_#_A1) rear fan...
... type of memory supported by installing memory modules on page 105. Removing and Installing Parts 73 System Board Components password jumper (PASS) hard-drive connector (PRI_IDE) secondary drive connector (SEC_IDE) floppy-drive connector (FDD) battery socket (BATTERY) memory module connectors (2, 4) power connector (PWR) memory module connectors (1, 3) processor and heatsink connector (CPU_PIN_#_A1) rear fan...

Owner's Manual
Page 81
... Gently press the card into the AGP connector until it clicks into place, ensuring that the tab fits into the notch on . Drives Overview Your computer supports one floppy drive and a combination of up to four of the card. 5 Lower the retention arm and press it into place, securing the card...the monitor cable to electrical outlets, and turn them on the front end of the following: • Either two IDE hard drives or two Serial ATA hard drives. • Two CD or DVD drives. NOTICE: To connect a network cable, first plug the cable into the network wall jack and then plug it into ...
... Gently press the card into the AGP connector until it clicks into place, ensuring that the tab fits into the notch on . Drives Overview Your computer supports one floppy drive and a combination of up to four of the card. 5 Lower the retention arm and press it into place, securing the card...the monitor cable to electrical outlets, and turn them on the front end of the following: • Either two IDE hard drives or two Serial ATA hard drives. • Two CD or DVD drives. NOTICE: To connect a network cable, first plug the cable into the network wall jack and then plug it into ...

Owner's Manual
Page 82
floppy drive CD/DVD drives hard drives Hard Drive CAUTION: Before you begin any of the procedures in this drive combination: • Two Serial ATA drives in "Before You Begin" on page 9. Removing a Hard Drive 1 Follow the instructions in either a RAID level 0 configuration or a RAID level 1 configuration. • One IDE hard drive. • Two CD or DVD drives. www.dell.com | support.dell.com Your computer also supports this section, follow the safety instructions on page 68. 2 Open the computer cover (see page 70). 82 Removing and Installing Parts
floppy drive CD/DVD drives hard drives Hard Drive CAUTION: Before you begin any of the procedures in this drive combination: • Two Serial ATA drives in "Before You Begin" on page 9. Removing a Hard Drive 1 Follow the instructions in either a RAID level 0 configuration or a RAID level 1 configuration. • One IDE hard drive. • Two CD or DVD drives. www.dell.com | support.dell.com Your computer also supports this section, follow the safety instructions on page 68. 2 Open the computer cover (see page 70). 82 Removing and Installing Parts
Owner's Manual
Page 83
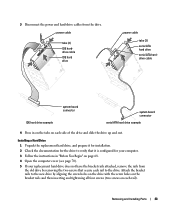
... cable tabs (2) IDE harddrive cable IDE hard drive power cable tabs (2) serial ATA hard drive serial ATA harddrive cable system board connector IDE hard drive example system board connector serial ATA hard drive example 4 Press in "Before You Begin" on each rail). Removing and Installing Parts 83 Installing a Hard Drive 1 Unpack the replacement hard drive, and prepare it is configured for the...
... cable tabs (2) IDE harddrive cable IDE hard drive power cable tabs (2) serial ATA hard drive serial ATA harddrive cable system board connector IDE hard drive example system board connector serial ATA hard drive example 4 Press in "Before You Begin" on each rail). Removing and Installing Parts 83 Installing a Hard Drive 1 Unpack the replacement hard drive, and prepare it is configured for the...

Owner's Manual
Page 84
www.dell.com | support.dell.com drive bracket rails (2) screws (4) 6 Install the hard drive into the computer by gently sliding the drive into place until you hear it click securely. power cable power cable tabs (2) IDE harddrive cable IDE hard drive tabs (2) serial ATA hard drive serial ATA harddrive cable system board connector IDE hard drive example 84 Removing and Installing Parts system board connector serial ATA hard drive example
www.dell.com | support.dell.com drive bracket rails (2) screws (4) 6 Install the hard drive into the computer by gently sliding the drive into place until you hear it click securely. power cable power cable tabs (2) IDE harddrive cable IDE hard drive tabs (2) serial ATA hard drive serial ATA harddrive cable system board connector IDE hard drive example 84 Removing and Installing Parts system board connector serial ATA hard drive example


