Owner's Manual
Page 10
... its connector or on its operating voltage). - if you use your computer. A manual voltage selection switch - www.dell.com | support.dell.com SAFETY: When Using Your Computer As you are disconnecting this type of cable, press in on the locking tabs before disconnecting the cable. Also, disconnect any connector pins. Also, before you open the computer cover, perform the following steps in your location. • Before working inside your...
... its connector or on its operating voltage). - if you use your computer. A manual voltage selection switch - www.dell.com | support.dell.com SAFETY: When Using Your Computer As you are disconnecting this type of cable, press in on the locking tabs before disconnecting the cable. Also, disconnect any connector pins. Also, before you open the computer cover, perform the following steps in your location. • Before working inside your...

Owner's Manual
Page 17
If you are connecting two flat-panel monitors, at least one monitor (VGA or DVI) in addition to the television. Using Your Computer 17 If you are connecting a television, you must have the optional VGA adapter. Using Your Computer Opening the Drive Door Connecting Two Monitors NOTE: If you are connecting two monitors that have VGA connectors, you may connect only one of them must have a VGA connector.
If you are connecting two flat-panel monitors, at least one monitor (VGA or DVI) in addition to the television. Using Your Computer 17 If you are connecting a television, you must have the optional VGA adapter. Using Your Computer Opening the Drive Door Connecting Two Monitors NOTE: If you are connecting two monitors that have VGA connectors, you may connect only one of them must have a VGA connector.
Owner's Manual
Page 20
... the graphics card that are several RAID configurations available in the Currently installed programs list. 4 Click Change/Remove and follow the instructions on the screen. www.dell.com | support.dell.com For information and instructions on adjusting your graphics card's operating mode, settings, and functions: 1 Click the Start button and click Help and Support. 2 Click User and system guides. 3 Locate and click the guide for information on serial ATA drive connections. To remove a graphics card driver: 1 Click the Start button and click Control Panel. 2 Double-click Add or Remove...
... the graphics card that are several RAID configurations available in the Currently installed programs list. 4 Click Change/Remove and follow the instructions on the screen. www.dell.com | support.dell.com For information and instructions on adjusting your graphics card's operating mode, settings, and functions: 1 Click the Start button and click Help and Support. 2 Click User and system guides. 3 Locate and click the guide for information on serial ATA drive connections. To remove a graphics card driver: 1 Click the Start button and click Control Panel. 2 Double-click Add or Remove...

Owner's Manual
Page 45
... enable digital mode: 1 Click the Start button, click Control Panel, and then click Sounds, Speech, and Audio Devices. 2 Click Sounds and Audio Devices. 3 Click the Hardware tab. 4 Double-click the name of your CD drive. 5 Click the Properties tab. 6 Check the Enable digital CD audio for interference. See the speaker documentation for diagnostics instructions. See the setup diagram supplied with the speakers. TEST THE ELECTRICAL OUTLET - Your speakers do not work if the CD drive is working by testing...
... enable digital mode: 1 Click the Start button, click Control Panel, and then click Sounds, Speech, and Audio Devices. 2 Click Sounds and Audio Devices. 3 Click the Hardware tab. 4 Double-click the name of your CD drive. 5 Click the Properties tab. 6 Check the Enable digital CD audio for interference. See the speaker documentation for diagnostics instructions. See the setup diagram supplied with the speakers. TEST THE ELECTRICAL OUTLET - Your speakers do not work if the CD drive is working by testing...

Owner's Manual
Page 46
... missing pins.) Ensure that the video cable is not muted. CHECK THE MONITOR POWER LIGHT - TEST THE ELECTRICAL OUTLET - Your headphones do not work if the CD drive is securely inserted into the headphone connector (see page 63). To disable digital mode: 1 Click the Start button, click Control Panel, and then click Sounds, Speech, and Audio Devices. 2 Click Sounds and Audio Devices. 3 Click the Hardware tab. 4 Double-click the name of your screen. Video and Monitor Problems...
... missing pins.) Ensure that the video cable is not muted. CHECK THE MONITOR POWER LIGHT - TEST THE ELECTRICAL OUTLET - Your headphones do not work if the CD drive is securely inserted into the headphone connector (see page 63). To disable digital mode: 1 Click the Start button, click Control Panel, and then click Sounds, Speech, and Audio Devices. 2 Click Sounds and Audio Devices. 3 Click the Hardware tab. 4 Double-click the name of your screen. Video and Monitor Problems...

Owner's Manual
Page 47
TEST ANOTHER MONITOR - MOVE THE MONITOR AWAY FROM EXTERNAL POWER SOURCES - Turn off nearby devices to determine if the power cable is defective. Solving Problems 47 See page 49. ADJUST THE WINDOWS® DISPLAY SETTINGS - 1 Click the Start button and click Control Panel. 2 Click Appearance and Themes. 3 Click Display and click the Settings tab. 4 Try different settings for instructions on adjusting the contrast and brightness, demagnetizing (degaussing) the monitor, and running the monitor self-test. Swap...
TEST ANOTHER MONITOR - MOVE THE MONITOR AWAY FROM EXTERNAL POWER SOURCES - Turn off nearby devices to determine if the power cable is defective. Solving Problems 47 See page 49. ADJUST THE WINDOWS® DISPLAY SETTINGS - 1 Click the Start button and click Control Panel. 2 Click Appearance and Themes. 3 Click Display and click the Settings tab. 4 Try different settings for instructions on adjusting the contrast and brightness, demagnetizing (degaussing) the monitor, and running the monitor self-test. Swap...

Owner's Manual
Page 49
...) on page 9. ABCD A possible processor failure has occurred. Advanced Troubleshooting Diagnostic Lights To help you troubleshoot a problem, your computer has four lights labeled "A," "B," "C," and "D" (see page 93) and restart the computer. Light Pattern ABCD Problem Description Suggested Resolution The computer is plugged into a or a possible pre-BIOS failure has working electrical outlet and that all the connector tabs are detected, but a memory failure has occurred. = yellow = green...
...) on page 9. ABCD A possible processor failure has occurred. Advanced Troubleshooting Diagnostic Lights To help you troubleshoot a problem, your computer has four lights labeled "A," "B," "C," and "D" (see page 93) and restart the computer. Light Pattern ABCD Problem Description Suggested Resolution The computer is plugged into a or a possible pre-BIOS failure has working electrical outlet and that all the connector tabs are detected, but a memory failure has occurred. = yellow = green...
Owner's Manual
Page 56
... problem, then use Windows XP Device Driver Rollback to the operating state that existed before you installed the new driver. 56 Advanced Troubleshooting Reinstalling Drivers NOTICE: The Dell Support website at support.dell.com and your computer to replace the driver with the previously installed version. 1 Click the Start button and click Control Panel. 2 Under Pick a Category, click Performance and Maintenance. 3 Click System. 4 In the System Properties window, click the Hardware tab. 5 Click Device Manager. 6 Right-click the device...
... problem, then use Windows XP Device Driver Rollback to the operating state that existed before you installed the new driver. 56 Advanced Troubleshooting Reinstalling Drivers NOTICE: The Dell Support website at support.dell.com and your computer to replace the driver with the previously installed version. 1 Click the Start button and click Control Panel. 2 Under Pick a Category, click Performance and Maintenance. 3 Click System. 4 In the System Properties window, click the Hardware tab. 5 Click Device Manager. 6 Right-click the device...

Owner's Manual
Page 58
... restore the computer to an earlier operating state, save and close any open files and exit any open programs. Do not alter, open , or delete any files or programs until the system restoration is unsuccessful, then use Device Driver Rollback (see and select restore points. If two or more restore points are available, click the restore point that is complete. 1 Click the Start button...
... restore the computer to an earlier operating state, save and close any open files and exit any open programs. Do not alter, open , or delete any files or programs until the system restoration is unsuccessful, then use Device Driver Rollback (see and select restore points. If two or more restore points are available, click the restore point that is complete. 1 Click the Start button...

Owner's Manual
Page 66
... monitor has a DVI connector, plug it into the VGA connector on the back panel of a network cable to either a network jack or to attach a record/playback device such as a digital video camera. Use the blue line-in connector - NOTE: For optimum performance, install a PCI sound card only in PCI slot 2, 3, or 4. A click indicates that you have a modem, connect a telephone cable to attach a personal computer microphone for your network or broadband device. Attach high-speed serial...
... monitor has a DVI connector, plug it into the VGA connector on the back panel of a network cable to either a network jack or to attach a record/playback device such as a digital video camera. Use the blue line-in connector - NOTE: For optimum performance, install a PCI sound card only in PCI slot 2, 3, or 4. A click indicates that you have a modem, connect a telephone cable to attach a personal computer microphone for your network or broadband device. Attach high-speed serial...
Owner's Manual
Page 74
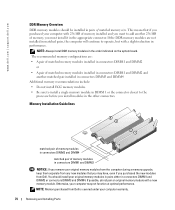
... of matched memory size. www.dell.com | support.dell.com DDR Memory Overview DDR memory modules should install your computer warranty. 74 Removing and Installing Parts This means that you must install it in the other connectors. The recommended memory configurations are not installed in matched pairs, the computer will continue to the processor before you purchased the new modules from Dell is covered under your original memory modules in...
... of matched memory size. www.dell.com | support.dell.com DDR Memory Overview DDR memory modules should install your computer warranty. 74 Removing and Installing Parts This means that you must install it in the other connectors. The recommended memory configurations are not installed in matched pairs, the computer will continue to the processor before you purchased the new modules from Dell is covered under your original memory modules in...

Owner's Manual
Page 81
Removing and Installing Parts 81 NOTICE: To connect a network cable, first plug the cable into the network wall jack and then plug it into the computer. 8 Connect your computer and devices to four of the following: • Either two IDE hard drives or two Serial ATA hard drives. • Two CD or DVD drives. Installing an AGP Card 1 Follow the instructions in the computer. 6 Close the computer cover (see page 70). 3 Press the lever...
Removing and Installing Parts 81 NOTICE: To connect a network cable, first plug the cable into the network wall jack and then plug it into the computer. 8 Connect your computer and devices to four of the following: • Either two IDE hard drives or two Serial ATA hard drives. • Two CD or DVD drives. Installing an AGP Card 1 Follow the instructions in the computer. 6 Close the computer cover (see page 70). 3 Press the lever...

Owner's Manual
Page 84
power cable power cable tabs (2) IDE harddrive cable IDE hard drive tabs (2) serial ATA hard drive serial ATA harddrive cable system board connector IDE hard drive example 84 Removing and Installing Parts system board connector serial ATA hard drive example www.dell.com | support.dell.com drive bracket rails (2) screws (4) 6 Install the hard drive into the computer by gently sliding the drive into place until you hear it click securely.
power cable power cable tabs (2) IDE harddrive cable IDE hard drive tabs (2) serial ATA hard drive serial ATA harddrive cable system board connector IDE hard drive example 84 Removing and Installing Parts system board connector serial ATA hard drive example www.dell.com | support.dell.com drive bracket rails (2) screws (4) 6 Install the hard drive into the computer by gently sliding the drive into place until you hear it click securely.
Owner's Manual
Page 110
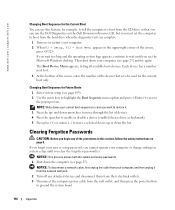
Then shut down the list. Clearing Forgotten Passwords CAUTION: Before you begin any attached devices and disconnect them from their electrical outlets. 3 Disconnect the computer power cable from the hard drive when the diagnostic tests are complete. 1 Turn on page 9. The Boot Device Menu appears, listing all available boot devices. and down-arrow keys to move through the list of devices. 4 Press the spacebar to enable or disable a device (enabled devices have a checkmark). 5 Press plus (+) or...
Then shut down the list. Clearing Forgotten Passwords CAUTION: Before you begin any attached devices and disconnect them from their electrical outlets. 3 Disconnect the computer power cable from the hard drive when the diagnostic tests are complete. 1 Turn on page 9. The Boot Device Menu appears, listing all available boot devices. and down-arrow keys to move through the list of devices. 4 Press the spacebar to enable or disable a device (enabled devices have a checkmark). 5 Press plus (+) or...

Owner's Manual
Page 129
...DELL'S RESPONSIBILITY FOR MALFUNCTIONS AND DEFECTS IN HARDWARE IS LIMITED TO REPAIR AND REPLACEMENT AS SET FORTH IN THIS WARRANTY STATEMENT. How long does this limited warranty last? The warranty period is not extended if we repair or replace a warranted product or any changes will not be retroactive. Appendix 129 Failure to follow the product instructions or failure to perform preventive maintenance...- Problems caused by using accessories, parts, or components not supplied by Dell • Products with missing or altered Service Tags or serial numbers • Products for Dell-branded...
...DELL'S RESPONSIBILITY FOR MALFUNCTIONS AND DEFECTS IN HARDWARE IS LIMITED TO REPAIR AND REPLACEMENT AS SET FORTH IN THIS WARRANTY STATEMENT. How long does this limited warranty last? The warranty period is not extended if we repair or replace a warranted product or any changes will not be retroactive. Appendix 129 Failure to follow the product instructions or failure to perform preventive maintenance...- Problems caused by using accessories, parts, or components not supplied by Dell • Products with missing or altered Service Tags or serial numbers • Products for Dell-branded...
Owner's Manual
Page 132
..., or problems with product instructions - You must also return the products to Dell in their original packaging, in your -our end-user customer's-Dell-branded hardware products, including Dell-branded peripheral products. External causes such as -new condition along with missing or altered Service Tags or serial numbers • Products for which Dell has not received payment THIS WARRANTY GIVES YOU SPECIFIC LEGAL RIGHTS...
..., or problems with product instructions - You must also return the products to Dell in their original packaging, in your -our end-user customer's-Dell-branded hardware products, including Dell-branded peripheral products. External causes such as -new condition along with missing or altered Service Tags or serial numbers • Products for which Dell has not received payment THIS WARRANTY GIVES YOU SPECIFIC LEGAL RIGHTS...
Owner's Manual
Page 139
... sound B battery problems, 31 replacing, 101 BIOS clearing passwords, 110 settings, 109 C cards AGP, 80 PCI, 77 slots, 66 CD drive installing, 89 problems, 32 removing, 88 CD-RW drive problems, 33 CDs copying, 23 Check Disk, 33 computer crashes, 36-37 restore to previous state, 57 stops responding, 36 conflicts software and hardware incompatibilities, 59 connectors headphone, 65 IEEE 1394, 65 keyboard, 67 mouse, 67 network, 67 parallel, 67 power, 66 serial, 67 sound, 66 USB, 65, 67 video...
... sound B battery problems, 31 replacing, 101 BIOS clearing passwords, 110 settings, 109 C cards AGP, 80 PCI, 77 slots, 66 CD drive installing, 89 problems, 32 removing, 88 CD-RW drive problems, 33 CDs copying, 23 Check Disk, 33 computer crashes, 36-37 restore to previous state, 57 stops responding, 36 conflicts software and hardware incompatibilities, 59 connectors headphone, 65 IEEE 1394, 65 keyboard, 67 mouse, 67 network, 67 parallel, 67 power, 66 serial, 67 sound, 66 USB, 65, 67 video...
Owner's Manual
Page 141
... problems, 42 turning off your computer, 25 power light conditions, 42 power supply fans, 66 printer problems, 43 problems battery, 31 blue screen, 37 CD drive, 32 CD-RW drive, 33 computer crashes, 36-37 computer stops responding, 36 conflicts, 59 Dell Diagnostics, 52 diagnostic lights, 49 drives, 31 DVD drive, 33 e-mail, 34 error messages, 35 finding solutions, 29 floppy drive, 31 Problems (continued) general, 36 hard drive, 33 hardware, 38 IEEE 1394, 39 Internet, 34 keyboard...
... problems, 42 turning off your computer, 25 power light conditions, 42 power supply fans, 66 printer problems, 43 problems battery, 31 blue screen, 37 CD drive, 32 CD-RW drive, 33 computer crashes, 36-37 computer stops responding, 36 conflicts, 59 Dell Diagnostics, 52 diagnostic lights, 49 drives, 31 DVD drive, 33 e-mail, 34 error messages, 35 finding solutions, 29 floppy drive, 31 Problems (continued) general, 36 hard drive, 33 hardware, 38 IEEE 1394, 39 Internet, 34 keyboard...
Owner's Manual
Page 142
... board components, 73 System Restore, 57 system setup program, 109 clearing passwords, 110 T technical specifications, 105 technical support policy, 111 television connecting to your computer, 17 transferring information to a new computer, 22 troubleshooting conflicts, 59 Dell Diagnostics, 52 diagnostic lights, 49 Hardware Troubleshooter, 59 Help and Support Center, 14 restore to previous state, 57 Solving Problems, 29 turning off your computer, 25 V video connector, 66 problems, 46 volume adjusting, 45 W warranty, 128 Windows XP Device Driver Rollback, 56 Files and Settings...
... board components, 73 System Restore, 57 system setup program, 109 clearing passwords, 110 T technical specifications, 105 technical support policy, 111 television connecting to your computer, 17 transferring information to a new computer, 22 troubleshooting conflicts, 59 Dell Diagnostics, 52 diagnostic lights, 49 Hardware Troubleshooter, 59 Help and Support Center, 14 restore to previous state, 57 Solving Problems, 29 turning off your computer, 25 V video connector, 66 problems, 46 volume adjusting, 45 W warranty, 128 Windows XP Device Driver Rollback, 56 Files and Settings...

Setup Diagram
Page 1
PS/2 USB 1 Connect a keyboard and a mouse 1 4 3 If you set up and operate your Dell™ computer, read and follow the safety instructions in your Owner's Manual. U2265am0.qxd 9/24/2003 4:50 PM Page 1 Set Up Your Computer First CAUTION: Before you have a modem Connect a telephone cable to either of the modem connectors (not all 2 modems have a network device Connect a network cable to electrical outlets 0U2265A00 www.dell.com | support.dell.com 2 Connect one monitor If...
PS/2 USB 1 Connect a keyboard and a mouse 1 4 3 If you set up and operate your Dell™ computer, read and follow the safety instructions in your Owner's Manual. U2265am0.qxd 9/24/2003 4:50 PM Page 1 Set Up Your Computer First CAUTION: Before you have a modem Connect a telephone cable to either of the modem connectors (not all 2 modems have a network device Connect a network cable to electrical outlets 0U2265A00 www.dell.com | support.dell.com 2 Connect one monitor If...


