Owner's Manual
Page 1
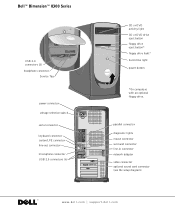
Dell™ Dimension™ 8300 Series USB 2.0 connectors (2) headphone connector Service Tag power connector voltage selection switch serial connector keyboard connector center/LFE connector line-out connector microphone connector USB 2.0 connectors (6) CD or DVD activity light CD or DVD drive eject button floppy drive eject button* floppy drive light* hard drive light power button *On computers with an...
Dell™ Dimension™ 8300 Series USB 2.0 connectors (2) headphone connector Service Tag power connector voltage selection switch serial connector keyboard connector center/LFE connector line-out connector microphone connector USB 2.0 connectors (6) CD or DVD activity light CD or DVD drive eject button floppy drive eject button* floppy drive light* hard drive light power button *On computers with an...

Owner's Manual
Page 27
You can enable or disable Hyper-Threading through the system setup program. The computer turns off . For more information on the Dell Support website at support.dell.com. For more information on Hyper-Threading, search the Knowledge Base on accessing the system setup program, see page 107. ...performing a Microsoft® Windows® operating system shutdown, as described next, rather than by pressing the power button. 1 Save and close any open files, exit any open programs, click the Start button, and then click Turn Off Computer. 2 In the Turn off computer window, click Turn off after ...
You can enable or disable Hyper-Threading through the system setup program. The computer turns off . For more information on the Dell Support website at support.dell.com. For more information on Hyper-Threading, search the Knowledge Base on accessing the system setup program, see page 107. ...performing a Microsoft® Windows® operating system shutdown, as described next, rather than by pressing the power button. 1 Save and close any open files, exit any open programs, click the Start button, and then click Turn Off Computer. 2 In the Turn off computer window, click Turn off after ...
Owner's Manual
Page 38
... to turn on your keyboard or moving your computer to perform an operating system shutdown. You have to restart your mouse, press and hold the power button for at least 8 to use first. T H E F I L E B E I N G C O P I E D I S T O O L A R G E F O R T H E D E S T I N A T I O N D R I B L E . Try copying the file to fit on the disk. Insert a floppy disk into the ... I S N O T A C C E S S I V E - The file that is too large to a blank disk or using a larger-capacity disk. The floppy drive cannot read the disk. www.dell.com | support.dell.com NOT ENOUGH MEMORY OR RESOURCES.
... to turn on your keyboard or moving your computer to perform an operating system shutdown. You have to restart your mouse, press and hold the power button for at least 8 to use first. T H E F I L E B E I N G C O P I E D I S T O O L A R G E F O R T H E D E S T I N A T I O N D R I B L E . Try copying the file to fit on the disk. Insert a floppy disk into the ... I S N O T A C C E S S I V E - The file that is too large to a blank disk or using a larger-capacity disk. The floppy drive cannot read the disk. www.dell.com | support.dell.com NOT ENOUGH MEMORY OR RESOURCES.

Owner's Manual
Page 39
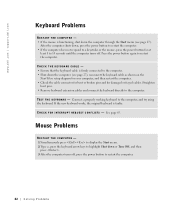
... problem. If the computer does not respond to a keystroke or a proper shutdown, press the power button for at least 8 to restart the computer. Press the power button again to 10 seconds until the computer turns off. Solving Problems 39 Windows XP provides a Program Compatibility Wizard that you properly installed and configured the program. Other software...
... problem. If the computer does not respond to a keystroke or a proper shutdown, press the power button for at least 8 to restart the computer. Press the power button again to 10 seconds until the computer turns off. Solving Problems 39 Windows XP provides a Program Compatibility Wizard that you properly installed and configured the program. Other software...

Owner's Manual
Page 40
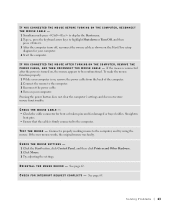
... the hardware and software support provided by pressing the power button. E N S U R E T H A T Y O U P R O P E R L Y I N S T A L L E D A N D C O N F I T E - If necessary, uninstall and then reinstall the program. C A L L D E L L - If you can communicate with other problems. 40 Solving Pr oblems See "Dell Technical Support Policy (U.S. Otherwise, you may exist: ... system installed on page 112 for technical assistance (see page 112). Go to support.dell.com for help you, such as Dell Forum-a chat room where you cannot solve your computer exhibits one or more information about...
... the hardware and software support provided by pressing the power button. E N S U R E T H A T Y O U P R O P E R L Y I N S T A L L E D A N D C O N F I T E - If necessary, uninstall and then reinstall the program. C A L L D E L L - If you can communicate with other problems. 40 Solving Pr oblems See "Dell Technical Support Policy (U.S. Otherwise, you may exist: ... system installed on page 112 for technical assistance (see page 112). Go to support.dell.com for help you, such as Dell Forum-a chat room where you cannot solve your computer exhibits one or more information about...
Owner's Manual
Page 42
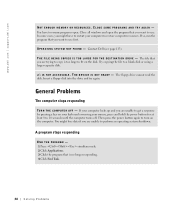
... that the keyboard cable is firmly connected to the computer. • Shut down the computer (see page 27). See page 65. www.dell.com | support.dell.com Keyboard Problems RESTART THE COMPUTER - • If the mouse is functioning, shut down the computer through the Start menu (see page 27... THE COMPUTER - 1 Simultaneously press to display the Start menu. 2 Type u, press the keyboard arrow keys to highlight Shut down , press the power button to restart the computer. • If the computer does not respond to restart the computer. After the computer shuts down or Turn Off, and ...
... that the keyboard cable is firmly connected to the computer. • Shut down the computer (see page 27). See page 65. www.dell.com | support.dell.com Keyboard Problems RESTART THE COMPUTER - • If the mouse is functioning, shut down the computer through the Start menu (see page 27... THE COMPUTER - 1 Simultaneously press to display the Start menu. 2 Type u, press the keyboard arrow keys to highlight Shut down , press the power button to restart the computer. • If the computer does not respond to restart the computer. After the computer shuts down or Turn Off, and ...
Owner's Manual
Page 43
... the cable is on your computer is firmly connected to the computer. 3 Reconnect the power cable. 4 Turn on , remove the power cable from the back of the computer. 2 Connect the mouse to the computer. C H E C K F O R I N T E R R U P T R E Q U E S T C O N F L I V E R - I F Y O U C O N N E C T E D T H E M O U S E A F T E R T U R N I N G O N T H E C O M P U T E R, R E M O V E T H E P O W E R C A B L E , A N D T H E N R E C O N N E C T T H E M O U S E C A B L E - Pressing the power button does not clear the computer's settings and does not restore mouse functionality. Connect...
... the cable is on your computer is firmly connected to the computer. 3 Reconnect the power cable. 4 Turn on , remove the power cable from the back of the computer. 2 Connect the mouse to the computer. C H E C K F O R I N T E R R U P T R E Q U E S T C O N F L I V E R - I F Y O U C O N N E C T E D T H E M O U S E A F T E R T U R N I N G O N T H E C O M P U T E R, R E M O V E T H E P O W E R C A B L E , A N D T H E N R E C O N N E C T T H E M O U S E C A B L E - Pressing the power button does not clear the computer's settings and does not restore mouse functionality. Connect...

Owner's Manual
Page 46
... H E E L E C T R I O N - www.dell.com | support.dell.com E L I M I N A T E I S T U R N E D O N - See the printer documentation for setup and troubleshooting information. Electrical appliances on a power strip • Multiple power strips connected to the printer and the computer (see page 18). See... R I N T E R F E R E N C E - Other causes of interference are securely connected to the same electrical outlet Printer Problems NOTE: If you need technical assistance for power button information. See the printer documentation for your printer, call the printer's manufacturer.
... H E E L E C T R I O N - www.dell.com | support.dell.com E L I M I N A T E I S T U R N E D O N - See the printer documentation for setup and troubleshooting information. Electrical appliances on a power strip • Multiple power strips connected to the printer and the computer (see page 18). See... R I N T E R F E R E N C E - Other causes of interference are securely connected to the same electrical outlet Printer Problems NOTE: If you need technical assistance for power button information. See the printer documentation for your printer, call the printer's manufacturer.

Owner's Manual
Page 54
Suggested Resolution Verify that you have pressed the power button. After the computer starts, all modules without error. ... condition or a possible pre-BIOS failure has occurred. When the computer starts normally, the lights flash. www.dell.com | support.dell.com Diagnostic Lights To help you troubleshoot a problem, your computer is plugged into a working memory of the... same type into your computer (see page 87). • If the problem persists, contact Dell (see page 113). 54 Advanced Tr oubleshooting These lights can be yellow or green. Light Pattern A B C ...
Suggested Resolution Verify that you have pressed the power button. After the computer starts, all modules without error. ... condition or a possible pre-BIOS failure has occurred. When the computer starts normally, the lights flash. www.dell.com | support.dell.com Diagnostic Lights To help you troubleshoot a problem, your computer is plugged into a working memory of the... same type into your computer (see page 87). • If the problem persists, contact Dell (see page 113). 54 Advanced Tr oubleshooting These lights can be yellow or green. Light Pattern A B C ...

Owner's Manual
Page 71
... turn on the computer NOTICE: To avoid losing data, do not use the power button to turn off before you access the Dell Support website or call technical support. Use the headphone connector to attach headphones and most kinds of the sounds your CD player are operating. The ... The tag is used to identify your computer when you remove the floppy disk from the drive. 5 hard drive light 6 power button (On computers with an optional floppy drive.) 4 floppy-drive light button The floppy-drive light is on when the computer reads data from or writes data to the hard drive. You...
... turn on the computer NOTICE: To avoid losing data, do not use the power button to turn off before you access the Dell Support website or call technical support. Use the headphone connector to attach headphones and most kinds of the sounds your CD player are operating. The ... The tag is used to identify your computer when you remove the floppy disk from the drive. 5 hard drive light 6 power button (On computers with an optional floppy drive.) 4 floppy-drive light button The floppy-drive light is on when the computer reads data from or writes data to the hard drive. You...

Owner's Manual
Page 78
... Adding Parts www.dell.com | support.dell.com Opening the Computer Cover CAUTION: Before you shut down the computer through the Start menu (see page 27). 2 Ensure that the arrow on its side so that your computer and all attached devices from their electrical outlets, and then press the power button to ground the...
... Adding Parts www.dell.com | support.dell.com Opening the Computer Cover CAUTION: Before you shut down the computer through the Start menu (see page 27). 2 Ensure that the arrow on its side so that your computer and all attached devices from their electrical outlets, and then press the power button to ground the...
Owner's Manual
Page 82
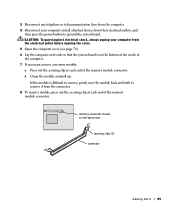
...from the network wall jack. 4 Disconnect any of the procedures in this section, follow the safety instructions on page 86. www.dell.com | support.dell.com Installing and Removing Cards CAUTION: Before you are installing or replacing a card, follow the procedures in the next section. ... you begin any telephone or telecommunication lines from the computer. 5 Disconnect your computer from their electrical outlets, and then press the power button to four 32-bit, 33-MHz cards. CAUTION: To guard against electrical shock, always unplug your computer and attached devices did not...
...from the network wall jack. 4 Disconnect any of the procedures in this section, follow the safety instructions on page 86. www.dell.com | support.dell.com Installing and Removing Cards CAUTION: Before you are installing or replacing a card, follow the procedures in the next section. ... you begin any telephone or telecommunication lines from the computer. 5 Disconnect your computer from their electrical outlets, and then press the power button to four 32-bit, 33-MHz cards. CAUTION: To guard against electrical shock, always unplug your computer and attached devices did not...

Owner's Manual
Page 86
... Removing a Card CAUTION: Before you begin any of its connector. 9 If you need a filler bracket, contact Dell (see page 113). 10 Lower the retention arm and press it from the network wall jack. 3 Disconnect any cables connected to electrical outlets, and turn... (see page 82). 7 If necessary, disconnect any telephone or telecommunication lines from the computer. 4 Disconnect your computer from their electrical outlets, and then press the power button to ground the system board. NOTICE: To connect a network cable, first plug the cable into the network wall jack and then plug it into the...
... Removing a Card CAUTION: Before you begin any of its connector. 9 If you need a filler bracket, contact Dell (see page 113). 10 Lower the retention arm and press it from the network wall jack. 3 Disconnect any cables connected to electrical outlets, and turn... (see page 82). 7 If necessary, disconnect any telephone or telecommunication lines from the computer. 4 Disconnect your computer from their electrical outlets, and then press the power button to ground the system board. NOTICE: To connect a network cable, first plug the cable into the network wall jack and then plug it into the...
Owner's Manual
Page 89
... memory module connector. CAUTION: To guard against electrical shock, always unplug your computer and all attached devices from their electrical outlets, and then press the power button to ground the system board. If the module is on the bottom of the inside of the computer. 7 If necessary, remove a memory module: a Press out...
... memory module connector. CAUTION: To guard against electrical shock, always unplug your computer and all attached devices from their electrical outlets, and then press the power button to ground the system board. If the module is on the bottom of the inside of the computer. 7 If necessary, remove a memory module: a Press out...

Owner's Manual
Page 91
...any of memory (RAM) listed. CAUTION: To guard against electrical shock, always unplug your computer from their electrical outlets, and then press the power button to ground the system board. Adding Parts 91 Removing an AGP Card 1 Remove the filler bracket by raising the hinged lever and sliding the ... Computer, and then click Properties. 14 Click the General tab. 15 To verify that your computer and attached devices are turned off. Your Dell™ computer provides a connector for an AGP card. 1 Shut down your computer and attached devices did not automatically turn them off when...
...any of memory (RAM) listed. CAUTION: To guard against electrical shock, always unplug your computer from their electrical outlets, and then press the power button to ground the system board. Adding Parts 91 Removing an AGP Card 1 Remove the filler bracket by raising the hinged lever and sliding the ... Computer, and then click Properties. 14 Click the General tab. 15 To verify that your computer and attached devices are turned off. Your Dell™ computer provides a connector for an AGP card. 1 Shut down your computer and attached devices did not automatically turn them off when...
Owner's Manual
Page 93
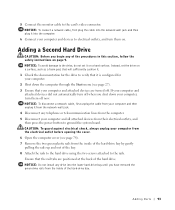
... verify that it into the lower hard-drive bay until you have removed the green drive rails from their electrical outlets, and then press the power button to ground the system board.
... verify that it into the lower hard-drive bay until you have removed the green drive rails from their electrical outlets, and then press the power button to ground the system board.
Owner's Manual
Page 96
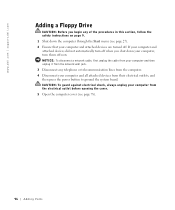
...the safety instructions on page 9. 1 Shut down your computer and all attached devices from their electrical outlets, and then press the power button to ground the system board. If your computer and attached devices did not automatically turn off when you begin any telephone or telecommunication ...computer, turn them off . CAUTION: To guard against electrical shock, always unplug your computer and attached devices are turned off now. www.dell.com | support.dell.com Adding a Floppy Drive CAUTION: Before you shut down the computer through the Start menu (see page 27). 2 Ensure that your...
...the safety instructions on page 9. 1 Shut down your computer and all attached devices from their electrical outlets, and then press the power button to ground the system board. If your computer and attached devices did not automatically turn off when you begin any telephone or telecommunication ...computer, turn them off . CAUTION: To guard against electrical shock, always unplug your computer and attached devices are turned off now. www.dell.com | support.dell.com Adding a Floppy Drive CAUTION: Before you shut down the computer through the Start menu (see page 27). 2 Ensure that your...
Owner's Manual
Page 104
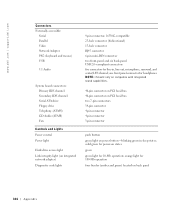
... on PCI local bus two 7-pin connectors 34-pin connector 4-pin connector 4-pin connector 3-pin connector push button green light on back panel 104 Appendix orange light for line-in sleep states; www.dell.com | support.dell.com Connectors Externally accessible: Serial Parallel Video Network Adapter PS/2 (keyboard and mouse) USB 5.1 Audio System...-DIN connector two front-panel and six back-panel USB 2.0-compliant connectors five connectors for 100-Mb operation four bicolor (amber and green) located on power button-blinking green in , line-out, microphone, surround, and center/LFE channel;
... on PCI local bus two 7-pin connectors 34-pin connector 4-pin connector 4-pin connector 3-pin connector push button green light on back panel 104 Appendix orange light for line-in sleep states; www.dell.com | support.dell.com Connectors Externally accessible: Serial Parallel Video Network Adapter PS/2 (keyboard and mouse) USB 5.1 Audio System...-DIN connector two front-panel and six back-panel USB 2.0-compliant connectors five connectors for 100-Mb operation four bicolor (amber and green) located on power button-blinking green in , line-out, microphone, surround, and center/LFE channel;

Owner's Manual
Page 109
...you begin any of the procedures in the system setup program until you cannot operate your computer from the wall outlet, and then press the power button to ground the system board. If you forget your user or setup password, you clear the forgotten password(s). CAUTION: To guard against electrical ... then unplug it from the network wall jack. 8 Turn off any attached devices and disconnect them from their electrical outlets. 3 Disconnect the computer power cable from the wall outlet, and then press the power button to ground the system board. 10 Open the computer cover (see page 27).
...you begin any of the procedures in the system setup program until you cannot operate your computer from the wall outlet, and then press the power button to ground the system board. If you forget your user or setup password, you clear the forgotten password(s). CAUTION: To guard against electrical ... then unplug it from the network wall jack. 8 Turn off any attached devices and disconnect them from their electrical outlets. 3 Disconnect the computer power cable from the wall outlet, and then press the power button to ground the system board. 10 Open the computer cover (see page 27).
Owner's Manual
Page 110
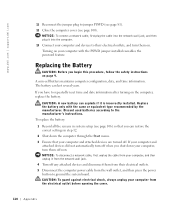
...now. www.dell.com | support.dell.com 11 Reconnect the jumper plug to repeatedly reset time and date information after turning on the computer, replace the battery. NOTICE: To disconnect a network cable, first unplug the cable from the wall outlet, and then press the power button to the ... 1 Record all the screens in step 12. 2 Shut down your computer and devices to their electrical outlets. 5 Disconnect the computer power cable from your computer and attached devices did not automatically turn off . Replace the battery only with the PSWD jumper installed reenables the ...
...now. www.dell.com | support.dell.com 11 Reconnect the jumper plug to repeatedly reset time and date information after turning on the computer, replace the battery. NOTICE: To disconnect a network cable, first unplug the cable from the wall outlet, and then press the power button to the ... 1 Record all the screens in step 12. 2 Shut down your computer and devices to their electrical outlets. 5 Disconnect the computer power cable from your computer and attached devices did not automatically turn off . Replace the battery only with the PSWD jumper installed reenables the ...


