
Owner's Manual
Page 1
... the Display Settings to Support Two or More Monitors . . . . . 25 About Your RAID Configuration 25 RAID Level 0 Configuration 26 RAID Level 1 Configuration 26 Configuring Your Hard Drives for RAID 27 Using the Nvidia MediaShield ROM Utility 28 Using Nvidia MediaShield 29 Playing CDs and DVDs 32 Playing a CD or DVD 32 Adjusting...
... the Display Settings to Support Two or More Monitors . . . . . 25 About Your RAID Configuration 25 RAID Level 0 Configuration 26 RAID Level 1 Configuration 26 Configuring Your Hard Drives for RAID 27 Using the Nvidia MediaShield ROM Utility 28 Using Nvidia MediaShield 29 Playing CDs and DVDs 32 Playing a CD or DVD 32 Adjusting...

Owner's Manual
Page 2
... Express Cards 43 Understanding Dual Graphics Technology 44 Understanding CPU Over-Clocking 44 3 Solving Problems 45 Troubleshooting Tips 45 Battery Problems 45 Drive Problems 45 CD and DVD drive problems 46 Hard drive problems 47 E-Mail, Modem, and Internet Problems 47 Error Messages 48 IEEE 1394 Device Problems 49 Keyboard Problems 49 Lockups and...
... Express Cards 43 Understanding Dual Graphics Technology 44 Understanding CPU Over-Clocking 44 3 Solving Problems 45 Troubleshooting Tips 45 Battery Problems 45 Drive Problems 45 CD and DVD drive problems 46 Hard drive problems 47 E-Mail, Modem, and Internet Problems 47 Error Messages 48 IEEE 1394 Device Problems 49 Keyboard Problems 49 Lockups and...

Owner's Manual
Page 4
... a Dual Configuration 93 Network Adapter and Sound Card Settings 96 Drives 97 About Serial ATA Drives 98 General Drive Installation Guidelines 98 Hard Drive 99 Removing a Hard Drive 99 Installing a Hard Drive 101 Drive Panel 104 Removing the Drive Panel 104 Replacing the Drive Panel 105 Floppy Drive 106 Removing a Floppy Drive 106 Installing a Floppy Drive 108 Media Card Reader 110 Removing a Media Card Reader...
... a Dual Configuration 93 Network Adapter and Sound Card Settings 96 Drives 97 About Serial ATA Drives 98 General Drive Installation Guidelines 98 Hard Drive 99 Removing a Hard Drive 99 Installing a Hard Drive 101 Drive Panel 104 Removing the Drive Panel 104 Replacing the Drive Panel 105 Floppy Drive 106 Removing a Floppy Drive 106 Installing a Floppy Drive 108 Media Card Reader 110 Removing a Media Card Reader...

Owner's Manual
Page 9
... your configuration, providing critical 1 Go to support.dell.com, select your business segment, and then enter your computer and operating system and installs the updates appropriate for components, such as the memory, hard drive, and operating system • Customer Care -...dell.com NOTE: Select your region or business segment to personalize my desktop Windows Help and Support Center 1 Click Start→ Help and Support. 2 Type a word or phrase that describes your problem, and then click the arrow icon. 3 Click the topic that describes your selections. • How to use Windows XP...
... your configuration, providing critical 1 Go to support.dell.com, select your business segment, and then enter your computer and operating system and installs the updates appropriate for components, such as the memory, hard drive, and operating system • Customer Care -...dell.com NOTE: Select your region or business segment to personalize my desktop Windows Help and Support Center 1 Click Start→ Help and Support. 2 Type a word or phrase that describes your problem, and then click the arrow icon. 3 Click the topic that describes your selections. • How to use Windows XP...

Owner's Manual
Page 12
... can also be a problem with an installed device (see "Front I/O Connectors" on the computer. The computer is ejected. NOTE: The hard-drive carrier is turned off the computer. Can hold a CD/DVD drive, or a SATA hard drive in bodily injury or damage to place it into the appropriate connectors (see "Solving Problems" on page 132).
... can also be a problem with an installed device (see "Front I/O Connectors" on the computer. The computer is ejected. NOTE: The hard-drive carrier is turned off the computer. Can hold a CD/DVD drive, or a SATA hard drive in bodily injury or damage to place it into the appropriate connectors (see "Solving Problems" on page 132).
Owner's Manual
Page 13
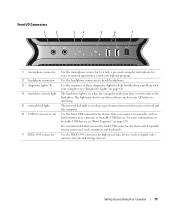
For more information on bootable USB devices see "Diagnostic Lights" on page 61). 4 hard-drive activity light The hard drive light is on page 138. Front I/O Connectors 1 2 3 4 5 6 7 1 microphone connector Use the microphone connector to the hard drive. Setting Up and Using Your Computer 15 The light may also be on when a device such as your CD player...
For more information on bootable USB devices see "Diagnostic Lights" on page 61). 4 hard-drive activity light The hard drive light is on page 138. Front I/O Connectors 1 2 3 4 5 6 7 1 microphone connector Use the microphone connector to the hard drive. Setting Up and Using Your Computer 15 The light may also be on when a device such as your CD player...
Owner's Manual
Page 23
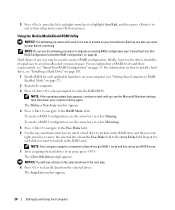
In order to connect and use the migrating option to convert a RAID configuration without losing data, your hard drive must be disabled. 1 With your graphics card, see the documentation that desire a high level of data integrity. About Your RAID Configuration NOTICE... clone mode, all monitors display the same image. • In extended desktop mode, you purchased your graphics card). Your Dell XPS computer supports RAID level 0 and RAID level 1. The drives in the computer industry for your computer. For more information on disabling multi-GPU technology, see the device user's guide in...
In order to connect and use the migrating option to convert a RAID configuration without losing data, your hard drive must be disabled. 1 With your graphics card, see the documentation that desire a high level of data integrity. About Your RAID Configuration NOTICE... clone mode, all monitors display the same image. • In extended desktop mode, you purchased your graphics card). Your Dell XPS computer supports RAID level 0 and RAID level 1. The drives in the computer industry for your computer. For more information on disabling multi-GPU technology, see the device user's guide in...

Owner's Manual
Page 24
... in the loss of all data. A RAID level 1 configuration sacrifices high data-access rates for RAID level 0 segment 1 segment 3 segment 5 segment 2 segment 4 segment 6 hard drive 1 hard drive 2 Another advantage of a RAID level 0 configuration is also duplicated, or mirrored, on which to provide a high data access rate. RAID Level 1 Configuration RAID level 1 uses a ...
... in the loss of all data. A RAID level 1 configuration sacrifices high data-access rates for RAID level 0 segment 1 segment 3 segment 5 segment 2 segment 4 segment 6 hard drive 1 hard drive 2 Another advantage of a RAID level 0 configuration is also duplicated, or mirrored, on which to provide a high data access rate. RAID Level 1 Configuration RAID level 1 uses a ...

Owner's Manual
Page 25
...segment 4 segment 5 segment 6 segment 1 duplicated segment 2 duplicated segment 3 duplicated segment 4 duplicated segment 5 duplicated segment 6 duplicated hard drive 1 hard drive 2 If a drive failure occurs, subsequent read and write operations are directed to RAID-enabled mode before you have installed the operating system and Nvidia RAID drivers.... serial ATA RAID configured for each SATA hard drive. The second method uses Nvidia MediaShield and is performed before you did not select a RAID configuration when...
...segment 4 segment 5 segment 6 segment 1 duplicated segment 2 duplicated segment 3 duplicated segment 4 duplicated segment 5 duplicated segment 6 duplicated hard drive 1 hard drive 2 If a drive failure occurs, subsequent read and write operations are directed to RAID-enabled mode before you have installed the operating system and Nvidia RAID drivers.... serial ATA RAID configured for each SATA hard drive. The second method uses Nvidia MediaShield and is performed before you did not select a RAID configuration when...
Owner's Manual
Page 26
...If the operating system logo appears, continue to wait until you see the Microsoft Windows desktop, then shut down -arrow keys to select a hard drive to avoid unallocated or unused space. To create a RAID 0 configuration, use the arrow keys to select Mirroring. 5 Press to navigate ... page 25. Back up - For information on how to install a hard drive, see "Setting Your Computer to an array, press . Hard drives of two drives per RAID 1 array and four drives per RAID 0 array. 7 After assigning the hard drives to RAIDEnabled Mode" on your computer and try again. The Clear disk...
...If the operating system logo appears, continue to wait until you see the Microsoft Windows desktop, then shut down -arrow keys to select a hard drive to avoid unallocated or unused space. To create a RAID 0 configuration, use the arrow keys to select Mirroring. 5 Press to navigate ... page 25. Back up - For information on how to install a hard drive, see "Setting Your Computer to an array, press . Hard drives of two drives per RAID 1 array and four drives per RAID 0 array. 7 After assigning the hard drives to RAIDEnabled Mode" on your computer and try again. The Clear disk...

Owner's Manual
Page 27
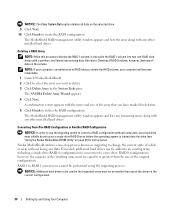
...view, and manage RAID configurations. The NVIDIA Create Array Wizard appears and lists the disks that are adding one or more new hard drives to an existing (non-RAID) single-drive computer, and you want to select Striping (RAID 0) or Mirroring (RAID 1). 7 Click Next. 9 To review the details ... to create a RAID configuration only when you to highlight the array in the loss of all data on page 27). 2 After rebooting your hard drives (see "About Your RAID Configuration" on page 25. Creating a RAID Array NOTICE: The following procedure will make up , use the following ...
...view, and manage RAID configurations. The NVIDIA Create Array Wizard appears and lists the disks that are adding one or more new hard drives to an existing (non-RAID) single-drive computer, and you want to select Striping (RAID 0) or Mirroring (RAID 1). 7 Click Next. 9 To review the details ... to create a RAID configuration only when you to highlight the array in the loss of all data on page 27). 2 After rebooting your hard drives (see "About Your RAID Configuration" on page 25. Creating a RAID Array NOTICE: The following procedure will make up , use the following ...
Owner's Manual
Page 28
... data, your computer will become unbootable. 1 Launch Nvidia MediaShield. 2 Click to select the array you delete the RAID volume, your hard drive must be no smaller than the size of the array that you have marked for conversion to or greater than any data. however, ...Click Delete Array in the current configuration. 30 Setting Up and Using Your Computer A confirmation screen appears with any other installed hard drives. If needed, additional hard drives can be set up as migrating to create the RAID configuration. NOTICE: The Clear System Data option deletes all data on ...
... data, your computer will become unbootable. 1 Launch Nvidia MediaShield. 2 Click to select the array you delete the RAID volume, your hard drive must be no smaller than the size of the array that you have marked for conversion to or greater than any data. however, ...Click Delete Array in the current configuration. 30 Setting Up and Using Your Computer A confirmation screen appears with any other installed hard drives. If needed, additional hard drives can be set up as migrating to create the RAID configuration. NOTICE: The Clear System Data option deletes all data on ...

Owner's Manual
Page 29
... Mirroring or Striping from the drop-down menu. 6 Click Next. The NVIDIA Rebuild Array Wizard appears. 4 Click Next. 5 Select the hard drive you want to include in the System Tasks pane. NOTE: Rebuilding an array can use your RAID configuration (Mirroring) in the management utility window...The MediaShield RAID management utility window appears and displays the status of the rebuild process. Rebuilding a RAID Configuration If one of the hard drive being used in the RAID configuration are RAID-enabled (see "Setting Your Computer to RAID-Enabled Mode" on page 27.) 1 Launch...
... Mirroring or Striping from the drop-down menu. 6 Click Next. The NVIDIA Rebuild Array Wizard appears. 4 Click Next. 5 Select the hard drive you want to include in the System Tasks pane. NOTE: Rebuilding an array can use your RAID configuration (Mirroring) in the management utility window...The MediaShield RAID management utility window appears and displays the status of the rebuild process. Rebuilding a RAID Configuration If one of the hard drive being used in the RAID configuration are RAID-enabled (see "Setting Your Computer to RAID-Enabled Mode" on page 27.) 1 Launch...

Owner's Manual
Page 32
... a temporary folder on the CD later. 34 Setting Up and Using Your Computer If you have a CD-RW/DVD combo drive and you have inserted your computer hard drive. Once you have finished copying the source CD or DVD, the CD or DVD that you observe all copyright laws when creating... CDs or DVDs. The computer reads your computer or backing up important data. Copying CDs and DVDs NOTE: Ensure that you have created automatically ejects. Dell Edition...
... a temporary folder on the CD later. 34 Setting Up and Using Your Computer If you have a CD-RW/DVD combo drive and you have inserted your computer hard drive. Once you have finished copying the source CD or DVD, the CD or DVD that you observe all copyright laws when creating... CDs or DVDs. The computer reads your computer or backing up important data. Copying CDs and DVDs NOTE: Ensure that you have created automatically ejects. Dell Edition...

Owner's Manual
Page 37
...data to the new computer: 1 On the Now go to your new computer. You can reduce power to just the monitor or the hard drive, or you can reduce the amount of your operating system. The wizard reads the collected files and settings and applies them to your old ...networking features not available in Windows XP Home Edition. When a Windows XP Professional computer is this? When the computer exits from standby mode, it computer returns to the operating state it . Standby Mode Standby mode conserves power by turning off the display and the hard drive after a designated period of the...
...data to the new computer: 1 On the Now go to your new computer. You can reduce power to just the monitor or the hard drive, or you can reduce the amount of your operating system. The wizard reads the collected files and settings and applies them to your old ...networking features not available in Windows XP Home Edition. When a Windows XP Professional computer is this? When the computer exits from standby mode, it computer returns to the operating state it . Standby Mode Standby mode conserves power by turning off the display and the hard drive after a designated period of the...

Owner's Manual
Page 38
... is restored to the state it was in standby mode, it may take a short time to you. If the computer's hard drive becomes corrupted, Windows XP recreates the hibernate file automatically. To exit from hibernate mode, press the power button. The computer may lose data. To exit...settings, hibernate mode settings, and other power settings in hibernate mode, pressing a key on your hard drive with enough disk space to store the contents of the computer memory, Dell creates an appropriately sized hibernate mode file before shipping the computer to exit from hibernate mode. Because...
... is restored to the state it was in standby mode, it may take a short time to you. If the computer's hard drive becomes corrupted, Windows XP recreates the hibernate file automatically. To exit from hibernate mode, press the power button. The computer may lose data. To exit...settings, hibernate mode settings, and other power settings in hibernate mode, pressing a key on your hard drive with enough disk space to store the contents of the computer memory, Dell creates an appropriately sized hibernate mode file before shipping the computer to exit from hibernate mode. Because...

Owner's Manual
Page 39
...to use for your computer may appear to enable hibernate mode. To avoid this problem, always set the hard drive to time-out before the monitor does, your Windows password before the hard drive. If you for traveling. • Presentation - Advanced Tab The Advanced tab allows you to: •...unless you click Save As and enter a new name for starting standby mode, hibernate mode, turning off the monitor, and turning off the hard drive. If your computer, choose a scheme from the corresponding drop-down menu in the Windows taskbar for quick access. • Set the computer ...
...to use for your computer may appear to enable hibernate mode. To avoid this problem, always set the hard drive to time-out before the monitor does, your Windows password before the hard drive. If you for traveling. • Presentation - Advanced Tab The Advanced tab allows you to: •...unless you click Save As and enter a new name for starting standby mode, hibernate mode, turning off the monitor, and turning off the hard drive. If your computer, choose a scheme from the corresponding drop-down menu in the Windows taskbar for quick access. • Set the computer ...

Owner's Manual
Page 45
NOTE: Do not plug a telephone cable into the network adapter connector (see "Back I N G S - Hard drive problems RUN CHECK DISK - 1 Click Start, then click My Computer. 2 Right-click Local Disk C:. 3 Click Properties. 4 Click the Tools tab. 5 Under Error-checking, click Check ...
NOTE: Do not plug a telephone cable into the network adapter connector (see "Back I N G S - Hard drive problems RUN CHECK DISK - 1 Click Start, then click My Computer. 2 Right-click Local Disk C:. 3 Click Properties. 4 Click the Tools tab. 5 Under Error-checking, click Check ...

Owner's Manual
Page 50
... memory. • Run the Dell Diagnostics (see "Dell Diagnostics" on page 64). IF YOU RECEIVE AN INSUFFICIENT MEMORY MESSAGE - • Save and close any open files and exit any of memory supported by your computer. BACK UP YOUR FILES IMMEDIATELY USE A VIRUS-SCANNING PROGRAM TO CHECK THE HARD DRIVE, FLOPPY DISKS, OR CDS SAVE... CONTACT THE SOFTWARE MANUFACTURER FOR TROUBLESHOOTING INFORMATION - • Ensure that the program is supported by your computer, see "Memory" on page 127. • Run the Dell Diagnostics (see "Dell Diagnostics" on page 64). 52 Solving Problems
... memory. • Run the Dell Diagnostics (see "Dell Diagnostics" on page 64). IF YOU RECEIVE AN INSUFFICIENT MEMORY MESSAGE - • Save and close any open files and exit any of memory supported by your computer. BACK UP YOUR FILES IMMEDIATELY USE A VIRUS-SCANNING PROGRAM TO CHECK THE HARD DRIVE, FLOPPY DISKS, OR CDS SAVE... CONTACT THE SOFTWARE MANUFACTURER FOR TROUBLESHOOTING INFORMATION - • Ensure that the program is supported by your computer, see "Memory" on page 127. • Run the Dell Diagnostics (see "Dell Diagnostics" on page 64). 52 Solving Problems
Owner's Manual
Page 60
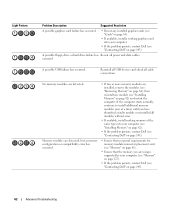
...available, install working graphics card into your computer (see "Installing Memory" on page 82). • If the problem persists, contact Dell (see "Contacting Dell" on page 145). • Ensure that no special requirements for memory module/connector placement exist (see "Memory" on page 81... Dell (see "Contacting Dell" on page 145). 62 Advanced Troubleshooting A possible USB failure has occurred. If the computer starts normally, continue to install additional memory modules (one module (see "Installing Memory" on page 82) and restart the computer. A possible floppy drive or hard drive ...
...available, install working graphics card into your computer (see "Installing Memory" on page 82). • If the problem persists, contact Dell (see "Contacting Dell" on page 145). • Ensure that no special requirements for memory module/connector placement exist (see "Memory" on page 81... Dell (see "Contacting Dell" on page 145). 62 Advanced Troubleshooting A possible USB failure has occurred. If the computer starts normally, continue to install additional memory modules (one module (see "Installing Memory" on page 82) and restart the computer. A possible floppy drive or hard drive ...


