Owners Manual
Page 5
...The screen is blank 47 The screen is difficult to read 48 3 Troubleshooting Tools 49 Diagnostic Lights 49 Dell Diagnostics 52 When to Use the Dell Diagnostics 52 Drivers 54 What Is a Driver 54 Identifying Drivers 54 Reinstalling Drivers 55 Resolving Software and ...Hardware Incompatibilities 56 Restoring Your Operating System 56 Using Microsoft Windows XP System Restore 56 4 Removing and Installing Parts 61 Before You Begin 61 Recommended Tools 61 Turning...
...The screen is blank 47 The screen is difficult to read 48 3 Troubleshooting Tools 49 Diagnostic Lights 49 Dell Diagnostics 52 When to Use the Dell Diagnostics 52 Drivers 54 What Is a Driver 54 Identifying Drivers 54 Reinstalling Drivers 55 Resolving Software and ...Hardware Incompatibilities 56 Restoring Your Operating System 56 Using Microsoft Windows XP System Restore 56 4 Removing and Installing Parts 61 Before You Begin 61 Recommended Tools 61 Turning...
Owners Manual
Page 14
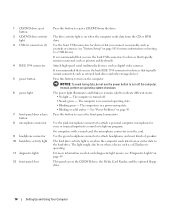
... Reader, and the optional floppy drive. 14 Setting Up and Using Your Computer NOTICE: To avoid losing data, do not use the power button to turn on page 49. Use the pink microphone connector to attach headphones and most kinds of speakers. 1 CD/DVD drive eject button 2 CD/DVD drive-... recommended that you use the back USB connectors for more information on when the computer reads data from the drive. It is on booting to turn off . • Steady green - The power light illuminates and blinks or remains solid to the hard drive. The computer is operating. The hard drive ...
... Reader, and the optional floppy drive. 14 Setting Up and Using Your Computer NOTICE: To avoid losing data, do not use the power button to turn on page 49. Use the pink microphone connector to attach headphones and most kinds of speakers. 1 CD/DVD drive eject button 2 CD/DVD drive-... recommended that you use the back USB connectors for more information on when the computer reads data from the drive. It is on booting to turn off . • Steady green - The power light illuminates and blinks or remains solid to the hard drive. The computer is operating. The hard drive ...
Owners Manual
Page 18
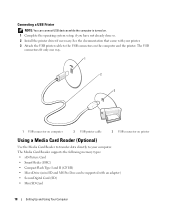
...; SmartMedia (SMC) • CompactFlash Type I and II (CF I/II) • MicroDrive (mini SD and MS Pro Duo can connect USB devices while the computer is turned on the computer and the printer. The USB connectors fit only one way. 1 2 3 1 USB connector on computer 2 USB printer cable 3 USB connector on printer Using...
...; SmartMedia (SMC) • CompactFlash Type I and II (CF I/II) • MicroDrive (mini SD and MS Pro Duo can connect USB devices while the computer is turned on the computer and the printer. The USB connectors fit only one way. 1 2 3 1 USB connector on computer 2 USB printer cable 3 USB connector on printer Using...
Owners Manual
Page 20
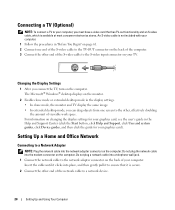
... in the display settings. • In clone mode, the monitor and TV display the same image. • In extended desktop mode, you connect the TV, turn on the monitor. 2 Enable clone mode or extended desktop mode in the Help and Support Center (click the Start button, click Help and Support, click...
... in the display settings. • In clone mode, the monitor and TV display the same image. • In extended desktop mode, you connect the TV, turn on the monitor. 2 Enable clone mode or extended desktop mode in the Help and Support Center (click the Start button, click Help and Support, click...
Owners Manual
Page 28
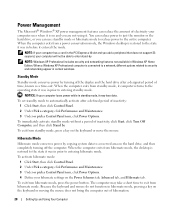
... Control Panel icon, click Power Options. To immediately activate standby mode without a period of inactivity, click Start, click Turn Off Computer, and then click Stand by turning off the computer. When the computer exits from standby mode, it computer returns to the operating state it . To ...mode, it was in prior to entering standby mode. Because the keyboard and mouse do not function in certain windows. When a Windows XP Professional computer is connected to a network, different options related to security and networking appear in hibernate mode, pressing a key on the...
... Control Panel icon, click Power Options. To immediately activate standby mode without a period of inactivity, click Start, click Turn Off Computer, and then click Stand by turning off the computer. When the computer exits from standby mode, it computer returns to the operating state it . To ...mode, it was in prior to entering standby mode. Because the keyboard and mouse do not function in certain windows. When a Windows XP Professional computer is connected to a network, different options related to security and networking appear in hibernate mode, pressing a key on the...
Owners Manual
Page 29
... monitor, Turn off the hard drive. NOTICE: If you want your computer to run with little power conservation. • Portable/Laptop - Setting Up and Using Your Computer 29 If the computer's hard drive becomes corrupted, Windows XP recreates the hibernate file automatically. If you set the ...name. Because hibernate mode requires a special file on your hard drive with enough disk space to store the contents of the computer memory, Dell creates an appropriately sized hibernate mode file before shipping the computer to you want to use for traveling. • Presentation - The Power...
... monitor, Turn off the hard drive. NOTICE: If you want your computer to run with little power conservation. • Portable/Laptop - Setting Up and Using Your Computer 29 If the computer's hard drive becomes corrupted, Windows XP recreates the hibernate file automatically. If you set the ...name. Because hibernate mode requires a special file on your hard drive with enough disk space to store the contents of the computer memory, Dell creates an appropriately sized hibernate mode file before shipping the computer to you want to use for traveling. • Presentation - The Power...
Owners Manual
Page 30
... window, click Performance and maintenance. 3 In the Performance and maintenance window, click Conserving power on the optional Microsoft® Windows® XP Media Center Edition 2005 remote control. 30 Setting Up and Using Your Computer Advanced Tab The Advanced tab allows you to: • Place...click an option from standby mode or hibernate mode. • Program the power button to activate standby mode, activate hibernate mode, or turn off feature. Hibernate Tab The Hibernate tab allows you may blink when the hard drive is an option for your computer. Also, you ...
... window, click Performance and maintenance. 3 In the Performance and maintenance window, click Conserving power on the optional Microsoft® Windows® XP Media Center Edition 2005 remote control. 30 Setting Up and Using Your Computer Advanced Tab The Advanced tab allows you to: • Place...click an option from standby mode or hibernate mode. • Program the power button to activate standby mode, activate hibernate mode, or turn off feature. Hibernate Tab The Hibernate tab allows you may blink when the hard drive is an option for your computer. Also, you ...
Owners Manual
Page 33
Discard used batteries according to repeatedly reset time and date information after turning on the computer, or if an incorrect time or date displays during start-up, replace the battery (see the program's documentation. Solving... 33 If the battery still does not work , ensure that the part is correctly installed. • If a peripheral device does not work properly, contact Dell (see "Contacting Dell" on page 94). CAUTION: Before you have to the manufacturer's instructions. R E P L A C E T H E B A T T E R Y - This message may help technical support personnel diagnose and fix ...
Discard used batteries according to repeatedly reset time and date information after turning on the computer, or if an incorrect time or date displays during start-up, replace the battery (see the program's documentation. Solving... 33 If the battery still does not work , ensure that the part is correctly installed. • If a peripheral device does not work properly, contact Dell (see "Contacting Dell" on page 94). CAUTION: Before you have to the manufacturer's instructions. R E P L A C E T H E B A T T E R Y - This message may help technical support personnel diagnose and fix ...

Owners Manual
Page 34
... CD or DVD. If the floppy, CD, or DVD drive, is not listed, perform a full scan with your screen. • Ensure that the volume is turned up by clicking any of your antivirus software to eliminate the possibility that are checked. See...
... CD or DVD. If the floppy, CD, or DVD drive, is not listed, perform a full scan with your screen. • Ensure that the volume is turned up by clicking any of your antivirus software to eliminate the possibility that are checked. See...
Owners Manual
Page 39
... CABLE - • Ensure that the keyboard cable is not damaged or frayed and check cable connectors for at least 8 to 10 seconds, until the computer turns off, and then restart your computer. • Ensure that the cable is firmly connected to perform an operating system shutdown.
... CABLE - • Ensure that the keyboard cable is not damaged or frayed and check cable connectors for at least 8 to 10 seconds, until the computer turns off, and then restart your computer. • Ensure that the cable is firmly connected to perform an operating system shutdown.

Owners Manual
Page 40
.... 4 Click End Task. A program crashes repeatedly NOTE: Most software includes installation instructions in an environment similar to non-Windows XP operating system environments. 1 Click the Start, point to 10 seconds, until the computer turns off, and then restart your computer. 40 Solving Problems A program stops responding END THE PROGRAM - 1 Press simultaneously to...
.... 4 Click End Task. A program crashes repeatedly NOTE: Most software includes installation instructions in an environment similar to non-Windows XP operating system environments. 1 Click the Start, point to 10 seconds, until the computer turns off, and then restart your computer. 40 Solving Problems A program stops responding END THE PROGRAM - 1 Press simultaneously to...
Owners Manual
Page 42
...working mouse to the computer, then try using is supported by your computer, see "Memory" on page 66. • Run the Dell Diagnostics (see "Dell Diagnostics" on page 52). CHECK THE MOUSE SETTINGS - 1 Click Start, click Control Panel, and then click Printers and Other Hardware... as needed. R E I N S T A L L T H E M O U S E D R I V E R - and down or Turn Off, and then press . 3 After the computer turns off, reconnect the mouse cable as shown on the setup diagram. 4 Turn on the computer. TE S T T H E M O U S E - CHECK THE MOUSE CABLE - • Ensure that the memory you are following...
...working mouse to the computer, then try using is supported by your computer, see "Memory" on page 66. • Run the Dell Diagnostics (see "Dell Diagnostics" on page 52). CHECK THE MOUSE SETTINGS - 1 Click Start, click Control Panel, and then click Printers and Other Hardware... as needed. R E I N S T A L L T H E M O U S E D R I V E R - and down or Turn Off, and then press . 3 After the computer turns off, reconnect the mouse cable as shown on the setup diagram. 4 Turn on the computer. TE S T T H E M O U S E - CHECK THE MOUSE CABLE - • Ensure that the memory you are following...

Owners Manual
Page 44
...system board (see "Cards" on page 70). I F T H E P O W E R L I G H T I N G A M B E R - The computer is either turned off or is working by testing it with another device, such as a lamp. • Ensure that the main power cable and front panel cable are... strips connected to the same electrical outlet Printer Problems CAUTION: Before you need technical assistance for setup and troubleshooting information. ENSURE THAT THE PRINTER IS TURNED ON 44 Solving Problems I F T H E P O W E R L I G H T I O N - E L I M I N A T E I N T E R F E R E N C E - A device may exist. • Ensure ...
...system board (see "Cards" on page 70). I F T H E P O W E R L I G H T I N G A M B E R - The computer is either turned off or is working by testing it with another device, such as a lamp. • Ensure that the main power cable and front panel cable are... strips connected to the same electrical outlet Printer Problems CAUTION: Before you need technical assistance for setup and troubleshooting information. ENSURE THAT THE PRINTER IS TURNED ON 44 Solving Problems I F T H E P O W E R L I G H T I O N - E L I M I N A T E I N T E R F E R E N C E - A device may exist. • Ensure ...

Owners Manual
Page 46
... diagram supplied with another device, such as shown on reinstalling the scanner driver. C H E C K T H E S P E A K E R C A B L E C O N N E C T I C A L O U T L E T - E N S U R E T H A T T H E S U B W O O F E R A N D T H E S P E A K E R S A R E T U R N E D O N - Sound from speakers NOTE: The volume control in the Product Information Guide. Turn off . Sound and Speaker Problems CAUTION: Before you purchased a sound card, ensure that the speakers are connected to check for information on the setup diagram...
... diagram supplied with another device, such as shown on reinstalling the scanner driver. C H E C K T H E S P E A K E R C A B L E C O N N E C T I C A L O U T L E T - E N S U R E T H A T T H E S U B W O O F E R A N D T H E S P E A K E R S A R E T U R N E D O N - Sound from speakers NOTE: The volume control in the Product Information Guide. Turn off . Sound and Speaker Problems CAUTION: Before you purchased a sound card, ensure that the speakers are connected to check for information on the setup diagram...
Owners Manual
Page 47
... power light is off, firmly press the button to ensure that the sound is blinking, press a key on page 13). Ensure that the volume is turned up and that the monitor is turned on. • If the power light is not muted. R U N T H E S P E A K E R D I A G N O S T I O N - Solving Problems 47 R U N T H E H A R D W A R E TR...
... power light is off, firmly press the button to ensure that the sound is blinking, press a key on page 13). Ensure that the volume is turned up and that the monitor is turned on. • If the power light is not muted. R U N T H E S P E A K E R D I A G N O S T I O N - Solving Problems 47 R U N T H E H A R D W A R E TR...

Owners Manual
Page 48
See "Diagnostic Lights" on adjusting the contrast and brightness, demagnetizing (degaussing) the monitor, and running the monitor self-test. Turn off nearby devices to appear shaky. Ensure that the subwoofer is at least 60 cm (2 ft) away from the monitor. The screen is working by ...
See "Diagnostic Lights" on adjusting the contrast and brightness, demagnetizing (degaussing) the monitor, and running the monitor self-test. Turn off nearby devices to appear shaky. Ensure that the subwoofer is at least 60 cm (2 ft) away from the monitor. The screen is working by ...
Owners Manual
Page 49
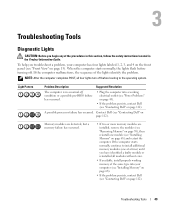
...on page 70), then reinstall one at a time) until you have identified a faulty module or reinstalled all four lights turn off . Contact Dell (see "Contacting Dell" on page 112). NOTE: After the computer completes POST, all modules without error. • If available, install properly ...working electrical outlet (see "Power Problems" on page 43). • If the problem persists, contact Dell (see "Contacting Dell" on page 13). If the computer malfunctions, the sequence of the procedures in this section, follow the safety instructions located in...
...on page 70), then reinstall one at a time) until you have identified a faulty module or reinstalled all four lights turn off . Contact Dell (see "Contacting Dell" on page 112). NOTE: After the computer completes POST, all modules without error. • If available, install properly ...working electrical outlet (see "Power Problems" on page 43). • If the problem persists, contact Dell (see "Contacting Dell" on page 13). If the computer malfunctions, the sequence of the procedures in this section, follow the safety instructions located in...
Owners Manual
Page 52
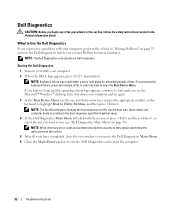
...Dell Diagnostics before you see "Dell Diagnostics Main Menu" on page 53). NOTE: The Quickboot feature changes the boot sequence for extended periods of the procedures in this section, follow the instructions on the keyboard to highlight Boot to Utility Partition, and then press . Starting the Dell Diagnostics 1 Turn on Dell ...computers. NOTE: Write down your computer. 2 When the DELL logo appears, press immediately.
...Dell Diagnostics before you see "Dell Diagnostics Main Menu" on page 53). NOTE: The Quickboot feature changes the boot sequence for extended periods of the procedures in this section, follow the instructions on the keyboard to highlight Boot to Utility Partition, and then press . Starting the Dell Diagnostics 1 Turn on Dell ...computers. NOTE: Write down your computer. 2 When the DELL logo appears, press immediately.

Owners Manual
Page 58
... spreadsheets, e-mail messages, digital photos, music files, etc. If possible, back up all data on computers purchased in when you reinstall Windows XP with www.dell.com appears at the top of free hard-disk space available, System Restore is restored to restore your computer. Use...System Restore is available only on the hard drive and removes any applications or drivers installed after you wish to the operating state it was turned on the computer. PC Restore restores your computer- If possible, back up the data before using PC Restore. The computer restarts. Enabling...
... spreadsheets, e-mail messages, digital photos, music files, etc. If possible, back up all data on computers purchased in when you reinstall Windows XP with www.dell.com appears at the top of free hard-disk space available, System Restore is restored to restore your computer. Use...System Restore is available only on the hard drive and removes any applications or drivers installed after you wish to the operating state it was turned on the computer. PC Restore restores your computer- If possible, back up the data before using PC Restore. The computer restarts. Enabling...

Owners Manual
Page 61
...exit any open programs before you shut down the operating system: a Save and close any open files, exit any attached devices are turned off after the operating system shutdown process finishes. 2 Ensure that the following conditions exist: • You have performed the steps in... "Turning Off Your Computer" on page 61 and "Before Working Inside Your Computer" on page 62. • You have read the safety information in your Dell™ Product Information Guide. • A component can be replaced or-if purchased...
...exit any open programs before you shut down the operating system: a Save and close any open files, exit any attached devices are turned off after the operating system shutdown process finishes. 2 Ensure that the following conditions exist: • You have performed the steps in... "Turning Off Your Computer" on page 61 and "Before Working Inside Your Computer" on page 62. • You have read the safety information in your Dell™ Product Information Guide. • A component can be replaced or-if purchased...


