Owner's Manual
Page 1
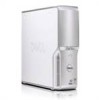
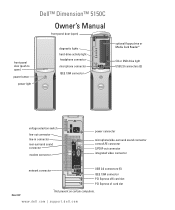
www.dell.com | support.dell.com Dell™ Dimension™ 5150C Owner's Manual front-panel door (open) front-panel door (push to open) power button power light diagnostic lights hard-drive activity light headphone connector microphone connector IEEE 1394 connector optional floppy drive or Media Card Reader* CD or DVD drive ...
www.dell.com | support.dell.com Dell™ Dimension™ 5150C Owner's Manual front-panel door (open) front-panel door (push to open) power button power light diagnostic lights hard-drive activity light headphone connector microphone connector IEEE 1394 connector optional floppy drive or Media Card Reader* CD or DVD drive ...

Owner's Manual
Page 24
...then click Stand by turning off the computer. When a Windows XP Professional computer is in Windows XP Home Edition. Standby Mode Standby mode conserves power by . When the computer exits from hibernate mode, press the power button. To set standby mode to the operating state it was in... certain windows. NOTICE: If your hibernate settings on the keyboard or move the mouse. Power Management The Microsoft® Windows® XP power management features can use standby mode...
...then click Stand by turning off the computer. When a Windows XP Professional computer is in Windows XP Home Edition. Standby Mode Standby mode conserves power by . When the computer exits from hibernate mode, press the power button. To set standby mode to the operating state it was in... certain windows. NOTICE: If your hibernate settings on the keyboard or move the mouse. Power Management The Microsoft® Windows® XP power management features can use standby mode...

Owner's Manual
Page 25
...hard drive becomes corrupted, Windows XP recreates the hibernate file automatically. The Power schemes drop-down menu in the Power Options Properties window. Power Options Properties Define your power settings on the Power Schemes tab, Advanced tab, and Hibernate tab. To access the Power Options Properties window: 1 Click the Start button and click Control Panel. 2 ...Because hibernate mode requires a special file on your hard drive with enough disk space to store the contents of the computer memory, Dell creates an appropriately sized hibernate mode file before the hard drive.
...hard drive becomes corrupted, Windows XP recreates the hibernate file automatically. The Power schemes drop-down menu in the Power Options Properties window. Power Options Properties Define your power settings on the Power Schemes tab, Advanced tab, and Hibernate tab. To access the Power Options Properties window: 1 Click the Start button and click Control Panel. 2 ...Because hibernate mode requires a special file on your hard drive with enough disk space to store the contents of the computer memory, Dell creates an appropriately sized hibernate mode file before the hard drive.

Owner's Manual
Page 26
...hard drive is still operating as a quick on the optional Microsoft® Windows® XP Media Center Edition 2005 remote control. 26 Setting Up and Using Your Computer Pressing the power button once causes the display to go blank and the audio to enable hibernate mode. For more...includes: • A BIOS with Microsoft® Windows® XP Media Center Edition 2005 and dual core processors. To resume normal computer operation, briefly press the power button, press any key on the keyboard, move the mouse, or press a button on /off the computer. Using Intel® Viiv™ Quick...
...hard drive is still operating as a quick on the optional Microsoft® Windows® XP Media Center Edition 2005 remote control. 26 Setting Up and Using Your Computer Pressing the power button once causes the display to go blank and the audio to enable hibernate mode. For more...includes: • A BIOS with Microsoft® Windows® XP Media Center Edition 2005 and dual core processors. To resume normal computer operation, briefly press the power button, press any key on the keyboard, move the mouse, or press a button on /off the computer. Using Intel® Viiv™ Quick...

Owner's Manual
Page 27
... in the Operating system 1 Click the Start button and click Control Panel. 2 Under Pick a category, click Performance and Maintenance. 3 Under or pick a Control Panel icon, click Power Options. 4 Click the Away tab. 5 Ensure that you use the Microsoft® Windows® XP Service Pack 1 (SP1) or later operating .... These drivers are checked. 6 Click the Advanced tab. 7 From the When I press the power button on my computer drop-down menu, select Do Nothing. 8 From the When I press the sleep button on my computer drop-down -arrow keys to highlight the Quick Resume option and press to enable ...
... in the Operating system 1 Click the Start button and click Control Panel. 2 Under Pick a category, click Performance and Maintenance. 3 Under or pick a Control Panel icon, click Power Options. 4 Click the Away tab. 5 Ensure that you use the Microsoft® Windows® XP Service Pack 1 (SP1) or later operating .... These drivers are checked. 6 Click the Advanced tab. 7 From the When I press the power button on my computer drop-down menu, select Do Nothing. 8 From the When I press the sleep button on my computer drop-down -arrow keys to highlight the Quick Resume option and press to enable ...
Owner's Manual
Page 34
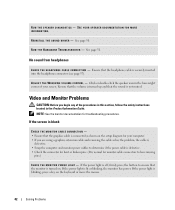
...C E - Contact the manufacturer of the procedures in this section, follow the safety instructions located in the Product Information Guide. ENSURE THAT THE POWER CABLE IS FIRMLY CONNECTED TO THE COMPUTER AND TO THE ELECTRICAL OUTLET 34 Solving Problems D E L L I E E E 1 3 9 ...E M S W I T H A D E L L I E E E 1 3 9 4 D E V I G H T S - See page 51. R U N T H E H A R D W A R E TR O U B L E S H O O T E R - Contact Dell (see page 111). ENSURE THAT THE IEEE 1394 DEVICE IS RECOGNIZED BY WINDOWS - 1 Click the Start button and click Control Panel. 2 Click Printers and Other Hardware.
...C E - Contact the manufacturer of the procedures in this section, follow the safety instructions located in the Product Information Guide. ENSURE THAT THE POWER CABLE IS FIRMLY CONNECTED TO THE COMPUTER AND TO THE ELECTRICAL OUTLET 34 Solving Problems D E L L I E E E 1 3 9 ...E M S W I T H A D E L L I E E E 1 3 9 4 D E V I G H T S - See page 51. R U N T H E H A R D W A R E TR O U B L E S H O O T E R - Contact Dell (see page 111). ENSURE THAT THE IEEE 1394 DEVICE IS RECOGNIZED BY WINDOWS - 1 Click the Start button and click Control Panel. 2 Click Printers and Other Hardware.

Owner's Manual
Page 35
.... 3 Click the program that it runs in its documentation or on your keyboard or moving your mouse, press and hold the power button for an earlier Windows operating system RUN THE PROGRAM COMPATIBILITY WIZARD - If necessary, uninstall and then reinstall the program. Then restart ...the screen. A program crashes repeatedly NOTE: Software usually includes installation instructions in an environment similar to non-Windows XP operating system environments. 1 Click the Start button, point to perform an operating system shutdown. If you are unable to get a response by pressing a key ...
.... 3 Click the program that it runs in its documentation or on your keyboard or moving your mouse, press and hold the power button for an earlier Windows operating system RUN THE PROGRAM COMPATIBILITY WIZARD - If necessary, uninstall and then reinstall the program. Then restart ...the screen. A program crashes repeatedly NOTE: Software usually includes installation instructions in an environment similar to non-Windows XP operating system environments. 1 Click the Start button, point to perform an operating system shutdown. If you are unable to get a response by pressing a key ...
Owner's Manual
Page 38
...R E E N A N D T H E C O M P U T E R I S N O T R E S P O N D I G H T S O N T H E B A C K O F T H E C O M P U T E R - Press a key on the keyboard, move the mouse, or press the power button to verify that the network is firmly inserted into both the network connector on the back of the computer and the network jack. C H E C K T H E N E T W O R K L I N G - Replace the ... your network settings are correct and that your network to resume normal operation. 38 Solving Problems Power Problems CAUTION: Before you begin any of the procedures in this section, follow the safety instructions...
...R E E N A N D T H E C O M P U T E R I S N O T R E S P O N D I G H T S O N T H E B A C K O F T H E C O M P U T E R - Press a key on the keyboard, move the mouse, or press the power button to verify that the network is firmly inserted into both the network connector on the back of the computer and the network jack. C H E C K T H E N E T W O R K L I N G - Replace the ... your network settings are correct and that your network to resume normal operation. 38 Solving Problems Power Problems CAUTION: Before you begin any of the procedures in this section, follow the safety instructions...
Owner's Manual
Page 42
... ensure that the graphics cable is turned on the keyboard or move the mouse. 42 Solving Problems R U N T H E H A R D W A R E TR O U B L E S H O O T E R - A D J U S T T H E W I O N - If the power light is off, firmly press the button to determine if the power cable is defective. • Check the connector for bent or broken pins. (It is normal for troubleshooting procedures. If the...
... ensure that the graphics cable is turned on the keyboard or move the mouse. 42 Solving Problems R U N T H E H A R D W A R E TR O U B L E S H O O T E R - A D J U S T T H E W I O N - If the power light is off, firmly press the button to determine if the power cable is defective. • Check the connector for bent or broken pins. (It is normal for troubleshooting procedures. If the...

Owner's Manual
Page 45
button. If the computer starts normally, reinstall an additional module. Troubleshooting Tools 45 After the computer completes POST, all modules without error. • If available, install properly working memory of the same type into a working condition or a possible pre-BIOS failure electrical outlet and press the power has occurred. Contact Dell (see page 111... starts normally, the lights flash. Troubleshooting Tools Diagnostic Lights CAUTION: Before you troubleshoot a problem, your computer (see page 65). • If the problem persists, contact Dell (see page 111).
button. If the computer starts normally, reinstall an additional module. Troubleshooting Tools 45 After the computer completes POST, all modules without error. • If available, install properly working memory of the same type into a working condition or a possible pre-BIOS failure electrical outlet and press the power has occurred. Contact Dell (see page 111... starts normally, the lights flash. Troubleshooting Tools Diagnostic Lights CAUTION: Before you troubleshoot a problem, your computer (see page 65). • If the problem persists, contact Dell (see page 111).
Owner's Manual
Page 47
... a different card, and then restart the computer. 3 Repeat this process for additional information. check system setup (see page 111). • Press the power button • Move the mouse • Press any key on the keyboard • Press any key on page 26 for each card. Another failure has occurred... diagnostic lights before booting to the system board from the computer for resource conflicts (see page 51). 4 If the problem persists, contact Dell (see page 99) to make sure the boot sequence is correct for the devices installed on your computer. • If the problem persists,...
... a different card, and then restart the computer. 3 Repeat this process for additional information. check system setup (see page 111). • Press the power button • Move the mouse • Press any key on the keyboard • Press any key on page 26 for each card. Another failure has occurred... diagnostic lights before booting to the system board from the computer for resource conflicts (see page 51). 4 If the problem persists, contact Dell (see page 99) to make sure the boot sequence is correct for the devices installed on your computer. • If the problem persists,...
Owner's Manual
Page 55
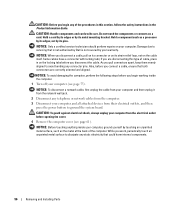
... that the following safety guidelines to help protect your computer from potential damage and to help ensure your operating system, press and hold the power button for removing and installing the components in your computer. 1 Shut down your own personal safety. Removing and Installing Parts 55 b In the...when you shut down the operating system: a Save and close any open files and exit any open programs before you turn off your Dell™ Product Information Guide. • A component can be replaced or-if purchased separately-installed by performing the removal procedure in this ...
... that the following safety guidelines to help protect your computer from potential damage and to help ensure your operating system, press and hold the power button for removing and installing the components in your computer. 1 Shut down your own personal safety. Removing and Installing Parts 55 b In the...when you shut down the operating system: a Save and close any open files and exit any open programs before you turn off your Dell™ Product Information Guide. • A component can be replaced or-if purchased separately-installed by performing the removal procedure in this ...
Owner's Manual
Page 56
...any connector pins. NOTICE: Only a certified service technician should perform repairs on your computer from their electrical outlets, and then press the power button to dissipate any of the procedures in on the locking tabs before you pull connectors apart, keep them evenly aligned to servicing that is... not authorized by Dell is not covered by its pins. NOTICE: When you begin any static electricity that both connectors are disconnecting this section, follow ...
...any connector pins. NOTICE: Only a certified service technician should perform repairs on your computer from their electrical outlets, and then press the power button to dissipate any of the procedures in on the locking tabs before you pull connectors apart, keep them evenly aligned to servicing that is... not authorized by Dell is not covered by its pins. NOTICE: When you begin any static electricity that both connectors are disconnecting this section, follow ...
Owner's Manual
Page 58
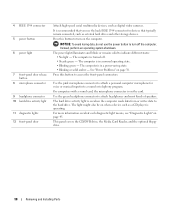
... computer reads data from or writes data to attach a personal computer microphone for devices that you use the power button to turn off . • Steady green - 4 IEEE 1394 connector 5 power button 6 power light 7 front-panel door release button 8 microphone connector 9 headphone connector 10 hard-drive activity light 11 diagnostic lights 12 front-panel door Attach high...
... computer reads data from or writes data to attach a personal computer microphone for devices that you use the power button to turn off . • Steady green - 4 IEEE 1394 connector 5 power button 6 power light 7 front-panel door release button 8 microphone connector 9 headphone connector 10 hard-drive activity light 11 diagnostic lights 12 front-panel door Attach high...

Owner's Manual
Page 61
... into the VGA connector on the computer. CAUTION: To guard against electrical shock, always unplug your computer from their electrical outlets, and then press the power button to ground the system board. 7 line-out connector 8 microphone/side surround sound connector 9 center/LFE connector 10 S/PDIF connector 11 VGA connector 12 USB 2.0 connectors...
... into the VGA connector on the computer. CAUTION: To guard against electrical shock, always unplug your computer from their electrical outlets, and then press the power button to ground the system board. 7 line-out connector 8 microphone/side surround sound connector 9 center/LFE connector 10 S/PDIF connector 11 VGA connector 12 USB 2.0 connectors...

Owner's Manual
Page 63
CD/DVD drive drive release latch power supply and fan hard drive front-panel door power button heat sink assembly Removing and Installing Parts 63 CAUTION: To guard against electrical shock, always unplug your computer from the electrical outlet before opening the cover. Inside View of Your Computer CAUTION: Before you begin any of the procedures in this section, follow the safety instructions in the Product Information Guide.
CD/DVD drive drive release latch power supply and fan hard drive front-panel door power button heat sink assembly Removing and Installing Parts 63 CAUTION: To guard against electrical shock, always unplug your computer from the electrical outlet before opening the cover. Inside View of Your Computer CAUTION: Before you begin any of the procedures in this section, follow the safety instructions in the Product Information Guide.

Owner's Manual
Page 98
... 939 BTU/hr NOTE: Heat dissipation is not detecting a physical connection to in sleep state; solid amber indicates an internal power problem (see "Power Problems" on integrated network adapter) green light - A good connection exists between a 10-Mbps network and the computer. Voltage... (See the safety instructions manual selection power supply - 90 to 135 V at 50/60 Hz; 180 to the network. Controls and Lights Power control push button Power light green light - amber light - orange light - off (no light) -
... 939 BTU/hr NOTE: Heat dissipation is not detecting a physical connection to in sleep state; solid amber indicates an internal power problem (see "Power Problems" on integrated network adapter) green light - A good connection exists between a 10-Mbps network and the computer. Voltage... (See the safety instructions manual selection power supply - 90 to 135 V at 50/60 Hz; 180 to the network. Controls and Lights Power control push button Power light green light - amber light - orange light - off (no light) -
Owner's Manual
Page 107
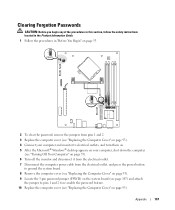
... "Turning Off Your Computer" on page 55). 6 Turn off the monitor and disconnect it from the electrical outlet. 7 Disconnect the computer power cable from the electrical outlet, and press the power button to ground the system board. 8 Remove the computer cover (see "Replacing the Computer Cover" on page 93). 9 Locate the 3-pin password...
... "Turning Off Your Computer" on page 55). 6 Turn off the monitor and disconnect it from the electrical outlet. 7 Disconnect the computer power cable from the electrical outlet, and press the power button to ground the system board. 8 Remove the computer cover (see "Replacing the Computer Cover" on page 93). 9 Locate the 3-pin password...


