Users Manual
Page 3
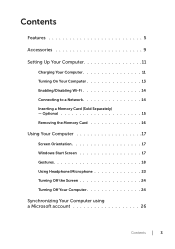
Contents Features 5 Accessories 9 Setting Up Your Computer 11 Charging Your Computer 11 Turning On Your Computer 13 Enabling/Disabling Wi-Fi 14 Connecting to a Network 14 Inserting a Memory Card (Sold Separately) - Optional 15 Removing the Memory Card 16 Using Your Computer 17 Screen Orientation 17 Windows Start Screen 17 Gestures 18 Using Headphone/Microphone 23 Turning Off the Screen 24 Turning Off Your Computer 24 Synchronizing Your Computer using a Microsoft account 26 Contents │ 3
Contents Features 5 Accessories 9 Setting Up Your Computer 11 Charging Your Computer 11 Turning On Your Computer 13 Enabling/Disabling Wi-Fi 14 Connecting to a Network 14 Inserting a Memory Card (Sold Separately) - Optional 15 Removing the Memory Card 16 Using Your Computer 17 Screen Orientation 17 Windows Start Screen 17 Gestures 18 Using Headphone/Microphone 23 Turning Off the Screen 24 Turning Off Your Computer 24 Synchronizing Your Computer using a Microsoft account 26 Contents │ 3

Users Manual
Page 6
Press to go to the most recently used app or most recently viewed screen. 6 │ Features Press for quick access to the Start screen while an app is active. Connect a power adapter to provide power to 5 Gbps. Provides data transfer speeds up to your computer and charge the battery. Feature 7 Headset/speaker port 8 USB 3.0 ports (2) 9 Power-adapter port 10 Windows button Functionality Connect a headphone, a headset (headphone and microphone combo), or speakers. Connect peripherals such as storage devices, printers, and so on.
Press to go to the most recently used app or most recently viewed screen. 6 │ Features Press for quick access to the Start screen while an app is active. Connect a power adapter to provide power to 5 Gbps. Provides data transfer speeds up to your computer and charge the battery. Feature 7 Headset/speaker port 8 USB 3.0 ports (2) 9 Power-adapter port 10 Windows button Functionality Connect a headphone, a headset (headphone and microphone combo), or speakers. Connect peripherals such as storage devices, printers, and so on.
Users Manual
Page 7
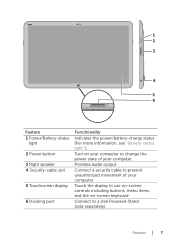
Provides audio output. Connect a security cable to prevent unauthorized movement of your computer. Features │ 7 Touch the display to a Dell Powered-Stand (sold separately). 1 2 3 4 5 6 Feature 1 Power/Battery-status light 2 Power button 3 Right speaker 4 Security-cable slot 5 Touchscreen display 6 Docking port Functionality Indicates the power/battery-charge status. (For more information, see "Battery-status light:"). Turn on -screen keyboard Connect to use on-screen controls including buttons, menu items, and the on your computer or change the power state of your ...
Provides audio output. Connect a security cable to prevent unauthorized movement of your computer. Features │ 7 Touch the display to a Dell Powered-Stand (sold separately). 1 2 3 4 5 6 Feature 1 Power/Battery-status light 2 Power button 3 Right speaker 4 Security-cable slot 5 Touchscreen display 6 Docking port Functionality Indicates the power/battery-charge status. (For more information, see "Battery-status light:"). Turn on -screen keyboard Connect to use on-screen controls including buttons, menu items, and the on your computer or change the power state of your ...

Users Manual
Page 9
It also allows adjusting the viewing angle and charges the battery. Allows you to connect a RJ45 (network) cable to your computer using a USB port. ∞∞ Powered stand (sold separately) - Accessories │ 9 Provides power to your computer to ethernet adapter (sold separately) - Accessories ∞∞ Power adapter and cable - Allows your computer and charges the battery. ∞∞ USB to be placed upright.
It also allows adjusting the viewing angle and charges the battery. Allows you to connect a RJ45 (network) cable to your computer using a USB port. ∞∞ Powered stand (sold separately) - Accessories │ 9 Provides power to your computer to ethernet adapter (sold separately) - Accessories ∞∞ Power adapter and cable - Allows your computer and charges the battery. ∞∞ USB to be placed upright.
Users Manual
Page 11
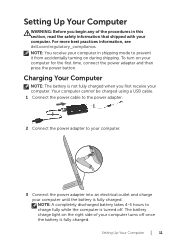
... best practices information, see dell.com/regulatory_compliance. NOTE: You receive your computer in this section, read the safety information that shipped with your computer for the first time, connect the power adapter and then press the power button. Your computer cannot be charged using a USB cable. 1 Connect the power cable to the power adapter. 2 Connect the power adapter to prevent it from accidentally turning on your computer. To...
... best practices information, see dell.com/regulatory_compliance. NOTE: You receive your computer in this section, read the safety information that shipped with your computer for the first time, connect the power adapter and then press the power button. Your computer cannot be charged using a USB cable. 1 Connect the power cable to the power adapter. 2 Connect the power adapter to prevent it from accidentally turning on your computer. To...
Users Manual
Page 12
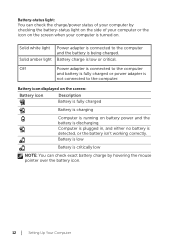
... white light Solid amber light Power adapter is running on . Battery charge is detected, or the battery isn't working correctly. Battery is low Battery is critically low NOTE: You can check the charge/power status of your computer or the icon on the screen when your computer by hovering the mouse pointer over the battery icon. 12 │ Setting Up Your Computer Off Power adapter is connected to...
... white light Solid amber light Power adapter is running on . Battery charge is detected, or the battery isn't working correctly. Battery is low Battery is critically low NOTE: You can check the charge/power status of your computer or the icon on the screen when your computer by hovering the mouse pointer over the battery icon. 12 │ Setting Up Your Computer Off Power adapter is connected to...

Users Manual
Page 13
NOTE: After the button is pressed, there is a slight delay before your computer turns on . Connect to your Microsoft account or creating a local account, and so on or off. 2 Finish Windows setup by selecting your options for personalization, signing into your wireless network. b. Setting Up Your Computer │ 13 a. Turning On Your Computer CAUTION: Use your computer in an ambient temperature between 0°C and 35°C (32°F and 95°F). 1 Press and release the Power and Sleep/Wake button . Enable security and updates.
NOTE: After the button is pressed, there is a slight delay before your computer turns on . Connect to your Microsoft account or creating a local account, and so on or off. 2 Finish Windows setup by selecting your options for personalization, signing into your wireless network. b. Setting Up Your Computer │ 13 a. Turning On Your Computer CAUTION: Use your computer in an ambient temperature between 0°C and 35°C (32°F and 95°F). 1 Press and release the Power and Sleep/Wake button . Enable security and updates.

Users Manual
Page 14
... to the left to enable Wi-Fi. Your computer is ready for use when the Windows Start screen is not enabled, the Start screen appears after you want to connect to access Charms. 2 Touch Settings → Available → Select an available network→ Connect. Enabling/Disabling Wi-Fi 1 Swipe from the right edge of the display to access Charms. 2 Touch Settings → Change PC settings→ Wireless. 3 Move the slider to...
... to the left to enable Wi-Fi. Your computer is ready for use when the Windows Start screen is not enabled, the Start screen appears after you want to connect to access Charms. 2 Touch Settings → Available → Select an available network→ Connect. Enabling/Disabling Wi-Fi 1 Swipe from the right edge of the display to access Charms. 2 Touch Settings → Change PC settings→ Wireless. 3 Move the slider to...

Users Manual
Page 16
... don not see Safely Remove Hardware , tap Show Hidden Icons to display all icons in the notification area. 3 Tap the memory card name in the list. A message appears confirming that the memory card can be removed, make sure all data transfers to and from the memory card are complete before removing it from the computer. 1 Tap the Desktop tile to access the Desktop mode. 2 In the notification...
... don not see Safely Remove Hardware , tap Show Hidden Icons to display all icons in the notification area. 3 Tap the memory card name in the list. A message appears confirming that the memory card can be removed, make sure all data transfers to and from the memory card are complete before removing it from the computer. 1 Tap the Desktop tile to access the Desktop mode. 2 In the notification...
Users Manual
Page 17
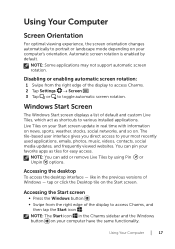
Disabling or enabling automatic screen rotation: 1 Swipe from the right edge of the display to access Charms. 2 Tap Settings → Screen . 3 Tap or to your Start screen update in real time with information on news, sports, weather, stocks, social networks, and so on your computer's orientation. NOTE: You can pin your favorite apps as shortcuts to various installed applications. Using Your Computer Screen Orientation For optimal...
Disabling or enabling automatic screen rotation: 1 Swipe from the right edge of the display to access Charms. 2 Tap Settings → Screen . 3 Tap or to your Start screen update in real time with information on news, sports, weather, stocks, social networks, and so on your computer's orientation. NOTE: You can pin your favorite apps as shortcuts to various installed applications. Using Your Computer Screen Orientation For optimal...

Users Manual
Page 20
... right or left on the selected object when the entire object is not visible. Move the focus on the active window. Scroll Horizontal - Scroll Vertical - Keeping a finger or thumb in place, move the other finger in an arched direction to the left to...the active content by moving both the fingers in an arched direction to start vertical scrolling. Finger gestures Rotate Scroll Allows you to pan the selected object. Move a finger up or scroll down to start horizontal scrolling. 20 │ Using Your Computer Move two fingers in the desired direction to : Rotate clockwise...
... right or left on the selected object when the entire object is not visible. Move the focus on the active window. Scroll Horizontal - Scroll Vertical - Keeping a finger or thumb in place, move the other finger in an arched direction to the left to...the active content by moving both the fingers in an arched direction to start vertical scrolling. Finger gestures Rotate Scroll Allows you to pan the selected object. Move a finger up or scroll down to start horizontal scrolling. 20 │ Using Your Computer Move two fingers in the desired direction to : Rotate clockwise...
Users Manual
Page 22
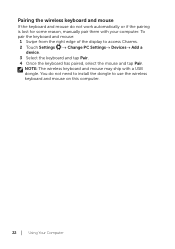
... the wireless keyboard and mouse If the keyboard and mouse do not need to install the dongle to access Charms. 2 Touch Settings → Change PC Settings→ Devices→ Add a device. 3 Select the keyboard and tap Pair. 4 Once the keyboard has paired, select the mouse and tap Pair. To pair the keyboard and mouse: 1 Swipe from the right edge of the display to use the wireless keyboard and mouse on this computer. 22 │ Using...
... the wireless keyboard and mouse If the keyboard and mouse do not need to install the dongle to access Charms. 2 Touch Settings → Change PC Settings→ Devices→ Add a device. 3 Select the keyboard and tap Pair. 4 Once the keyboard has paired, select the mouse and tap Pair. To pair the keyboard and mouse: 1 Swipe from the right edge of the display to use the wireless keyboard and mouse on this computer. 22 │ Using...

Users Manual
Page 24
... turn off Using Charms: Swipe from the right edge of the display to access Charms. Touch Settings → Power → Sleep to turn off ), press the Power and Sleep/Wake button or Windows button once to turn on , but screen is off the screen. Turning Off Your Computer Swipe from the right edge of the display to access Charms. Touch Settings → Power → Shut down to turn off the computer. 24 │ Using...
... turn off Using Charms: Swipe from the right edge of the display to access Charms. Touch Settings → Power → Sleep to turn off ), press the Power and Sleep/Wake button or Windows button once to turn on , but screen is off the screen. Turning Off Your Computer Swipe from the right edge of the display to access Charms. Touch Settings → Power → Shut down to turn off the computer. 24 │ Using...
Users Manual
Page 25
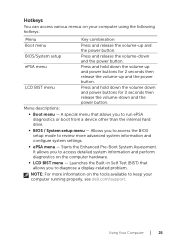
... menu that allows you to access the BIOS setup mode to review more information on the tools available to run ePSA diagnostics or boot from a device other than the internal hard drive. ∞∞ BIOS / System setup menu - It allows you to keep your computer using the following hotkeys: Menu Key combination Boot menu Press and release the volume-up and the power button. ePSA menu Press and hold down the volume down and power buttons...
... menu that allows you to access the BIOS setup mode to review more information on the tools available to run ePSA diagnostics or boot from a device other than the internal hard drive. ∞∞ BIOS / System setup menu - It allows you to keep your computer using the following hotkeys: Menu Key combination Boot menu Press and release the volume-up and the power button. ePSA menu Press and hold down the volume down and power buttons...

Users Manual
Page 26
... installed apps, theme, wallpaper, internet browser history, application settings, personal files, and so on, with other Windows 8/8.1 computers that use the same Microsoft account. 1 Swipe from the right edge of the display to access Charms, then click Settings → Change PC Settings→ Users→ Switch to a Microsoft account to switch to your Microsoft account. 2 Click Settings → Change PC Settings→ Sync your settings to configure synchronization options...
... installed apps, theme, wallpaper, internet browser history, application settings, personal files, and so on, with other Windows 8/8.1 computers that use the same Microsoft account. 1 Swipe from the right edge of the display to access Charms, then click Settings → Change PC Settings→ Users→ Switch to a Microsoft account to switch to your Microsoft account. 2 Click Settings → Change PC Settings→ Sync your settings to configure synchronization options...

Users Manual
Page 33
... edge of your personal files, installed applications, or personalization settings. Troubleshooting │ 33 Troubleshooting Windows Troubleshooting and Recovery Refreshing your computer Refreshing your computer restores Windows to access Charms. 2 Touch Settings → Change PC settings→ General→ Remove everything and reinstall Windows. 3 Touch Get started . 4 Read the instructions on the screen and touch Next. Resetting your computer Resetting your computer returns Windows to original factory settings and removes any settings, files, and applications you...
... edge of your personal files, installed applications, or personalization settings. Troubleshooting │ 33 Troubleshooting Windows Troubleshooting and Recovery Refreshing your computer Refreshing your computer restores Windows to access Charms. 2 Touch Settings → Change PC settings→ General→ Remove everything and reinstall Windows. 3 Touch Get started . 4 Read the instructions on the screen and touch Next. Resetting your computer Resetting your computer returns Windows to original factory settings and removes any settings, files, and applications you...
Users Manual
Page 35
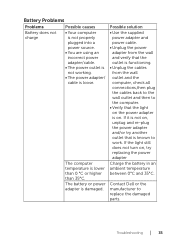
... plug the cables back to the wall outlet and then to work. If it is not on, unplug and re-plug the power adapter and/or try replacing the power adapter Charge the battery in an ambient temperature between 0°C and 35°C. Contact Dell or the manufacturer to replace the damaged parts. The computer temperature is damaged. If the light still does not turn...
... plug the cables back to the wall outlet and then to work. If it is not on, unplug and re-plug the power adapter and/or try replacing the power adapter Charge the battery in an ambient temperature between 0°C and 35°C. Contact Dell or the manufacturer to replace the damaged parts. The computer temperature is damaged. If the light still does not turn...
Users Manual
Page 36
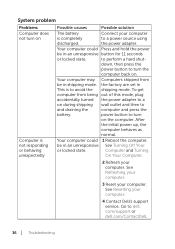
... │ Troubleshooting Go to perform a hard shut- the factory are set in an unresponsive See Turning Off Your or locked state. See Refreshing your computer. 3 Reset your computer. to dell. Your computer may Computers shipped from being out of this mode, plug accidentally turned the power adapter to and draining the computer and press the battery. See Resetting your computer is to a power source using discharged...
... │ Troubleshooting Go to perform a hard shut- the factory are set in an unresponsive See Turning Off Your or locked state. See Refreshing your computer. 3 Reset your computer. to dell. Your computer may Computers shipped from being out of this mode, plug accidentally turned the power adapter to and draining the computer and press the battery. See Resetting your computer is to a power source using discharged...
Users Manual
Page 38
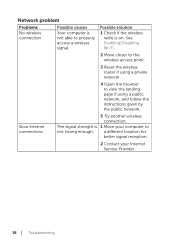
... location for better signal reception. 2 Contact your computer to view the landing page if using a private network. 4 Open the browser to not strong enough. See Enabling/Disabling Wi-Fi. 2 Move closer to the wireless access point. 3 Reset the wireless router if using a public network, and follow the instructions given by the public network. Network problem Problems No wireless connection Possible causes Your computer is 1 Move your Internet Service Provider. 38 │ Troubleshooting...
... location for better signal reception. 2 Contact your computer to view the landing page if using a private network. 4 Open the browser to not strong enough. See Enabling/Disabling Wi-Fi. 2 Move closer to the wireless access point. 3 Reset the wireless router if using a public network, and follow the instructions given by the public network. Network problem Problems No wireless connection Possible causes Your computer is 1 Move your Internet Service Provider. 38 │ Troubleshooting...
Users Manual
Page 40
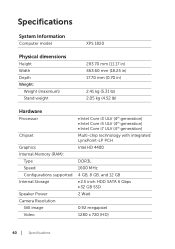
Specifications System Information Computer model XPS 1820 Physical dimensions Height Width Depth Weight: Weight (maximum) Stand weight 283.70 mm (11.17 in) 463.60 mm (18.25 in) 17.70 mm (0.70 in) 2.41 kg (5.31 lb) 2.05 kg (4.52 lb) Hardware Processor Chipset Graphics Internal Memory (RAM): Type Speed Configurations supported Internal Storage Speaker Power Camera Resolution Still image Video • Intel Core i3 ULV (4th generation) • Intel...
Specifications System Information Computer model XPS 1820 Physical dimensions Height Width Depth Weight: Weight (maximum) Stand weight 283.70 mm (11.17 in) 463.60 mm (18.25 in) 17.70 mm (0.70 in) 2.41 kg (5.31 lb) 2.05 kg (4.52 lb) Hardware Processor Chipset Graphics Internal Memory (RAM): Type Speed Configurations supported Internal Storage Speaker Power Camera Resolution Still image Video • Intel Core i3 ULV (4th generation) • Intel...


