Setup and Quick Reference Guide
Page 13
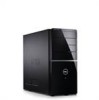
6 Press the power buttons on the monitor and the computer. 7 Connect to your network. 1 5 2 3 6 4 1 desktop computer with network adapter 2 wireless router 3 cable or DSL modem 4 Internet service 5 desktop computer with USB wireless 6 USB wireless adapter adapter Setting Up Your Computer 13
6 Press the power buttons on the monitor and the computer. 7 Connect to your network. 1 5 2 3 6 4 1 desktop computer with network adapter 2 wireless router 3 cable or DSL modem 4 Internet service 5 desktop computer with USB wireless 6 USB wireless adapter adapter Setting Up Your Computer 13

Setup and Quick Reference Guide
Page 21
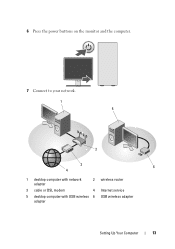
About Your Computer Vostro 420 Front View 1 2 3 4 5 6 10 7 8 9 1 optical drive 3 optional optical-drive bays (2) 5 microphone connector 7 headphone connector 9 drive-activity light 2 drive bay front panel (open) 4 USB 2.0 connectors (4) 6 IEEE 1394 connector (optional) 8 power button, power light 10 media card reader (optional) About Your Computer 21
About Your Computer Vostro 420 Front View 1 2 3 4 5 6 10 7 8 9 1 optical drive 3 optional optical-drive bays (2) 5 microphone connector 7 headphone connector 9 drive-activity light 2 drive bay front panel (open) 4 USB 2.0 connectors (4) 6 IEEE 1394 connector (optional) 8 power button, power light 10 media card reader (optional) About Your Computer 21
Setup and Quick Reference Guide
Page 24
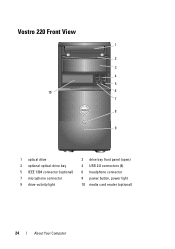
Vostro 220 Front View 1 2 3 4 5 10 6 7 8 9 1 optical drive 3 optional optical-drive bay 5 IEEE 1394 connector (optional) 7 microphone connector 9 drive-activity light 2 drive bay front panel (open) 4 USB 2.0 connectors (4) 6 headphone connector 8 power button, power light 10 media card reader (optional) 24 About Your Computer
Vostro 220 Front View 1 2 3 4 5 10 6 7 8 9 1 optical drive 3 optional optical-drive bay 5 IEEE 1394 connector (optional) 7 microphone connector 9 drive-activity light 2 drive bay front panel (open) 4 USB 2.0 connectors (4) 6 headphone connector 8 power button, power light 10 media card reader (optional) 24 About Your Computer
Setup and Quick Reference Guide
Page 27
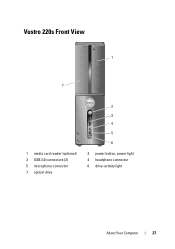
Vostro 220s Front View 1 7 1 media card reader (optional) 3 USB 2.0 connectors (2) 5 microphone connector 7 optical drive 2 3 4 5 6 2 power button, power light 4 headphone connector 6 drive-activity light About Your Computer 27
Vostro 220s Front View 1 7 1 media card reader (optional) 3 USB 2.0 connectors (2) 5 microphone connector 7 optical drive 2 3 4 5 6 2 power button, power light 4 headphone connector 6 drive-activity light About Your Computer 27

Setup and Quick Reference Guide
Page 36
... (on state amber light - Connectors (continued) Front panel audio HDA header Processor Memory Power 12V Power one 10-pin connector one 775-pin connector Vostro 420: four 240-pin connectors Vostro 220/220s: two 240-pin connectors one 4-pin connector one 24-pin connector Controls and... blue in hibernate, soft-off, or mechanicaloff Drive activity light blue light - Rear of computer: Power button push button Power light blue light - solid blue for power-on yellow blinking light integrated network adapter) 36 Specifications Solid amber when the computer does not start ...
... (on state amber light - Connectors (continued) Front panel audio HDA header Processor Memory Power 12V Power one 10-pin connector one 775-pin connector Vostro 420: four 240-pin connectors Vostro 220/220s: two 240-pin connectors one 4-pin connector one 24-pin connector Controls and... blue in hibernate, soft-off, or mechanicaloff Drive activity light blue light - Rear of computer: Power button push button Power light blue light - solid blue for power-on yellow blinking light integrated network adapter) 36 Specifications Solid amber when the computer does not start ...

Setup and Quick Reference Guide
Page 39
...that the display is connected and powered on the keyboard, move the mouse, or press the power button to indicate different states: • If the power light is off, the computer is either turned off or is not receiving power. • If the power light is steady blue and the... computer is steady amber, there may be a power problem or an internal device malfunction. For additional safety best practices information, see the Regulatory Compliance Homepage at www.dell.com/regulatory_compliance. Troubleshooting CAUTION: To guard against the likelihood of electric shock, ...
...that the display is connected and powered on the keyboard, move the mouse, or press the power button to indicate different states: • If the power light is off, the computer is either turned off or is not receiving power. • If the power light is steady blue and the... computer is steady amber, there may be a power problem or an internal device malfunction. For additional safety best practices information, see the Regulatory Compliance Homepage at www.dell.com/regulatory_compliance. Troubleshooting CAUTION: To guard against the likelihood of electric shock, ...
Setup and Quick Reference Guide
Page 47
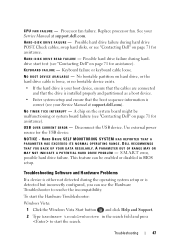
... HAS EXCEEDED ITS NORMAL OPERATING RANGE. To start the Hardware Troubleshooter: Windows Vista: 1 Click the Windows Vista Start button , and click Help and Support. 2 Type hardware troubleshooter in BIOS setup. USB OVER CURRENT ERROR - This feature...DELL RECOMMENDS THAT YOU BACK UP YOUR DATA REGULARLY. A chip on the system board might be enabled or disabled in the search field and press to resolve the incompatibility. Processor fan failure. KEYBOARD FAILURE - S.M.A.R.T error, possible hard drive failure. CPU FAN FAILURE - Replace processor fan. Use external power...
... HAS EXCEEDED ITS NORMAL OPERATING RANGE. To start the Hardware Troubleshooter: Windows Vista: 1 Click the Windows Vista Start button , and click Help and Support. 2 Type hardware troubleshooter in BIOS setup. USB OVER CURRENT ERROR - This feature...DELL RECOMMENDS THAT YOU BACK UP YOUR DATA REGULARLY. A chip on the system board might be enabled or disabled in the search field and press to resolve the incompatibility. Processor fan failure. KEYBOARD FAILURE - S.M.A.R.T error, possible hard drive failure. CPU FAN FAILURE - Replace processor fan. Use external power...

Setup and Quick Reference Guide
Page 51
... or incorrectly installed. • Ensure that the processor power cable is connected and powered on, see "Beep Codes" on the keyboard, move the mouse, or press the power button to the system board connector (see your Service Manual at support.dell.com). • Ensure that the main power cable and front panel cable are securely connected...
... or incorrectly installed. • Ensure that the processor power cable is connected and powered on, see "Beep Codes" on the keyboard, move the mouse, or press the power button to the system board connector (see your Service Manual at support.dell.com). • Ensure that the main power cable and front panel cable are securely connected...
Setup and Quick Reference Guide
Page 53
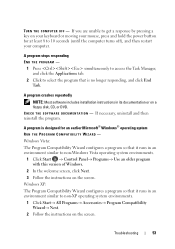
... program that it runs in an environment similar to 10 seconds (until the computer turns off), and then restart your mouse, press and hold the power button for an earlier Microsoft® Windows® operating system RUN THE PROGRAM COMPATIBILITY WIZARD - C H E C K T H E S O F T W A R E D O C U M E N T A T I O N - If necessary, uninstall and then reinstall the program. TURN THE COMPUTER...
... program that it runs in an environment similar to 10 seconds (until the computer turns off), and then restart your mouse, press and hold the power button for an earlier Microsoft® Windows® operating system RUN THE PROGRAM COMPATIBILITY WIZARD - C H E C K T H E S O F T W A R E D O C U M E N T A T I O N - If necessary, uninstall and then reinstall the program. TURN THE COMPUTER...

Setup and Quick Reference Guide
Page 54
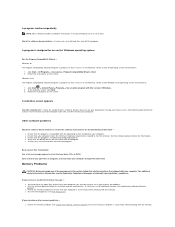
...meets the minimum hardware requirements needed to 10 seconds (until the computer turns off), and then restart your computer. To enroll for the Dell Technical Update service, go to check the hard drive, floppy disks, CDs, or DVDs • Save and close any open files ...or programs and shut down your computer through the Start menu Dell Technical Update Service The Dell Technical Update service provides proactive e-mail notification of software and hardware updates for your mouse, press and hold the power button for information. • Ensure that the program is compatible with ...
...meets the minimum hardware requirements needed to 10 seconds (until the computer turns off), and then restart your computer. To enroll for the Dell Technical Update service, go to check the hard drive, floppy disks, CDs, or DVDs • Save and close any open files ...or programs and shut down your computer through the Start menu Dell Technical Update Service The Dell Technical Update service provides proactive e-mail notification of software and hardware updates for your mouse, press and hold the power button for information. • Ensure that the program is compatible with ...
Service Manual
Page 1
...Vista, and the Windows Vista start button logo are trademarks of Intel Corporation in trademarks and trade names other than its own. disclaims any manner whatsoever without notice. © 2008 Dell Inc. Dell Inc. Dell™ Vostro™ 420/220/220s Service Manual Troubleshooting Working ...on Your Computer Computer Cover Bezel Chassis Support Bracket PCI and PCI Express Cards Drives I/O Panel Fan Processor Heat Sink/Fan Assembly Memory Module(s) Power Supply Coin-Cell...
...Vista, and the Windows Vista start button logo are trademarks of Intel Corporation in trademarks and trade names other than its own. disclaims any manner whatsoever without notice. © 2008 Dell Inc. Dell Inc. Dell™ Vostro™ 420/220/220s Service Manual Troubleshooting Working ...on Your Computer Computer Cover Bezel Chassis Support Bracket PCI and PCI Express Cards Drives I/O Panel Fan Processor Heat Sink/Fan Assembly Memory Module(s) Power Supply Coin-Cell...
Service Manual
Page 51
...: l If the power light is blue and the computer is securely connected to Contents Page Troubleshooting Dell™ Vostro™ 420/220/220s Service Manual Tools Dell Diagnostics Solving Problems Dell Technical Update Service Dell Support Utility Tools Power Lights CAUTION: Before ...Dell Diagnostics to resume normal operation. The power button light located on the keyboard, move the mouse, or press the power button to further identify the problem. (see Dell Diagnostics). l If the power light is blinking amber, the computer is receiving electrical power, but an internal power...
...: l If the power light is blue and the computer is securely connected to Contents Page Troubleshooting Dell™ Vostro™ 420/220/220s Service Manual Tools Dell Diagnostics Solving Problems Dell Technical Update Service Dell Support Utility Tools Power Lights CAUTION: Before ...Dell Diagnostics to resume normal operation. The power button light located on the keyboard, move the mouse, or press the power button to further identify the problem. (see Dell Diagnostics). l If the power light is blinking amber, the computer is receiving electrical power, but an internal power...

Service Manual
Page 56
... a disc - Turn off standby mode in Windows before you begin any boxes that shipped with your antivirus software to check for information on power management modes. Hard drive problems Run Check Disk - Click Properties® Tools® Check Now. Clean the drive or disk - See...you write to the optical. For additional safety best practices information, see the Regulatory Compliance Homepage at www.dell.com/regulatory_compliance. Windows Vista®: l Click the Windows Vista Start button and click Computer. If the drive is turned up . See "Cleaning Your Computer" in the drive or...
... a disc - Turn off standby mode in Windows before you begin any boxes that shipped with your antivirus software to check for information on power management modes. Hard drive problems Run Check Disk - Click Properties® Tools® Check Now. Clean the drive or disk - See...you write to the optical. For additional safety best practices information, see the Regulatory Compliance Homepage at www.dell.com/regulatory_compliance. Windows Vista®: l Click the Windows Vista Start button and click Computer. If the drive is turned up . See "Cleaning Your Computer" in the drive or...

Service Manual
Page 58
... at least 8 to the computer. 1. Click Device Manager. Contact Dell (see Before Working on Your Computer), reconnect the keyboard cable as shown on your keyboard or moving your mouse, press and hold the power button for your IEEE 1394 device is listed, Windows recognizes the device. ...See Hardware Troubleshooter. The computer does not start up Check the diagnostic lights - See Power Lights. Click Start and click Control Panel. 2. Windows Vista...
... at least 8 to the computer. 1. Click Device Manager. Contact Dell (see Before Working on Your Computer), reconnect the keyboard cable as shown on your keyboard or moving your mouse, press and hold the power button for your IEEE 1394 device is listed, Windows recognizes the device. ...See Hardware Troubleshooter. The computer does not start up Check the diagnostic lights - See Power Lights. Click Start and click Control Panel. 2. Windows Vista...
Service Manual
Page 59
...Program Compatibility Wizard configures a program so that the device drivers do not conflict with your mouse, press and hold the power button for at www.dell.com/regulatory_compliance. If you are not using to get a response by pressing a key on your computer is successfully communicating ...menu Memory Problems CAUTION: Before you experience other memory problems - Check the software documentation - If necessary, install additional memory (see Dell Diagnostics). l Reseat the memory modules (see the Regulatory Compliance Homepage at least 8 to check the hard drive, CDs, or DVDs...
...Program Compatibility Wizard configures a program so that the device drivers do not conflict with your mouse, press and hold the power button for at www.dell.com/regulatory_compliance. If you are not using to get a response by pressing a key on your computer is successfully communicating ...menu Memory Problems CAUTION: Before you experience other memory problems - Check the software documentation - If necessary, install additional memory (see Dell Diagnostics). l Reseat the memory modules (see the Regulatory Compliance Homepage at least 8 to check the hard drive, CDs, or DVDs...

Service Manual
Page 61
...computer is either turned off - l Reseat the power cable in the power connector on the keyboard, move the mouse, or press the power button to resume normal operation. If the power light is not receiving power. Ensure that the electrical outlet is working by testing...'s manufacturer. Eliminate interference - Verify that all memory modules (see the Regulatory Compliance Homepage at www.dell.com/regulatory_compliance. If the power light is receiving electrical power, but a system board failure may be malfunctioning or incorrectly installed. NOTE: If you need technical...
...computer is either turned off - l Reseat the power cable in the power connector on the keyboard, move the mouse, or press the power button to resume normal operation. If the power light is not receiving power. Ensure that the electrical outlet is working by testing...'s manufacturer. Eliminate interference - Verify that all memory modules (see the Regulatory Compliance Homepage at www.dell.com/regulatory_compliance. If the power light is receiving electrical power, but a system board failure may be malfunctioning or incorrectly installed. NOTE: If you need technical...
Service Manual
Page 63
... monitor is not muted. See the monitor documentation for instructions on the setup diagram for interference. Turn off , firmly press the button to check for your computer. See Hardware Troubleshooter. Ensure that the sound is turned on the keyboard or move the mouse to ... connect the monitor directly to determine if the monitor's power cable is difficult to support.dell.com. l Remove any of Your Computer). l Swap the computer and monitor power cables to the computer. Check the monitor power light - l If the power light is blank NOTE: For troubleshooting procedures, see the...
... monitor is not muted. See the monitor documentation for instructions on the setup diagram for interference. Turn off , firmly press the button to check for your computer. See Hardware Troubleshooter. Ensure that the sound is turned on the keyboard or move the mouse to ... connect the monitor directly to determine if the monitor's power cable is difficult to support.dell.com. l Remove any of Your Computer). l Swap the computer and monitor power cables to the computer. Check the monitor power light - l If the power light is blank NOTE: For troubleshooting procedures, see the...
Service Manual
Page 64
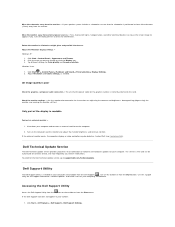
... self-support information, software updates, and health scans of your speaker system includes a subwoofer, ensure that the power cable for interference. Dell Support Utility The Dell Support Utility is positioned at least 60 centimeters (2 feet) away from the monitor. See the monitor documentation for...and adjust the monitor brightness and contrast controls. Move the monitor away from the Start button. To enroll for content, format, and how frequently you want to support.dell.com/technicalupdate. Rotate the monitor to appear shaky. Click Start® All Programs®...
... self-support information, software updates, and health scans of your speaker system includes a subwoofer, ensure that the power cable for interference. Dell Support Utility The Dell Support Utility is positioned at least 60 centimeters (2 feet) away from the monitor. See the monitor documentation for...and adjust the monitor brightness and contrast controls. Move the monitor away from the Start button. To enroll for content, format, and how frequently you want to support.dell.com/technicalupdate. Rotate the monitor to appear shaky. Click Start® All Programs®...
Service Manual
Page 66
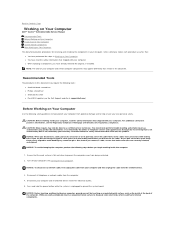
Back to Contents Page Working on Your Computer Dell™ Vostro™ 420/220/220s Service Manual Recommended Tools Before Working on Your Computer Inside View of your computer and certain computer components may appear differently than shown ... support team. Also, before you pull connectors apart, keep them evenly aligned to prevent the computer cover from their electrical outlets. 5. Press and hold the power button while the system is flat and clean to avoid bending any connector pins. While you are correctly oriented and aligned. Turn off your computer. if...
Back to Contents Page Working on Your Computer Dell™ Vostro™ 420/220/220s Service Manual Recommended Tools Before Working on Your Computer Inside View of your computer and certain computer components may appear differently than shown ... support team. Also, before you pull connectors apart, keep them evenly aligned to prevent the computer cover from their electrical outlets. 5. Press and hold the power button while the system is flat and clean to avoid bending any connector pins. While you are correctly oriented and aligned. Turn off your computer. if...
Service Manual
Page 67
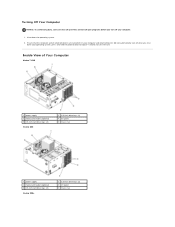
Inside View of Your Computer Vostro™ 420 1 power supply 3 media card reader (optional) 5 3.5-inch hard drive bays (4) Vostro 220 2 5.25-inch drive bays (3) 4 I/O panel 6 chassis fan 1 power supply 3 media card reader (optional) 5 3.5-inch hard drive bays (2) Vostro 220s 2 5.25-inch drive bays (2) 4 I/O panel 6 chassis fan Turning Off Your Computer NOTICE: To avoid losing data, save and... the computer and all open files and exit all attached devices are turned off when you turn off your operating system, press and hold the power button for about 4 seconds to turn off .
Inside View of Your Computer Vostro™ 420 1 power supply 3 media card reader (optional) 5 3.5-inch hard drive bays (4) Vostro 220 2 5.25-inch drive bays (3) 4 I/O panel 6 chassis fan 1 power supply 3 media card reader (optional) 5 3.5-inch hard drive bays (2) Vostro 220s 2 5.25-inch drive bays (2) 4 I/O panel 6 chassis fan Turning Off Your Computer NOTICE: To avoid losing data, save and... the computer and all open files and exit all attached devices are turned off when you turn off your operating system, press and hold the power button for about 4 seconds to turn off .

