Service Manual
Page 65
... that shipped with your computer. Drives 65 Hard Drives CAUTION: Before working inside your computer, read the safety information that contains data you want to keep, back up your computer from the back of the drive. 5 For the Vostro 420 and Vostro 220: a Remove the screws securing the hard drive to the drive, do not set the drive on a hard surface. Removing a Hard Drive 1 Follow the procedures in...
... that shipped with your computer. Drives 65 Hard Drives CAUTION: Before working inside your computer, read the safety information that contains data you want to keep, back up your computer from the back of the drive. 5 For the Vostro 420 and Vostro 220: a Remove the screws securing the hard drive to the drive, do not set the drive on a hard surface. Removing a Hard Drive 1 Follow the procedures in...
Service Manual
Page 67
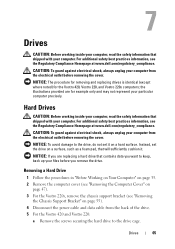
Drives 67 b Slide the drive partway out of the bay, rotate the back of the drive upward until the drive is perpendicular to the drive cage, and guide the screws through the cutaway channels in the drive cage until you can lift the drive away from the computer. c Repeat step a and step b for the second hard drive, if installed. Vostro 220 4 3 1 2 1 screws (4) 3 power cable 2 hard drive 4 data cable 6 For the Vostro 220s: a Raise and hold the hard-drive release latch.
Drives 67 b Slide the drive partway out of the bay, rotate the back of the drive upward until the drive is perpendicular to the drive cage, and guide the screws through the cutaway channels in the drive cage until you can lift the drive away from the computer. c Repeat step a and step b for the second hard drive, if installed. Vostro 220 4 3 1 2 1 screws (4) 3 power cable 2 hard drive 4 data cable 6 For the Vostro 220s: a Raise and hold the hard-drive release latch.
Service Manual
Page 68
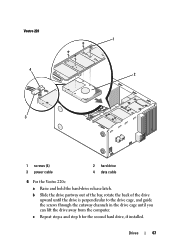
Vostro 220s 3 2 1 4 56 1 cutaway channels (2) 3 hard drive 5 power cable 2 hard-drive release latch 4 screw guides (4) 6 data cable 7 If you are installing a replacement drive, skip to step 8. 68 Drives If you are removing this drive permanently and the drive bay is to remain empty, proceed to step 3 in "Replacing or Adding a Hard Drive" on page 69.
Vostro 220s 3 2 1 4 56 1 cutaway channels (2) 3 hard drive 5 power cable 2 hard-drive release latch 4 screw guides (4) 6 data cable 7 If you are installing a replacement drive, skip to step 8. 68 Drives If you are removing this drive permanently and the drive bay is to remain empty, proceed to step 3 in "Replacing or Adding a Hard Drive" on page 69.
Service Manual
Page 69
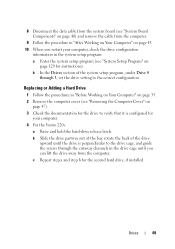
.... b In the Drives section of the drive upward until you can lift the drive away from the computer. 9 Follow the procedure in "After Working on Your Computer" on page 45. 10 When you restart your computer. 4 For the Vostro 220s: a Raise and hold the hard-drive release latch. c Repeat step a and step b for instructions). Drives 69 Replacing or Adding a Hard Drive 1 Follow the...
.... b In the Drives section of the drive upward until you can lift the drive away from the computer. 9 Follow the procedure in "After Working on Your Computer" on page 45. 10 When you restart your computer. 4 For the Vostro 220s: a Raise and hold the hard-drive release latch. c Repeat step a and step b for instructions). Drives 69 Replacing or Adding a Hard Drive 1 Follow the...
Service Manual
Page 70
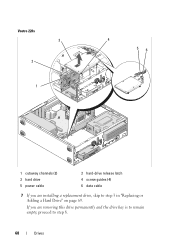
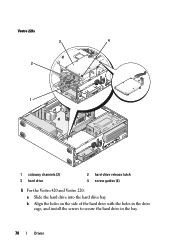
Vostro 220s 3 4 2 1 1 cutaway channels (2) 3 hard drive 2 hard-drive release latch 4 screw guides (4) 5 For the Vostro 420 and Vostro 220: a Slide the hard drive into the hard drive bay. b Align the holes on the side of the hard drive with the holes in the drive cage, and install the screws to secure the hard drive in the bay. 70 Drives
Vostro 220s 3 4 2 1 1 cutaway channels (2) 3 hard drive 2 hard-drive release latch 4 screw guides (4) 5 For the Vostro 420 and Vostro 220: a Slide the hard drive into the hard drive bay. b Align the holes on the side of the hard drive with the holes in the drive cage, and install the screws to secure the hard drive in the bay. 70 Drives
Service Manual
Page 72
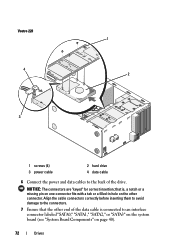
... cable is , a notch or a missing pin on one connector fits with a tab or a filled-in hole on page 40). 72 Drives NOTICE: The connectors are "keyed" for correct insertion; Vostro 220 4 3 1 2 1 screws (4) 3 power cable 2 hard drive 4 data cable 6 Connect the power and data cables to an interface connector labeled "SATA0," "SATA1," "SATA2," or "SATA3" on the...
... cable is , a notch or a missing pin on one connector fits with a tab or a filled-in hole on page 40). 72 Drives NOTICE: The connectors are "keyed" for correct insertion; Vostro 220 4 3 1 2 1 screws (4) 3 power cable 2 hard drive 4 data cable 6 Connect the power and data cables to an interface connector labeled "SATA0," "SATA1," "SATA2," or "SATA3" on the...
Service Manual
Page 89
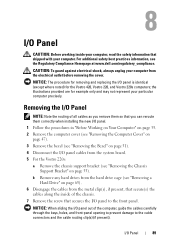
... I /O Panel 89 the illustrations provided are for the Vostro 420, Vostro 220, and Vostro 220s computers; I/O Panel CAUTION: Before working inside of the chassis. 7 Remove the screw that shipped with your particular computer precisely. NOTICE: When sliding the I/O panel out of... practices information, see "Removing a Hard Drive" on page 55). CAUTION: To guard against electrical shock, always unplug your computer from the hard drive cage (see the Regulatory Compliance Homepage at www.dell.com/regulatory_compliance. b Remove any hard drives from the electrical outlet before removing ...
... I /O Panel 89 the illustrations provided are for the Vostro 420, Vostro 220, and Vostro 220s computers; I/O Panel CAUTION: Before working inside of the chassis. 7 Remove the screw that shipped with your particular computer precisely. NOTICE: When sliding the I/O panel out of... practices information, see "Removing a Hard Drive" on page 55). CAUTION: To guard against electrical shock, always unplug your computer from the hard drive cage (see the Regulatory Compliance Homepage at www.dell.com/regulatory_compliance. b Remove any hard drives from the electrical outlet before removing ...


