
Owner's Manual
Page 218
... of the following information is no guarantee that interference will not occur in compliance with the FCC regulations: Product name: Model number: Company name: Dell™ Vostro™ 1400 PP26L Dell Inc. These limits are designed to the following two conditions: • This device may not cause harmful interference. • This device must accept...
... of the following information is no guarantee that interference will not occur in compliance with the FCC regulations: Product name: Model number: Company name: Dell™ Vostro™ 1400 PP26L Dell Inc. These limits are designed to the following two conditions: • This device may not cause harmful interference. • This device must accept...
Service Manual
Page 1
... in trademarks and trade names other countries; A01 NOTICE: A NOTICE indicates either potential damage to either trademarks or registered trademarks of Dell Inc.; CAUTION: A CAUTION indicates a potential for I/O Connectors Notes, Notices, and Cautions NOTE: A NOTE indicates important information that...marks and names or their products. NOTE: The appearance of Dell Inc. is used in this document is a registered trademark owned by Dell under license. Dell™ Inspiron™ 1420/Dell Vostro™ 1400 Service Manual Before You Begin Internal Card With Bluetooth® Wireless...
... in trademarks and trade names other countries; A01 NOTICE: A NOTICE indicates either potential damage to either trademarks or registered trademarks of Dell Inc.; CAUTION: A CAUTION indicates a potential for I/O Connectors Notes, Notices, and Cautions NOTE: A NOTE indicates important information that...marks and names or their products. NOTE: The appearance of Dell Inc. is used in this document is a registered trademark owned by Dell under license. Dell™ Inspiron™ 1420/Dell Vostro™ 1400 Service Manual Before You Begin Internal Card With Bluetooth® Wireless...

Service Manual
Page 2
...computer from potential damage and to help to ensure your computer. 1. Back to Contents Page Before You Begin Dell™ Inspiron™ 1420/Dell Vostro™ 1400 Service Manual Recommended Tools Turning Off Your Computer Before Working Inside Your Computer This section provides procedures for about 4...: l You have connectors with locking tabs; if you begin any connector pins. Read and follow the safety instructions in the Dell™ Product Information Guide. Unless otherwise noted, each procedure assumes that the computer and all open programs before you are correctly ...
...computer from potential damage and to help to ensure your computer. 1. Back to Contents Page Before You Begin Dell™ Inspiron™ 1420/Dell Vostro™ 1400 Service Manual Recommended Tools Turning Off Your Computer Before Working Inside Your Computer This section provides procedures for about 4...: l You have connectors with locking tabs; if you begin any connector pins. Read and follow the safety instructions in the Dell™ Product Information Guide. Unless otherwise noted, each procedure assumes that the computer and all open programs before you are correctly ...

Service Manual
Page 4
When the reboot message appears, click OK and wait for the computer to Contents Page Back to restart. After the download completes, double-click the BIOS utility file. 3. Back to your desktop. 2. Download the BIOS utility from the Dell Support website at support.dell.com and save it to Contents Page Flashing the BIOS Dell™ Inspiron™ 1420/Dell Vostro™ 1400 Service Manual 1. In the Dell BIOS Flash window, click Continue. 4.
When the reboot message appears, click OK and wait for the computer to Contents Page Back to restart. After the download completes, double-click the BIOS utility file. 3. Back to your desktop. 2. Download the BIOS utility from the Dell Support website at support.dell.com and save it to Contents Page Flashing the BIOS Dell™ Inspiron™ 1420/Dell Vostro™ 1400 Service Manual 1. In the Dell BIOS Flash window, click Continue. 4.

Service Manual
Page 5
Back to Contents Page Internal Card With Bluetooth® Wireless Technology Dell™ Inspiron™ 1420/Dell Vostro™ 1400 Service Manual Removing and Replacing Internal Card With Bluetooth® Wireless Technology CAUTION: Before you begin working inside the computer. NOTICE: To help prevent damage ...
Back to Contents Page Internal Card With Bluetooth® Wireless Technology Dell™ Inspiron™ 1420/Dell Vostro™ 1400 Service Manual Removing and Replacing Internal Card With Bluetooth® Wireless Technology CAUTION: Before you begin working inside the computer. NOTICE: To help prevent damage ...

Service Manual
Page 6
... two M2 x 3-mm screws securing camera module to the display assembly. 5. Gently lift the camera module. 6. Back to Contents Page Camera Module Dell™ Inspiron™ 1420/Dell Vostro™ 1400 Service Manual Removing and Replacing the Camera Module Removing and Replacing the Camera Module CAUTION: Before you perform any of the procedures in...
... two M2 x 3-mm screws securing camera module to the display assembly. 5. Gently lift the camera module. 6. Back to Contents Page Camera Module Dell™ Inspiron™ 1420/Dell Vostro™ 1400 Service Manual Removing and Replacing the Camera Module Removing and Replacing the Camera Module CAUTION: Before you perform any of the procedures in...
Service Manual
Page 7
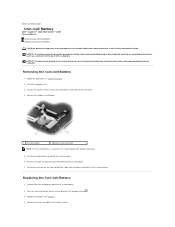
... system board. 2. Place the coin-cell battery on the system board in Before You Begin. 2. Back to Contents Page Coin-Cell Battery Dell™ Inspiron™ 1420/Dell Vostro™ 1400 Service Manual Removing the Coin-Cell Battery Replacing the Coin-Cell Battery CAUTION: Before you must remove the battery from the power connector...
... system board. 2. Place the coin-cell battery on the system board in Before You Begin. 2. Back to Contents Page Coin-Cell Battery Dell™ Inspiron™ 1420/Dell Vostro™ 1400 Service Manual Removing the Coin-Cell Battery Replacing the Coin-Cell Battery CAUTION: Before you must remove the battery from the power connector...
Service Manual
Page 9
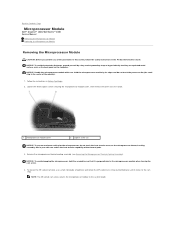
NOTE: The ZIF-socket cam screw secures the microprocessor module to Contents Page Microprocessor Module Dell™ Inspiron™ 1420/Dell Vostro™ 1400 Service Manual Removing the Microprocessor Module Replacing the Microprocessor Module Removing the Microprocessor Module CAUTION: Before you perform any of the procedures in this section, ...
NOTE: The ZIF-socket cam screw secures the microprocessor module to Contents Page Microprocessor Module Dell™ Inspiron™ 1420/Dell Vostro™ 1400 Service Manual Removing the Microprocessor Module Replacing the Microprocessor Module Removing the Microprocessor Module CAUTION: Before you perform any of the procedures in this section, ...

Service Manual
Page 12
cooling assembly to Contents Page Microprocessor Thermal-Cooling Assembly Dell™ Inspiron™ 1420/Dell Vostro™ 1400 Service Manual Removing the Microprocessor Thermal-Cooling Assembly Replacing the Microprocessor Thermal-Cooling Assembly Removing the Microprocessor Thermal-Cooling Assembly CAUTION: Before you perform any ...
cooling assembly to Contents Page Microprocessor Thermal-Cooling Assembly Dell™ Inspiron™ 1420/Dell Vostro™ 1400 Service Manual Removing the Microprocessor Thermal-Cooling Assembly Replacing the Microprocessor Thermal-Cooling Assembly Removing the Microprocessor Thermal-Cooling Assembly CAUTION: Before you perform any ...

Service Manual
Page 14
... the computer. 3. Remove the keyboard cover (see Removing the Keyboard). 5. Remove the screw from the cards. 10. Back to Contents Page Display Dell™ Inspiron™ 1420/Dell Vostro™ 1400 Service Manual Removing the Display Assembly Replacing the Display Assembly Removing the Display Bezel Replacing the Display Bezel Removing the Display Panel Replacing...
... the computer. 3. Remove the keyboard cover (see Removing the Keyboard). 5. Remove the screw from the cards. 10. Back to Contents Page Display Dell™ Inspiron™ 1420/Dell Vostro™ 1400 Service Manual Removing the Display Assembly Replacing the Display Assembly Removing the Display Bezel Replacing the Display Bezel Removing the Display Panel Replacing...

Service Manual
Page 20
... connector. 6. Follow the instructions in the Product Information Guide. Follow the instructions in the Product Information Guide. Back to Contents Page Fan Dell™ Inspiron™ 1420/Dell Vostro™ 1400 Service Manual Removing the Fan Replacing the Fan Removing the Fan CAUTION: Before you perform any of the procedures in this section, follow...
... connector. 6. Follow the instructions in the Product Information Guide. Follow the instructions in the Product Information Guide. Back to Contents Page Fan Dell™ Inspiron™ 1420/Dell Vostro™ 1400 Service Manual Removing the Fan Replacing the Fan Removing the Fan CAUTION: Before you perform any of the procedures in this section, follow...
Service Manual
Page 22
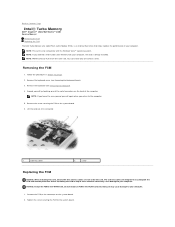
... FCM in the WLAN card slot. Tighten the screw securing the FCM to your computer. Back to Contents Page Intel® Turbo Memory Dell™ Inspiron™ 1420/Dell Vostro™ 1400 Service Manual Removing the FCM Replacing the FCM The Intel Turbo Memory also called Flash Cache Module (FCM), is already installed. NOTE...
... FCM in the WLAN card slot. Tighten the screw securing the FCM to your computer. Back to Contents Page Intel® Turbo Memory Dell™ Inspiron™ 1420/Dell Vostro™ 1400 Service Manual Removing the FCM Replacing the FCM The Intel Turbo Memory also called Flash Cache Module (FCM), is already installed. NOTE...

Service Manual
Page 24
...the pull-tab. Removing the Hard Drive 1. Slide and click the battery release latches to Contents Page Hard Drive Dell™ Inspiron™ 1420/Dell Vostro™ 1400 Service Manual Removing the Hard Drive Replacing the Hard Drive CAUTION: If you remove the hard drive from sources other... than Dell. Slide the battery out of the hard drive. Follow the procedures in hibernate mode. b. CAUTION: Before working inside your...
...the pull-tab. Removing the Hard Drive 1. Slide and click the battery release latches to Contents Page Hard Drive Dell™ Inspiron™ 1420/Dell Vostro™ 1400 Service Manual Removing the Hard Drive Replacing the Hard Drive CAUTION: If you remove the hard drive from sources other... than Dell. Slide the battery out of the hard drive. Follow the procedures in hibernate mode. b. CAUTION: Before working inside your...

Service Manual
Page 26
Back to Contents Page Keyboard Cover Dell™ Inspiron™ 1420/Dell Vostro™ 1400 Service Manual Removing the Keyboard Cover Replacing the Keyboard Cover CAUTION: Before you begin working inside the computer. Insert a plastic scribe into place. Ease the ...
Back to Contents Page Keyboard Cover Dell™ Inspiron™ 1420/Dell Vostro™ 1400 Service Manual Removing the Keyboard Cover Replacing the Keyboard Cover CAUTION: Before you begin working inside the computer. Insert a plastic scribe into place. Ease the ...

Service Manual
Page 27
... covers (2) 2 keyboard 4 keyboard cable 6 palmrest Replacing the Keyboard 1. Remove the keyboard cover (see Removing the Keyboard Cover). 3. Back to Contents Page Keyboard Dell™ Inspiron™ 1420/Dell Vostro™ 1400 Service Manual Removing the Keyboard Replacing the Keyboard CAUTION: Before you begin working inside the computer. NOTICE: To avoid electrostatic discharge, ground yourself...
... covers (2) 2 keyboard 4 keyboard cable 6 palmrest Replacing the Keyboard 1. Remove the keyboard cover (see Removing the Keyboard Cover). 3. Back to Contents Page Keyboard Dell™ Inspiron™ 1420/Dell Vostro™ 1400 Service Manual Removing the Keyboard Replacing the Keyboard CAUTION: Before you begin working inside the computer. NOTICE: To avoid electrostatic discharge, ground yourself...

Service Manual
Page 29
Back to Contents Page Memory Dell™ Inspiron™ 1420/Dell Vostro™ 1400 Service Manual Removing the Memory Module Replacing the Memory Module You can increase your computer memory by periodically touching an unpainted metal surface (such as a ... modules at a 30-degree angle to spread the memory module securing clips. 5. Your computer has two user-accessible SODIMM sockets, DIMM A and DIMM B accessed from Dell are intended for your fingertips to install memory modules in two connectors, install a memory module in the connector labeled "DIMMA" before you begin any of...
Back to Contents Page Memory Dell™ Inspiron™ 1420/Dell Vostro™ 1400 Service Manual Removing the Memory Module Replacing the Memory Module You can increase your computer memory by periodically touching an unpainted metal surface (such as a ... modules at a 30-degree angle to spread the memory module securing clips. 5. Your computer has two user-accessible SODIMM sockets, DIMM A and DIMM B accessed from Dell are intended for your fingertips to install memory modules in two connectors, install a memory module in the connector labeled "DIMMA" before you begin any of...

Service Manual
Page 31
... system board. 5. Follow the procedures in the Product Information Guide. Loosen the screw that secures the WLAN card to Contents Page Communication Cards Dell™ Inspiron™ 1420/Dell Vostro™ 1400 Service Manual Removing a WLAN Card Replacing a WLAN Card Removing a Mobile Broadband or WWAN Card Replacing a WWAN Card If you ordered a wireless Mini...
... system board. 5. Follow the procedures in the Product Information Guide. Loosen the screw that secures the WLAN card to Contents Page Communication Cards Dell™ Inspiron™ 1420/Dell Vostro™ 1400 Service Manual Removing a WLAN Card Replacing a WLAN Card Removing a Mobile Broadband or WWAN Card Replacing a WWAN Card If you ordered a wireless Mini...

Service Manual
Page 34
.... 5. Connect the modem cable. 7. NOTICE: The connectors are keyed to Contents Page Back to ensure correct insertion. Back to Contents Page Modem Dell™ Inspiron™ 1420/Dell Vostro™ 1400 Service Manual Removing and Replacing the Modem Removing and Replacing the Modem CAUTION: Before you feel resistance, check the connectors and realign the...
.... 5. Connect the modem cable. 7. NOTICE: The connectors are keyed to Contents Page Back to ensure correct insertion. Back to Contents Page Modem Dell™ Inspiron™ 1420/Dell Vostro™ 1400 Service Manual Removing and Replacing the Modem Removing and Replacing the Modem CAUTION: Before you feel resistance, check the connectors and realign the...

Service Manual
Page 35
... into the bay. 2. Remove the locking screw from the bay. 5. Replace and tighten the locking screw. Back to Contents Page Optical Drive Dell™ Inspiron™ 1420/Dell Vostro™ 1400 Service Manual Removing the Optical Drive Replacing the Optical Drive CAUTION: Before you begin any of the bay. 1 optical drive 2 locking screw Replacing...
... into the bay. 2. Remove the locking screw from the bay. 5. Replace and tighten the locking screw. Back to Contents Page Optical Drive Dell™ Inspiron™ 1420/Dell Vostro™ 1400 Service Manual Removing the Optical Drive Replacing the Optical Drive CAUTION: Before you begin any of the bay. 1 optical drive 2 locking screw Replacing...

Service Manual
Page 36
... the instructions in the Product Information Guide. Remove the display assembly (see Removing the Optical Drive). 3. Back to Contents Page Palm Rest Dell™ Inspiron™ 1420/Dell Vostro™ 1400 Service Manual Removing the Palm Rest Replacing the Palm Rest Removing the Palm Rest CAUTION: Before you perform any of the procedures in...
... the instructions in the Product Information Guide. Remove the display assembly (see Removing the Optical Drive). 3. Back to Contents Page Palm Rest Dell™ Inspiron™ 1420/Dell Vostro™ 1400 Service Manual Removing the Palm Rest Replacing the Palm Rest Removing the Palm Rest CAUTION: Before you perform any of the procedures in...


