User Guide
Page 3
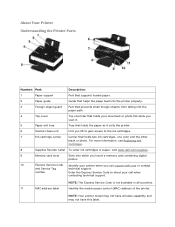
...printer. 6 Scanner base unit Unit you use support.dell.com or contact and Service Tag technical support. NOTE: Your printer model may not have wireless capability and may not have this label. About Your Printer Understanding the Printer... Parts Number: Part: Description: 1 Paper support Part that supports loaded paper. 2 Paper guide Guide that helps the paper feed into the printer properly. 3 Foreign object guard Part that holds two ink cartridges, one color...
...printer. 6 Scanner base unit Unit you use support.dell.com or contact and Service Tag technical support. NOTE: Your printer model may not have wireless capability and may not have this label. About Your Printer Understanding the Printer... Parts Number: Part: Description: 1 Paper support Part that supports loaded paper. 2 Paper guide Guide that helps the paper feed into the printer properly. 3 Foreign object guard Part that holds two ink cartridges, one color...
User Guide
Page 4
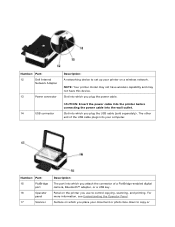
...plugs into which you plug the USB cable (sold separately). NOTE: Your printer model may not have wireless capability and may not have this device. Number: Part: 15 PictBridge port 16 Operator panel 17 Scanner Description: The port into your computer. The other end of a PictBridge-... or a USB key. Number: Part: 12 Dell Internal Network Adapter 13 Power connector 14 USB connector Description: A networking device to set up your printer on which you use to copy or CAUTION: Insert the power cable into the printer before connecting the power cable into the wall outlet...
...plugs into which you plug the USB cable (sold separately). NOTE: Your printer model may not have wireless capability and may not have this device. Number: Part: 15 PictBridge port 16 Operator panel 17 Scanner Description: The port into your computer. The other end of a PictBridge-... or a USB key. Number: Part: 12 Dell Internal Network Adapter 13 Power connector 14 USB connector Description: A networking device to set up your printer on which you use to copy or CAUTION: Insert the power cable into the printer before connecting the power cable into the wall outlet...
User Guide
Page 9
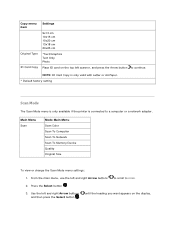
...valid with Letter or A4 Paper. * Default factory setting Scan Mode The Scan Mode menu is only available if the printer is connected to continue. From the main menu, use the left scanner, and press the Arrow button to a computer or a network adapter. Use the left and right Arrow buttons and then... press the Select button . Main Menu Scan Mode Main Menu Scan Color Scan To Computer Scan To Network Scan To Memory Device...
...valid with Letter or A4 Paper. * Default factory setting Scan Mode The Scan Mode menu is only available if the printer is connected to continue. From the main menu, use the left scanner, and press the Arrow button to a computer or a network adapter. Use the left and right Arrow buttons and then... press the Select button . Main Menu Scan Mode Main Menu Scan Color Scan To Computer Scan To Network Scan To Memory Device...

User Guide
Page 10
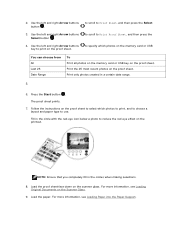
When the setting you want appears on scanner, and press the right Arrow button . *Automatic 75 dpi 150 dpi 300 dpi 600 dpi 1200 dpi *Automatic 8.5 x 11 in. 2.25 x 3.25 3 x 5 in. 3.5 x 5 in. 4 x 6 in. 4 x 8 ... 20x25 cm Use the left and right Arrow buttons to save the setting. Scan menu item Scan Color Scan To Computer Scan To Network Scan To Memory Device Quality Original Size *Default factory setting Settings *Color Black App List PC Name Place document on the display, press the Select button to scroll...
When the setting you want appears on scanner, and press the right Arrow button . *Automatic 75 dpi 150 dpi 300 dpi 600 dpi 1200 dpi *Automatic 8.5 x 11 in. 2.25 x 3.25 3 x 5 in. 3.5 x 5 in. 4 x 6 in. 4 x 8 ... 20x25 cm Use the left and right Arrow buttons to save the setting. Scan menu item Scan Color Scan To Computer Scan To Network Scan To Memory Device Quality Original Size *Default factory setting Settings *Color Black App List PC Name Place document on the display, press the Select button to scroll...
User Guide
Page 24
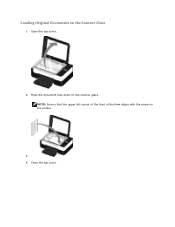
Open the top cover. 2. Close the top cover. Loading Original Documents on the scanner glass. Place the document face down on the Scanner Glass 1. NOTE: Ensure that the upper left corner of the front of the item aligns with the arrow on the printer. 3. 4.
Open the top cover. 2. Close the top cover. Loading Original Documents on the scanner glass. Place the document face down on the Scanner Glass 1. NOTE: Ensure that the upper left corner of the front of the item aligns with the arrow on the printer. 3. 4.
User Guide
Page 47
... and then press the Select to scroll to Print Proof Sheet, and then press the to use. Print the 25 most recent photos on the scanner glass. Follow the instructions on the proof sheet to select which photos to print, and to choose a layout and paper type to specify which photos.... For more information, see Loading Paper into the Paper Support. Fill in the circle with the red-eye icon below a photo to print on the Scanner Glass. 9. Load the proof sheet face down on the proof sheet. NOTE: Ensure that you completely fill in a certain date range. 5. 6. The proof sheet ...
... and then press the Select to scroll to Print Proof Sheet, and then press the to use. Print the 25 most recent photos on the scanner glass. Follow the instructions on the proof sheet to select which photos to print, and to choose a layout and paper type to specify which photos.... For more information, see Loading Paper into the Paper Support. Fill in the circle with the red-eye icon below a photo to print on the Scanner Glass. 9. Load the proof sheet face down on the proof sheet. NOTE: Ensure that you completely fill in a certain date range. 5. 6. The proof sheet ...
User Guide
Page 49
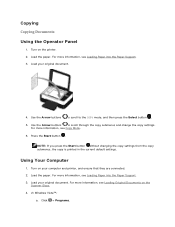
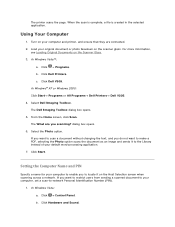
... to the COPY mode, and then press the Select button . 5. Using Your Computer 1. For more information, see Loading Original Documents on the Scanner Glass. 4. Turn on your original document. For more information, see Copy Mode. 6. Press the Start button . Use the Arrow buttons to ...scroll to scroll through the copy submenus and change the copy settings. Load your computer and printer, and ensure that they are connected. 2. For more information, see Loading Paper into the Paper Support. 3. Load the paper. In Windows ...
... to the COPY mode, and then press the Select button . 5. Using Your Computer 1. For more information, see Loading Original Documents on the Scanner Glass. 4. Turn on your original document. For more information, see Copy Mode. 6. Press the Start button . Use the Arrow buttons to ...scroll to scroll through the copy submenus and change the copy settings. Load your computer and printer, and ensure that they are connected. 2. For more information, see Loading Paper into the Paper Support. 3. Load the paper. In Windows ...
User Guide
Page 51
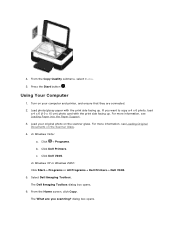
For more information, see Loading Original Documents on the Scanner Glass. 4. 4. Turn on the scanner glass. Load your original photo on your computer and printer, and ensure that they are you want to copy a 4 x 6 photo, load a 4 x 6 (10 x 15 cm) photo card with the print side...Programs. b. dialog box opens. If you scanning? In Windows XP or Windows 2000: Click Start Programs or All Programs Dell Printers Dell V305. 5. From the Home screen, click Copy. c. The What are connected. 2. For more information, see Loading Paper into the Paper Support...
For more information, see Loading Original Documents on the Scanner Glass. 4. 4. Turn on the scanner glass. Load your original photo on your computer and printer, and ensure that they are you want to copy a 4 x 6 photo, load a 4 x 6 (10 x 15 cm) photo card with the print side...Programs. b. dialog box opens. If you scanning? In Windows XP or Windows 2000: Click Start Programs or All Programs Dell Printers Dell V305. 5. From the Home screen, click Copy. c. The What are connected. 2. For more information, see Loading Paper into the Paper Support...

User Guide
Page 53
...is connected using a USB cable: a. For more information, see Setting the Computer Name and PIN. Press the Select button . 6. The printer downloads the application list from the computer. Use the left and right Arrow buttons which you want to enter the four-digit PIN. You can... Scanning Single-Page Documents and Single Photos Using the Operator Panel 1. Load your scan. Use the left and right Arrow buttons . Turn on the Scanner Glass. 3. If the computer has a PIN associated with it is connected to Scan To Computer, and then press the 5. to scroll to ...
...is connected using a USB cable: a. For more information, see Setting the Computer Name and PIN. Press the Select button . 6. The printer downloads the application list from the computer. Use the left and right Arrow buttons which you want to enter the four-digit PIN. You can... Scanning Single-Page Documents and Single Photos Using the Operator Panel 1. Load your scan. Use the left and right Arrow buttons . Turn on the Scanner Glass. 3. If the computer has a PIN associated with it is connected to Scan To Computer, and then press the 5. to scroll to ...
User Guide
Page 54
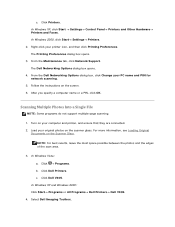
... of your computer to enable you scanning? Click Control Panel. For more information, see Loading Original Documents on the scanner glass. c. The Dell Imaging Toolbox dialog box opens. 5. Using Your Computer 1. Load your computer and printer, and ensure that they are you to locate it to -network Personal Identification Number (PIN). 1. Click...
... of your computer to enable you scanning? Click Control Panel. For more information, see Loading Original Documents on the scanner glass. c. The Dell Imaging Toolbox dialog box opens. 5. Using Your Computer 1. Load your computer and printer, and ensure that they are you to locate it to -network Personal Identification Number (PIN). 1. Click...
User Guide
Page 55
..., and then click Printing Preferences. Load your computer and printer, and ensure that they are connected. 2. In Windows Vista: a. Select Dell Imaging Toolbox. Click Printers. The Dell Networking Options dialog box opens. 4. The Printing Preferences dialog box opens. 3. Follow the instructions on the Scanner Glass. Click Dell V305. From the Maintenance tab, click Network Support. For...
..., and then click Printing Preferences. Load your computer and printer, and ensure that they are connected. 2. In Windows Vista: a. Select Dell Imaging Toolbox. Click Printers. The Dell Networking Options dialog box opens. 4. The Printing Preferences dialog box opens. 3. Follow the instructions on the Scanner Glass. Click Dell V305. From the Maintenance tab, click Network Support. For...
User Guide
Page 56
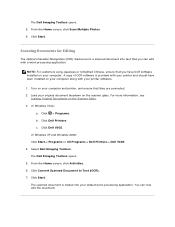
.... Click Start. Scanning Documents for Editing The Optical Character Recognition (OCR) feature turns a scanned document into your original document facedown on the scanner glass. The Dell Imaging Toolbox opens. 5. A copy of OCR software is loaded into text that they are connected. 2. c. Click Dell Printers. The Dell Imaging Toolbox opens. 5. Load your default word-processing application.
.... Click Start. Scanning Documents for Editing The Optical Character Recognition (OCR) feature turns a scanned document into your original document facedown on the scanner glass. The Dell Imaging Toolbox opens. 5. A copy of OCR software is loaded into text that they are connected. 2. c. Click Dell Printers. The Dell Imaging Toolbox opens. 5. Load your default word-processing application.

User Guide
Page 57
... or multiple photos face down on the scanner glass. For more information, see Loading Original Documents on the scanner glass. In Windows XP and Windows 2000: Click Start Programs or All Programs Dell Printers Dell V305. 4. From the Home screen,...the Save or Edit dialog box. 9. Turn on the Scanner Glass. Click Edit Picture. 7. Click Dell Printers. In Windows Vista: c. Select Dell Imaging Toolbox. For more information, see Loading Original Documents on your computer and printer, and ensure that they are connected. 2. Scanning Photos for...
... or multiple photos face down on the scanner glass. For more information, see Loading Original Documents on the scanner glass. In Windows XP and Windows 2000: Click Start Programs or All Programs Dell Printers Dell V305. 4. From the Home screen,...the Save or Edit dialog box. 9. Turn on the Scanner Glass. Click Edit Picture. 7. Click Dell Printers. In Windows Vista: c. Select Dell Imaging Toolbox. For more information, see Loading Original Documents on your computer and printer, and ensure that they are connected. 2. Scanning Photos for...
User Guide
Page 60
... For more information, see Loading Original Documents on the scanner glass. Load your scanned image. 10. Click Dell Printers. In Windows XP and Windows 2000: Click Start Programs or All Programs Dell Printers Dell V305. 4. The scanned image appears in your scanned image... using the settings on the left pane of the Library. 7. Save your original document or photo facedown on the Scanner Glass. 3. From the Send ...
... For more information, see Loading Original Documents on the scanner glass. Load your scanned image. 10. Click Dell Printers. In Windows XP and Windows 2000: Click Start Programs or All Programs Dell Printers Dell V305. 4. The scanned image appears in your scanned image... using the settings on the left pane of the Library. 7. Save your original document or photo facedown on the Scanner Glass. 3. From the Send ...
User Guide
Page 61
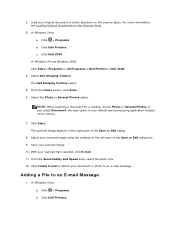
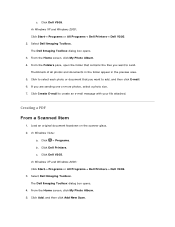
... the scanner glass. 2. Click Programs. b. Click Add, and then click Add New Scan. From the Folders pane, open the folder that you are sending one or more photos, select a photo size. 7. Creating a PDF From a Scanned Item 1. c. Click Dell V305. Select Dell Imaging Toolbox. Click Create E-mail to send. Click Dell V305. Click Dell Printers. The Dell Imaging...
... the scanner glass. 2. Click Programs. b. Click Add, and then click Add New Scan. From the Folders pane, open the folder that you are sending one or more photos, select a photo size. 7. Creating a PDF From a Scanned Item 1. c. Click Dell V305. Select Dell Imaging Toolbox. Click Create E-mail to send. Click Dell V305. Click Dell Printers. The Dell Imaging...
User Guide
Page 67
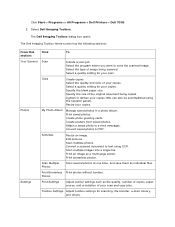
...Photos Scan several photos at one time, and save them as the quality, number of copies, paper source, and orientation of your copies. The Dell Imaging Toolbox Home screen has ...copies (this section: Your Scanner Photos Settings Click To Scan Initiate a scan job. Scan multiple photos. Print borderless photos. Copy Create copies Select the quality and color of your scan. Select...photos in a photo album. Click Start Programs or All Programs Dell Printers Dell V305. 2. Select the program where you want to text using the operator panel). Print an...
...Photos Scan several photos at one time, and save them as the quality, number of copies, paper source, and orientation of your copies. The Dell Imaging Toolbox Home screen has ...copies (this section: Your Scanner Photos Settings Click To Scan Initiate a scan job. Scan multiple photos. Print borderless photos. Copy Create copies Select the quality and color of your scan. Select...photos in a photo album. Click Start Programs or All Programs Dell Printers Dell V305. 2. Select the program where you want to text using the operator panel). Print an...
User Guide
Page 89
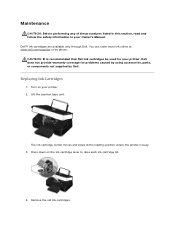
... each ink cartridge lid. 4. CAUTION: It is busy. 3. Lift the scanner base unit. Dell™ ink cartridges are available only through Dell. Maintenance CAUTION: Before performing any of the procedures listed in this section, read and follow the safety information in your printer. 2. You can order more ink online at the loading position unless...
... each ink cartridge lid. 4. CAUTION: It is busy. 3. Lift the scanner base unit. Dell™ ink cartridges are available only through Dell. Maintenance CAUTION: Before performing any of the procedures listed in this section, read and follow the safety information in your printer. 2. You can order more ink online at the loading position unless...

User Guide
Page 91
... cartridges when they are not aligned at the left margin, or when vertical or straight lines appear wavy. To align the ink cartridges from the printer software: 1. You may also need to MAINTENANCE, and then press the Select 3. In Windows Vista™: You may discard the alignment page when the alignment... the Paper Support. 2. To align the ink cartridges from the operator panel: 1. Use the left and right Arrow buttons button . Load plain paper. 2. Lower the scanner base unit until it is complete. 10. Load plain paper.
... cartridges when they are not aligned at the left margin, or when vertical or straight lines appear wavy. To align the ink cartridges from the printer software: 1. You may also need to MAINTENANCE, and then press the Select 3. In Windows Vista™: You may discard the alignment page when the alignment... the Paper Support. 2. To align the ink cartridges from the operator panel: 1. Use the left and right Arrow buttons button . Load plain paper. 2. Lower the scanner base unit until it is complete. 10. Load plain paper.
User Guide
Page 100
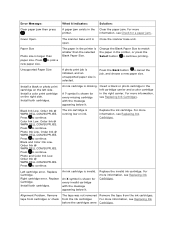
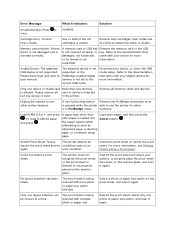
... appearing below it indicates: Solution: Clear paper jam then press . Close the scanner base unit. Insert a black or photo cartridge in the printer. symbol is open. Order Ink @ WWW.DELL.COM/SUPPLIES. Replace Cartridge. Install both cartridges. Replace the invalid ink cartridge. Press...A photo print job is initiated, and an unsupported paper size is missing. Install a color print cartridge on the left cartridge carrier and a color cartridge A ? An ink cartridge is selected. Color Ink Low. Error Message: What it . For more information, see Replacing Ink Cartridges....
... appearing below it indicates: Solution: Clear paper jam then press . Close the scanner base unit. Insert a black or photo cartridge in the printer. symbol is open. Order Ink @ WWW.DELL.COM/SUPPLIES. Replace Cartridge. Install both cartridges. Replace the invalid ink cartridge. Press...A photo print job is initiated, and an unsupported paper size is missing. Install a color print cartridge on the left cartridge carrier and a color cartridge A ? An ink cartridge is selected. Color Ink Low. Error Message: What it . For more information, see Replacing Ink Cartridges....
User Guide
Page 101
... place the proof sheet face down on the scanner glass, and scan it is not damaged and is in the printer. Check the proof sheet or reprint the proof sheet. Or Load PLAIN A4 paper and press . Only one memory is invalid. Refer to use the printer for more information, see Printing Photos Using...
... place the proof sheet face down on the scanner glass, and scan it is not damaged and is in the printer. Check the proof sheet or reprint the proof sheet. Or Load PLAIN A4 paper and press . Only one memory is invalid. Refer to use the printer for more information, see Printing Photos Using...


