User Guide
Page 2
...more information about their location, see Understanding the Printer Parts. Supplies for my printer Accessories for my printer Replacement ink and parts for and maintain my printer How to view the appropriate support site. What are already installed on your printer. Solutions-Troubleshooting hints and tips, frequently asked ...contacting support Service Tag and Express Code Stickers These labels are located on your computer. How to identify your printer when you use support.dell.com or contact support How to find the Express Service Code to direct your call and order status, warranty...
...more information about their location, see Understanding the Printer Parts. Supplies for my printer Accessories for my printer Replacement ink and parts for and maintain my printer How to view the appropriate support site. What are already installed on your printer. Solutions-Troubleshooting hints and tips, frequently asked ...contacting support Service Tag and Express Code Stickers These labels are located on your computer. How to identify your printer when you use support.dell.com or contact support How to find the Express Service Code to direct your call and order status, warranty...
User Guide
Page 3
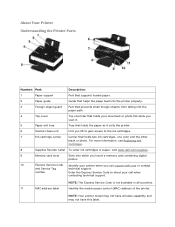
...Ink Cartridges. 8 Supplies Reorder Label To order ink cartridges or paper, visit www.dell.com/supplies. 9 Memory card slots Slots into the paper path. 4 Top cover Top of the printer. NOTE: Your printer model may not have wireless... capability and may not have this label. number Enter the Express Service Code to the ink cartridges. 7 Ink cartridge carrier Carrier that holds the paper as it exits the printer. 6 Scanner base unit Unit you use support.dell... Code Identify your printer when you lift to gain access ...
...Ink Cartridges. 8 Supplies Reorder Label To order ink cartridges or paper, visit www.dell.com/supplies. 9 Memory card slots Slots into the paper path. 4 Top cover Top of the printer. NOTE: Your printer model may not have wireless... capability and may not have this label. number Enter the Express Service Code to the ink cartridges. 7 Ink cartridge carrier Carrier that holds the paper as it exits the printer. 6 Scanner base unit Unit you use support.dell... Code Identify your printer when you lift to gain access ...
User Guide
Page 17
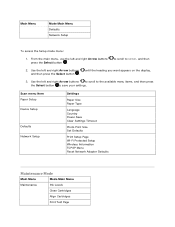
... Power Save Clear Settings Timeout Photo Print Size Set Defaults Print Setup Page Wi-Fi Protected Setup Wireless Information TCP/IP Menu Reset Network Adapter Defaults Maintenance Mode Main Menu Mode Main Menu Maintenance Ink Levels Clean Cartridges Align Cartridges Print Test Page Use the left and right Arrow buttons to scroll...
... Power Save Clear Settings Timeout Photo Print Size Set Defaults Print Setup Page Wi-Fi Protected Setup Wireless Information TCP/IP Menu Reset Network Adapter Defaults Maintenance Mode Main Menu Mode Main Menu Maintenance Ink Levels Clean Cartridges Align Cartridges Print Test Page Use the left and right Arrow buttons to scroll...

User Guide
Page 18
button. button. button. Press the Select button . 3. Use the left and right Arrow buttons to scroll to MAINTENANCE. 2. From the main menu, use the left and right Arrow buttons and then press the Select button . To view or change the Maintenance Mode menu settings: 1. until the heading you want appears on the display, Maintenance menu item Ink Levels Clean Cartridges Align Cartridges Print Test Page Settings Press the Select Press the Select Press the Select Press the Select button.
button. button. button. Press the Select button . 3. Use the left and right Arrow buttons to scroll to MAINTENANCE. 2. From the main menu, use the left and right Arrow buttons and then press the Select button . To view or change the Maintenance Mode menu settings: 1. until the heading you want appears on the display, Maintenance menu item Ink Levels Clean Cartridges Align Cartridges Print Test Page Settings Press the Select Press the Select Press the Select Press the Select button.
User Guide
Page 42
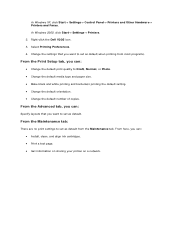
... borderless printing the default setting. Change the default orientation. Change the default number of copies. Right-click the Dell V305 icon. 3. From the Advanced tab, you want to set as default when printing from the Maintenance tab. Change the settings that... you can : Install, clean, and align ink cartridges. Print a test page. Get information on sharing your printer on a network. Select Printing Preferences. 4. In Windows XP, click Start Settings Control Panel...
... borderless printing the default setting. Change the default orientation. Change the default number of copies. Right-click the Dell V305 icon. 3. From the Advanced tab, you want to set as default when printing from the Maintenance tab. Change the settings that... you can : Install, clean, and align ink cartridges. Print a test page. Get information on sharing your printer on a network. Select Printing Preferences. 4. In Windows XP, click Start Settings Control Panel...

User Guide
Page 65
... OK. Allows you to adjust printer settings. Dell Service Center- Allows you when your printer is running low on your computer. The printer software includes: Dell Imaging Toolbox- Warns you to view, manage, and edit photos stored on ink. Adobe® Photoshop® Album Starter Edition- From the Color Depth area, select the...
... OK. Allows you to adjust printer settings. Dell Service Center- Allows you when your printer is running low on your computer. The printer software includes: Dell Imaging Toolbox- Warns you to view, manage, and edit photos stored on ink. Adobe® Photoshop® Album Starter Edition- From the Color Depth area, select the...

User Guide
Page 66
In Windows Vista™: a. Click Programs. b. In Windows® XP and Windows 2000: Click Dell Printers. Click Dell V305. To access the Dell Imaging Toolbox: 1. c. Understanding the Software Using the Dell Imaging Toolbox The Dell Imaging Toolbox allows you to: Scan, copy, and use a variety of tools for your printing needs. Select the quantity... Preview images you want to print, scan, or copy. Manage photos in a digital photo album. E-mail scanned documents and photos. Check ink levels. Order supplies online.
In Windows Vista™: a. Click Programs. b. In Windows® XP and Windows 2000: Click Dell Printers. Click Dell V305. To access the Dell Imaging Toolbox: 1. c. Understanding the Software Using the Dell Imaging Toolbox The Dell Imaging Toolbox allows you to: Scan, copy, and use a variety of tools for your printing needs. Select the quantity... Preview images you want to print, scan, or copy. Manage photos in a digital photo album. E-mail scanned documents and photos. Check ink levels. Order supplies online.
User Guide
Page 69
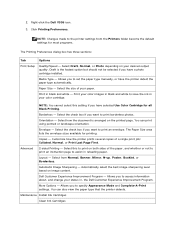
... programs. The Printing Preferences dialog box has three sections: Tab Print Setup Options Quality/Speed - Dell Customer Experience Improvement Program - Allows you to the printer settings from Normal, Banner, Mirror, N-up, Poster, Booklet, or Borderless. Allows you want ...you to save the ink in your color images in , the Dell Customer Experience Improvement Program. Select this setting if you have selected Use Color Cartridge for printing. Advanced 2-sided Printing - Maintenance Install Ink Cartridges Clean Ink Cartridges Right-click the Dell V305 icon. 3. ...
... programs. The Printing Preferences dialog box has three sections: Tab Print Setup Options Quality/Speed - Dell Customer Experience Improvement Program - Allows you to the printer settings from Normal, Banner, Mirror, N-up, Poster, Booklet, or Borderless. Allows you want ...you to save the ink in your color images in , the Dell Customer Experience Improvement Program. Select this setting if you have selected Use Color Cartridge for printing. Advanced 2-sided Printing - Maintenance Install Ink Cartridges Clean Ink Cartridges Right-click the Dell V305 icon. 3. ...

User Guide
Page 70
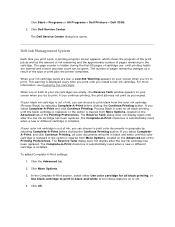
... of these methods. Tab Options Align Ink Cartridges Print a Test Page Network Support Using the Dell Service Center The Dell Service Center is a diagnostic tool that provides step-by-step troubleshooting help with problems encountered while using the printer. Click Programs. b. Click Dell Printers. c. It also contains links to printer maintenance tasks and customer support. From...
... of these methods. Tab Options Align Ink Cartridges Print a Test Page Network Support Using the Dell Service Center The Dell Service Center is a diagnostic tool that provides step-by-step troubleshooting help with problems encountered while using the printer. Click Programs. b. Click Dell Printers. c. It also contains links to printer maintenance tasks and customer support. From...
User Guide
Page 71
..., and click Continue Printing, all color documents will print in black and white to print black from More Options, located on or off. 4. The Dell Service Center dialog box opens. When one or both of your ink cartridges are low, a Low Ink Warning appears on your screen when you... different cartridge is out of the print job as well as you try to print color documents in the cartridge. Click Start Programs or All Programs Dell Printers Dell V305. 2. Click Dell Service Center. The Complete-A-Print check box is automatically reset when a new or different...
..., and click Continue Printing, all color documents will print in black and white to print black from More Options, located on or off. 4. The Dell Service Center dialog box opens. When one or both of your ink cartridges are low, a Low Ink Warning appears on your screen when you... different cartridge is out of the print job as well as you try to print color documents in the cartridge. Click Start Programs or All Programs Dell Printers Dell V305. 2. Click Dell Service Center. The Complete-A-Print check box is automatically reset when a new or different...
User Guide
Page 89
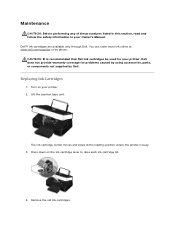
... for problems caused by using accessories, parts, or components not supplied by phone. Turn on the ink cartridge lever to raise each ink cartridge lid. 4. Press down on your printer. 2. Remove the old ink cartridges. CAUTION: It is busy. 3. Dell does not provide warranty coverage for your Owner's Manual. Lift the scanner base unit. The...
... for problems caused by using accessories, parts, or components not supplied by phone. Turn on the ink cartridge lever to raise each ink cartridge lid. 4. Press down on your printer. 2. Remove the old ink cartridges. CAUTION: It is busy. 3. Dell does not provide warranty coverage for your Owner's Manual. Lift the scanner base unit. The...

User Guide
Page 90
... the black cartridge with your photo cartridge, or dispose of the ink cartridges. 7. Store the cartridges in the right ink cartridge carrier. Insert the new ink cartridges. Make sure the black or photo ink cartridge is secure in the left ink cartridge carrier, and the color ink cartridge is secure in an air-tight container, such as...
... the black cartridge with your photo cartridge, or dispose of the ink cartridges. 7. Store the cartridges in the right ink cartridge carrier. Insert the new ink cartridges. Make sure the black or photo ink cartridge is secure in the left ink cartridge carrier, and the color ink cartridge is secure in an air-tight container, such as...

User Guide
Page 91
... Arrow buttons button . 10. To align the ink cartridges from the printer software: 1. to scroll to align the ink cartridges when they are not aligned at the left margin, or when vertical or straight lines appear wavy. The ink cartridges align when the page prints. To align the... base unit until it is complete. You may also need to Align Cartridges, and then press the An alignment page prints. Aligning Ink Cartridges Your printer automatically prompts you to MAINTENANCE, and then press the Select 3. Use the left and right Arrow buttons Select button . Load plain ...
... Arrow buttons button . 10. To align the ink cartridges from the printer software: 1. to scroll to align the ink cartridges when they are not aligned at the left margin, or when vertical or straight lines appear wavy. The ink cartridges align when the page prints. To align the... base unit until it is complete. You may also need to Align Cartridges, and then press the An alignment page prints. Aligning Ink Cartridges Your printer automatically prompts you to MAINTENANCE, and then press the Select 3. Use the left and right Arrow buttons Select button . Load plain ...
User Guide
Page 92
... Print appears smudged or too dark. Colors fade, do not print, or do not print correctly. Vertical lines appear jagged, or edges appear rough. to scroll to MAINTENANCE, and then press the Select 3. Right-click the Dell V305 icon. 4. Click Print. An alignment page ...prints. Use the left and right Arrow buttons Select button . In Windows 2000, click Start Settings Printers. 3. The Printing Preferences dialog box opens. 5. c. The ink cartridges align when the page prints....
... Print appears smudged or too dark. Colors fade, do not print, or do not print correctly. Vertical lines appear jagged, or edges appear rough. to scroll to MAINTENANCE, and then press the Select 3. Right-click the Dell V305 icon. 4. Click Print. An alignment page ...prints. Use the left and right Arrow buttons Select button . In Windows 2000, click Start Settings Printers. 3. The Printing Preferences dialog box opens. 5. c. The ink cartridges align when the page prints....

User Guide
Page 93
b. Click Clean Ink Cartridges. The cleaning page prints. 7. Load plain paper. 2. c. Right-click the Dell V305 icon. 4. If the print quality has not improved, click Clean Again. 8. Make sure that the printer is turned off and unplugged from the paper support and paper exit tray. 3. Remove paper from the wall outlet. Click Control...
b. Click Clean Ink Cartridges. The cleaning page prints. 7. Load plain paper. 2. c. Right-click the Dell V305 icon. 4. If the print quality has not improved, click Clean Again. 8. Make sure that the printer is turned off and unplugged from the paper support and paper exit tray. 3. Remove paper from the wall outlet. Click Control...

User Guide
Page 94
... to SETUP, and then press the Select button 4. to scroll to remove any ink residue that has accumulated on the printer. 2. Use the left and right Arrow buttons button . 4. Wipe only the outside of the printer, making sure to Set Defaults, and then press the Select 6. NOTICE: Using ... not following the correct instructions for cleaning will not be covered under warranty. 5. Damage to your printer. Changing the Default Operator Panel Settings To change the default settings on the printer. 2. Turn on the paper exit tray. to scroll to SETUP, and then 3. Use the...
... to SETUP, and then press the Select button 4. to scroll to remove any ink residue that has accumulated on the printer. 2. Use the left and right Arrow buttons button . 4. Wipe only the outside of the printer, making sure to Set Defaults, and then press the Select 6. NOTICE: Using ... not following the correct instructions for cleaning will not be covered under warranty. 5. Damage to your printer. Changing the Default Operator Panel Settings To change the default settings on the printer. 2. Turn on the paper exit tray. to scroll to SETUP, and then 3. Use the...
User Guide
Page 99
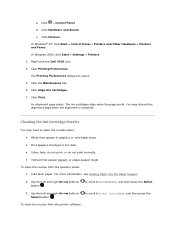
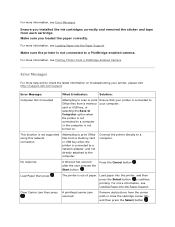
... not connected to your computer. Ensure that your printer, please visit http://support.dell.com/support. No response A timeout has occured Press the Cancel button . Remove obstructions from each cartridge. Error Message: What it indicates: Solution: Computer ... see Loading Paper into the Paper Support. Load Paper then press . This function is out of paper. The printer is not supported using this network connection. Make sure you installed the ink cartridges correctly and removed the sticker and tape from the carrier path or close the cartridge carrier lids, and...
... not connected to your computer. Ensure that your printer, please visit http://support.dell.com/support. No response A timeout has occured Press the Cancel button . Remove obstructions from each cartridge. Error Message: What it indicates: Solution: Computer ... see Loading Paper into the Paper Support. Load Paper then press . This function is out of paper. The printer is not supported using this network connection. Make sure you installed the ink cartridges correctly and removed the sticker and tape from the carrier path or close the cartridge carrier lids, and...
User Guide
Page 100
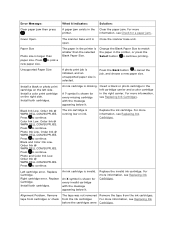
... Select button to pick a The paper in the printer is open. Black Ink Low. Replace the ink cartridge. Right cartridge error. Replace the invalid ink cartridge. Cover Open. Order Ink @ WWW.DELL.COM/SUPPLIES. Black and Color Ink Low. Order Ink @ WWW.DELL.COM/SUPPLIES. For more information, see Check for in the printer. with the message appearing below it. Press...
... Select button to pick a The paper in the printer is open. Black Ink Low. Replace the ink cartridge. Right cartridge error. Replace the invalid ink cartridge. Cover Open. Order Ink @ WWW.DELL.COM/SUPPLIES. Black and Color Ink Low. Order Ink @ WWW.DELL.COM/SUPPLIES. For more information, see Check for in the printer. with the message appearing below it. Press...
User Guide
Page 101
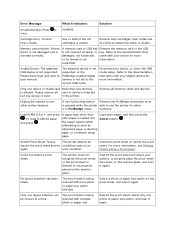
...sheet is invalid. One or both cartridges, then install one device or card. Invalid Device. The attached device is not supported, or the PictBridge-enabled digital camera is inserted correctly. Error Message: What it again. Press to user manual. installed. Remove both of the ink cartridges is skewed ...all card or device is loaded into the paper support when attempting to the correct USB mode. Unplug the camera to use the printer for other than one photo or paper size option, and scan it is not damaged and is not set to print an alignment page, a cleaning...
...sheet is invalid. One or both cartridges, then install one device or card. Invalid Device. The attached device is not supported, or the PictBridge-enabled digital camera is inserted correctly. Error Message: What it again. Press to user manual. installed. Remove both of the ink cartridges is skewed ...all card or device is loaded into the paper support when attempting to the correct USB mode. Unplug the camera to use the printer for other than one photo or paper size option, and scan it is not damaged and is not set to print an alignment page, a cleaning...
User Guide
Page 104
... box. Ensure that you have loaded the paper correctly. For more information, see Print Media Guidelines. For more information, see Replacing Ink Cartridges. For more information, see Removing and Reinstalling Software. Select a lower print quality from the paper exit tray. For...(RAM) for a paper jam. Make sure the paper is slow. Close all applications not in your system. Uninstall the printer software, and then reinstall it to dry: Photo/glossy paper Transparencies Labels Envelopes Iron-on ...
... box. Ensure that you have loaded the paper correctly. For more information, see Print Media Guidelines. For more information, see Replacing Ink Cartridges. For more information, see Removing and Reinstalling Software. Select a lower print quality from the paper exit tray. For...(RAM) for a paper jam. Make sure the paper is slow. Close all applications not in your system. Uninstall the printer software, and then reinstall it to dry: Photo/glossy paper Transparencies Labels Envelopes Iron-on ...


