User Guide
Page 3
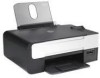
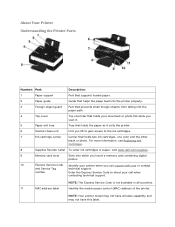
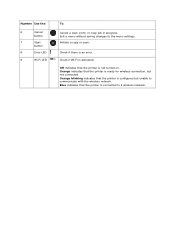
... lift to gain access to direct your document or photo flat while you scan it. 5 Paper exit tray Tray that holds the paper as it exits the printer. 6 Scanner base unit Unit you use support.dell.com or contact and Service Tag technical support. For more information, see Replacing...paper path. 4 Top cover Top of the printer. NOTE: Your printer model may not have wireless capability and may not have this label. number Enter the Express Service Code to the ink cartridges. 7 Ink cartridge carrier Carrier that holds two ink cartridges, one color and the other black or photo.
... lift to gain access to direct your document or photo flat while you scan it. 5 Paper exit tray Tray that holds the paper as it exits the printer. 6 Scanner base unit Unit you use support.dell.com or contact and Service Tag technical support. For more information, see Replacing...paper path. 4 Top cover Top of the printer. NOTE: Your printer model may not have wireless capability and may not have this label. number Enter the Express Service Code to the ink cartridges. 7 Ink cartridge carrier Carrier that holds two ink cartridges, one color and the other black or photo.
User Guide
Page 4
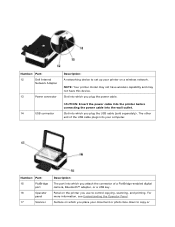
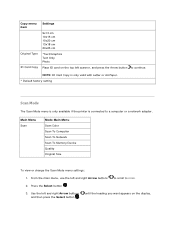
... you plug the power cable. For more information, see Understanding the Operator Panel. Surface on the printer you use to control copying, scanning, and printing. Slot into your printer on a wireless network. The other end of a PictBridge-enabled digital camera, Bluetooth™ adapter, or a USB... Description: The port into the wall outlet. Number: Part: 12 Dell Internal Network Adapter 13 Power connector 14 USB connector Description: A networking device to set up your computer. NOTE: Your printer model may not have wireless capability and may not have this device.
... you plug the power cable. For more information, see Understanding the Operator Panel. Surface on the printer you use to control copying, scanning, and printing. Slot into your printer on a wireless network. The other end of a PictBridge-enabled digital camera, Bluetooth™ adapter, or a USB... Description: The port into the wall outlet. Number: Part: 12 Dell Internal Network Adapter 13 Power connector 14 USB connector Description: A networking device to set up your computer. NOTE: Your printer model may not have wireless capability and may not have this device.
User Guide
Page 5
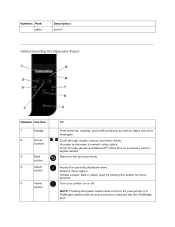
...through photos and Microsoft® Office files on or off your printer on a memory card or digital camera. Scroll through modes, menus, and menu items. Increase or decrease a numeric value option. Number: Part: glass Description: scan it. NOTE: Pressing the power button does not turn off... . Return to the previous menu. Turn your printer if a PictBridge camera with an active session is inserted into the PictBridge port. Understanding...
...through photos and Microsoft® Office files on or off your printer on a memory card or digital camera. Scroll through modes, menus, and menu items. Increase or decrease a numeric value option. Number: Part: glass Description: scan it. NOTE: Pressing the power button does not turn off... . Return to the previous menu. Turn your printer if a PictBridge camera with an active session is inserted into the PictBridge port. Understanding...
User Guide
Page 6
.... Check if Wi-Fi is activated: Off indicates that the printer is not turned on. Blue indicates that the printer is connected to a wireless network. Orange blinking indicates that the printer is ready for wireless connection, but unable to the menu settings. Initiate a copy or scan. Check if there is configured but not connected. Orange indicates...
.... Check if Wi-Fi is activated: Off indicates that the printer is not turned on. Blue indicates that the printer is connected to a wireless network. Orange blinking indicates that the printer is ready for wireless connection, but unable to the menu settings. Initiate a copy or scan. Check if there is configured but not connected. Orange indicates...
User Guide
Page 9
...: ID Card Copy is only valid with Letter or A4 Paper. * Default factory setting Scan Mode The Scan Mode menu is only available if the printer is connected to a computer or a network adapter. Main Menu Scan Mode Main Menu Scan Color Scan To Computer Scan To Network Scan To Memory Device Quality Original Size To view or change the...
...: ID Card Copy is only valid with Letter or A4 Paper. * Default factory setting Scan Mode The Scan Mode menu is only available if the printer is connected to a computer or a network adapter. Main Menu Scan Mode Main Menu Scan Color Scan To Computer Scan To Network Scan To Memory Device Quality Original Size To view or change the...

User Guide
Page 10
... dpi 600 dpi 1200 dpi *Automatic 8.5 x 11 in. 2.25 x 3.25 3 x 5 in. 3.5 x 5 in. 4 x 6 in. 4 x 8 in. 5 x 7 in. 8 x 10 in. Scan menu item Scan Color Scan To Computer Scan To Network Scan To Memory Device Quality Original Size *Default factory setting Settings *Color Black App List PC Name Place document on the display, press the Select button to scroll through...
... dpi 600 dpi 1200 dpi *Automatic 8.5 x 11 in. 2.25 x 3.25 3 x 5 in. 3.5 x 5 in. 4 x 6 in. 4 x 8 in. 5 x 7 in. 8 x 10 in. Scan menu item Scan Color Scan To Computer Scan To Network Scan To Memory Device Quality Original Size *Default factory setting Settings *Color Black App List PC Name Place document on the display, press the Select button to scroll through...
User Guide
Page 11
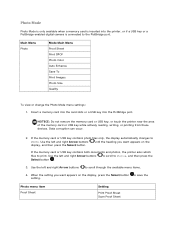
Data corruption can occur. 2. Use the left and right Arrow buttons to scroll to PHOTO. Photo menu item Proof Sheet Setting Print Proof Sheet Scan Proof Sheet Use the left and right Arrow buttons to print. Photo Mode Photo Mode is only available when a memory card is connected to save...the If the memory card or USB key contains both documents and photos, the printer asks which files to scroll through the available menu items. 4. Main Menu Photo Mode Main Menu Proof Sheet Print DPOF Photo Color Auto Enhance Save To Print Images Photo Size Quality To view or change the Photo...
Data corruption can occur. 2. Use the left and right Arrow buttons to scroll to PHOTO. Photo menu item Proof Sheet Setting Print Proof Sheet Scan Proof Sheet Use the left and right Arrow buttons to print. Photo Mode Photo Mode is only available when a memory card is connected to save...the If the memory card or USB key contains both documents and photos, the printer asks which files to scroll through the available menu items. 4. Main Menu Photo Mode Main Menu Proof Sheet Print DPOF Photo Color Auto Enhance Save To Print Images Photo Size Quality To view or change the Photo...
User Guide
Page 17
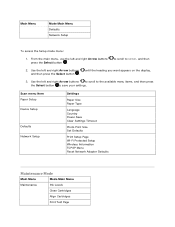
...to the available menu items, and then press the Select button to SETUP, and then 2. to scroll to save your settings. Scan menu item Paper Setup Device Setup Defaults Network Setup Settings Paper Size Paper Type Language Country Power Save Clear Settings Timeout Photo Print Size... Set Defaults Print Setup Page Wi-Fi Protected Setup Wireless Information TCP/IP Menu Reset Network Adapter Defaults Maintenance Mode Main Menu Mode Main Menu Maintenance Ink Levels Clean Cartridges Align Cartridges ...
...to the available menu items, and then press the Select button to SETUP, and then 2. to scroll to save your settings. Scan menu item Paper Setup Device Setup Defaults Network Setup Settings Paper Size Paper Type Language Country Power Save Clear Settings Timeout Photo Print Size... Set Defaults Print Setup Page Wi-Fi Protected Setup Wireless Information TCP/IP Menu Reset Network Adapter Defaults Maintenance Mode Main Menu Mode Main Menu Maintenance Ink Levels Clean Cartridges Align Cartridges ...
User Guide
Page 48
...a memory card into a card slot or a USB key into the PictBridge port. NOTE: Ensure that you specified in the proof sheet. For information on your printer, see Office File Mode. 3. Press the Start button Use the left and right Arrow buttons to scroll to OFFICE FILE mode. Use the left and... right Arrow buttons to scroll to Scan Proof Sheet, and then press the Printing Office Files 1. NOTE: Photo/glossy paper is recommended for printing photos. 11. If the memory card or...
...a memory card into a card slot or a USB key into the PictBridge port. NOTE: Ensure that you specified in the proof sheet. For information on your printer, see Office File Mode. 3. Press the Start button Use the left and right Arrow buttons to scroll to OFFICE FILE mode. Use the left and... right Arrow buttons to scroll to Scan Proof Sheet, and then press the Printing Office Files 1. NOTE: Photo/glossy paper is recommended for printing photos. 11. If the memory card or...
User Guide
Page 50
... the Home screen, click Copy. dialog box opens. 7. Click Copy Now. Turn on the printer. 2. In Windows® XP or Windows 2000: Click Start Programs or All Programs Dell Printers Dell V305. 5. Click Custom Settings if you scanning? Copying Photos Using the Operator Panel 1. b. Select Document. 8. Load the paper. 3. The What are...
... the Home screen, click Copy. dialog box opens. 7. Click Copy Now. Turn on the printer. 2. In Windows® XP or Windows 2000: Click Start Programs or All Programs Dell Printers Dell V305. 5. Click Custom Settings if you scanning? Copying Photos Using the Operator Panel 1. b. Select Document. 8. Load the paper. 3. The What are...
User Guide
Page 51
From the Copy Quality submenu, select Photo. 5. If you scanning? For more information, see Loading Paper into the Paper Support. 3. Click Programs. b. The Dell Imaging Toolbox dialog box opens. 6. The What are connected. 2. Using Your Computer 1. Turn on your original ...the scanner glass. In Windows XP or Windows 2000: Click Start Programs or All Programs Dell Printers Dell V305. 5. 4. In Windows Vista: a. Click Dell V305. dialog box opens. Load your computer and printer, and ensure that they are you want to copy a 4 x 6 photo, load a 4 x...
From the Copy Quality submenu, select Photo. 5. If you scanning? For more information, see Loading Paper into the Paper Support. 3. Click Programs. b. The Dell Imaging Toolbox dialog box opens. 6. The What are connected. 2. Using Your Computer 1. Turn on your original ...the scanner glass. In Windows XP or Windows 2000: Click Start Programs or All Programs Dell Printers Dell V305. 5. 4. In Windows Vista: a. Click Dell V305. dialog box opens. Load your computer and printer, and ensure that they are you want to copy a 4 x 6 photo, load a 4 x...
User Guide
Page 52
The photo appears in the table. From the drop-down list in the last column to view and select other than 10 x 15 cm (4 x 6 in.), select the options you want in the right pane of a photo, or to adjust how your document will be scanned before creating a copy or copies. 9. To select multiple prints of the Copy dialog box. 10. Click Copy Now. Click Start. Click Custom Settings if you want to select photo sizes other sizes. 12. Use the drop-down lists, select the print quality, paper size, and paper type settings that you want . 11. 7. Select Photo. 8.
The photo appears in the table. From the drop-down list in the last column to view and select other than 10 x 15 cm (4 x 6 in.), select the options you want in the right pane of a photo, or to adjust how your document will be scanned before creating a copy or copies. 9. To select multiple prints of the Copy dialog box. 10. Click Copy Now. Click Start. Click Custom Settings if you want to select photo sizes other sizes. 12. Use the drop-down lists, select the print quality, paper size, and paper type settings that you want . 11. 7. Select Photo. 8.

User Guide
Page 53
...computer to d. If your original document. The printer downloads the application list from the computer. to scroll through the available computers to which your scan. If your printer is only required if the computer you want to send your scan can be sent. If you want to the ...network. 2. it , use appears on your computer and printer, and ensure that your printer is not required by default; Scanning Scanning Single-Page Documents and Single Photos Using the Operator Panel 1. to scroll to enter the four-digit PIN....
...computer to d. If your original document. The printer downloads the application list from the computer. to scroll through the available computers to which your scan. If your printer is only required if the computer you want to send your scan can be sent. If you want to the ...network. 2. it , use appears on your computer and printer, and ensure that your printer is not required by default; Scanning Scanning Single-Page Documents and Single Photos Using the Operator Panel 1. to scroll to enter the four-digit PIN....
User Guide
Page 54
...Windows 2000: Click Start Programs or All Programs Dell Printers Dell V305. 4. Click Hardware and Sound. The Dell Imaging Toolbox dialog box opens. 5. From the Home screen, click Scan. If you want to scan a document without changing the text, and you do not want ...locate it to -network Personal Identification Number (PIN). 1. Click Dell V305. The What are connected. 2. Click Start. Click Dell Printers. Select the Photo option. If you want to make a PDF, selecting the Photo option scans the document as an image and sends it on the Scanner ...
...Windows 2000: Click Start Programs or All Programs Dell Printers Dell V305. 4. Click Hardware and Sound. The Dell Imaging Toolbox dialog box opens. 5. From the Home screen, click Scan. If you want to scan a document without changing the text, and you do not want ...locate it to -network Personal Identification Number (PIN). 1. Click Dell V305. The What are connected. 2. Click Start. Click Dell Printers. Select the Photo option. If you want to make a PDF, selecting the Photo option scans the document as an image and sends it on the Scanner ...
User Guide
Page 55
... a PIN, click OK. c. In Windows XP, click Start Settings Control Panel Printers and Other Hardware Printers and Faxes. Scanning Multiple Photos Into a Single File NOTE: Some programs do not support multiple-page scanning. 1. Click Dell V305. The Dell Networking Options dialog box opens. 4. Follow the instructions on the Scanner Glass. NOTE: For...
... a PIN, click OK. c. In Windows XP, click Start Settings Control Panel Printers and Other Hardware Printers and Faxes. Scanning Multiple Photos Into a Single File NOTE: Some programs do not support multiple-page scanning. 1. Click Dell V305. The Dell Networking Options dialog box opens. 4. Follow the instructions on the Scanner Glass. NOTE: For...
User Guide
Page 56
... screen, click Activities. 6. For more information, see Loading Original Documents on the scanner glass. Scanning Documents for Editing The Optical Character Recognition (OCR) feature turns a scanned document into your computer. Click Dell Printers. The scanned document is provided with your printer and should have OCR software installed on your computer along with a word-processing application. You...
... screen, click Activities. 6. For more information, see Loading Original Documents on the scanner glass. Scanning Documents for Editing The Optical Character Recognition (OCR) feature turns a scanned document into your computer. Click Dell Printers. The scanned document is provided with your printer and should have OCR software installed on your computer along with a word-processing application. You...

User Guide
Page 57
...; Dell V305. 4. Click Dell Printers. From the Home screen, click Activities. 6. Click Edit Picture. 7. Turn on your computer and printer, and ensure that they are connected. 2. In Windows Vista: Select editing options from the left pane to edit your original photo or multiple photos face down on the Scanner Glass. 3. Scanning Photos for Editing 1. For...
...; Dell V305. 4. Click Dell Printers. From the Home screen, click Activities. 6. Click Edit Picture. 7. Turn on your computer and printer, and ensure that they are connected. 2. In Windows Vista: Select editing options from the left pane to edit your original photo or multiple photos face down on the Scanner Glass. 3. Scanning Photos for Editing 1. For...
User Guide
Page 58
Select one or more of the Save or Edit dialog box, click Save. 9. c. Click Dell Printers. In Windows XP and Windows 2000: Click Start Programs or All Programs Dell Printers Dell V305. 4. Click Programs. b. Click Programs. b. Select the Photo or Several Photos option. 7. Turn on your computer and printer, and ensure that they... down list. To select a date for the photo, click the drop-down list, and select a date from the calendar. From the Home screen, click Scan. 6. Click Save. a.
Select one or more of the Save or Edit dialog box, click Save. 9. c. Click Dell Printers. In Windows XP and Windows 2000: Click Start Programs or All Programs Dell Printers Dell V305. 4. Click Programs. b. Click Programs. b. Select the Photo or Several Photos option. 7. Turn on your computer and printer, and ensure that they... down list. To select a date for the photo, click the drop-down list, and select a date from the calendar. From the Home screen, click Scan. 6. Click Save. a.
User Guide
Page 59
...Next. Click File New Scan New Image. Click Resize a Scanned Image. 6. Select the size of your new image using a saved image: e. In Windows XP and Windows 2000: Click Start Programs or All Programs Dell Printers Dell V305. 3. If you are connected. ...b. The thumbnails of all photos and documents in the folder appear in the right pane of the scanned image appears in the preview area. EMailing Documents ...
...Next. Click File New Scan New Image. Click Resize a Scanned Image. 6. Select the size of your new image using a saved image: e. In Windows XP and Windows 2000: Click Start Programs or All Programs Dell Printers Dell V305. 3. If you are connected. ...b. The thumbnails of all photos and documents in the folder appear in the right pane of the scanned image appears in the preview area. EMailing Documents ...
User Guide
Page 60
... Programs or All Programs Dell Printers Dell V305. 4. Click Start. Click Programs. b. Select Dell Imaging Toolbox. The scanned image appears in your scanned image using the settings on the left pane of the Save or Edit dialog. 8. Click Dell Printers. Click Programs. b. If you select Document, the scan opens in the right pane of...
... Programs or All Programs Dell Printers Dell V305. 4. Click Start. Click Programs. b. Select Dell Imaging Toolbox. The scanned image appears in your scanned image using the settings on the left pane of the Save or Edit dialog. 8. Click Dell Printers. Click Programs. b. If you select Document, the scan opens in the right pane of...


