Dell 3335DN Support Question
Dell 3335DN Support Question
Find answers below for this question about Dell 3335DN.Need a Dell 3335DN manual? We have 4 online manuals for this item!
Question posted by krdalley on March 1st, 2013
Scan To Email - Timeout Value
We have been experiencing issues with our scan to email function. Sometimes we will scan a document and it will not show up in our email. We are using the same email address from the address book. Have been told that it is due to the job timing out. Where can we change this value.
Current Answers
Answer #1: Posted by NiranjanvijaykumarAtDell on March 14th, 2013 3:08 AM
NiranjanvijaykumarAtDell

Member since:
May 12th, 2012 Points: 807,180

Member since:
May 12th, 2012 Points: 807,180
Hello krdalley,
I am from Dell Social Media and Community.
Unfortunately, we do not have the option to change the timer. I would suggest you a work around to resolve this issue.
You may scan it to a computer and then attach it to an item and email it across.
Follow the steps below:
Scanning to a computer
1 Type the printer IP address into the address field of your Web browser.
Note: If you do not know the IP address of the printer, then print a network setup page and locate the IP address in the TCP/IP section.
2 Click Scan Profile.
3 Click Create Scan Profile.
Note: Your computer must have java program installed to be able to create a scan profile.
4 Select your scan settings, and then click Next.
5 Select a location on your computer where you want to save the scanned output file.
6 Enter a scan name. The scan name is the name that appears in the Scan Profile list on the display.
7 Click Submit.
8 Review the instructions on the Scan Profile screen. A shortcut number was automatically assigned when you clicked Submit. You can use this shortcut number when you are ready to scan your documents.
9 Load an original document faceup, short edge first into the ADF or facedown on the scanner glass.
Note: Do not load postcards, photos, small items, transparencies, photo paper, or thin media (such as magazine clippings) into the ADF. Place these items on the scanner glass.
10 If you are loading a document into the ADF, then adjust the paper guides.
11 Press the F looking key, and then enter the shortcut number using the keypad, or touch Held Jobs on the home screen, and then touch profiles.
12 After you enter the shortcut number, the scanner scans and sends the document to the directory or program you specified. If you touched Profiles on the home screen, then locate your shortcut on the list.
13 Touch Finish the Job.
14 Return to the computer to view the file. The output file is saved in the location you specified or launched in the program you specified.
You may follow the link below to find your users manual and go to Page 150 if you need any further clarifications.
http://dell.to/YcKrSe
If this has not helped you or if you need any further assistance, feel free to message me on Twitter(@NiranjanatDell). I will be happy to assist.
Dell-Niranjan
NiranjanAtDell
Dell Inc
Related Dell 3335DN Manual Pages
User Manual - Page 6
... a modem...134 Enabling the fax function...135 Using the Embedded Web Server for fax setup...using the Embedded Web Server 138 Creating a fax destination shortcut using the touch screen 139 Changing the fax destination shortcut using the Embedded Web Server 139
Using shortcuts and the address book...140
Using fax shortcuts...140 Using the address book...documents are still scanning 143
Contents
6
User Manual - Page 7
... faxes...145
Holding faxes...145 Forwarding a fax ...146
Scanning to an FTP address 147
Scanning to an FTP address...147
Scanning to an FTP address using the keypad ...147 Scanning to an FTP address using a shortcut number...147 Scanning to an FTP address using the address book ...148
Creating shortcuts...148
Creating an FTP shortcut using the Embedded Web Server 148 Creating an FTP shortcut...
User Manual - Page 11

...31.yy Replace defective or missing cartridge ...260 32.yy Cartridge part number unsupported by device...260 34 Short paper ...260 35 Insufficient memory to support Resource Save feature 260 ...88 Cartridge low...264 1565 Emulation error, load emulation option...264 Scanner ADF Cover Open ...265 Scan Document Too Long ...265 Replace all originals if restarting job...265 Paper Change: Load Tray ...265...
User Manual - Page 21

...: The fax function is available on the printer control panel to perform specific copy jobs. • Send a fax using the printer control panel. • Send a fax to multiple fax destinations at the same time. • Scan documents and send them to your computer, an e-mail address, a flash drive, or an FTP destination. • Scan documents and send...
User Manual - Page 22

... glass in the upper left corner. • Scan or copy documents up to 215.9 x 355.6 mm (8.5 x 14 in.). • Scan documents with mixed page sizes (letter and legal). • Copy books up to 215.9 x 355.6 mm (8.5 x 14 in .) thick. Using the ADF
The ADF can scan multiple pages, including duplex pages.
Use the scanner glass for multiple-page...
User Manual - Page 111
..., short edge first into the ADF.
When the end of original documents using different job parameters.
Note: The "Allow priority copies" setting must be scanned using the supplied parameters, and then it scans the next set is enabled, the scanner scans the first set of a set with the same or different parameters. Place these items on...
User Manual - Page 117
...can type the e-mail address, use a shortcut number, or use the address book. Submitting changes appears....use the printer to e-mail scanned documents to one or more information, see your Primary SMTP (mail server) Gateway address.
You can use . Use the scanner glass for multiple-page documents. E-mailing
117
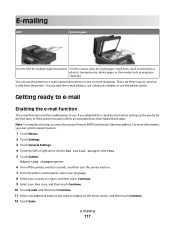
Getting ready to e-mail
Enabling the e-mail function
The e-mail function...
User Manual - Page 121

... the scanner glass.
2 If you are loading a document into the ADF, adjust the paper guides. 3 On the home screen, touch E-mail. 4 Type an e-mail address. 5 Touch Options. 6 Touch Color. 7 Touch E-mail It. appears. • When using the ADF, touch Cancel Job while Scanning... appears or while Scan the Next
Page / Finish the Job appears. Place...
User Manual - Page 143

... option. Canceling an outgoing fax
Canceling a fax while the original documents are deleted, and then the home screen appears. appears. • When using the ADF, touch Cancel Job while Scanning...
Understanding fax options
Original Size
This option opens a screen where you can scan an original document that contains mixed paper
sizes.
• When "Original Size...
User Manual - Page 147
... becomes available as a shortcut number, or it is similar to an FTP address
147
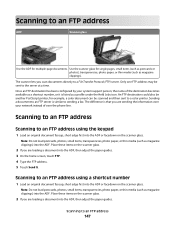
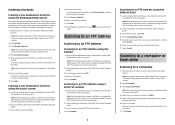
Scanning to an FTP address
Scanning to an FTP address using a shortcut number
1 Load an original document faceup, short edge first into the ADF. Scanning to an FTP address
ADF
Scanner glass
Use the ADF for single pages, small items (such as postcards or photos), transparencies...
User Manual - Page 148
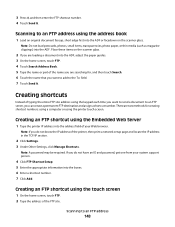
.... 3 Under Other Settings, click Manage Shortcuts.
Scanning to an FTP server, you do not have an ID and password, get one from your Web browser. Creating an FTP shortcut using the printer touch screen.
If you want to send a document to an FTP address using the address book
1 Load an original document faceup, short edge first into the...
User Manual - Page 150
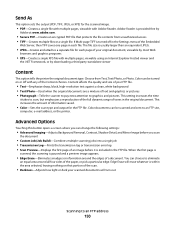
... Text/Photo-Used when the original documents are a mixture of your original document, viewable by most Web
browsers and graphics programs
• XPS-Creates a single XPS file with multiple pages, viewable using an Internet ...in each file. Color documents can choose to an FTP site,
computer, e-mail address, or the printer. Edge Erase will turn out
Scanning to an FTP address
150 The file size ...
User Manual - Page 270

... unit.
Troubleshooting
270 MAKE SURE THE PRINTER HAS ENOUGH MEMORY
Add printer memory or an optional hard disk.
Unexpected page breaks occur
INCREASE THE PRINT TIMEOUT VALUE
1 Make sure the printer is on and Ready appears. 2 On the home screen, touch . 3 Touch Settings. 4 Touch General Settings. 5 Touch the down arrow until...
User Manual - Page 296

...low 264
Symbols
"scan to computer" screen options 154, 155
A
Active NIC menu 165 address book, fax
using 140 ADF
copying using 104 ADF separator ...unresponsive printer 254 checking an unresponsive scanner 273 checking device status
on Embedded Web Server 238 cleaning
ADF ...256 Close front door 256 collating copies 109 color documents e-mailing 121 Confidential print jobs 98 printing from Macintosh...
User Manual - Page 297
...
copier does not respond 270 partial document or photo
copies 272 poor copy quality 271 poor scanned image quality 273 scanner unit does not...documents 121 configuring the e-mail
settings 118 creating shortcuts using the
Embedded Web Server 118 creating shortcuts using the touch
screen 119 e-mail setup 117 setting up e-mail function 118 using shortcut numbers 119 using the address book 120 using...
User Manual - Page 301
...259 Unsupported USB device, please
remove 259...Scan Document Too Long 265 Scan Profile options 153, 154, 155 scan quality, improving 155 scan to an FTP address
creating shortcuts using the computer 148
creating shortcuts using the touch screen 148
improving FTP quality 151 using shortcut numbers 147 using the address book 148 using 105 scanning to a computer 152
improving scan quality 155 scanning...
Brochure - Page 1

... connectivity. The Dell 3335dn offers both a scan and a fax function; For more information on our products, visit www.euro.dell.com The Dell 3335dn delivers professional-quality printouts with fast print/copy speeds of use ).
Small and medium workgroups within businesses of all -in USB or network devices for easy document management. The Dell 3335dn multifunction laser printer
Fast...
Brochure - Page 3

... use ) Single ADF duplex scan to multiple copies: up to 38 cpm A4 (actual copy speed will vary with use . Paper weight: 60 - 163 g/m2
Optional 550 sheet tray
Continuously adjustable for A4, A5, A6, JIS B5, US Letter, US Legal, Executive, Folio, Oficio, Statement
Envelopes: Monarch (7 3/4), 9, Com-10, C5, B5, DL; Dell 3335dn multifunction...
Quick Reference Guide - Page 1

.... Canceling a copy job while copying pages using the scanner glass
1 Place an original document facedown on the scanner glass. Dell 3333dn/3335dn Laser MFP
Quick Reference
Copying
Making copies
Making a quick copy
1 Load an original document faceup, short edge first into the address field of your Web
browser.
A "Canceling scan job" screen appears.
The home screen...
Quick Reference Guide - Page 3
... guides.
3 Press #, and then enter the FTP shortcut number. 4 Touch Send It.
3
Scanning to a computer
1 Type the printer IP address into the address field of your Web browser. Scanning to a computer or flash drive
Scanning to an FTP address using the address book
1 Load an original document faceup, short edge first into the ADF, then adjust the paper guides.
3 On...
Similar Questions


Email
We have a couple email accounts typed in with errors on them how do i change the email address or de...
We have a couple email accounts typed in with errors on them how do i change the email address or de...
(Posted by Daryld101163 10 years ago)

Scanning Documents
HOW CAN I SCAN A DOCUMENT AND SEND IT TO AN EMAIL ADDRESS
HOW CAN I SCAN A DOCUMENT AND SEND IT TO AN EMAIL ADDRESS
(Posted by ismatujusu 11 years ago)
Inferior Scanned Documents
There is a blue line running down the middle of the page of my scanned documents. How do I clean the...
There is a blue line running down the middle of the page of my scanned documents. How do I clean the...
(Posted by deedeec 13 years ago)