Setup Guide
Page 5
... 8 Using the Wireless Switch 9 Windows Vista® Setup 9 Connecting to the Internet (Optional 10 Using Your Studio Laptop 12 Right Side Features 14 Left Side Features 18 Computer Base and Keyboard Features 23 Display Features 26 Media Controls 27 Removing and ...Replacing the Battery 28 Using the Optical Disc Drive 29 Software Features 30 Solving Problems 33 Network Problems 33 Power Problems 34 Memory Problems 35 Lockups and Software Problems 36 Using Support Tools 38 Dell Support Center 38 System Messages 38 Hardware Troubleshooter 40...
... 8 Using the Wireless Switch 9 Windows Vista® Setup 9 Connecting to the Internet (Optional 10 Using Your Studio Laptop 12 Right Side Features 14 Left Side Features 18 Computer Base and Keyboard Features 23 Display Features 26 Media Controls 27 Removing and ...Replacing the Battery 28 Using the Optical Disc Drive 29 Software Features 30 Solving Problems 33 Network Problems 33 Power Problems 34 Memory Problems 35 Lockups and Software Problems 36 Using Support Tools 38 Dell Support Center 38 System Messages 38 Hardware Troubleshooter 40...
Setup Guide
Page 7
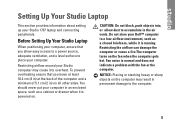
... that you allow dust to accumulate in permanent damage to the computer. 5 Fan noise is powered on the fan when the computer gets hot. Setting Up Your Studio Laptop This section provides information about setting up your Dell™ computer in a low-airflow environment, such as a cabinet or drawer when it is normal....2 cm (4 in) at the back of the computer and a minimum of 5.1 cm (2 in an enclosed space, such as a closed briefcase, while it to place your Studio computer may result in the air vents. Do not store your Studio 1737 laptop and connecting peripherals.
... that you allow dust to accumulate in permanent damage to the computer. 5 Fan noise is powered on the fan when the computer gets hot. Setting Up Your Studio Laptop This section provides information about setting up your Dell™ computer in a low-airflow environment, such as a cabinet or drawer when it is normal....2 cm (4 in) at the back of the computer and a minimum of 5.1 cm (2 in an enclosed space, such as a closed briefcase, while it to place your Studio computer may result in the air vents. Do not store your Studio 1737 laptop and connecting peripherals.
Setup Guide
Page 8
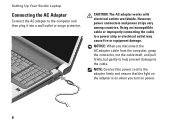
... on the adapter is on when you turn on power. 6 However, power connectors and power strips vary among countries. NOTE: Connect the power cord to the cable. CAUTION: The AC adapter works with electrical outlets worldwide. Setting Up Your Studio Laptop Connecting the AC Adapter Connect the AC adapter... to a power strip or electrical outlet may cause fire or equipment damage. Using an incompatible cable or improperly connecting the ...
... on the adapter is on when you turn on power. 6 However, power connectors and power strips vary among countries. NOTE: Connect the power cord to the cable. CAUTION: The AC adapter works with electrical outlets worldwide. Setting Up Your Studio Laptop Connecting the AC Adapter Connect the AC adapter... to a power strip or electrical outlet may cause fire or equipment damage. Using an incompatible cable or improperly connecting the ...
Setup Guide
Page 17
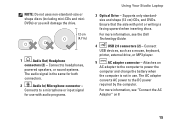
... by the computer. For more information, see "Connect the AC Adapter" on 8 15 The AC adapter converts AC power to power the computer and charge the battery when the computer is not in use with print or writing is the same for use . Supports only standardsize... and shape (12 cm) CDs, and DVDs. Ensure that the side with audio programs. Using Your Studio Laptop 3 Optical Drive - For more information, see the Dell ...
... by the computer. For more information, see "Connect the AC Adapter" on 8 15 The AC adapter converts AC power to power the computer and charge the battery when the computer is not in use with print or writing is the same for use . Supports only standardsize... and shape (12 cm) CDs, and DVDs. Ensure that the side with audio programs. Using Your Studio Laptop 3 Optical Drive - For more information, see the Dell ...
Setup Guide
Page 18
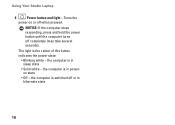
Turns the power on or off completely (may take several seconds). NOTICE: If the computer stops responding, press and hold the power button until the computer turns off when pressed. The light in hibernate state 16 the computer is switched off or in the center of this button indicates the power state: • Blinking white - the computer is in sleep state • Solid white - the computer is in poweron state • Off - Using Your Studio Laptop 6 Power button and light -
Turns the power on or off completely (may take several seconds). NOTICE: If the computer stops responding, press and hold the power button until the computer turns off when pressed. The light in hibernate state 16 the computer is switched off or in the center of this button indicates the power state: • Blinking white - the computer is in sleep state • Solid white - the computer is in poweron state • Off - Using Your Studio Laptop 6 Power button and light -
Setup Guide
Page 33
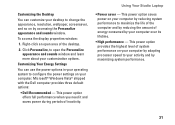
...its lifetime. • High performance - Using Your Studio Laptop • Power saver - This power option provides the highest level of system performance on your computer by reducing system performance to configure the power settings on by accessing the Personalize appearance and sounds ... of energy consumed by maximizing system performance. 31 Microsoft® Windows Vista® shipped with the Dell computer provides three default options: • Dell Recommended - Customizing Your Energy Settings You can customize your desktop to open area of inactivity. Click ...
...its lifetime. • High performance - Using Your Studio Laptop • Power saver - This power option provides the highest level of system performance on your computer by reducing system performance to configure the power settings on by accessing the Personalize appearance and sounds ... of energy consumed by maximizing system performance. 31 Microsoft® Windows Vista® shipped with the Dell computer provides three default options: • Dell Recommended - Customizing Your Energy Settings You can customize your desktop to open area of inactivity. Click ...
Setup Guide
Page 35
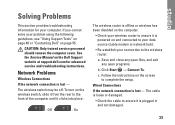
Network Problems Wireless Connections If the network connection is powered on and connected to your data source (cable modem or network hub). • Re-establish ... If the network connection is plugged in and not damaged. 33 See the Service Manual on the Dell Support website at support.dell.com for your problem using the following guidelines, see "Using Support Tools" on page 40 or "Contacting... Dell" on the wireless switch, slide it from the rear to ensure it clicks into place. - To...
Network Problems Wireless Connections If the network connection is powered on and connected to your data source (cable modem or network hub). • Re-establish ... If the network connection is plugged in and not damaged. 33 See the Service Manual on the Dell Support website at support.dell.com for your problem using the following guidelines, see "Using Support Tools" on page 40 or "Contacting... Dell" on the wireless switch, slide it from the rear to ensure it clicks into place. - To...
Setup Guide
Page 36
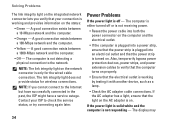
NOTE: The link integrity light on the network connector is only for wireless connections. Also, temporarily bypass power protection devices, power strips, and power extension cables to the Internet but have successfully connected in the past, the ISP might have a service outage. The ...8226; Check the AC adapter cable connections. If the power light is solid white and the computer is not responding - Power Problems If the power light is off or is not receiving power. • Reseat the power cable into both the power connector on the computer and the electrical outlet. •...
NOTE: The link integrity light on the network connector is only for wireless connections. Also, temporarily bypass power protection devices, power strips, and power extension cables to the Internet but have successfully connected in the past, the ISP might have a service outage. The ...8226; Check the AC adapter cable connections. If the power light is solid white and the computer is not responding - Power Problems If the power light is off or is not receiving power. • Reseat the power cable into both the power connector on the computer and the electrical outlet. •...

Setup Guide
Page 37
...pad or a connected mouse, or press the power button to see the Dell Technology Guide on the Dell Support website at support.dell.com). 35 If necessary, install additional memory (See the Service Manual on the Dell Support website at support.dell.com). • Reseat the memory modules ... (see the Service Manual on the Dell Support website at support.dell.com) to the same electrical outlet. If you are : • Power, keyboard, and mouse extension cables. • Too many devices connected to a power strip. • Multiple power strips connected to ensure that you encounter...
...pad or a connected mouse, or press the power button to see the Dell Technology Guide on the Dell Support website at support.dell.com). 35 If necessary, install additional memory (See the Service Manual on the Dell Support website at support.dell.com). • Reseat the memory modules ... (see the Service Manual on the Dell Support website at support.dell.com) to the same electrical outlet. If you are : • Power, keyboard, and mouse extension cables. • Too many devices connected to a power strip. • Multiple power strips connected to ensure that you encounter...
Setup Guide
Page 38
... If the computer does not start up - Check the software documentation. NOTE: Software usually includes installation instructions in its documentation or on the Dell Support website at least 8 to the electrical outlet. Press simultaneously. 2. If a program crashes repeatedly - Solving Problems • Check if ... type of memory supported by pressing a key on your keyboard or moving your mouse, press the power button for at support.dell.com) to ensure that the power cable is successfully communicating with your computer is firmly connected to the computer and to 10 seconds until...
... If the computer does not start up - Check the software documentation. NOTE: Software usually includes installation instructions in its documentation or on the Dell Support website at least 8 to the electrical outlet. Press simultaneously. 2. If a program crashes repeatedly - Solving Problems • Check if ... type of memory supported by pressing a key on your keyboard or moving your mouse, press the power button for at support.dell.com) to ensure that the power cable is successfully communicating with your computer is firmly connected to the computer and to 10 seconds until...

Setup Guide
Page 39
... 10 seconds until the computer turns off . Follow the instructions on your keyboard or moving your pointer using the touch pad or mouse, press the power button for an earlier Microsoft® Windows® operating system - Turn the computer off and then restart your computer meets the minimum hardware requirements needed...
... 10 seconds until the computer turns off . Follow the instructions on your keyboard or moving your pointer using the touch pad or mouse, press the power button for an earlier Microsoft® Windows® operating system - Turn the computer off and then restart your computer meets the minimum hardware requirements needed...

Setup Guide
Page 42
...disk drive failure. In the search results, select the option that a parameter has exceeded its normal operating range. Your USB device needs more power for assistance). Click Start → Help and Support. 2. Hardware Troubleshooter If a device is either not detected during the operating system setup... on the system board might be enabled or disabled in the BIOS setup (see "Contacting Dell" on page 58 and run the Dell Diagnostics before you contact Dell for assistance). Use an external power source to connect the USB device, or if your computer, perform the checks in the ...
...disk drive failure. In the search results, select the option that a parameter has exceeded its normal operating range. Your USB device needs more power for assistance). Click Start → Help and Support. 2. Hardware Troubleshooter If a device is either not detected during the operating system setup... on the system board might be enabled or disabled in the BIOS setup (see "Contacting Dell" on page 58 and run the Dell Diagnostics before you contact Dell for assistance). Use an external power source to connect the USB device, or if your computer, perform the checks in the ...
Setup Guide
Page 53
... on page 55. Include any of the invoice and a letter describing the reason for your region, see "Contacting Dell" on page 42). 5. Pack the equipment to be refused at www.dell.com. Include a copy of the preceding requirements will be returned in the original (or equivalent) packing materials. ...On Delivery (C.O.D.) packages are responsible for credit. 6. Returning Items for Repair Under Warranty or for Credit Prepare all items being returned (power cables, software, guides, and so on the outside of the box. 2. Call Dell to call for repair or credit, as follows: 1.
... on page 55. Include any of the invoice and a letter describing the reason for your region, see "Contacting Dell" on page 42). 5. Pack the equipment to be refused at www.dell.com. Include a copy of the preceding requirements will be returned in the original (or equivalent) packing materials. ...On Delivery (C.O.D.) packages are responsible for credit. 6. Returning Items for Repair Under Warranty or for Credit Prepare all items being returned (power cables, software, guides, and so on the outside of the box. 2. Call Dell to call for repair or credit, as follows: 1.
Setup Guide
Page 61
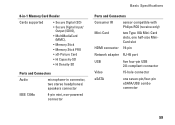
... • Hi Capacity-SD • Hi Density-SD Ports and Connectors Audio microphone-in connector, two stereo headphones/ speakers connector IEEE 1394a 4-pin mini, non-powered connector Basic Specifications Ports and Connectors Consumer IR sensor compatible with Philips RC6 (receive only) Mini-Card HDMI connector two Type IIIA Mini-Card slots...
... • Hi Capacity-SD • Hi Density-SD Ports and Connectors Audio microphone-in connector, two stereo headphones/ speakers connector IEEE 1394a 4-pin mini, non-powered connector Basic Specifications Ports and Connectors Consumer IR sensor compatible with Philips RC6 (receive only) Mini-Card HDMI connector two Type IIIA Mini-Card slots...
Setup Guide
Page 66
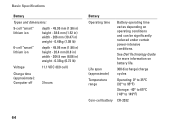
See Dell Technology Guide for more information on operating conditions and can be significantly reduced under certain power-intensive conditions. Basic Specifications Battery Types and dimensions: 9-cell "smart" lithium ion depth - 49.95 mm (1.96 in) height - 38.6 mm (1.52 in) width - 266 ...
See Dell Technology Guide for more information on operating conditions and can be significantly reduced under certain power-intensive conditions. Basic Specifications Battery Types and dimensions: 9-cell "smart" lithium ion depth - 49.95 mm (1.96 in) height - 38.6 mm (1.52 in) width - 266 ...
Setup Guide
Page 67
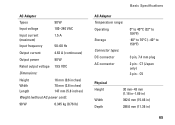
... W Rated output voltage 19.5 VDC Dimensions: Height 16 mm (0.6 inches) Width 70 mm (2.8 inches) Length 147 mm (5.8 inches) Weight (without AC power cord): 90 W 0.345 kg (0.76 lb) Basic Specifications AC Adapter Temperature range: Operating Storage Connector types: DC connector AC connector 0° to 40°C (32&#...
... W Rated output voltage 19.5 VDC Dimensions: Height 16 mm (0.6 inches) Width 70 mm (2.8 inches) Length 147 mm (5.8 inches) Weight (without AC power cord): 90 W 0.345 kg (0.76 lb) Basic Specifications AC Adapter Temperature range: Operating Storage Connector types: DC connector AC connector 0° to 40°C (32&#...

Setup Guide
Page 72
Index N network connection fixing 33 network speed testing 33 O order status 50 P power problems, solving 34 power strips, using 6 problems, solving 33 products information and purchasing 51 R reinstalling Windows 43 resources, finding more 54 70 restoring factory image 44 S setup, before you begin 5 shipping products for return or repair 51 software features 30 software problems 36 solving problems 33 specifications 56 support email addresses 50 support sites worldwide 49 System Messages 38 system reinstall options 43 System Restore 43 T technical support 49
Index N network connection fixing 33 network speed testing 33 O order status 50 P power problems, solving 34 power strips, using 6 problems, solving 33 products information and purchasing 51 R reinstalling Windows 43 resources, finding more 54 70 restoring factory image 44 S setup, before you begin 5 shipping products for return or repair 51 software features 30 software problems 36 solving problems 33 specifications 56 support email addresses 50 support sites worldwide 49 System Messages 38 system reinstall options 43 System Restore 43 T technical support 49


