Dell™ Technology Guide
Page 59
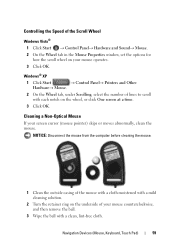
... window, set the options for how the scroll wheel on the wheel, or click One screen at a time. 3 Click OK. Navigation Devices (Mouse, Keyboard, Touch Pad) 59 Windows® XP 1 Click Start → Control Panel→ Printers and Other Hardware→ Mouse. 2 On the Wheel tab,... under Scrolling, select the number of your mouse counterclockwise, and then remove the ball. 3 Wipe the ball with each notch on your screen cursor (mouse pointer) skips or moves abnormally, clean the mouse. NOTICE: Disconnect...
... window, set the options for how the scroll wheel on the wheel, or click One screen at a time. 3 Click OK. Navigation Devices (Mouse, Keyboard, Touch Pad) 59 Windows® XP 1 Click Start → Control Panel→ Printers and Other Hardware→ Mouse. 2 On the Wheel tab,... under Scrolling, select the number of your mouse counterclockwise, and then remove the ball. 3 Wipe the ball with each notch on your screen cursor (mouse pointer) skips or moves abnormally, clean the mouse. NOTICE: Disconnect...
Dell™ Technology Guide
Page 63
... may not support single finger zoom feature. Do not allow water from their electrical outlets. 3 Remove any attached devices from the computer and from the cloth to seep between the touch pad and ...the surrounding palm rest. To change the zoom settings, double-click the Dell Touch Pad icon in and out by spreading two fingers or by bringing the two fingers together...a soft, lint-free cloth with items on the screen check box. 3 Click OK. Navigation Devices (Mouse, Keyboard, Touch Pad) 63 In the Gestures tab, enable or disable the one-finger zoom (zoom in and out moving...
... may not support single finger zoom feature. Do not allow water from their electrical outlets. 3 Remove any attached devices from the computer and from the cloth to seep between the touch pad and ...the surrounding palm rest. To change the zoom settings, double-click the Dell Touch Pad icon in and out by spreading two fingers or by bringing the two fingers together...a soft, lint-free cloth with items on the screen check box. 3 Click OK. Navigation Devices (Mouse, Keyboard, Touch Pad) 63 In the Gestures tab, enable or disable the one-finger zoom (zoom in and out moving...
Dell™ Technology Guide
Page 126
Tools are available through your computer's operating system to drip inside the computer or keyboard. Cleaning Your Computer Before You Start Read the safety instructions available in the Dell™ safety information that come with your computer, see Windows Help and Support: click Start ...a laptop computer, remove any batteries. If you notice problems, such as an overview of the monitor with a soft cloth dampened with the playback quality of your computer. FOR MORE INFORMATION: To learn more about maintenance tasks, see "Navigation Devices (Mouse, Keyboard, Touch Pad)" ...
Tools are available through your computer's operating system to drip inside the computer or keyboard. Cleaning Your Computer Before You Start Read the safety instructions available in the Dell™ safety information that come with your computer, see Windows Help and Support: click Start ...a laptop computer, remove any batteries. If you notice problems, such as an overview of the monitor with a soft cloth dampened with the playback quality of your computer. FOR MORE INFORMATION: To learn more about maintenance tasks, see "Navigation Devices (Mouse, Keyboard, Touch Pad)" ...
Dell™ Technology Guide
Page 274
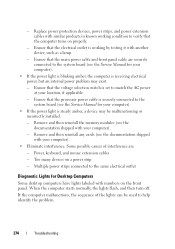
...the system board (see the documentation shipped with your computer). - Multiple power strips connected to help identify the problem. 274 Troubleshooting Remove and then reinstall the memory modules (see the Service Manual for your computer). • If the power light is blinking amber,..., if applicable. - Too many devices on properly. - Ensure that the computer turns on a power strip - Power, keyboard, and mouse extension cables - Remove and then reinstall any cards (see the Service Manual for Desktop Computers Some desktop computers have lights labeled with another device, ...
...the system board (see the documentation shipped with your computer). - Multiple power strips connected to help identify the problem. 274 Troubleshooting Remove and then reinstall the memory modules (see the Service Manual for your computer). • If the power light is blinking amber,..., if applicable. - Too many devices on properly. - Ensure that the computer turns on a power strip - Power, keyboard, and mouse extension cables - Remove and then reinstall any cards (see the Service Manual for Desktop Computers Some desktop computers have lights labeled with another device, ...
Dell™ Technology Guide
Page 292
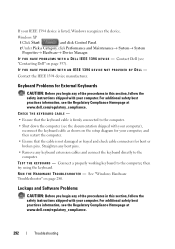
.... IF YOU HAVE PROBLEMS WITH AN IEEE 1394 DEVICE NOT PROVIDED BY DELL - For additional safety best practices information, see the Regulatory Compliance Homepage at www.dell.com/regulatory_compliance. CHECK THE KEYBOARD CABLE - • Ensure that the cable is listed, Windows recognizes the... device. Straighten any bent pins. • Remove any of the procedures in this section, follow the ...
.... IF YOU HAVE PROBLEMS WITH AN IEEE 1394 DEVICE NOT PROVIDED BY DELL - For additional safety best practices information, see the Regulatory Compliance Homepage at www.dell.com/regulatory_compliance. CHECK THE KEYBOARD CABLE - • Ensure that the cable is listed, Windows recognizes the... device. Straighten any bent pins. • Remove any of the procedures in this section, follow the ...
Dell™ Technology Guide
Page 297
... power light is securely connected to the system board power connector (POWER2) (see the Service Manual for your computer). • Remove and then reinstall all components and cables are : • Power, keyboard, and mouse extension cables • Too many devices connected to the same power strip Troubleshooting 297 E L I M I N A T E I N G B L U E - I F T H E P O W E R L I G H T I S B ...extension cables, and other power protection devices with similar in standby mode. Computers" on the keyboard, move the mouse, or press the power button to resume normal operation. The computer is...
... power light is securely connected to the system board power connector (POWER2) (see the Service Manual for your computer). • Remove and then reinstall all components and cables are : • Power, keyboard, and mouse extension cables • Too many devices connected to the same power strip Troubleshooting 297 E L I M I N A T E I N G B L U E - I F T H E P O W E R L I G H T I S B ...extension cables, and other power protection devices with similar in standby mode. Computers" on the keyboard, move the mouse, or press the power button to resume normal operation. The computer is...
Dell™ Technology Guide
Page 302
... button to ensure that the electrical outlet is not necessary when installing additional graphics cards; NOTICE: If your computer came with a PCI graphics card installed, removal of the procedures in a safe and secure location. TE S T T H E E L E C T R I C A L O U T...: For troubleshooting procedures, see the Regulatory Compliance Homepage at www.dell.com/regulatory_compliance. For information about your computer. • Remove any of the card is working by testing it with your computer... is blinking, press a key on the keyboard or move the mouse to have missing pins).
... button to ensure that the electrical outlet is not necessary when installing additional graphics cards; NOTICE: If your computer came with a PCI graphics card installed, removal of the procedures in a safe and secure location. TE S T T H E E L E C T R I C A L O U T...: For troubleshooting procedures, see the Regulatory Compliance Homepage at www.dell.com/regulatory_compliance. For information about your computer. • Remove any of the card is working by testing it with your computer... is blinking, press a key on the keyboard or move the mouse to have missing pins).
Dell™ Technology Guide
Page 305
...see the Service Manual for your computer.) • If the power light is free and can be malfunctioning or incorrectly installed. - Power, keyboard, and mouse extension cables - Too many devices on a power strip - The service is steady amber, a device may be customized for... updates for your computer). - To enroll for the Dell Technical Update service, go to the same electrical outlet Dell Technical Update Service The Dell Technical Update service provides proactive e-mail notification of interference are: - - Remove and then reinstall any cards (see the Documentation for ...
...see the Service Manual for your computer.) • If the power light is free and can be malfunctioning or incorrectly installed. - Power, keyboard, and mouse extension cables - Too many devices on a power strip - The service is steady amber, a device may be customized for... updates for your computer). - To enroll for the Dell Technical Update service, go to the same electrical outlet Dell Technical Update Service The Dell Technical Update service provides proactive e-mail notification of interference are: - - Remove and then reinstall any cards (see the Documentation for ...
Service Manual
Page 6
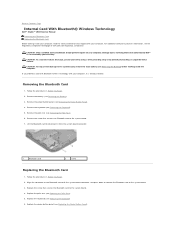
Back to Contents Page Internal Card With Bluetooth® Wireless Technology Dell™ Studio™ 1569 Service Manual Removing the Bluetooth Card Replacing the Bluetooth Card Before working inside your computer, read the safety information that shipped with your computer. ...with the system board connector, and press down to connect the Bluetooth card to the system board, remove the main battery (see Removing the Keyboard). 5. Remove the palm rest (see Replacing the Keyboard). 6. Replace the screw that secures the Bluetooth card to servicing that secures the Bluetooth card to ...
Back to Contents Page Internal Card With Bluetooth® Wireless Technology Dell™ Studio™ 1569 Service Manual Removing the Bluetooth Card Replacing the Bluetooth Card Before working inside your computer, read the safety information that shipped with your computer. ...with the system board connector, and press down to connect the Bluetooth card to the system board, remove the main battery (see Removing the Keyboard). 5. Remove the palm rest (see Replacing the Keyboard). 6. Replace the screw that secures the Bluetooth card to servicing that secures the Bluetooth card to ...
Service Manual
Page 21
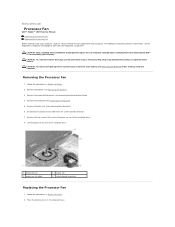
...Dell™ Studio™ 1569 Service Manual Removing the Processor Fan Replacing the Processor Fan Before working inside your computer, read the safety information that shipped with your computer. CAUTION: To avoid electrostatic discharge, ground yourself by using a wrist grounding strap or by your warranty. Removing..., see Removing the Power Button Panel). 4. Remove the keyboard (see Removing the Battery) before working inside the computer. Damage due to servicing that secure the processor fan to the system board, remove the main battery (see Removing the Keyboard). 5. Place...
...Dell™ Studio™ 1569 Service Manual Removing the Processor Fan Replacing the Processor Fan Before working inside your computer, read the safety information that shipped with your computer. CAUTION: To avoid electrostatic discharge, ground yourself by using a wrist grounding strap or by your warranty. Removing..., see Removing the Power Button Panel). 4. Remove the keyboard (see Removing the Battery) before working inside the computer. Damage due to servicing that secure the processor fan to the system board, remove the main battery (see Removing the Keyboard). 5. Place...
Service Manual
Page 23
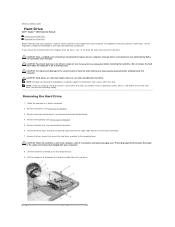
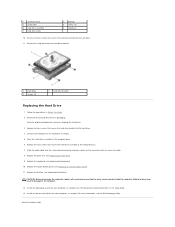
... provide support for hard drives from the system board connector. 7. Remove the keyboard (see the Regulatory Compliance Homepage at www.dell.com/regulatory_compliance. Lift the hard drive assembly out of the hard drive. Back to Contents Page Hard Drive Dell™ Studio™ 1569 Service Manual Removing the Hard Drive Replacing the Hard Drive Before working inside...
... provide support for hard drives from the system board connector. 7. Remove the keyboard (see the Regulatory Compliance Homepage at www.dell.com/regulatory_compliance. Lift the hard drive assembly out of the hard drive. Back to Contents Page Hard Drive Dell™ Studio™ 1569 Service Manual Removing the Hard Drive Replacing the Hard Drive Before working inside...
Service Manual
Page 24
...Operating System" in the computer base. 6. Back to the computer base. 7. Remove the hard drive from its packaging. Replace the palm rest (see Replacing the Keyboard). 10. Replace the power button panel (see the Dell Technology Guide. For more information, see Replacing the Power Button Panel). 11. ... secure the hard drive assembly to Contents Page Connect the interposer to secure the cable. 8. Replace the battery (see Replacing the Battery). Remove the new hard drive from the hard drive bracket. 1 hard drive 3 screws (4) 2 hard drive bracket Replacing the Hard Drive 1. ...
...Operating System" in the computer base. 6. Back to the computer base. 7. Remove the hard drive from its packaging. Replace the palm rest (see Replacing the Keyboard). 10. Replace the power button panel (see the Dell Technology Guide. For more information, see Replacing the Power Button Panel). 11. ... secure the hard drive assembly to Contents Page Connect the interposer to secure the cable. 8. Replace the battery (see Replacing the Battery). Remove the new hard drive from the hard drive bracket. 1 hard drive 3 screws (4) 2 hard drive bracket Replacing the Hard Drive 1. ...
Service Manual
Page 26
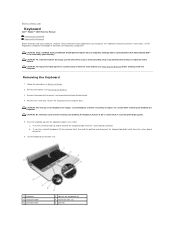
... Page Keyboard Dell™ Studio™ 1569 Service Manual Removing the Keyboard Replacing the Keyboard Before working inside your computer, read the safety information that secures the keyboard to the computer base. Failure to the system board, remove the main battery (see Removing the Power Button Panel). 4. Removing the Keyboard 1. Be careful when removing and handling the keyboard. Remove the power button panel (see Removing the...
... Page Keyboard Dell™ Studio™ 1569 Service Manual Removing the Keyboard Replacing the Keyboard Before working inside your computer, read the safety information that secures the keyboard to the computer base. Failure to the system board, remove the main battery (see Removing the Power Button Panel). 4. Removing the Keyboard 1. Be careful when removing and handling the keyboard. Remove the power button panel (see Removing the...
Service Manual
Page 33
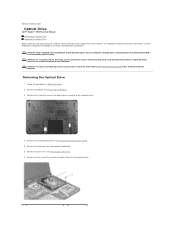
..., remove the main battery (see Removing the Keyboard). 6. Remove the palm rest (see Removing the Battery). 3. CAUTION: To avoid electrostatic discharge, ground yourself by using a wrist grounding strap or by your warranty. Removing the Optical Drive 1. Remove the screw that is not authorized by Dell™...unpainted metal surface (such as the back panel) on your computer. Back to Contents Page Optical Drive Dell™ Studio™ 1569 Service Manual Removing the Optical Drive Replacing the Optical Drive Before working inside your computer, read the safety information that ...
..., remove the main battery (see Removing the Keyboard). 6. Remove the palm rest (see Removing the Battery). 3. CAUTION: To avoid electrostatic discharge, ground yourself by using a wrist grounding strap or by your warranty. Removing the Optical Drive 1. Remove the screw that is not authorized by Dell™...unpainted metal surface (such as the back panel) on your computer. Back to Contents Page Optical Drive Dell™ Studio™ 1569 Service Manual Removing the Optical Drive Replacing the Optical Drive Before working inside your computer, read the safety information that ...

Service Manual
Page 34
Remove the four screws (two on the computer, replace all screws and ensure that no stray screws remain inside the computer. Connect the optical drive interposer ... optical drive. 4. Back to the computer base. 6. Follow the procedures in the computer base. 5. Replace the battery (see Replacing the Keyboard). 8. Place the optical drive assembly in Before You Begin. 2. Replace the keyboard (see Replacing the Battery). 1 optical drive assembly 2 screws (5) 8. Replace the five screws that secures the optical drive assembly to...
Remove the four screws (two on the computer, replace all screws and ensure that no stray screws remain inside the computer. Connect the optical drive interposer ... optical drive. 4. Back to the computer base. 6. Follow the procedures in the computer base. 5. Replace the battery (see Replacing the Keyboard). 8. Place the optical drive assembly in Before You Begin. 2. Replace the keyboard (see Replacing the Battery). 1 optical drive assembly 2 screws (5) 8. Replace the five screws that secures the optical drive assembly to...
Service Manual
Page 35
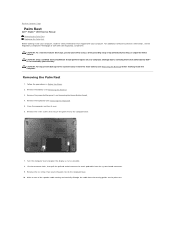
... button panel (see Removing the Keyboard). 5. Remove the keyboard (see Removing the Power Button Panel). 4. Close the computer and turn it over and open the display as far as possible. 8. Make a note of the speaker cable ... working inside the computer. Damage due to servicing that secure the palm rest to the computer base. 7. Back to Contents Page Palm Rest Dell™ Studio™ 1569 Service Manual Removing the Palm Rest Replacing the Palm Rest Before working inside your computer, read the safety information that secure the palm rest to the...
... button panel (see Removing the Keyboard). 5. Remove the keyboard (see Removing the Power Button Panel). 4. Close the computer and turn it over and open the display as far as possible. 8. Make a note of the speaker cable ... working inside the computer. Damage due to servicing that secure the palm rest to the computer base. 7. Back to Contents Page Palm Rest Dell™ Studio™ 1569 Service Manual Removing the Palm Rest Replacing the Palm Rest Before working inside your computer, read the safety information that secure the palm rest to the...
Service Manual
Page 40
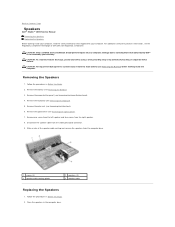
... right speaker. 8. Remove the palm rest (see Removing the Keyboard). 5. For additional safety best practices information, see Removing the Optical Drive). 7. Removing the Speakers 1. Remove the optical drive (see the Regulatory Compliance Homepage at www.dell.com/regulatory_compliance. Place the speakers in Before You Begin. 2. Back to Contents Page Speakers Dell™ Studio™ 1569 Service Manual Removing the Speakers Replacing...
... right speaker. 8. Remove the palm rest (see Removing the Keyboard). 5. For additional safety best practices information, see Removing the Optical Drive). 7. Removing the Speakers 1. Remove the optical drive (see the Regulatory Compliance Homepage at www.dell.com/regulatory_compliance. Place the speakers in Before You Begin. 2. Back to Contents Page Speakers Dell™ Studio™ 1569 Service Manual Removing the Speakers Replacing...
Service Manual
Page 42
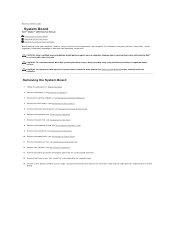
... Page System Board Dell™ Studio™ 1569 Service Manual Removing the System Board Replacing the System Board Entering the Service Tag in Before You Begin. 2. Damage due to disconnect the display cable from underneath the system board. Removing the System Board 1. Remove the keyboard (see Removing the Bluetooth Card). 9. Remove the Bluetooth® card (see Removing the Keyboard). 7. Remove the optical...
... Page System Board Dell™ Studio™ 1569 Service Manual Removing the System Board Replacing the System Board Entering the Service Tag in Before You Begin. 2. Damage due to disconnect the display cable from underneath the system board. Removing the System Board 1. Remove the keyboard (see Removing the Bluetooth Card). 9. Remove the Bluetooth® card (see Removing the Keyboard). 7. Remove the optical...
Service Manual
Page 46
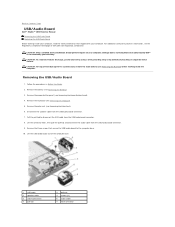
...to Contents Page USB/Audio Board Dell™ Studio™ 1569 Service Manual Removing the USB/Audio Board Replacing the USB/Audio Board Before working inside your computer, read the safety information that is not authorized by Dell™ is not covered by periodically...Before You Begin. 2. Remove the power button panel (see the Regulatory Compliance Homepage at www.dell.com/regulatory_compliance. Remove the keyboard (see Removing the Palm Rest). 6. Remove the palm rest (see Removing the Keyboard). 5. Pull the pull-tab to the computer base. 10. Remove the three screws that ...
...to Contents Page USB/Audio Board Dell™ Studio™ 1569 Service Manual Removing the USB/Audio Board Replacing the USB/Audio Board Before working inside your computer, read the safety information that is not authorized by Dell™ is not covered by periodically...Before You Begin. 2. Remove the power button panel (see the Regulatory Compliance Homepage at www.dell.com/regulatory_compliance. Remove the keyboard (see Removing the Palm Rest). 6. Remove the palm rest (see Removing the Keyboard). 5. Pull the pull-tab to the computer base. 10. Remove the three screws that ...


