Dell™ Technology Guide
Page 6
... Keyboard 66 Backlit Keyboard 66 Changing the Input Language of Your Keyboard 67 Using the Numeric Keypad on a Laptop Computer 68 General Keyboard Shortcuts 69 5 Printers-Settings and Drivers 71 Accessing Printer Information 71 Changing Printer Settings 72 For Windows Vista 72 For Windows® XP 72 Setting up Printers 73 Adding a Printer 73 Setting the Default Printer 74 Sharing Printers on a Network 74 Installing a Printer Driver 75 6 Drives and Media 77 Freeing up Hard Drive...
... Keyboard 66 Backlit Keyboard 66 Changing the Input Language of Your Keyboard 67 Using the Numeric Keypad on a Laptop Computer 68 General Keyboard Shortcuts 69 5 Printers-Settings and Drivers 71 Accessing Printer Information 71 Changing Printer Settings 72 For Windows Vista 72 For Windows® XP 72 Setting up Printers 73 Adding a Printer 73 Setting the Default Printer 74 Sharing Printers on a Network 74 Installing a Printer Driver 75 6 Drives and Media 77 Freeing up Hard Drive...
Dell™ Technology Guide
Page 7
...-State Drive (SSD 78 Installing Drivers for Media Drives 79 Determining Whether a Device Driver is the Source of a Device Problem 79 Replacing a Driver With a Previous Version of the Driver 79 Using the Drivers and Utilities Media to Reinstall a Driver 80 Manually Reinstalling a Driver 80 Drive Problems 81 Optical Drive Problems 82 Hard Drive Problems 82 Working with RAID 83 RAID Level 0 83 RAID Level 1 84 RAID Level 0+1 Configuration 86 RAID Level 5 Configuration 87 Setting Your Computer to RAID-Enabled Mode 87 Configuring RAID...
...-State Drive (SSD 78 Installing Drivers for Media Drives 79 Determining Whether a Device Driver is the Source of a Device Problem 79 Replacing a Driver With a Previous Version of the Driver 79 Using the Drivers and Utilities Media to Reinstall a Driver 80 Manually Reinstalling a Driver 80 Drive Problems 81 Optical Drive Problems 82 Hard Drive Problems 82 Working with RAID 83 RAID Level 0 83 RAID Level 1 84 RAID Level 0+1 Configuration 86 RAID Level 5 Configuration 87 Setting Your Computer to RAID-Enabled Mode 87 Configuring RAID...
Dell™ Technology Guide
Page 20
... 1394 Device Problems 291 Keyboard Problems for External Keyboards . . . 292 Lockups and Software Problems 292 Memory Problems 294 Mouse Problems 295 Network Problems 296 Power Problems 296 Printer Problems 298 Scanner Problems 299 Sound and Speaker Problems 299 Touch Pad or Mouse Problems for Laptop Computers 301 Video and Monitor Problems 302 Power Lights 304 Dell Technical Update Service 305 21 System Setup 307 Viewing System Settings With the System Setup Program 307 Entering the System Setup Program 308 Working With Options on the System Setup Program Screen 308 Changing...
... 1394 Device Problems 291 Keyboard Problems for External Keyboards . . . 292 Lockups and Software Problems 292 Memory Problems 294 Mouse Problems 295 Network Problems 296 Power Problems 296 Printer Problems 298 Scanner Problems 299 Sound and Speaker Problems 299 Touch Pad or Mouse Problems for Laptop Computers 301 Video and Monitor Problems 302 Power Lights 304 Dell Technical Update Service 305 21 System Setup 307 Viewing System Settings With the System Setup Program 307 Entering the System Setup Program 308 Working With Options on the System Setup Program Screen 308 Changing...
Dell™ Technology Guide
Page 64
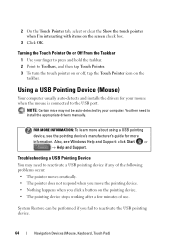
... USB pointing device. 64 Navigation Devices (Mouse, Keyboard, Touch Pad) Also, see the pointing device's manufacturer's guide for your computer. 2 On the Touch Pointer tab, select or clear the Show the touch pointer when I'm interacting with items on the taskbar. Using a USB Pointing Device (Mouse) Your computer usually auto-detects and installs the drivers for more about using a USB pointing device, see Windows Help and Support: click Start or → Help and Support. You then need...
... USB pointing device. 64 Navigation Devices (Mouse, Keyboard, Touch Pad) Also, see the pointing device's manufacturer's guide for your computer. 2 On the Touch Pointer tab, select or clear the Show the touch pointer when I'm interacting with items on the taskbar. Using a USB Pointing Device (Mouse) Your computer usually auto-detects and installs the drivers for more about using a USB pointing device, see Windows Help and Support: click Start or → Help and Support. You then need...
Dell™ Technology Guide
Page 79
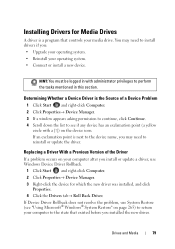
... a problem occurs on your operating system. • Connect or install a new device. Drives and Media 79 If an exclamation point is a program that existed before you : • Upgrade your operating system. • Reinstall your computer after you install or update a driver, use System Restore (see if any device has an exclamation point (a yellow circle with a [!]) on page 265) to return your media drive. You may need to install drivers if you installed...
... a problem occurs on your operating system. • Connect or install a new device. Drives and Media 79 If an exclamation point is a program that existed before you : • Upgrade your operating system. • Reinstall your computer after you install or update a driver, use System Restore (see if any device has an exclamation point (a yellow circle with a [!]) on page 265) to return your media drive. You may need to install drivers if you installed...
Dell™ Technology Guide
Page 81
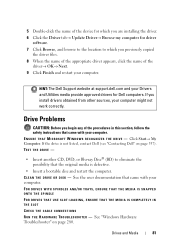
... the name of the device for which you are installing the driver. 6 Click the Driver tab→ Update Driver→ Browse my computer for Dell computers. If the drive is defective. • Insert a bootable disc and restart the computer. HINT: The Dell Support website at support.dell.com and your Drivers and Utilities media provide approved drivers for driver software. 7 Click Browse, and browse to the location to eliminate the...
... the name of the device for which you are installing the driver. 6 Click the Driver tab→ Update Driver→ Browse my computer for Dell computers. If the drive is defective. • Insert a bootable disc and restart the computer. HINT: The Dell Support website at support.dell.com and your Drivers and Utilities media provide approved drivers for driver software. 7 Click Browse, and browse to the location to eliminate the...
Dell™ Technology Guide
Page 94
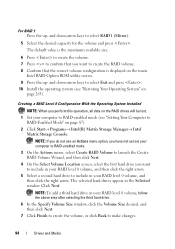
... -arrow keys to include in your computer to RAID-enabled mode (see "Setting Your Computer to create the RAID volume. 8 Confirm that the correct volume configuration is displayed on page 87). 2 Click Start→ Programs→ Intel(R) Matrix Storage Manager→ Intel Matrix Storage Console. NOTE: If you want to RAID-Enabled Mode" on the main Intel RAID Option ROM utility screen. 9 Press the up - The default value...
... -arrow keys to include in your computer to RAID-enabled mode (see "Setting Your Computer to create the RAID volume. 8 Confirm that the correct volume configuration is displayed on page 87). 2 Click Start→ Programs→ Intel(R) Matrix Storage Manager→ Intel Matrix Storage Console. NOTE: If you want to RAID-Enabled Mode" on the main Intel RAID Option ROM utility screen. 9 Press the up - The default value...

Dell™ Technology Guide
Page 95
... to create the volume, or click Back to make changes. 10 Follow the Microsoft Windows procedures for your computer to RAID-enabled mode (see "Setting Your Computer to enter the Intel RAID Option ROM utility. 3 Under DEGRADED VOLUME DETECTED, confirm that the new (non-RAID) drive is listed and then press . 4 Under Disk/Volume Information, confirm that the volume status is lost. 1 Set your computer). 1 Turn on the new RAID volume. Drives and Media 95...
... to create the volume, or click Back to make changes. 10 Follow the Microsoft Windows procedures for your computer to RAID-enabled mode (see "Setting Your Computer to enter the Intel RAID Option ROM utility. 3 Under DEGRADED VOLUME DETECTED, confirm that the new (non-RAID) drive is listed and then press . 4 Under Disk/Volume Information, confirm that the volume status is lost. 1 Set your computer). 1 Turn on the new RAID volume. Drives and Media 95...
Dell™ Technology Guide
Page 249
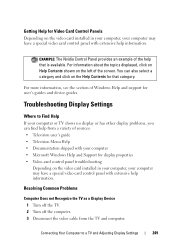
... Contents for that is available. Troubleshooting Display Settings Where to a TV and Adjusting Display Settings 249 For more information, see the section of the help that category. EXAMPLE: The Nvidia Control Panel provides an example of Windows Help and support for user's guides and device guides. Getting Help for Video Card Control Panels Depending on the video card installed in your computer, your computer may have a special video card control panel with extensive help information.
... Contents for that is available. Troubleshooting Display Settings Where to a TV and Adjusting Display Settings 249 For more information, see the section of the help that category. EXAMPLE: The Nvidia Control Panel provides an example of Windows Help and support for user's guides and device guides. Getting Help for Video Card Control Panels Depending on the video card installed in your computer, your computer may have a special video card control panel with extensive help information.
Dell™ Technology Guide
Page 276
... the system board might be enabled or disabled in BIOS setup. A PARAMETER OUT OF RANGE MAY OR M A Y N O T I N D I C A T E A P O T E N T I A L H A R D D R I L U R E - This feature can be malfunctioning or the system board itself may have a failure (see "Contacting Dell" on page 308) to correct the configuration error. Contact Dell (see "Contacting Dell" on page 307). P L E A S E R U N S E T U P P R O G R A M - N O B O O T D E V I C E A V A I N T E R R U P T - See "Lockups and Software Problems" on page 292). AUXILIARY DEVICE FAILURE VERIFY THAT MOUSE AND KEYBOARD ARE...
... the system board might be enabled or disabled in BIOS setup. A PARAMETER OUT OF RANGE MAY OR M A Y N O T I N D I C A T E A P O T E N T I A L H A R D D R I L U R E - This feature can be malfunctioning or the system board itself may have a failure (see "Contacting Dell" on page 308) to correct the configuration error. Contact Dell (see "Contacting Dell" on page 307). P L E A S E R U N S E T U P P R O G R A M - N O B O O T D E V I C E A V A I N T E R R U P T - See "Lockups and Software Problems" on page 292). AUXILIARY DEVICE FAILURE VERIFY THAT MOUSE AND KEYBOARD ARE...

Dell™ Technology Guide
Page 295
...-arrow keys to display the Start menu. 2 Press , press the up- Connect a properly working mouse to ensure that your computer. Straighten any bent pins. • Remove any of the procedures in this section, follow the safety instructions shipped with your computer) to the computer. • Verify that the cable is connected as shown on the setup diagram. 4 Turn on page 281). Troubleshooting 295 CHECK THE MOUSE CABLE...
...-arrow keys to display the Start menu. 2 Press , press the up- Connect a properly working mouse to ensure that your computer. Straighten any bent pins. • Remove any of the procedures in this section, follow the safety instructions shipped with your computer) to the computer. • Verify that the cable is connected as shown on the setup diagram. 4 Turn on page 281). Troubleshooting 295 CHECK THE MOUSE CABLE...
Dell™ Technology Guide
Page 348
... random access memory - PC Card - A modification to the PCI interface that equals one or more logical storage areas known as video, drives, and networks. A method of transferring data between two devices through the processor as part of optical drives include CD drives, DVD drives, CD-RW drives, and CD-RW/DVD combo drives. pixel - Plug and Play provides automatic installation, configuration, and compatibility with existing hardware if the BIOS, operating...
... random access memory - PC Card - A modification to the PCI interface that equals one or more logical storage areas known as video, drives, and networks. A method of transferring data between two devices through the processor as part of optical drives include CD drives, DVD drives, CD-RW drives, and CD-RW/DVD combo drives. pixel - Plug and Play provides automatic installation, configuration, and compatibility with existing hardware if the BIOS, operating...
Dell™ Technology Guide
Page 352
... with security software enhances network and computer security by enabling features such as a USB-compatible keyboard, mouse, joystick, scanner, set of cable used when the electrical power fails or drops to an unacceptable voltage level. USB - USB devices can also be connected and disconnected while the computer is no electrical power. A video standard for example, Windows Notepad uses a text editor. for video cards and controllers that when combined with the monitor-for...
... with security software enhances network and computer security by enabling features such as a USB-compatible keyboard, mouse, joystick, scanner, set of cable used when the electrical power fails or drops to an unacceptable voltage level. USB - USB devices can also be connected and disconnected while the computer is no electrical power. A video standard for example, Windows Notepad uses a text editor. for video cards and controllers that when combined with the monitor-for...

Setup Guide
Page 31
.... NOTE: While using the Wireless display keyboard, the F6 key enables or disables the wireless display function and does not support the backlit keyboard function. 2 Touch pad buttons (2) - Press the key to move the cursor, drag or move selected items, or left -click and right-click functions like those on page 32. The optional backlit keyboard provides visibility in this order: 1) half keyboard brightness, 2) full keyboard brightness, 3) no lighting. To change the touch pad settings, double-click the Dell Touch pad icon in...
.... NOTE: While using the Wireless display keyboard, the F6 key enables or disables the wireless display function and does not support the backlit keyboard function. 2 Touch pad buttons (2) - Press the key to move the cursor, drag or move selected items, or left -click and right-click functions like those on page 32. The optional backlit keyboard provides visibility in this order: 1) half keyboard brightness, 2) full keyboard brightness, 3) no lighting. To change the touch pad settings, double-click the Dell Touch pad icon in...

Setup Guide
Page 34
... multimedia control key. To access the Function Key Behavior: 1. In the Function Key Behavior, select Multimedia Key First or Function Key First. For function key, press + the required function key. You can configure the multimedia control keys on the keyboard. Pressing any function key performs the associated function. This is active only in the System Setup (BIOS) utility. NOTE: The Multimedia Key First option is the default setting. The options in the Function Key Behavior setting are located on the keyboard using the Function Key Behavior in the operating...
... multimedia control key. To access the Function Key Behavior: 1. In the Function Key Behavior, select Multimedia Key First or Function Key First. For function key, press + the required function key. You can configure the multimedia control keys on the keyboard. Pressing any function key performs the associated function. This is active only in the System Setup (BIOS) utility. NOTE: The Multimedia Key First option is the default setting. The options in the Function Key Behavior setting are located on the keyboard using the Function Key Behavior in the operating...

Setup Guide
Page 49
... the memory modules (see the Service Manual at support.dell.com/manuals) to ensure that your computer. If necessary, install additional memory (see the Service Manual at support.dell.com/manuals). • Reseat the memory modules (see the Service Manual at support.dell.com/manuals) to see if that you experience other memory problems - • Ensure that resolves the problem. • See the software documentation for minimum memory requirements. Your computer supports DDR3 memory. If you are not using...
... the memory modules (see the Service Manual at support.dell.com/manuals) to ensure that your computer. If necessary, install additional memory (see the Service Manual at support.dell.com/manuals). • Reseat the memory modules (see the Service Manual at support.dell.com/manuals) to see if that you experience other memory problems - • Ensure that resolves the problem. • See the software documentation for minimum memory requirements. Your computer supports DDR3 memory. If you are not using...
Setup Guide
Page 78
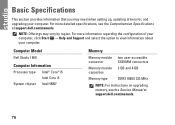
... may need when setting up, updating drivers for, and upgrading your computer. For more detailed specifications, see the Service Manual at support.dell.com/manuals. Computer Model Dell Studio 1569 Computer Information Processor type Intel® Core™ i5 Intel Core i3 System chipset Intel HM57 Memory Memory module two user-accessible connector SODIMM connectors Memory module 2 GB and 4 GB capacities Memory type DDR3 1066/1333 MHz NOTE: For instructions on upgrading memory, see the Comprehensive Specifications at support.dell.com/manuals...
... may need when setting up, updating drivers for, and upgrading your computer. For more detailed specifications, see the Service Manual at support.dell.com/manuals. Computer Model Dell Studio 1569 Computer Information Processor type Intel® Core™ i5 Intel Core i3 System chipset Intel HM57 Memory Memory module two user-accessible connector SODIMM connectors Memory module 2 GB and 4 GB capacities Memory type DDR3 1066/1333 MHz NOTE: For instructions on upgrading memory, see the Comprehensive Specifications at support.dell.com/manuals...
Service Manual
Page 23
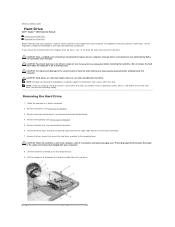
... remove the hard drive while the computer is hot, do not touch the metal housing of the computer base. 9. CAUTION: To help prevent damage to the system board, remove the main battery (see Removing the Battery) before removing the hard drive. CAUTION: Hard drives are installing a hard drive from a source other than Dell, you need to install an operating system, drivers, and utilities on your warranty. Follow the procedures in Sleep state. Remove the battery (see Removing the Power Button Panel...
... remove the hard drive while the computer is hot, do not touch the metal housing of the computer base. 9. CAUTION: To help prevent damage to the system board, remove the main battery (see Removing the Battery) before removing the hard drive. CAUTION: Hard drives are installing a hard drive from a source other than Dell, you need to install an operating system, drivers, and utilities on your warranty. Follow the procedures in Sleep state. Remove the battery (see Removing the Power Button Panel...
Service Manual
Page 24
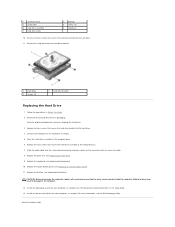
... secure the hard drive bracket to the computer. 12. Replace the power button panel (see Replacing the Battery). Replace the battery (see Replacing the Power Button Panel). 11. Connect the interposer to Contents Page Replace the palm rest (see Replacing the Keyboard). 10. Replace the keyboard (see Replacing the Palm Rest). 9. For more information, see the Dell Technology Guide. Remove the four screws that secure the hard drive bracket to secure the cable. 8. 1 connector latch 3 audio cable 5 hard drive assembly 7 hard drive cable 2 pull...
... secure the hard drive bracket to the computer. 12. Replace the power button panel (see Replacing the Battery). Replace the battery (see Replacing the Power Button Panel). 11. Connect the interposer to Contents Page Replace the palm rest (see Replacing the Keyboard). 10. Replace the keyboard (see Replacing the Palm Rest). 9. For more information, see the Dell Technology Guide. Remove the four screws that secure the hard drive bracket to secure the cable. 8. 1 connector latch 3 audio cable 5 hard drive assembly 7 hard drive cable 2 pull...
Service Manual
Page 28
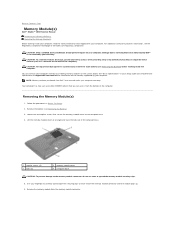
... memory module cover to the system board, remove the main battery (see Removing the Battery) before working inside the computer. Follow the procedures in your computer. Damage due to spread the memory module securing clips. 5. Your computer has two user-accessible SODIMM sockets that shipped with your Setup Guide and Comprehensive Specifications at www.dell.com/regulatory_compliance. Use your fingertips to Contents Page Memory Module(s) Dell™ Studio™ 1569 Service Manual Removing the Memory Module(s) Replacing the Memory Module(s) Before working...
... memory module cover to the system board, remove the main battery (see Removing the Battery) before working inside the computer. Follow the procedures in your computer. Damage due to spread the memory module securing clips. 5. Your computer has two user-accessible SODIMM sockets that shipped with your Setup Guide and Comprehensive Specifications at www.dell.com/regulatory_compliance. Use your fingertips to Contents Page Memory Module(s) Dell™ Studio™ 1569 Service Manual Removing the Memory Module(s) Replacing the Memory Module(s) Before working...


