
Dell Studio 1555 Service Manual
Page 16
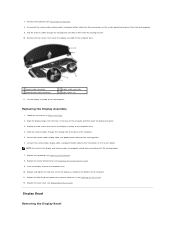
...the two that secure the display assembly to it from the routing channel. 10. Replace the base cover (see Removing the Keyboard). 8. Display Bezel Removing the Display Bezel Remove the keyboard (see Replacing the Base Cover). Secure the camera cable, display cable, and power button cable ...Card and connect the antenna cables to the computer base. 4. Lift the display assembly out of the computer. 5. Replace the keyboard (see Replacing the Keyboard). 8. Replace the two screws that secure the display assembly to the base of the computer. Connect the camera cable, display ...
...the two that secure the display assembly to it from the routing channel. 10. Replace the base cover (see Removing the Keyboard). 8. Display Bezel Removing the Display Bezel Remove the keyboard (see Replacing the Base Cover). Secure the camera cable, display cable, and power button cable ...Card and connect the antenna cables to the computer base. 4. Lift the display assembly out of the computer. 5. Replace the keyboard (see Replacing the Keyboard). 8. Replace the two screws that secure the display assembly to the base of the computer. Connect the camera cable, display ...

Dell Studio 1555 Service Manual
Page 26
... the center control cover (see Before Working Inside Your Computer) before working inside the computer. Slide the keyboard cable out of the keyboard. Back to Contents Page Keyboard Dell Studio™ 1555 Service Manual Removing the Keyboard Replacing the Keyboard WARNING: Before working inside your computer, read the safety information that shipped with your warranty. For additional safety...
... the center control cover (see Before Working Inside Your Computer) before working inside the computer. Slide the keyboard cable out of the keyboard. Back to Contents Page Keyboard Dell Studio™ 1555 Service Manual Removing the Keyboard Replacing the Keyboard WARNING: Before working inside your computer, read the safety information that shipped with your warranty. For additional safety...
Dell Studio 1555 Service Manual
Page 27
Rotate the keyboard connector latch to Contents Page Align the tabs along the bottom of the keyboard and slide them into the slots of the keyboard. 7. Back to secure the cable. 4. 2. Replace the two screws on the corner edges near the top to snap the keyboard into the keyboard connector. 3. Replace the center control cover (see Replacing the Center Control Cover). Slide the keyboard cable into place. 6. Press on top of the palm rest. 5.
Rotate the keyboard connector latch to Contents Page Align the tabs along the bottom of the keyboard and slide them into the slots of the keyboard. 7. Back to secure the cable. 4. 2. Replace the two screws on the corner edges near the top to snap the keyboard into the keyboard connector. 3. Replace the center control cover (see Replacing the Center Control Cover). Slide the keyboard cable into place. 6. Press on top of the palm rest. 5.
Dell Studio 1555 Service Manual
Page 28
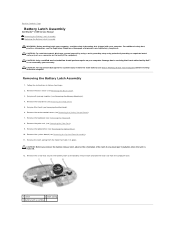
... latch spring from the computer base. 1 screw 2 latch spring 3 battery latch assembly Remove the center control cover (see Removing the Keyboard). 8. CAUTION: To avoid electrostatic discharge, ground yourself by using a wrist grounding strap or by periodically touching an unpainted metal surface (such...palm rest (see Removing the Optical Drive). 10. Back to Contents Page Battery Latch Assembly Dell Studio™ 1555 Service Manual Removing the Battery Latch Assembly Replacing the Battery Latch Assembly WARNING: Before working inside your computer, read the safety information that ...
... latch spring from the computer base. 1 screw 2 latch spring 3 battery latch assembly Remove the center control cover (see Removing the Keyboard). 8. CAUTION: To avoid electrostatic discharge, ground yourself by using a wrist grounding strap or by periodically touching an unpainted metal surface (such...palm rest (see Removing the Optical Drive). 10. Back to Contents Page Battery Latch Assembly Dell Studio™ 1555 Service Manual Removing the Battery Latch Assembly Replacing the Battery Latch Assembly WARNING: Before working inside your computer, read the safety information that ...
Setup Guide
Page 59
... device. • Enter system setup and ensure that the boot sequence information is correct (see the Service Manual at support.dell.com/manuals). Keyboard failure or loose cable. To replace the keyboard, see the Dell Technology Guide available on page 76). No bootable partition on hard drive, the hard drive cable is loose, or no...
... device. • Enter system setup and ensure that the boot sequence information is correct (see the Service Manual at support.dell.com/manuals). Keyboard failure or loose cable. To replace the keyboard, see the Dell Technology Guide available on page 76). No bootable partition on hard drive, the hard drive cable is loose, or no...


