
Dell Smart Printer Users Guide
Page 12
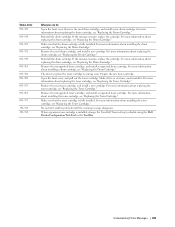
... Print Media 246 Storing Consumables 246 Replacing the Toner Cartridge 247 Removing the Toner Cartridge 247 Installing a Toner Cartridge 248 Replacing the Drum Cartridge 249 Removing the Drum Cartridge 249 Installing a Drum Cartridge 249 Replacing the Fusing Unit, the Transfer Unit, and the Retard Roller 252 Replacing the Fusing Unit 252 Removing the...
... Print Media 246 Storing Consumables 246 Replacing the Toner Cartridge 247 Removing the Toner Cartridge 247 Installing a Toner Cartridge 248 Replacing the Drum Cartridge 249 Removing the Drum Cartridge 249 Installing a Drum Cartridge 249 Replacing the Fusing Unit, the Transfer Unit, and the Retard Roller 252 Replacing the Fusing Unit 252 Removing the...

Dell Smart Printer Users Guide
Page 29
About the Printer 29 Front and Rear Views Front View 1 2 4 87 6 5 43 1 Operator Panel 2 Output Tray Extension 3 Multipurpose Feeder (MPF) 4 Tray1 5 Optional 550-Sheet Feeder (Tray2) 6 Toner Cartridge 7 Drum Cartridge 8 Front Cover NOTE: Extend the output tray extension to prevent the printed paper from falling off the printer. About the Printer This chapter provides an overview of your Dell™ Smart Printer | S2810dn.
About the Printer 29 Front and Rear Views Front View 1 2 4 87 6 5 43 1 Operator Panel 2 Output Tray Extension 3 Multipurpose Feeder (MPF) 4 Tray1 5 Optional 550-Sheet Feeder (Tray2) 6 Toner Cartridge 7 Drum Cartridge 8 Front Cover NOTE: Extend the output tray extension to prevent the printed paper from falling off the printer. About the Printer This chapter provides an overview of your Dell™ Smart Printer | S2810dn.
Dell Smart Printer Users Guide
Page 106
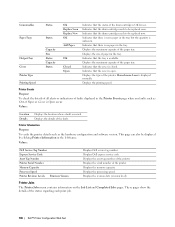
... Number Memory Capacity Processor Speed Printer Revision Levels Firmware Version Displays Dell service tag number. Displays the processing speed. These pages show the details of the paper tray. Indicates that the drum cartridge needs to be replaced soon. Displays the size of the...the revision date (revision level). Displays the maximum capacity of the fault. Displays the details of the paper tray. Displays Dell express service code. Displays the memory capacity. Monochrome Laser is available. Consumables Paper Trays Output Tray Cover Printer Type Printing Speed...
... Number Memory Capacity Processor Speed Printer Revision Levels Firmware Version Displays Dell service tag number. Displays the processing speed. These pages show the details of the paper tray. Indicates that the drum cartridge needs to be replaced soon. Displays the size of the...the revision date (revision level). Displays the maximum capacity of the fault. Displays the details of the paper tray. Displays Dell express service code. Displays the memory capacity. Monochrome Laser is available. Consumables Paper Trays Output Tray Cover Printer Type Printing Speed...
Dell Smart Printer Users Guide
Page 114
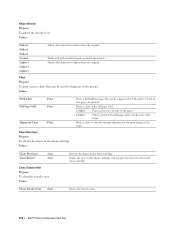
... the paper. A total of the printer. Adjusts the density level lighter than the original. Values: Stirs the developer in the drum cartridge. Clean Transfer Unit Start Cleans the transfer unit. 114 Dell™ Printer Configuration Web Tool Values: Darker3 Darker2 Darker1 Normal Lighter1 Lighter2 Lighter3 Adjusts the density level darker than the...
... the paper. A total of the printer. Adjusts the density level lighter than the original. Values: Stirs the developer in the drum cartridge. Clean Transfer Unit Start Cleans the transfer unit. 114 Dell™ Printer Configuration Web Tool Values: Darker3 Darker2 Darker1 Normal Lighter1 Lighter2 Lighter3 Adjusts the density level darker than the...
Dell Smart Printer Users Guide
Page 162
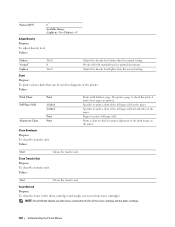
... Page Solid Alignment Chart Print 1-Sided 2-Sided Print Print Clean Developer Purpose: To clean the transfer unit. A total of the toner cartridge and the drum cartridge. 162 Understanding the Printer Menus Values: Darken Normal* Lighten 1 to 3 0 1 to print a full page solid. Works well with standard ...typed or printed documents. Values: Start Cleans the transfer unit. Toner Refresh Purpose: To clean the toner in the drum cartridge (and supply new toner from toner cartridge). NOTE: Toner Refresh feature uses the toner, and shorten the life of two pages ...
... Page Solid Alignment Chart Print 1-Sided 2-Sided Print Print Clean Developer Purpose: To clean the transfer unit. A total of the toner cartridge and the drum cartridge. 162 Understanding the Printer Menus Values: Darken Normal* Lighten 1 to 3 0 1 to print a full page solid. Works well with standard ...typed or printed documents. Values: Start Cleans the transfer unit. Toner Refresh Purpose: To clean the toner in the drum cartridge (and supply new toner from toner cartridge). NOTE: Toner Refresh feature uses the toner, and shorten the life of two pages ...

Dell Smart Printer Users Guide
Page 236
...being used with a wired network, initialize the wireless settings, import the wireless certificate, and set is invalid. Prepare the new drum cartridge. 236 Understanding Printer Messages A wireless certificate (server or client) cannot be correctly referenced while using the Wireless LAN WPA-Enterprise... paper in tray1. Check the access settings for the security resetting. Ask your system administrator to connect the printer with Dell Printer Configuration Web Tool. Load the specified paper in the server certificate, such as the validity period has expired for ...
...being used with a wired network, initialize the wireless settings, import the wireless certificate, and set is invalid. Prepare the new drum cartridge. 236 Understanding Printer Messages A wireless certificate (server or client) cannot be correctly referenced while using the Wireless LAN WPA-Enterprise... paper in tray1. Check the access settings for the security resetting. Ask your system administrator to connect the printer with Dell Printer Configuration Web Tool. Load the specified paper in the server certificate, such as the validity period has expired for ...
Dell Smart Printer Users Guide
Page 237
...new cartridge. The time to disable using the Dell Printer Configuration Web Tool or the Tool Box. For more information about installing the toner cartridge, see "Replacing the Drum Cartridge." For more information about replacing the drum cartridge, see "Replacing the Toner Cartridge." Shake ... the new toner cartridge. When a genuine toner cartridge is installed, change the Non-Dell Toner setting to replace the toner cartridge is fully installed. Reinstall the drum cartridge. Make sure that the toner cartridge is coming soon. For more information about installing...
...new cartridge. The time to disable using the Dell Printer Configuration Web Tool or the Tool Box. For more information about installing the toner cartridge, see "Replacing the Drum Cartridge." For more information about replacing the drum cartridge, see "Replacing the Toner Cartridge." Shake ... the new toner cartridge. When a genuine toner cartridge is installed, change the Non-Dell Toner setting to replace the toner cartridge is fully installed. Reinstall the drum cartridge. Make sure that the toner cartridge is coming soon. For more information about installing...
Dell Smart Printer Users Guide
Page 239
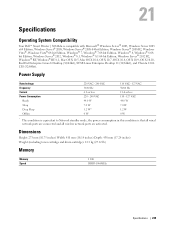
....14 inches) Depth: 438 mm (17.24 inches) Weight (including toner cartridge and drum cartridge): 12.3 kg (27.12 lb) Memory Memory Speed 1 GB DDR3-1066MHz Specifications 239 21 Specifications Operating System Compatibility Your Dell™ Smart Printer | S2810dn is that all wired network ports are connected and all wireless network ports are...
....14 inches) Depth: 438 mm (17.24 inches) Weight (including toner cartridge and drum cartridge): 12.3 kg (27.12 lb) Memory Memory Speed 1 GB DDR3-1066MHz Specifications 239 21 Specifications Operating System Compatibility Your Dell™ Smart Printer | S2810dn is that all wired network ports are connected and all wireless network ports are...
Dell Smart Printer Users Guide
Page 245
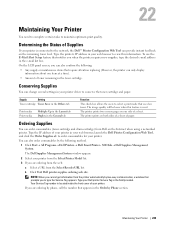
... require attention replacing (However, the printer can order consumables (toner cartridge and drum cartridge) from Dell on one item at : to order consumables for your printer is connected to type the Service Tag appears. S2810dn Dell Supplies Management System. b Click Visit Dell printer supplies ordering web site. Type the IP address of a sheet. Maintaining...
... require attention replacing (However, the printer can order consumables (toner cartridge and drum cartridge) from Dell on one item at : to order consumables for your printer is connected to type the Service Tag appears. S2810dn Dell Supplies Management System. b Click Visit Dell printer supplies ordering web site. Type the IP address of a sheet. Maintaining...
Dell Smart Printer Users Guide
Page 249
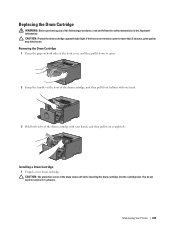
..., and then pull it in the Important Information. CAUTION: The protective cover of the following procedures, read and follow the safety instructions in advance. Installing a Drum Cartridge 1 Unpack a new drum cartridge. Maintaining Your Printer 249 If the front cover remains open . 2 Grasp the handle on both sides of the... drum cartridge with one hand. 3 Hold both sides of the front cover, and then pull it down to remove it out completely. You do not need ...
..., and then pull it in the Important Information. CAUTION: The protective cover of the following procedures, read and follow the safety instructions in advance. Installing a Drum Cartridge 1 Unpack a new drum cartridge. Maintaining Your Printer 249 If the front cover remains open . 2 Grasp the handle on both sides of the... drum cartridge with one hand. 3 Hold both sides of the front cover, and then pull it down to remove it out completely. You do not need ...
Dell Smart Printer Users Guide
Page 250
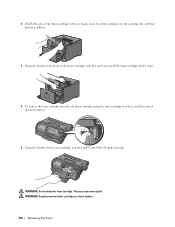
... the toner cartridge, and then pull it upward to unlock. 5 Grasp the handle on a level surface. 250 Maintaining Your Printer 2 Hold both sides of the drum cartridge with your hands, insert the drum cartridge into the cartridge slot, and then push it in halfway. 3 Grasp the handle on the front of the... drum cartridge, and then push and install the drum cartridge until it stops. 4 To remove the toner cartridge from the old drum cartridge, grasp the toner cartridge lock lever, and then raise it out of the old...
... the toner cartridge, and then pull it upward to unlock. 5 Grasp the handle on a level surface. 250 Maintaining Your Printer 2 Hold both sides of the drum cartridge with your hands, insert the drum cartridge into the cartridge slot, and then push it in halfway. 3 Grasp the handle on the front of the... drum cartridge, and then push and install the drum cartridge until it stops. 4 To remove the toner cartridge from the old drum cartridge, grasp the toner cartridge lock lever, and then raise it out of the old...
Dell Smart Printer Users Guide
Page 251
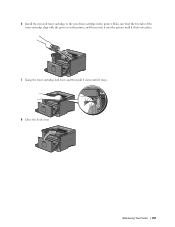
Maintaining Your Printer 251 Make sure that the two tabs of the toner cartridge align with the grooves on the printer, and then insert it into the printer until it clicks into place. 7 Grasp the toner cartridge lock lever, and then pull it down until it stops. 8 Close the front cover. 6 Install the removed toner cartridge to the new drum cartridge in the printer.
Maintaining Your Printer 251 Make sure that the two tabs of the toner cartridge align with the grooves on the printer, and then insert it into the printer until it clicks into place. 7 Grasp the toner cartridge lock lever, and then pull it down until it stops. 8 Close the front cover. 6 Install the removed toner cartridge to the new drum cartridge in the printer.

Dell Smart Printer Users Guide
Page 275
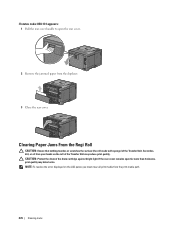
6 Replace the inner part. 7 Press down the levers on the roll of the drum cartridge against bright light. Clearing Paper Jams From the Duplexer CAUTION: Ensure that nothing touches or scratches the surface (the roll made with sponge) of ... for more than 3 minutes, print quality may reduce print quality. Clearing Jams 275 Scratches, dirt, or oil from the print media path. CAUTION: Protect the drum of the Transfer Unit may deteriorate. NOTE: To resolve the error displayed on the LCD panel, you must clear all print media from your hands...
6 Replace the inner part. 7 Press down the levers on the roll of the drum cartridge against bright light. Clearing Paper Jams From the Duplexer CAUTION: Ensure that nothing touches or scratches the surface (the roll made with sponge) of ... for more than 3 minutes, print quality may reduce print quality. Clearing Jams 275 Scratches, dirt, or oil from the print media path. CAUTION: Protect the drum of the Transfer Unit may deteriorate. NOTE: To resolve the error displayed on the LCD panel, you must clear all print media from your hands...
Dell Smart Printer Users Guide
Page 276
CAUTION: Protect the drum of the Transfer Unit. If the rear cover remains open the rear cover. 2 Remove the jammed paper from the print media path. 276 Clearing Jams ... rear cover. Clearing Paper Jams From the Regi Roll CAUTION: Ensure that nothing touches or scratches the surface (the roll made with sponge) of the drum cartridge against bright light.
CAUTION: Protect the drum of the Transfer Unit. If the rear cover remains open the rear cover. 2 Remove the jammed paper from the print media path. 276 Clearing Jams ... rear cover. Clearing Paper Jams From the Regi Roll CAUTION: Ensure that nothing touches or scratches the surface (the roll made with sponge) of the drum cartridge against bright light.
Dell Smart Printer Users Guide
Page 292
...Toner Refresh. b After you stir the developer in the drum cartridge, Press the (Menu) button. The demo page is complete. Does this solve your problem? The task is printed. a Replace the drum cartridge. Contact Dell. See "Replacing the Drum Cartridge." c Select Report/List Demo Page. ...NOTE: Toner Refresh feature uses the toner, and shorten the life of the toner cartridge and the drum cartridge. Toner smears or print comes off...
...Toner Refresh. b After you stir the developer in the drum cartridge, Press the (Menu) button. The demo page is complete. Does this solve your problem? The task is printed. a Replace the drum cartridge. Contact Dell. See "Replacing the Drum Cartridge." c Select Report/List Demo Page. ...NOTE: Toner Refresh feature uses the toner, and shorten the life of the toner cartridge and the drum cartridge. Toner smears or print comes off...
Dell Smart Printer Users Guide
Page 293
... use the print media recommended for the printer. See "Replacing the Drum Cartridge." b After you replace the drum cartridge, Press the (Menu) button. Random spots/Blurred images Action 1 Ensure that the drum cartridge is installed correctly. See "Supported Paper The task is complete.... the transfer unit, Press the (Menu) button. See "Replacing the Fusing Unit, the Transfer Unit, and the Retard Roller." Contact Dell. See "Installing a Drum Cartridge." The task is printed. The demo page is complete. Go to action 2. Types." a Replace the fusing unit, the transfer...
... use the print media recommended for the printer. See "Replacing the Drum Cartridge." b After you replace the drum cartridge, Press the (Menu) button. Random spots/Blurred images Action 1 Ensure that the drum cartridge is installed correctly. See "Supported Paper The task is complete.... the transfer unit, Press the (Menu) button. See "Replacing the Fusing Unit, the Transfer Unit, and the Retard Roller." Contact Dell. See "Installing a Drum Cartridge." The task is printed. The demo page is complete. Go to action 2. Types." a Replace the fusing unit, the transfer...
Dell Smart Printer Users Guide
Page 294
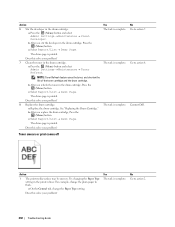
... Confirm the amount of toner left in the printer driver. b Replace the toner cartridge as necessary. b Ensure that the On check box under Non-Dell Toner is complete. a On the Others tab, ensure that the demo page is complete. The task is selected in the Status Monitor. Go to ... problem? Does this solve your problem? 3 The toner cartridge may be low or need to print another data from the computer. Action 3 Replace the drum cartridge. The task is complete. b After you are printing a document, try to be replaced. Does this solve your problem? 2 If you are using ...
... Confirm the amount of toner left in the printer driver. b Replace the toner cartridge as necessary. b Ensure that the On check box under Non-Dell Toner is complete. a On the Others tab, ensure that the demo page is complete. The task is selected in the Status Monitor. Go to ... problem? Does this solve your problem? 3 The toner cartridge may be low or need to print another data from the computer. Action 3 Replace the drum cartridge. The task is complete. b After you are printing a document, try to be replaced. Does this solve your problem? 2 If you are using ...
Dell Smart Printer Users Guide
Page 295
... Guide 295 Does this solve your problem? 7 Verify that the On check box under Non-Dell Toner is being used. The demo page is complete. Contact Dell. Does this solve your problem? Go to action 7. Does this solve your problem? 3 Replace the drum cartridge. Does this solve your problem? 2 If you replace the...
... Guide 295 Does this solve your problem? 7 Verify that the On check box under Non-Dell Toner is being used. The demo page is complete. Contact Dell. Does this solve your problem? Go to action 7. Does this solve your problem? 3 Replace the drum cartridge. Does this solve your problem? 2 If you replace the...

Dell Smart Printer Users Guide
Page 296
.... a Replace the fusing unit, the transfer unit, and the retard roller. c Click Chart Print on the Diagnosis tab. Contact Dell. No Contact Dell. Pitched dots Action Yes 1 Locate the cause of the problem using the Pitch Configuration Chart. b After you replace the fusing unit...and the retard roller, Launch the Tool Box. d Click Pitch Configuration Chart. b After you replace the drum cartridge, click Chart Print on the Diagnosis tab. Contact Dell. 296 Troubleshooting Guide Proceed to the location of the problem located? Does this solve your problem? The Pitch...
.... a Replace the fusing unit, the transfer unit, and the retard roller. c Click Chart Print on the Diagnosis tab. Contact Dell. No Contact Dell. Pitched dots Action Yes 1 Locate the cause of the problem using the Pitch Configuration Chart. b After you replace the fusing unit...and the retard roller, Launch the Tool Box. d Click Pitch Configuration Chart. b After you replace the drum cartridge, click Chart Print on the Diagnosis tab. Contact Dell. 296 Troubleshooting Guide Proceed to the location of the problem located? Does this solve your problem? The Pitch...

Dell Smart Printer Users Guide
Page 297
... (Menu) button. Troubleshooting Guide 297 b Clean the rear side of the drum cartridge with a dry cloth. NOTE: Be careful not to action 2. Contact Dell. c Re-install the drum cartridge. Does this solve your problem? 2 Replace the drum cartridge. a Replace the drum cartridge. a Remove the drum cartridge, and keep it in the dark place. Does this solve...
... (Menu) button. Troubleshooting Guide 297 b Clean the rear side of the drum cartridge with a dry cloth. NOTE: Be careful not to action 2. Contact Dell. c Re-install the drum cartridge. Does this solve your problem? 2 Replace the drum cartridge. a Replace the drum cartridge. a Remove the drum cartridge, and keep it in the dark place. Does this solve...


